Small Steps 2 Success Mastering - Unknown
Contents Title Page and key to symbols used 4 Preface 5 Introduction 9 Part I – Passed Pawns in the Middlegame 15 1 Iden
Views 60 Downloads 1 File size 48MB
Recommend stories


- Author / Uploaded
- Koustav
Citation preview
Contents Title Page and key to symbols used 4 Preface 5 Introduction 9 Part I – Passed Pawns in the Middlegame 15 1 Identical Twins 17 Exercises 2 Unstoppable and Immovable 39 Exercises 3 Single and Happy 65 Exercises 4 Single on Valentine’s Day 87 Exercises 5 Safety and Inevitability 113 Exercises 6 Divide and Conquer 133 Exercises Part II – Passed Pawns in the Endgame 155 7 Inevitable Graduation 157 Exercises 8 Slowing the Invasion 183 Exercises 9 Support Your Local Vigilante 213 Exercises 10 Dealing with the Last Man Standing 239 Exercises 11 The Rack 263 Exercises 12 Building a Smaller Home 283 Exercises 13 My Pawn is Bigger than Yours 309 Exercises 14 Long Distance Relationships 327 Exercises
2
Game Index 352 Name Index 356
3
Small Steps 2 Success By
Sam Shankland
Quality Chess http://www.qualitychess.co.uk
First edition 2019 by Quality Chess UK Ltd Copyright © 2019 Sam Shankland
All rights reserved. No part of this publication may be reproduced, stored in a retrieval system or transmitted in any form or by any means, electronic, electrostatic, magnetic tape, photocopying, recording or otherwise, without prior permission of the publisher. Paperback ISBN 978-1-78483-089-2 Hardcover ISBN 978-1-78483-090-8 All sales or enquiries should be directed to Quality Chess UK Ltd, Suite 247, Central Chambers, 11 Bothwell Street, Glasgow G2 6LY, United Kingdom Phone +44 141 204 2073 e-mail: [email protected] website: www.qualitychess.co.uk Distributed in North and South America by National Book Network Distributed in Rest of the World by Quality Chess UK Ltd through Sunrise Handicrafts, ul. Szarugi 59, 21-002 Marysin, Poland Typeset by Jacob Aagaard Proofreading by Colin McNab & John Shaw Edited by Andrew Greet Cover design by www.adamsondesign.com 4
Cover pictures: Astronaut waving © Can Stock Photo/lenm Earth from Space © Can Stock Photo Inc./skevron2001; elements provided by NASA Nebula from Hubble “Serpens Nebula HBC 672” credits: NASA, ESA, and STScl Author photo on back cover by Mike Klein/chess.com
Key to symbols used ² ³ ± µ +– –+ = © „ ƒ ÷ ? ?? ! !! !? ?! ™ #
White is slightly better Black is slightly better White is better Black is better White has a decisive advantage Black has a decisive advantage equality with compensation with counterplay with an initiative unclear a weak move a blunder a good move an excellent move a move worth considering a move of doubtful value only move mate
5
Preface
The year-and-a-half between finishing Small Steps to Giant Improvement and writing Small Steps 2 Success was the most eventful of my career. I won the US Championship, the Capablanca Memorial and the American Continental back to back to back, and finally smashed through the 2700 barrier after having been stuck in the mid-to-high 2600s for a few years. Obviously I was ecstatic at making this breakthrough, but also determined to make sure I would not be a flash in the pan. I analyzed my games closely and reached some conclusions about the massive difference in the quality of my play between 2017 and 2018. I found that a surprisingly large number of my games featured topics I had explicitly researched and written about in Small Steps to Giant Improvement. I even had a nearly identical position in the 2018 Olympiad, where the work I did helped me understand the position better and score the critical victory in the USA’s 2½–1½ win over Azerbaijan on the top table. I became more aware of my opponents’ mishandling of their pawns, and exploited their mistakes more effectively than before. I followed the book’s guidelines almost every time I could, and they tended to work. There is no example more illustrative than the encounter that made me US Champion.
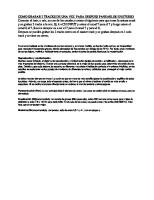
Sam Shankland – Awonder Liang St Louis 2018 1.e4 c6 2.d4 d5 3.exd5 cxd5 4.Bd3 Nc6 5.c3 Nf6 6.Bf4 Bg4 7.Qb3 e5 8.h3 exf4 9.hxg4 Qe7† 10.Kf1 0-0-0 11.Nd2 g6 12.Re1 Qc7 13.g5 Nh5 14.Be2 Ng7 15.Ngf3 Ne6 16.Bb5 Bg7 17.Qa4 Rd6
6
18.Nb3! The idea was to provoke ...b6, which will weaken the light squares around Black’s king. 18...b6? My opponent obliges me. 19.Nc1 Nb8 20.Nd3 Kb7 Once again, I made a move intended to provoke my opponent’s pawn forward.
21.Nb4! The knight is superbly placed and White has prevented the threat of ...a6. Black can and probably 7
should expel the knight by means of ...a5, but this will not save him. 21...a5 In the game, Black tried 21...Qd8 but promptly lost material after 22.Ne5! Qc7 23.Qb3!, when he could not hold all of the d5-, f7- and h7-pawns. I went on to win with no further trouble: 23...Rhd8 24.Rxh7 a6 25.Bd3 Ka7
26.Qa4 a5 27.Bb5 Kb7 28.Nbd3 Rg8 29.Nf3 Rh8 30.Rxh8 Bxh8 31.a3 Nc6 32.Bxc6† Rxc6 33.Nde5 Bxe5 34.Nxe5 Rd6 35.Qe8 Rd8 36.Qxf7 Nxg5 37.Qxc7† Kxc7 38.Nxg6 f3 39.Nf4 Kc6 40.gxf3 Nxf3 41.Re6† Kb5 42.Ke2 Ng1† 43.Kd3 1–0 22.Nd3
8
We have the same position as just a moment ago, except White has played the move ...a5 for his opponent instead of making a move himself. This pawn advance is horribly detrimental for Black as it not only allows the bishop to stay on the fantastic b5-square for the rest of the game, but also creates a hook on the queenside, enabling White to open lines of attack with b2-b4 at a suitable moment. He should be winning, and the preceding couple of moves would have fit perfectly into Chapters 7 or 10 of Small Steps to Giant Improvement. The book helped a lot more players than just me. It sold extremely well, and I never saw a rating other than five stars. Despite the overwhelmingly positive feedback, I took some constructive criticism to heart and made some minor changes in the second volume. There is a little less text and significantly more (and sometimes harder) exercises. The chapters are a little longer and more detailed, but there are only fourteen of them instead of sixteen. I have largely refrained from reciprocal guidelines when dealing with the same topic from the other side of the board. This book reads a little less like a manual – but overall, the structure remains the same. In the Introduction to the first volume, I wrote “If Small Steps to Giant Improvement proves to be a successful book, I will write a second volume on some of the other pawn-related topics.” My word is my bond, but I never cited a timeline in which this had to happen. I could have chosen to write the follow-up many years in the future, after my playing career is over and when I would have more time to write, without having to worry about studying or training. Yet instead, I chose to write the second volume at more or less the first opportunity. The reason for this is, once again, largely selfish. I wrote Small Steps to Giant Improvement not because I longed to write a book, but because I wanted to investigate a topic that I did not understand as well as I should have. I strongly believe that the study and process of writing Small Steps to Giant Improvement improved my understanding dramatically, and was one of the biggest reasons for my recent meteoric rise. I wrote Small Steps 2 Success as a means of continuing to investigate a topic that I 9
would like to understand better, in the hope that my studies would help me become a better player. I made another set of guidelines that I believe have improved my understanding; and although only time will tell, I am confident that the improved understanding I came to by writing Small Steps 2 Success will help me further along in my quest to become the best chess player I can be. Just like last time, I’m hopeful that the fruits of my studies will not only be a catalyst to my own future improvement, but will also be of benefit to other aspiring chess players. It is my sincere hope that Small Steps 2 Success will help the readers improve their chess-playing abilities. Sam Shankland Walnut Creek, USA August 2019
10
Introduction
Small Steps to Giant Improvement was all about pawns not being able to move backwards, and seldom moving sideways. It focused on times that players mismanaged their pawns, creating weaknesses in their own position, as well as how to provoke an opponent’s pawn forward to make them suffer from the same weaknesses we were trying to avoid. While this is undoubtedly a very important topic, this book covers the polar opposite situations. Before we move on to the subject at hand, I do have a small retraction to make. While I stand by my work in the previous book, it is still an author’s duty to correct any mistakes. On page 51, I wrote the following:
“Note that White would be winning if the pieces were shifted one file to the left.” I have since been made aware that the position would, in fact, still be a draw. Consider yourself warned! With that aside, let’s move on to our topic at hand. We all know the power of passed pawns. By the traditional material count, a pawn is worth one point, bishops and knights are worth three, a rook is worth five and a queen is worth nine. As such, a pawn becoming a queen can massively change the evaluation of a position. Even people who do not play chess tend to know of the promotion rule, whereby the humble pawn transforms into the valuable piece. 11
I can think of no better way to illustrate the power of promotion than turning to the drama of Hollywood, with the ending of a fictional game which was shown in the movie Searching for Bobby Fischer. (The White player is a fictional character, whereas Josh Waitzkin is, of course, real.)
Jonathan Poe – Josh Waitzkin The Big Screen 1993
1...Nd7† 2.Kf5 Nxe5 3.Kxe5?? In the movie, both sides were playing their moves instantly and White slammed down this losing move in less than a second, despite visibly having some fifteen minutes on his clock. 3.h5! This draws with a tempo to spare. Thus, if it had been legal to ‘pass’ and do nothing on move 3, this would still have been a great improvement on capturing the knight. 3...Nf7 3...a5 4.h6 a4 5.h7 Nf7 6.Kg6 Nh8† 7.Kg7 leads to the same thing. 4.Kg6 The knight will not find a stable home.
12
4...Nh8† 4...a5?! does not help: after 5.Kxf7 a4 6.h6 White will promote first, although Black still draws by one tempo. 5.Kg7 a5 6.Kxh8 a4 7.h6 a3 8.h7 a2 9.Kg8 a1=Q 10.h8=Q With an obvious draw. 3...a5 4.h5 a4 5.h6 a3 6.h7 a2
7.h8=Q a1=Q† 8.Kf5 Qxh8 Leave it to the movies to dramatize a fictional final-round game! Bam, Bam, Bam, Queen me! Check! Skewer! Nothing could be more theatrical. Even as we are first introduced to chess, pawn 13
promotion can often seem to be about showmanship. I certainly remember the following game making a strong impression on me when I first saw it – even before I played my first tournament.
A. McDonnell – L.C.M. de La Bourdonnais London (16) 1834 1.e4 c5 2.Nf3 Nc6 3.d4 cxd4 4.Nxd4 e5 5.Nxc6 bxc6 6.Bc4 Nf6 7.Bg5 Be7 8.Qe2 d5 9.Bxf6 Bxf6 10.Bb3 0-0 11.0-0 a5 12.exd5 cxd5 13.Rd1 d4 14.c4 Qb6 15.Bc2 Bb7 16.Nd2 Rae8 17.Ne4 Bd8 18.c5 Qc6 19.f3 Be7 20.Rac1 f5 21.Qc4† Kh8 22.Ba4 Qh6 23.Bxe8 fxe4 24.c6 exf3 25.Rc2 Qe3† 26.Kh1 Bc8 27.Bd7 f2 28.Rf1 d3 29.Rc3 Bxd7 30.cxd7 e4 31.Qc8 Bd8 32.Qc4
Knowing this game is a part of one’s chess culture. The pawns go straight through. 32...Qe1! 33.Rc1 d2 34.Qc5 Rg8 35.Rd1 e3 36.Qc3 Qxd1! 37.Rxd1 e2
14
A picturesque final position! 0–1 A common bystander might think that all one has to know about passed pawns is that you win when they become a queen. Undoubtedly, becoming a queen is the ultimate goal of any passed pawn, and there will be plenty of that in this book. But as any chess player should know, things are usually a lot more complicated than merely pushing a pawn over and over again until it reaches the final rank. For instance, in the following two positions, White’s passed d-pawn is the most important positional factor to the overall evaluation.
Evgeny Bareev – Loek van Wely Bugojno 1999
15
Viswanathan Anand – Garry Kasparov Frankfurt (rapid) 1999
Despite the identical pawn structure, a minor difference in piece placement make one position much better for White, while the other is much better for Black! Handling passed pawns correctly is extremely difficult, and even a player as strong as Anand found himself in horrible shape very early on. Conversely, Bareev already stood much better. About This Book
16
This book is dedicated to the study of passed pawns of all kinds, and in all phases of the game. The unique chapters and guidelines will deal with the different kinds of passed pawns one might encounter, with emphasis on the different phases of the game in which they might arise. Passed pawns are a feature of nearly all chess games, other than those which are decided by a direct attack, tactical oversight or early draw agreement. How one plays with them is extremely important, as whether or not they promote or otherwise dominate the game will often dictate the final result. I have seen plenty of high-level games where passed pawns were mishandled, or a player didn’t play against them as well as they might have done. Chapter Structure When preparing material to write about, I came to the conclusion that passed pawns play completely different roles in the middlegame and in the endgame. Obviously they are more common in the endgame, which is why the middlegame section is slightly shorter. I also found that the characteristics of passed pawns change dramatically based on how the other pawns are placed. I divided them into three broad subcategories: connected passed pawns, lone passed pawns and protected passed pawns. Chapters 1 and 2 focus on playing with and against connected passed pawns in the middlegame. Chapters 3 and 4 are about playing with and against lone (isolated) passers in the middlegame. And Chapters 5 and 6 are dedicated to playing with and against protected passers in, you guessed it, the middlegame. Chapters 7 through 12 cover all the same kinds of passers, but in the endgame instead of the middlegame. Chapter 13 covers outside versus inside passers; and finally, Chapter 14 deals with split passed pawns. The final two topics feature in the endgame section only, as these situations rarely occur until most of the pieces have been exchanged. As a simple illustration of the chapter classification, the Bareev – Van Wely and Anand – Kasparov games shown above would fit into Chapters 3 or 4, as they feature a lone passed pawn in the middlegame. It is a basic rule of chess that pawns cannot move backwards, or sideways without capturing, and this was the premise of my first book. The second volume is based on the similarly simple rule that pawns promote when they reach the final rank. But, as mentioned in the introduction of Small Steps to Giant Improvement, there is so much more to pawn play than just these topics. Isolated pawns, hanging pawns, pawn wedges, locked vs. open structures, pawn breaks and extra space, just to name a few. With this in mind, I am ready to make another promise. If Small Steps 2 Success proves as successful as Small Steps to Giant Improvement, both in terms of sales and helping my own development, I will write yet another volume to make it a trilogy. So, if you enjoy this book and would like to see the third one come out, be sure to buy a copy for your friends!
17
Part I Passed Pawns in the Middlegame
In chess, the little one can become the big one! – Queen of Katwe
When considering the relative value of material in a chess game, it is quite clear that a pawn turning into a queen makes a large impact. By the traditional count of pawn=1, bishop/knight=3, rook=5 and queen=9, promoting a pawn yields a gain of +8. This is the reason that many endgames that seem to feature only a marginal advantage in force can end up winning for the stronger side. And although propelling a pawn all the way to the final rank is far less common in the middlegame than in the endgame, it can occur there too from time to time. One does not need to be a rocket scientist to realize that it if a pawn can make it through to the final rank, it should do so. For instance, take my first-round victory of the 2014 American Continental Championship, where my strategy is not too hard to understand:
Sam Shankland – Almir Correia Cardoso Praia da Pipa 2014
18
Up to this point, I had mostly just recited well-known theory and sacrificed a piece to get a pair of dangerous passed pawns. White is winning, but Black could have maintained some attacking chances with: 20...g3 This is clearly the move which is most in the spirit of the King’s Indian: Black plays for mate at all costs. Had my opponent tried this, I would have been able to play a beautiful line I had calculated. The game actually continued: 20...gxf3? Black should lose in the not-so-long run if he doesn’t get something going on the kingside, which is why I consider this move to be equivalent to capitulation. 21.gxf3 Black has no real attacking chances. 21...Rc8 22.d6† Kh8 23.Nxd7 Qxd7
19
24.Rfd1! The last preparatory move. Bxb5 is coming next and White will promote his central pawns in the middlegame. The rest of the game was not especially interesting. 24...Nxe4 25.Bxb5 Qf5 26.fxe4 Qg4† 27.Kh1 f3 28.Rg1 Qxe4 29.d7 Nf4 30.dxc8=Q Rxc8 31.Qf7 1– 0 21.hxg3! White has more than one way to reel in the full point, but I like the forcing line that I had calculated. 21.Be1 is a quieter option which would surely win as well, but anyone with experience on the white side of the Mar del Plata knows to fear a queen showing up on the h-file when Black still has a pawn on g3, particularly if White is unable to bring his bishop to g1. Even though Black is nowhere near in time in this case, I still found the more forcing move to be the cleanest route to victory. 21...fxg3 22.Bxg3 Nh5 Black has no choice but to throw everything at the white king.
20
23.d6†! Kh8 24.Nxd7! Energetic and strong. 24.Bh2? would be a mistake: wasting time is seldom a good idea in the King’s Indian, for either side. White’s position is so good that he would still be winning, but he is starting to lose control. After something like 24...Ngf4 25.Rf2 Bh6 a lot of stuff is hanging in White’s position and ...Rg8 is on the way. My machine insists on a solid +3 evaluation, but I could imagine an accident happening here. 24...Qxd7 24...Nxg3 25.Bxb5! wins easily. White seems to be in a quandary as both his bishop and d6-pawn are hanging. Which should he save? 25.Rfd1! Nxg3 Black has nothing else to do. 26.Bxb5+–
21
I find the final position of the variation extremely picturesque. Black is two pieces up and his king is safe as can be, but the evaluation is not in question. Minor pieces are better than pawns, but queens are better than minor pieces! This was a straightforward example, but also a good one to introduce the first guideline when dealing with passed pawns. It should be noted that this is the only guideline in the book that applies to both middlegames and endgames with equal weight. A passed pawn in the middlegame often poses no threat of becoming a queen, but connected passers can sometimes run straight down the board. It is often worth investing material to gain connected passed pawns, or to advance existing connected passers towards promotion. When we picked up the previous example, I had already invested a piece to acquire the connected passers, and then I invested another to crash through with them. Simple as pie. But chess is seldom this easy, and most games do not see such a mismatch of ratings. Let’s examine a case where the first guideline can be applied to a game in a super-tournament.
Veselin Topalov – Levon Aronian Wijk aan Zee 2006 1.d4 Nf6 2.c4 e6 3.Nf3 b6 4.g3 Ba6 5.b3 Bb4† 6.Bd2 Be7 7.Bg2 c6 8.Bc3 d5 9.Ne5 Nfd7 10.Nxd7 Nxd7 11.Nd2 0-0 12.0-0 Nf6 13.e4 b5 14.exd5 exd5 15.Re1 Rb8 16.c5 Bc8 17.Nf3 Ne4
22
We pick up the game at a moment far before connected passed pawns can be imagined. In fact, the structure is symmetrical! But Topalov soon changed that with dynamic and energetic play. 18.Rxe4! An imaginative exchange sacrifice. Nowadays this is a thematic idea which both sides should be aware of in the Queen’s Indian. But at the time of the game, chess knowledge was not as developed, and I don’t know if Fritz or whatever engine Topalov had at his disposal would have ever suggested this move. As such, despite modern engines’ immediate enthusiasm, I am not sure if it was preparation or not. 18...dxe4 19.Ne5 Black’s main problem is that the c6-pawn is extremely weak; in fact, I don’t see a good way to preserve it. If the pawn falls and White ends up with connected passers, Black will have a hard time keeping them under control.
23
19...Qd5! Aronian finds the best defensive idea. This move is not so hard as it is the only way to prevent both Bxe4 and Nxc6, but the next few moves were not as easy. 19...Bb7 A passive move like this would make sense if Black was able to buckle down on the c6-pawn and keep it alive for the foreseeable future, hoping to eventually expel White’s pieces and untangle while keeping his material advantage intact. But the reality is that it fails – and quickly. 20.Bxe4 Qc7 21.Qf3! The pressure keeps building. 21...Rbc8 What else?
24
22.a4! A final move to highlight the hopelessness of Black’s situation. He has no good way to challenge White’s pieces in the center: ...f6 is always met by Qh5, ...f5 is not possible, and the simple threat of axb5 is impossible to meet. White’s activity is impressive – his minor pieces are certainly superior to Black’s rooks! 22...bxa4 23.Rxa4!+–
Black is unable to prevent Ba5, which will win the c6-pawn, and the game promptly afterwards.
25
20.Qe1! The right square. 20.Qe2? looks like a natural choice. However, any time you are sacrificing material or going for forcing lines, any general principle must be discarded when a concrete variation proves it wrong. Following 20...f5! White’s typical thrust 21.f3 is refuted by:
21...Bxc5! The loose bishop on c3 turns out to be White’s undoing. 20...Bf5! Aronian again finds the best move. It looks a little unnatural, but the point is that he wants to meet f226
f3 with ...e3 to keep the diagonal closed, at which point he will need to be ready to meet f3-f4 with ...Be4. 20...f5? offers no relief due to 21.f3!, since the ...Bxc5 tactic does not work with the queen on e1. Black cannot stop the long diagonal from being blasted open, with disastrous consequences.
21.g4! Questioning the bishop’s stability. 21.f3?! This is the other natural attempt but it squanders White’s advantage. We will soon see why provoking ...Bg6 makes a difference. 21...e3 22.Qxe3 f6! The point of Black’s play. The knight is hanging and White must settle for:
27
23.Nxc6 23.f4? runs into 23...Qe6! when White loses even more material. 23...Qxc6 24.Qxe7 Note that White’s connected passers are much less effective here in view of: 24...Rfe8! The immediate 24...Be6 allows 25.Ba5! intending Qd6, when Black is under unpleasant pressure. 25.Qxa7 Be6 Black will set up an effective light-square blockade. It is hard to imagine how White can hope to send the pawns any further than they are currently advanced, and Black’s rooks will soon invade along the efile. Still, the pawns count for something, so any result would be possible. 21...Bg6! Again, Aronian finds the best move. He cannot prevent White from opening the long diagonal, but if doing so means trading the e5-knight for the g6-bishop, the c6-pawn will live. Unlike the previous note above, counter-attacking the knight with 21...f6? does not reach its desired goals as White has a nice desperado at his disposal: 22.Nxc6! Before the knight dies, it fulfils a vital task by taking out the c6-pawn, leaving White with connected passers. After 22...Qxc6 23.gxf5 White will take on e4 next and win easily.
28
22.f3! White avoids taking the e4-pawn prematurely, and remains focused on the goal of acquiring connected passers at all costs. After 22.Nxg6? hxg6 23.Bxe4 Qe6 Black is more than fine. The c6-pawn will not be taken, and White does not have a great plan to show compensation for the missing exchange. 22...b4 I’m sure Aronian was not happy to allow 23.fxe4, but he didn’t really have a choice. After 22...exf3? 23.Bxf3 Qe6 24.Nxc6 the connected passers are monstrously strong, and White should crash through without a ton of trouble. 22...e3? This is the move Black would like to play; compare the note to White’s 21st move above, where we saw that this was the best option in the position without g3-g4 and ...Bg6 included. The difference is on full display after: 23.Qxe3! f6?
29
With the bishop already on g6, this counterattacking move is refuted trivially by: 24.Nxg6 hxg6 25.Qxe7 White wins a piece and the game. 23.fxe4 Qe6 24.Bb2
Aronian has fought back as hard as he could, and for the moment he seems to have avoided the dreaded connected passers. The trouble is that d4-d5 is hanging over his head at every juncture, and could soon become a massive problem. His next move makes a whole lot of sense, and was clearly aimed at releasing the tension as soon as possible.
30
24...Bf6 Black pressures the knight. What to do? 25.Nxc6! Topalov transforms the position yet again, and finally obtains connected passers. 25...Qxc6 26.e5 Qa6 27.exf6 The first phase of this middlegame clearly revolved around Topalov’s goal of getting connected passed pawns. He obviously appreciated how dangerous they would be for his opponent, and the first move we saw from him was an exchange sacrifice in the hope of acquiring a pair of runners. There was no moment in his calculations where he ended up with equal material by a traditional count, but the value of the connected passers meant his play was completely correct. Thus, we see the first guideline on full display.
But what now? White has finally acquired his desired connected passed pawns, but they are still a long way from queening. We need to reassess the situation, as the goals have changed. At this point, both players surely knew that the connected passed pawns represent a winning unit in the long run. The game now revolves around White’s ability to contain Black’s counterplay. After all, his king is a little open and the e-file is ripe for entry by Black’s rooks. Topalov does an admirable job of keeping everything under control while slowly but surely advancing his pawns. 27...Rfe8 28.Qf1! When trying to avoid counterplay, particularly in the form of threats against one’s king, exchanging queens tends to be a good place to start. 28...Qe2! 31
Aronian again finds the best move. Black can invade with his queen since White is unable to comfortably trade, at least for the moment. Material is not of great significance. If Black tries to grab a pawn with 28...Qxf6?, allowing White to trade queens on favorable terms while avoiding counterplay, he will have no hope of saving the game.
29.Qxf6 gxf6 30.d5+– Black’s rooks are fine pieces. One of them stands on the open e-file and the other can soon follow. White’s bishops are inferior to the rooks; yet Black is obviously and hopelessly lost, as the connected passed pawns are too powerful. Without any notable counterplay, Black has nothing to say about the rather simple winning plan of c5-c6-c7-c8=Q and d5-d6-d7-d8=Q.
29.Qf2! A high-class move. Now that Black’s queen is occupying the e2-square, his rook cannot arrive there. 32
Of course, White does not mind the exchange of queens, but it must be done in a manner that does not allow Black’s rook to land on e2. 29.Qxe2? Rxe2 hits the bishop, making 30.Bc1 a sad necessity.
30...Re1†! 31.Kf2 Rbe8„ Trading queens is often a good way to avoid counterplay – but not when it allows the remaining enemy pieces to become so active. White has thrown away the win and is even a little lucky that 32.Bf3 still enables him to maintain the balance. 29...Qxg4 30.h3! Qg5 31.Bc1! Black’s queen struggles to find stability.
33
31...Qh5 Aronian clearly understands that the pawns will win in the long run. He is unable to stop them, so all he can do is try to get to the white king first. Therefore he must keep the queens on at all costs. 31...Qxf6?! 32.Qxf6 gxf6 33.Bf4 leaves Black the exchange up, yet he is in big trouble because the connected passers are far too strong. I don’t see how he plans to stop their advance after something like: 33...Rbc8
34.Bb7! Rcd8 35.d5± I doubt that Black can contain the pawns in the long run. 32.Bf4 Rbd8
34
33.c6! Incoming! Once White has beaten Black’s pieces back and got his kingside under control, the pawns will claim the day. 33...Be4 Black tries to remove the enemy king’s best defender. 33...Re2 would not help on account of 34.Qf3. 34.c7 Rc8 35.Re1! Qg6 Black could have tried exchanging the g2-bishop right away, but it would not have changed the result: 35...Bxg2 36.Rxe8† Rxe8 37.Qxg2 The threat of mate on g7 forces Black into a losing endgame. Note that Black’s rook cannot join the attack on e1 or e2, since it is busy babysitting the c7-pawn.
37...Qg6 37...g6 38.Qg4! also leads to a trade of queens, and White’s pawns will win the day. 38.Qxg6 fxg6 39.d5 Kf7 40.fxg7 Black is losing. There are too many passed pawns for him to handle. The final critical moment of the game has been reached. There is only one winning move, and Topalov does not disappoint.
35
36.Rxe4! For the second time, White sacrifices an exchange on e4. The first time, he did it with a view to acquiring connected passers, which he subsequently achieved with skillful follow-up play. The second time, he does so to send the passers through to victory. 36.Kh2? unpins the bishop in an attempt to carry out d4-d5. Time is of the essence though, and the slowness of this option makes it much less effective. After 36...Bxg2 37.Rxe8† Rxe8 38.Qxg2 Qxf6 White’s king is too open, and Black holds. 36...Rxe4 37.d5+– White’s king is totally safe and the d-pawn will soon join the party. Black’s two extra exchanges are meaningless and he is unable to resist for much longer. 37...Rce8 38.d6 Re1† 39.Kh2 Qf5 40.Qg3 g6 41.Qg5 Qxg5 42.Bxg5 Rd1 43.Bc6 Re2† 44.Kg3 1–0 A fine game from Topalov. The first guideline was once again on full display. Topalov was more than willing to sacrifice material to get his c- and d-pawns moving. He gave the g4-pawn and offered the f6-pawn, before giving another exchange on e4. In the end, none of that mattered, but the ability of the c- and d-pawns to reach the end of the board certainly did. However, Topalov’s play also had more depth to it than simply placing all his eggs in one basket and watching the pawns cruise towards the 8th rank as if nothing else mattered. In particular, he expertly controlled his opponent’s counterplay. In general, you will usually have to give something up to gain connected passers. If you get them for nothing, I trust you can win the game on your own without any further help. Since connected passers 36
tend to come at a price, and they have as much value in the ending as in the middlegame, the next guideline follows logically. Connected passed pawns are such a powerful asset that when you have them, it is often more important to keep your opponent’s play under control than it is to simply advance the passers. Inevitability is on your side and you will likely have the win in your pocket, provided you can prevent the opponent from accomplishing their goals. I would argue that this guideline applies to extra material as well. Connected passers often constitute exactly that. I once heard a maxim that connected pawns on the sixth rank are worth a rook. Another useful rule (which I believe was first articulated by Euwe) is that connected passed pawns cannot be stopped by a lone rook if they have a combined four steps (or less) to promotion. For instance, if white pawns are on c6/d6 or c7/d5, a lone rook will be unable to prevent a promotion, unless it can capture one of the pawns in the initial position. Obviously, connected passers may be worth more or worth less depending on the circumstances, but the point is clear: they can be considered extra material. Let’s examine a case where a player would have been well advised to follow the second guideline.
Nguyen Anh Dung – Chanda Sandipan Jodhpur 2003
White has badly misplayed a Noteboom and is in serious trouble. In the particular line he chose, Black’s rooks can easily come to a8 and b8 to support the advance of his passed pawns, and White’s only plan is to play for a quick e3-e4 and d4-d5, blasting open the position in an attempt to deliver mate. Not only has this not come close to happening, but White has also placed the wrong rook on c1. 37
Black’s passed pawns look extremely menacing, but he was far too eager to push them. White clearly cannot stop them in the long run, and Black needed to pay more attention to controlling his opponent’s counterplay. 19...a4? The computer rates this move as second-best only by a small margin, and indicates that Black may still be a bit better. From a human perspective, however, the move is completely wrong. It allows White to execute his one and only idea and change the character of the game. If Black had put himself in his opponent’s shoes and thought about what White might be planning, he surely would have landed on the correct 19...Bc6!. With this, he forcefully prevents the c5-c6 advance and the bishop is perfectly placed to support the further advance of the pawns. Next comes ...a4, and it is hard to see White surviving for long. 20.c6! White spots his chance and takes it. Although he had mishandled the game up to this point, choosing the wrong plan of supporting his c-pawn rather than trying to blast through with e3-e4 and d4-d5 to open things up for his bishops, he must be given credit for immediately cashing in on his chance to find counterplay. 20...Bxc6
21.Be4! Black finds himself facing unpleasant tactical resources: he has no good way to save the bishop on c6.
38
21...a3 A sad necessity. 21...Ra6? This move would have been well met by: 22.Bxh7†! Perhaps this is what Sandipan overlooked when deciding on his 19th move. Black cannot take the bishop due to the fork on d3. 22...Kh8
23.d5! Black is sorely missing the h7-pawn and his king comes under fire remarkably fast. His only saving move is: 23...a3! With complications, leading to eventual equality after accurate play. Instead after 23...exd5? 24.Qd4! White gains a tempo by threatening mate on g7, while Qh4 is on the way. Black will be promptly checkmated. 21...Rb6 leads to a similar position to the game. After 22.Bxc6 Rxc6 23.Qxb4 Black is marginally more comfortable due to the outside passer, but it’s nothing special. 22.Rxc6 axb2 23.Rb1 Qd8
39
In the game White chose 24.Rc4?!, but was a little worse after 24...Ra1. Still, after some mutual errors, presumably induced by time trouble, he even went on to win. The objectively better choice would have been: 24.Qxb2 After capturing the pawn White is certainly not worse, and should not have much trouble containing a single passer. Without the help of his brother on the a-file, the b-pawn is unlikely to win the day unless White makes some serious errors. In the above example, Black could have improved his prospects significantly if he had slowed down just for a single move to avoid any and all counterplay. Had he done so, there is every chance that his queenside pawns would have won him the game. Instead, one of the connected passers promptly left the board, leaving him without any advantage. Another Noteboom game, this time from an elite-level tournament, will introduce the final guideline when playing with connected passed pawns.
Jon Ludvig Hammer – Hikaru Nakamura Stavanger 2013 1.d4 d5 2.c4 e6 3.Nf3 c6 4.Nc3 dxc4 5.e3 b5 6.a4 Bb4 7.Bd2 a5 8.axb5 Bxc3 9.Bxc3 cxb5 10.b3 Bb7 11.bxc4 b4 12.Bb2 Nf6 13.Bd3 0-0 14.0-0 Nbd7 15.Nd2 Qc7 16.f4
40
16...a4! Black makes use of a simple but important tactical resource to get his pawns side-by-side. Note how they are incredibly effective at controlling all the squares in front of them, and neither one can be blockaded. This is largely due to the flexibility of being able to advance either pawn at an appropriate time, rather than already committing to having one pawn in front of the other. This brings us to the next guideline: Connected passed pawns tend to be best placed directly side by side. If one pawn is in front of the other, they are much easier for an enemy piece to blockade. 17.Rb1 Of course White cannot take the pawn, as 17.Rxa4?? would lose on the spot to 17...Qc6 with a deadly fork. 17...Rfd8 18.Qe2 The position is sharp and difficult to handle for both players. It is a little unsophisticated to suggest that Black’s next move is a mistake due to basic principles – but they do go a long way. 18...b3? Black advances his pawns too fast. Now they are no longer side by side, and they will never reach this optimal side-by-side state again, as they can become blockaded. The pawns should only move when they both can go, one after the other. By advancing the b-pawn too soon, Black has lost control of the a3-square and thus allowed a blockade. Pawns do not move backwards, after all. Of course, this was the topic of my previous book, but it serves as an important reminder that in a game as complex as chess, a wide range of themes can be present in the same position. 41
19.Ba1? White misses his chance. I think Black would have been in quite a bit of trouble if White had found: 19.Ra1! The rook wasn’t doing much on b1 anyhow; and after this move it is hard to imagine how Black will ever manage to carry out the ...a3 advance. Moreover, the nagging pressure against the a4pawn means Black will always need to have a piece defending it. I can’t really see a decent plan for him, and a massive central avalanche could be on the horizon. In ChessBase, Krasenkow suggested: 19...Nb8 Presumably with the goal of preventing e3-e4 by bringing the knight to c6. However, Black’s position looks incredibly dangerous after the energetic continuation:
42
20.f5! White is blasting open the cover around Black’s king. 20...Nc6 21.fxe6 fxe6 Now White can remove another kingside defender with: 22.Ne4! Nxe4 23.Bxe4
Seemingly out of nowhere, Black faces mating threats. The primary threat is Qh5, and it is hard to stop. Stockfish suggests that the only way to offer any kind of resistance is a forced line in which Black gives away one of his connected passed pawns. 23...Nb4 24.Bb1! Nc2! It is imperative for Black to shut down the light-squared bishop. Black could delay the pawn sacrifice for a move or two; but with Rc1 and Qh5 on the agenda, he would have to play it at 43
some point. 25.Bxc2 bxc2 26.Qxc2²
The position has simplified considerably. Black is going to have a rough life, and can only hope that the opposite-colored bishops will show their drawish tendencies. He is a pawn down and faces a strong center, while the connected passers seem like a distant memory. 19...Qd6 The position is messy again. The rest of the game was dynamic and interesting, but outside of our topic.
20.e4 Nc5 21.e5 Qc6 22.exf6 Nxd3 23.Qg4 g6 24.Rf3 b2 25.Qg5 bxa1=Q 26.Rxa1 Qb6 27.Rxd3 44
Rxd4 28.Rb1 Qd8 29.Rxb7 Rxd3 30.Nf3 a3 31.Rxf7 Qb6† 32.c5 Qb1† 33.Kf2
33...Rxf3† 0–1 Despite his victory, Hikaru would have been well advised to follow the final guideline and leave the pawns side by side until he was sure they could advance in unison. Had Jon Ludvig continued with 19.Ra1!, Black would have been in a bad way. Connected passed pawns are not wildly common in the middlegame, and the general approach to handling them is simple. In practice, however, this does not make the task easy. They usually are present in unbalanced positions where accurate calculation is of the utmost importance. It is appropriate to end the theoretical discussion of connected passers in the middlegame here and instead do some exercises. Happy solving!
45
Exercises
Ray Robson – Li Ruifeng St Louis 2016
White has played well up to this point and has a highly promising position. How can he best exploit his advantage? Show/Hide Solution > 28.Qd5! White pays no attention to the hanging knight on a5 and instead insists on forcing the passed pawns through as soon as possible. Saving the knight with 28.cxb6? would not work nearly as well. Following 28...Bd4†! 29.Kh1 Rxb6! White is rapidly losing pawns. Best play continues:
46
30.Qd3! Rxd6 31.Nc4! White remains much better, but Black still has a fighting chance in a practical game. 28.Nc4? is also much less incisive than the game continuation. After 28...bxc5 29.Qd3 Bd4† 30.Kh1 Qe6 White keeps the advantage but the game is far from over; it is not so easy to send the pawns through. 28...bxa5 29.c6 Qa7† 30.Kh1 The pawns will easily cruise to the finish line.
30...Rb5 31.Qc4 Be5 32.c7 Bxd6 33.c8=Q Rxc8 34.Qxc8† Kh7 35.Rc6 f3 36.Rxd6 fxg2† 37.Kxg2 47
Qe3 38.Qc2 Rc5 39.Qd3 Rg5† 40.Kh1 1–0
Vladimir Kramnik – Veselin Topalov Tromso (ol) 2014
Kramnik has a well-known and well-deserved reputation for promoting center pawns, but that might sound like a pipe dream for the moment. What should White play? Show/Hide Solution > 30.e4! Forceful and strong. White pays no heed to the hanging rook on a1. Black has no choice but to take the exchange, since moving the knight would allow e4-e5. 30...Bxa1 31.exd5± Black does not have time to take back on d5 due to the hanging bishop, and White will advance his pawn to d6. From there on, it will be hard to defend the c6-pawn. 31...Qf6 Defending passively with 31...Bf6 is also unlikely to work. After 32.d6! Kramnik offered the following variation: 32...Qd7 33.Nf3! Rab8
48
34.Bd4! Black will have a horrible time defending the pawn on c6. His position looks lost to me: for instance, after something like 34...Bxd4† 35.Nxd4 Bb7 36.Qa4 when the black rooks are totally ineffective, the a5-pawn is falling and Rb1-b6 is on the way. White should win the c6-pawn and the game along with it.
32.d6! Establishing the pawn on a protected square. White also creates the subtle threat of Ne4 to win the a1-bishop, since ...Qb2 would be met by Qd1. As such, there is no time for Black to defend c6. 32...Qc3 49
32...Rac8? 33.Ne4! Qb2 34.Qd1!+– illustrates the above point. After 32...Bd4 33.Nf3! Bxf2† 34.Kxf2 Black cannot prevent Ne5, so he will lose the c6-pawn and the game. 33.Qd1 Bb2 34.Bxc6 The rest was straightforward. Unsurprisingly, the pawns won the day.
34...Rad8 35.Nb1 Qf6 36.Qd2 Rb8 37.Be4 37.d7!? is another good choice. Even though it seems to violate the last guideline, Black cannot establish much of a blockade on the c7-square, unlike the Hammer – Nakamura game where the blockade on a3 could have made a big difference. 37...e5 38.Nc3 Qe6 39.Nd5 Qxh3 40.Bg2 Qh5 41.d7 exf4 42.Qxf4 Bxa3
50
43.Qxb8! Not the only winning move by any stretch, but a nice one nonetheless. 43...Rxb8 44.Re8† Kh7 45.Rxb8 Qd1† 46.Kh2 Qh5† 47.Bh3 Qf3 48.d8=Q Qxf2† 49.Bg2 1–0 Judit Polgar – Peter Svidler Moscow (blitz) 2009
Black has two extra pawns but his connected passers seem overextended. How should he continue? 51
Show/Hide Solution > 50...Rxg2!! Black forces the white king farther away from the pawns. Keeping in line with the principles highlighted in Guideline 1, he is happy to invest some material to force the pawns through. 50...Re8 would also win, but it’s not nearly as quick or clean as the game. Obviously 50...c3?? 51.Kxe2 would lead to a reversal of the result: Black needs to lure White’s king away from the pawns before shoving them any further along. 51.Kxg2 c3 Nothing to be done now. 52.Kf3 c2 53.Ke2 c1=Q 0–1
Vladimir Kramnik – Erwin L’Ami Isle of Man 2018
Kramnik has achieved his dreaded connected passed pawns. How should he proceed? Show/Hide Solution 52
> White’s passed pawns clearly represent a winning unit in the long run; but for now, his king is not too secure. Kramnik first eliminates all counterplay before pushing his center to the far edge of the board. 25.Qb3! A good start is bringing the most powerful piece back to the defense. There was no other easily winning move. 25.d5?? Primitively trying to push the pawns while ignoring the opponent’s counterplay is not to be recommended. 25...Rc1†! One of several winning moves. 26.Rxc1 bxc1=Q† 27.Kxc1 Qxa2 White will be mated in short order. 25.Kxb2? Taking the pawn on b2 is not a bad idea in itself, but it is best done while simultaneously bringing the queen back to the defense. White’s king is not out of the woods after: 25...Rhf8! The simple threat of ...Rxf2† is surprisingly hard to deal with. White has a tough time surviving, as most of his pieces are already performing vital defensive tasks. 26.Rf1 26.Nxg4 Rc4! cuts the queen off from the defense, meaning that ...Rfc8 and ...Qa4 are massive threats. White’s only move not to lose on the spot is 27.Kb1!, and after 27...Qa4 28.Rb3 Rfc8 the game goes on and anything could happen.
26...Ba3†! 27.Rxa3 Qd2† 28.Kb1 Rxf2!= White must force a perpetual before it’s too late. 25.Nc2? also fails to hold things together. 25...Rxc2! 26.Kxc2 Rc8† 27.Kxb2 Bc3† 28.Kb1 Rc4!= The 53
last move cuts off the queen’s route to b3, forcing White to take a perpetual. 25...Rc7 Trying to hang on to the b2-pawn with 25...Bc3 doesn’t accomplish much, as Black has no counterplay with the c-file closed. 26.e6 wins easily enough, with d4-d5 to follow.
26.Qxb2! Safety first. Without the b2-pawn and with White’s queen sitting on b3, Black will not be able to give mate. 26...Bc3 27.Qb3 Rhc8 28.Rhd1 This final preparatory move keeps everything under control, and now the pawns are ready to roll. 28...b4 29.e6 Rb7 30.d5 Bf6 31.Nxg4 Bg7 32.d6 Rc3
54
33.d7 Rxb3† 34.Rxb3 Qd8 35.e7 1–0
55
Previously, we saw cases of connected passed pawns being a strong force in the middlegame. Obviously, it’s great when we get them – but what if we find ourselves in the unfortunate situation of looking at connected passed pawns from the other side of the board? The most common result of such a situation is that you will be in trouble. For instance, I have no brilliant words of wisdom to offer you help in a position like this one:
White is up by two connected passed pawns for nothing. How should Black contain them? Obviously he won’t, as he is completely lost. Despite the material count only being two pawns up for White, the computer offers him a +10 advantage. If you are facing connected passed pawns with nothing to show for them, the most prudent course of action is probably to resign, get some rest, clear your head and play a better game tomorrow. Luckily, such situations are rare. As mentioned previously, connected passed pawns tend to come at a price. Thus, when you find yourself facing them, you may well have some extra resources to help deal with them. 56
Moving on from the extremely one-sided scenario of the above diagram, far more common is the kind of situation we saw in the Hammer – Nakamura game, where the connected passers were a serious asset for Black, but White had something in return: in this particular case, a mobile central pawn mass and pair of bishops. Let’s revisit the same position, but looking at it from White’s point of view instead. Jon Ludvig Hammer – Hikaru Nakamura Stavanger 2013
We pick up the game a move earlier than in the previous chapter. In the game, Jon Ludvig seized a lot of space in the center and hoped to launch an attack, but it allowed Black to get his connected passers side-by-side. I think his play can be improved upon. 16.f4?! I strongly dislike this move. Everyone knows that passed pawns must be pushed, and connected passed pawns must really be pushed! It was inadvisable to allow Black to carry out the ...a4 advance. White had more than one improvement at his disposal, but the move which appeals to me the most is 16.Bc2!. The point is simple: Black’s connected passed pawns are stopped firmly in their tracks, and White can look for activity in the center in the coming moves. 16...a4! 17.Rb1 Rfd8 18.Qe2 b3? 19.Ba1? As was previously discussed, the best continuation was to blockade the pawns with 19.Ra1!. The improvements I cited from White’s point of view bring us to our first guideline when fighting against connected passers. One of the best ways to deal with connected passed pawns is to blockade them while using as few resources as possible. If the pawns cannot advance, they are much less of a threat. They are much easier to blockade if they do not 57
stand side by side.
Georgi Ilivitzki – Lev Polugaevsky Saratov 1953
Let’s examine a game where a blockade worked more effectively. Black seems to be facing an unpleasant situation. He has allowed White a protected passed pawn (a topic we will discuss in more detail later on), but hopes that his d6-bishop will serve as a blockader. However, the main problem he is facing is that he is about to lose control of the all-important c4square. The b5-pawn is hanging; it cannot be defended and it seemingly must either advance to b4 or exchange on a4. In both cases, Black would be left with a wretched position as White would gain access to the c4outpost and Black would be left with a backward c-pawn. However, Polugaevsky found an excellent resource to keep himself in the game. 14...c4!! It is not clear whether Polugaevsky had seen a positional sacrifice of this kind before, or if he found it at the board without any prior exposure to the concept. Nowadays this type of sacrifice is considered standard and thematic, but it’s safe to say it was not so widely known in 1953. 15.bxc4 b4 The merits of the pawn sacrifice are clear. White’s pawn has been lured from b3 to c4, where it is badly misplaced. Not only does it block the d2-knight’s access to the c4-square, but the b4-pawn will be a dangerous passer as well. Moreover, Black has gained an excellent outpost on c5 for his knight. But wait – all that might sound nice and fun, but didn’t Black just give White connected passed pawns? Shouldn’t those win the game without any resistance, as we have seen previously? The answer is a 58
resounding no, for one simple reason. Let’s examine the situation more closely after a few forced moves. 16.Ne2 Nc5 17.Bc2 a5
It’s time to take stock of the position. The first question White should be thinking about is something along the lines of “How can I push my connected passed pawns to victory?” The answer is rather simple: “This will not happen.” Black has a rock-solid blockade on the c5- and d6- squares, so the pawns are not going anywhere in the foreseeable future. Note that this is largely because the pawns are not side by side. 18.Ng3 Black’s highest priority must be to maintain his blockade. It should not be too hard to do, but his next move was a step in the wrong direction. 18...Ba6? Black’s dark-squared bishop is extremely well placed and a highly effective blockader. Therefore he should not have allowed it to be exchanged for a knight. Several moves were fine, but the one that appeals most to me is the simple 18...g6. Black takes control of the f5-square, which strengthens the blockade, as Nf5 is no longer on the agenda. 19.Nf5 g6 20.Nxd6 Qxd6
59
21.Re1? For once, a “mysterious rook move” is simply wrong. White would be well advised to prepare to smash through with f2-f4. Following 21.Bb2! Black’s blockade looks a lot flimsier than it did a few moves ago. When you are blocking passed pawns on a specific color complex, giving up the bishop operating on that color square tends to be inadvisable. If I were playing Black from here, I would be worried about losing control over the dark squares, with f2-f4 on the way. 21...Nfd7! Simple and strong. Black brings yet another piece to fight for the blockading squares, even though White was not threatening anything yet. 22.Re3 Nb6 23.Qe2 Rbc8 Around here, I think White started to panic. It is clear that his c4- and d5- pawns are likely to remain on their current squares for the rest of the game, while Black can slowly but surely build up pressure and potentially threaten the a4-pawn. Still, if White had been a bit more patient, his prospects would have improved.
60
24.Rh3?! This is too optimistic, and it gets in the way of a potential attacking plan of h4-h5. Black will react with ...Rc7 and ...Rfc8, when any dreams of mating on the h-file turn sour thanks to a simple lateral defense by means of ...f7-f6. Again, I prefer the simple 24.Bb2. 24...Rc7 25.Bb2 Rfc8 26.f4 Black now takes his chance to change the nature of the game with a tactical sequence that removes one of the connected passers.
61
26...Nxc4!? While the game continuation is fine, I also quite like the simple 26...f6!, which maintains the blockade without rocking the boat. The tactics on c4 will still be there on the next move. 27.Nxc4 Bxc4 28.fxe5 The tactical point is that 28.Qxc4? Nd7 enables Black to win back the material while landing a rook on c2.
28...Qxd5! Well spotted. 29.Qe3!? White plays for an attack. 29.exd5 Bxe2 30.Re3 Bc4 leads to a dynamically balanced situation. White’s bishop pair and central pawns look impressive, but the pressure against d5 and a4 forces White to advance his d-pawn, giving Black an effective blockade on the light squares. 29...Qe6 White’s connected passers are long gone, and all that remains of his central structure is a pair of doubled, isolated pawns on the e-file, which block his bishops. Nevertheless, he still has some counterplay due to an incoming Qe3-h6. The rest of the game contains some interesting moments but is not relevant to our topic. 30.Qh6 b3 31.Qxh7† Kf8 32.Bd1 Nd3 33.Ba3† Ke8
62
34.Rxd3 Bxd3 35.Bg4 f5 36.Qh8† Kd7 37.Qh7† Kc6 38.Qh3 Bxe4 39.Bd1 Kb7 40.Qxb3† Qxb3 41.Bxb3 Rc3 42.Bd1 Rxa3 43.Rxa3 Rc1 44.Rg3 Rxd1† 0–1 Polugaevsky’s strategy was not too hard to understand. If you are 100% sure that connected passed pawns have absolutely no chance of advancing up the board at any point in the game, they can be viewed as non-threatening. This is rarely the case but it can happen – especially if the pawns are not side-by-side and can be blocked on a single-color complex. Unfortunately, blockades are hard to pull off, particularly in open or semi-open positions. Polugaevsky’s strategy was as successful as it was largely because the closed nature of the struggle made it nigh-on impossible for White to use open lines to challenge Black’s blockading pieces. This is a luxury that the blockading side does not always enjoy. Polugaevsky’s example was atypical, since it’s rare to face connected passers while being down on material and yet still maintain a decent position. A much more normal scenario would be if you are ahead on material when facing the connected passed pawns. The first guideline’s relevance then doubles, as if the pawns can be neutralized you will remain material up with a winning position. I would have done well to follow my own advice in the following example.
Sam Shankland – Yaroslav Zherebukh St Louis 2018
63
White is a piece up, while Black can only hope that his connected passed pawns will offer him some hope of salvation. This is a meager prospect, as the pawns are not side by side and should be easily blockaded. 42.Nd3?? According to the machine, my move is the best one. But from a human point of view, it is total nonsense. Black’s c5-pawn should never have been allowed to advance to c4. White is still completely winning, but the first move to mess up a winning position is the one that makes your life difficult – not the one that makes the win impossible. Instead, White is routinely winning with the extremely simple: 42.Qc4†! Gaining a tempo and firmly blockading the pawns. 42...Kg7 43.Nd3 I was a little worried about Black’s queen coming to a square like e3 to harass my king, but this is easily dispelled by basic calculation. 43...Qf3 44.Rf1! Qe3† 45.Rf2
64
Black is out of checks and out of luck. I cannot take his pawns, but I don’t need to. They are firmly blockaded and going nowhere, while White is poised to launch a mating attack, making use of his extra piece. Qf7† is on the agenda and Black can resign. 42...c4! 43.Qe4 I was aware that I should not allow the c-pawn to reach c4, but I decided to overrule my positional understanding with a concrete variation. This is not always a bad decision to make – if you can calculate a forced win, then any positional rule or principle should be considered irrelevant. In this case, however, I had missed a key resource. I believed I was winning both pawns, as Qd5† cannot be prevented. But in fact, it can. 43...Qd6! A strong move, stopping the queen check. Nothing else would do. For instance, trying to step out of the check in advance with 43...Kg7? would lose the rook to 44.Qb7†. 43...Kh8 is another try, but 44.Rf1 followed by Ne5 gives White a mating attack. At this moment, I had put myself in a situation where the win had become difficult. It is undoubtedly still achievable, but no longer simple. Black’s pawns are side by side and they provide both short- and long-term counterplay.
65
44.Ne5? 44.Nb4! is the more convincing winning move, intending Nd5. The pawns may look dangerous but neither can advance for the moment; and once the knight lands on d5, there will be mating threats. 44...c3 45.Nd3 By now I was really kicking myself. I did set up a blockade, but a far less effective one compared to that in the note to move 42 above. Not only are Black’s pawns more advanced, but I am also blockading the further advanced pawn with my rook as opposed to my knight. If I could rearrange things so that the knight stands on c2 and the rook on d3 I would be winning, but this is hard to pull off. 45...Kg7 46.Kg2 Rc7 47.Re1 c2 And now a final mistake allows my opponent to save the game.
66
48.h4? After 48.Kg1 White is probably still winning if he stays solid, keeps the queens on the board, and ever so slowly reorganizes with a view to capturing the c2-pawn. 48...Qc6! 49.Qxc6 Rxc6 At this moment I realized that my intended continuation would allow an unpleasant surprise. 50.Kf3 When I played 48.h4, I had seen this far and thought that I am winning after: 50.hxg5? My reasoning was that once Black recaptures, I will get a similar position to the game but I will keep my g3-pawn alive. The problem is that Black will not bother taking back. Always shun automatic moves when calculating – it is important to look for other candidates.
67
50...Rc3! If Black were to automatically recapture with 50...hxg5? then White would be happy, since the game continuation of 51.Kf3 Rc3 52.Ke4 Rxa3 53.Rc1 leaves him with his final pawn on g3, not h4. Black has no real chance to attack it, so White wins easily. 51.gxh6† Kxh6 The pawns are becoming extremely dangerous, and I will have to lose my knight after something like: 52.Nc1 d3 53.Re6† Kg5 54.Rd6 Rxa3 55.Rxd3 Ra1= The c-pawn will cost White his knight and the game will be drawn. 50...gxh4! Black ensures that White’s last pawn will stand on h4 where it can be targeted, rather than the safer g3-square. 51.gxh4 Rc3 52.Ke4 Rxa3 53.Rc1 Black can hold this endgame but he still has some work to do. Thankfully, after a long defense, fatigue started to show and my opponent faltered near the finish line.
68
53...Rc3 54.Kxd4 Rc8 55.Nc5 Kg6 56.Rxc2 Kh5 57.Rh2 Rg8? Black clearly thought he could not be prevented from going ...Rg4(†) and taking my last pawn, but he missed a nice resource. 58.Ne4! Suddenly, things are not so clear.
58...Rg1? White’s point is revealed after 58...Rg4? 59.Ke5! when Black is losing, since Nf6† is on the way and the pawn is taboo: 59...Rxh4 60.Nf6† Kg5 61.Rg2† Black is mated in a study-like manner.
69
The only saving move was to look for lateral harassment with 58...Rb8!, when it is hard for White to keep Black’s king away from h5. For instance, after 59.Nf6† Kg6 60.Ke5 Rb5† 61.Nd5 Kh5 I cannot see a good way to make progress. 59.Nf6†! Kg6 60.Ke5!
White has coordinated his pieces and is winning again. And this time, I didn’t let him off the hook. 60...Re1† 61.Ne4 Kh5 62.Kf4 Rf1† 63.Kg3 Re1 64.Nf6† Kg6 65.Nd5 Rd1 66.Nf4† Kf5 67.Ra2 Rg1†
68.Ng2 Rb1 69.Rxa6 Rb3† 70.Kh2 Kg4 71.Rxh6 70
1–0 I ignored my own principles in this game because I saw a concrete line that I believed won on the spot. Chess is complex enough that principles can only go so far, and direct calculation must take precedence if there is a conflict between principles and dynamics. But when you choose to violate positional rules in favor of concrete variations, you should be especially sure that you are calculating accurately. Because if you aren’t, you may risk looking like as much of a doofus as I did in this game. Had I faced stiffer resistance at the end, I might not have won the US Championship. Blockading connected passers is a valid strategy when it is possible, and obviously it is more feasible to pull this off when you have extra resources, such the knight I had in the previous game. Nevertheless, a far more common scenario is when a permanent blockade cannot be constructed. In such a situation, the pawns will tend to prevail in the long run, and all you can do is win the game in another part of the board before the pawns can have their say. The next guideline follows logically. Let’s examine a case where a strong player did just that. When facing connected passed pawns that cannot be blockaded, the best strategy tends to be to throw everything at another part of the board, be liberal about sacrificing, and do whatever it takes to smash through before the pawns spell your doom.
Shakh. Mamedyarov – Alexander Morozevich Bursa 2010
Black has two connected passed pawns on the queenside. Despite not being side by side, any hope of a blockade is meager. In short, the pawns will win the game for Black, if given enough time. As such, 71
White’s best chance lies in throwing everything at the lonely enemy king, while ignoring the connected passers which cannot be stopped anyway. 24.Ng5! Threatening devastation on f7. It would be completely wrong to try to set up a blockade with: 24.Bb5? Due to the open nature of the position, Black can easily fight for control of the b5-square. 24...Ba6! Simple and strong. The first blockading piece is exchanged, and now the d4-pawn is hanging. 25.Be3 Black has several winning moves, but for our purposes I like the following instructive option:
25...Qd7! Simply adding another attacker to the b5-square. The blockade is easily broken and the pawns should win routinely. 24...e6 24...a4?? Black would like for his queenside pawns to promote, but they are still several tempos away and there is more pressing stuff going on. After 25.Bxf7† Kh8 White has several options, of which the engine prefers 26.Bxg6 with a small edge for White, in the neighborhood of +20. Black will be mated. 25.d5! Energetic and strong. White pays no heed to the queenside and instead insists on attacking the king with as much force as possible.
72
25...h6 Again, Black has no time to advance his pawns. After 25...a4? 26.dxe6 he will be demolished on the kingside well before a new queen lands on a1. White’s previous few moves have been easy enough, but the next one requires a little more class.
26.dxe6! White continues with his energetic play. He needs counterplay right now as he is doomed to eventual defeat if he does not make something happen. In such a situation, retreating is out of the question. Thus, after the timid 26.Nf3? Black can breathe a huge sigh of relief as his kingside is no longer feeling nearly as much pressure, and he finally has time for 26...a4³. 26...hxg5 27.exf7† Kh7 28.e5 White is now a piece down, but he has a pair of connected passed pawns himself. And his are so much more menacing! Moreover, Black’s king remains an obvious target. 28...Nc6
73
29.Bd3? White lets Black off the hook for just one move. There was no reason not to keep the pawn storm coming. 29.e6! As a little throwback to Chapter 1, we notice that White has already shown his willingness to give up material to gain a pair of connected passers. With the text move and the spectacular follow-up, he could have given up even more material to advance them, with decisive effect. 29...Nd4 Perhaps this was the move that bothered Mamedyarov, but it meets with a beautiful refutation. If 29...Qe7 then 30.Bd3! comes with much greater force than in the game, and Black can resign. 30.e7! The power of connected passers is on full display, and they become exponentially stronger the further advanced they are. 30...Nxe2† 31.Rxe2
74
In this picturesque position Black is temporarily ahead by a queen for just a pawn, yet he is entirely lost. 29...Bf5? Black would be better advised to leave the pawn on g6 so that the h5-square remains under his control. Correct would have been 29...Bg4! 30.Qxg4 Qxd3 31.Qxg5 Qf5! and Black is still kicking. 30.Bxf5 gxf5
White inexplicably didn’t take the opportunity to land his queen on h5. To be fair, his chosen move was decent too. 75
31.e6?! After the accurate 31.Qh5†! Bh6 32.Bc3! Black will not survive the coming onslaught. For example, if he tries to get his pawns moving, he ends up in a great deal of pain.
32...b5 (32...Qd3 allows a nice tactical finish with 33.Rd1! Qxc3 34.f8=Q! followed by a deadly check on d7) 33.e6 b4 (33...Qe7 is met by 34.Qf3! with a decisive double attack against c6 and f5) 34.e7! Nxe7 35.Bf6 White wins. 31...g4 White’s pawns are not threatening to queen, but they make a strong attacking unit. All he needs to do to win the game is to get his queen to h5, and his remaining moves served that purpose effectively.
76
32.h3! Nd4 A bad move, but Black’s position was beyond saving. 33.Qe3 Nc2 34.Qf4 Qd5 35.Qg5 The queen will go to h5 next and Black will be mated. His proud connected passers on the queenside never had their say. In fact, they never even moved since our starting position! 1–0 Mamedyarov’s play was most instructive. He understood that he had no chance to blockade the connected passers, and that they would eventually win the game for his opponent. But the key word is eventually! They were still many moves away from becoming queens, and in the meantime he was able to obliterate his opponent on the other side of the board. Neither of the connected passers had a chance to move even once, as Black was constantly having to respond to direct threats until they became unanswerable. If the concept of playing with connected passed pawns is simple, playing against them is even simpler. Ideally, we would prefer not to allow them in the first place. If they must be allowed, try to blockade them and not let them stand side by side. And if they cannot be blockaded, go nuts and start throwing stuff at the other side of the board! Facing connected passers is seldom fun, but here’s your opportunity to do it. Have fun solving!
77
Exercises
Dmitry Gurevich – Karl Dehmelt New York 1986
In the game, White played f2-f4, allowing his opponent a pair of connected passers. What do you think of his decision? Show/Hide Solution > 15.f4! White is absolutely right to allow passed pawns on e4 and d5, since they can be firmly blockaded by a Nd4/Be3 set-up. Conversely, White’s connected passed pawns should win the day. 15...e4? Black could have offered stiffer resistance with 15...Nc6 16.fxe5 Ne4!, playing in accordance with the second guideline and throwing stuff when the opponent has unblockable connected passers. Black’s lead in development promises him some counter-chances but White keeps an edge after:
78
17.Nxe4 (17.0-0 allows a ...Nxb4 trick, either before of after exchanging on c3, leading to an acceptable position for Black) 17...dxe4 18.Qxd8 Rfxd8 19.Bxe4 Bd5 20.Bxd5 Rxd5 21.Be3² Black still has to work for full equality. 16.Nd4±
The difference in the quality of protected passers is on clear display. Black’s pawns are going nowhere while the b- and c-pawns will slowly but surely advance. 16...Bd7 17.Be3 Na6 18.Nc2 Rb8 19.0-0 Nc7 20.Qd2 Nb5 21.Rfc1 Qc7 22.Bf1 Nxc3 23.Qxc3 Rfc8 24.Bd4 Ra8 25.Ne3 Ba4 26.Kh1 Qd8 79
White’s position is perfect; it is time for the pawns to roll. 27.b5 Nd7 28.c6 Nf6 29.c7 Black resigned. Note that his passers are on the same squares that they started on and he never had a hope of advancing either of them, while their White counterparts are on c7 and soon b7. 1–0
Sam Shankland – Elshan Moradiabadi Chinggis 2017
80
Black’s connected passers in the center seem sure to clinch him the game in short order. Time to resign? Show/Hide Solution > 39.Rxe3! White needs counterplay and needs it immediately. He is clearly doomed to fail if he defends passively. Black now finds himself in a dilemma, as recapturing with the queen drops the c2-pawn while taking with the bishop allows f5-f6. 39...Bxe3? This doesn’t lose just yet, but Black will have to find an insane move to survive. 39...Qxe3 was an easier route to half a point. The position after 40.Rxc2 is a bit unpleasant for Black but after 40...Rxc2! 41.Qxc2 h5! he should be able to hold. 40.f6! White cannot stop the passed pawns, but out of nowhere he creates mating threats.
40...gxf6? The last move before the time control seals Black’s fate. 40...Bxc1? allows a nice refutation:
81
41.Qf2! Black is mated as he cannot stop the many threats. The biggest one is f6-f7† followed by either Bxg7† or f8=Q† with imminent mate in either case. The finish might be: 41...Ng6 (41...Bh6 loses to 42.fxe7! when the queen’s arrival on f8 will hurt) 42.f7† Kh8 43.e7
White wins. A picturesque final position! Black can just hold if he finds the only move: 40...Ng6!
82
41.f7† Kh8 White’s connected passers are looking pretty dangerous themselves! 42.e7 After 42.Qf1 Qb4! White can force a perpetual but no more. 42...Nxe7 43.Qf1
43...Ng6! The only defense to Bxg7† followed by Qf6 mate. 44.Qf5 Qc4! Black holds... just!
83
41.Nxf6† Kf8 42.Qf1
Black cannot avoid mate. 1–0
Magnus Carlsen – Penteala Harikrishna Wijk aan Zee 2013
White has a strategically fantastic position due to his superior pieces and extra space, but he is two pawns down and facing connected passers. What should he do?
84
Show/Hide Solution > 25.Bc5! Magnus finds the best way to blockade the pawns. Black will have a much harder time challenging for the c5-square when his knight is pinned. As such, it’s clear that White will own the c5- and d4squares for the rest of the game, which means Black’s pawns are going nowhere. By contrast, if White were to use his knight to do the blockading, it quickly starts to look unstable. After 25.Nc5? Nc4! White’s knight has to move again, and it’s not at all clear if he can stop the queenside pawns from advancing in the long run. 25...Bh5 26.Qc3 Qe8 27.Qe3?!
A slight inaccuracy. White removes his queen from the firing line after a possible ...Ne4, but there was a better way of dealing with Black’s threat. The simplest continuation was: 27.Rf4!±
85
With this strong prophylactic move, White prevents ...Ne4 and is ready to play Nd4 and perhaps g2g4. Black should lose. 27...Qa8 28.Nd4 Rxc5 29.Rxc5
29...Ne4? Surprisingly, Black could have obtained a lot of counterplay with 29...Nc4!, pointing out the instability of White’s queen. After something like 30.Qf4 Qa1†! 31.Rf1 Qa7! 32.Rxc6 Rc8! Black will play ...Be8 next, and his pawns will finally get moving.
86
30.Nxc6! Nxf2 31.Kxf2±
The blockade is back on. White controls the d4- and c5-squares so firmly that the connected passers are virtually useless, and soon enough they start to drop off. Magnus went on to win. 31...Qa2† 32.Kg3 Re8 33.h3 Qa6 34.Qc3 Be2 35.Rxd5 Bb5 36.Nb4 Qb7 37.Qc5 Ba4 38.Rd7 Qe4 39.Rxc7 h5 40.Kh2 Kh7 41.Qf2 Rg8 42.Na6 Be8 43.Rc5 Qd3 44.Nb4 Qd6† 45.Kh1 Qd1† 46.Qg1 Qd6 47.Nd5 Rf8 48.Qd4 Kh8 49.Rc8 Bc6 1–0
Semen Elistratov – Oleg Nikolenko Moscow 2016
87
What should Black do? Show/Hide Solution > Even though material is level for the moment, White’s connected passed pawns represent a long-term material advantage. Black correctly chose the most active move possible, looking for immediate counterplay while White was still underdeveloped. 23...Nxf6! White is still objectively better after this move, but Black is fighting back and making chances. This appeals to me much more than a passive approach. The most sensible alternative would be 23...Nf8, improving the bad knight which had no other route back into the game if it was not going to be sacrificed. However, after the simple 24.Bg2 I would evaluate Black’s position as more or less lost. He is badly lacking counterplay, f4-f5 followed by Bf4 is on the way, and every conceivable endgame will be awful for him. 24.gxf6 Qxf6 White’s virtual material advantage of the connected passed pawns has turned into a real one. He is now up a piece for two pawns. On the other hand, his position is incredibly hard to hold together and ...Bg6 is on the way. In short, Black seized the moment and produced counterplay when it was needed most.
88
25.Bg2? White needed to play precisely to maintain his advantage, but he fails at the first hurdle. Striving for activity was certainly the way to go for Black. The computer claims White is much better after: 25.Ng3! Bg6 26.Qf3 Bxc2
Instead of resigning here, White maintains his advantage with the shocking 27.Ba6!!. Even here, Black can continue fighting with 27...Rd6 28.Rxb7 d3! when the position remains messy, albeit better for White with accurate play. 25.f5! was a more human continuation, offering a pawn to improve the prospects of the c1-bishop while taking the sting out of ...Bg6. Play might continue: 89
25...exf5 26.Qf3 Qh4† 27.Ng3! (27.Qg3 is met by 27...Qe4!„ hitting c2) 27...Bd7 White keeps some advantage although Black has three pawns for the piece and the position remains complex. 25...Bg6 26.Qf3 d3! Incoming! Black could also have tried 26...Bxc2 27.Rxb7 Rd5!, again with a wildly complicated position.
27.Be3? White had to avoid simple tactics, such as 27.Rxb7? d2† 28.Kd1 Bxc2†.
90
For better or for worse, White’s only hope of salvation was: 27.cxd3 Rxd3 28.Be3 Rxe3 29.Qxe3 Bxb1
30.Bxc6! bxc6 31.Qxa7! After a series of precise moves, White has secured equality. One side or the other will deliver perpetual check reasonably soon. 27...d2†! 28.Kd1
28...Qf5! Well spotted. The rest requires no comment. 29.Qe4 Qxe4 30.Bxe4 Bxe4 31.Nxc3 Bf3† 32.Ne2 Nd4 33.Bxd4 Rxd4 34.Ra1 Re4 35.Kxd2 Rxe2† 36.Kd3 Rg2 37.c3 Bg4 38.Kd4 Bf5 39.Rh1 Kc7 91
0–1
Sam Shankland – Irina Krush Las Vegas 2014
Black is under a lot of pressure and the a6-pawn looks ripe for plucking. How can she offer the most resistance? Show/Hide Solution > Black is losing a pawn no matter how she plays. The best way to try to salvage a draw is to allow White to take on a6 and force the pawns onto light squares in order to set up a blockade. The best continuation was therefore: 26...g6! The b4-pawn is poisoned: 26...Bxb4? 27.Bd3! Threatening mate on h7 as well as Rxb4. Black’s only chance is 27...f5 28.Qxe6† Kh8, but after 29.Bxa6! White’s extra pawn, vastly superior pieces and the relative weakness of the black kingside should add up to a decisive advantage. In the game, Black tried to avoid the loss of a pawn but lost out to a tactical strike: 26...a5? 27.bxa5! Qxa5
92
28.Bxe6! White is a pawn to the good and Black’s rook is chained to the defense of the f7-pawn. White wins easily. 28...Bc7 29.Bb3 Qc5 30.Rb5 Qd6 31.Qc4 Bb6 32.a5 Bd8 33.Qd5 Qf6 34.Rb7 g6
Note that the passed a-pawn doesn’t win the game on its own, but rather serves to stretch Black’s defenses. The overworked queen cannot stop the pawn and hold the kingside together at the same time. 35.a6! Bb6 35...Qxa6 removes the dangerous pawn but following 36.Rxf7 Black will promptly be mated. 36.Qf3 Qxf3† 37.Kxf3 Bc5 38.a7 Kh8 39.Rb8 1–0
93
27.Bxa6 If White is able to keep his pawns side-by-side or put them on the dark squares, he will win easily. But Black is in time to prevent this. 27.Bxe6? fails to 27...fxe6 28.Qxe6† Kh8 29.Qxd6 Qf3†. For example: 30.Kh3 Qf5† 31.g4 Qf3† 32.Kh4 g5†! 33.Kh5 Qh3† 34.Kxg5 Rg8† And White will soon be mated. 27...Rb8! Trading a passive rook for an active one. Not only was the b7-rook threatening Black’s seventh rank, but it was also performing a vital task of protecting the b4-pawn. 28.Rxb8† Bxb8 White is not quite in time to consolidate in the way he would like. The key point is that as he is unable to prevent ...Bd6, forcing his pawns onto light squares. For instance:
94
29.Be2 Bd6 30.b5 Bc5² Black should hold. She will put the bishop on b6, firmly blockading the pawns, while the weakness of the f2-pawn will make it hard for the white queen to leave the kingside. Black is undoubtedly suffering and will have to defend for a long time, but I think her prospects of saving half a point are quite high.
Dimitrios Tsomis – Andreas Tzermiadianos Kavala 1999
What should Black do? 95
Show/Hide Solution > White’s mass of queenside and central pawns clearly represents a long-term winning unit that will not be stopped. Black needs counterplay, and he needs it yesterday. 23...f4! The only reasonable move. The only hope of surviving against White’s pawns is to crash through on the kingside before they can bring the game to its conclusion. Now Black has a lot of counterplay, with ...Bf5 on the way. Trying to contain the pawns is plain wrong, but I suppose the most sensible attempt would be to capture one of them. After 23...Bxb4? 24.Bf3! Black has nothing to say about d5-d6 followed by c4-c5-c6. His counterplay is much slower, and after something like 24...f4 25.g4! the kingside remains closed; and 25.d6!? does not look half bad either. I can’t imagine Black getting out of such a situation in one piece. 24.a3 Bf5! 25.Qf3 Black’s next move was not the most accurate, although it was played in the right spirit of the position.
25...g5 Armed with my trusty silicon friend, my favorite of its recommendations is the aggressive 25...Bh3!?, which leads to a highly complicated position where anything could happen. 26.Bd3! White tries to swap off a valuable attacker. 96
26...g4 27.Qd1 f3 28.c5? Too slow. The direct 28.d6! would have been winning. White intends to march the pawn to its promotion square, and there is not much that Black can do about it. 28...Bxd3! 29.Qxd3 Re2! Black is back in the game.
30.Nd6 Rd8 For reasons I don’t fully understand, my machine claims Black is absolutely winning after 30...Rf8!. I guess the main point is to play ...Qh6 while being ready to answer h2-h4 with ...gxh3, when the f3-pawn remains protected. 31.Ne4 Qf5 32.Qxc3 Rxe4? Black errs, but the position is extremely complicated and hard to play for both sides. It is not surprising that his mistake went unpunished. Black could have forced a draw on the spot with 32...Qxe4! 33.d6 Rxf2! 34.Rxf2 Qb1† 35.Rf1 Qa2 36.Rf2 Qb1† when White cannot avoid the repetition. 33.d6 White is winning no matter what, but Black found the best practical chance. Once again, he made no attempt to stop the passed pawns and instead looked for counterplay.
97
33...Qh5! The computer claims that Black should try 33...Qd5, but 34.a4 should slowly win for White. I think the move played in the game was a better choice in human terms. Presumably with the seconds ticking down, White did not find the best way forward. 34.Qf6? White could have won with the hyper-accurate: 34.h4! gxh3 35.Rd1!!
Assuming he passes a strip-search for an engine, that is. 34...Qh3 98
35.Qg5† Taking the rook even loses! 35.Qxd8†? Kf7 36.Qd7† Kg6 No more checks – and ...Qg2 mate incoming! 35...Kf7 36.Qf5† Kg8 37.Qd5† Kf8 38.Qf5† Kg8 ½–½
99
Thus far, we have seen that connected passed pawns can often cruise straight to the finish line, even in middlegames where a lot of pieces remain on the board. If they are not firmly blockaded, they tend to be a winning unit. While queening a pawn in the middlegame is much, much easier when it has a colleague next to it, singleton passers can be dangerous as well. Obviously connected passers constitute a more potent force than a singleton. If the existence of connected passed pawns for one side is the only imbalance in the position, the game is usually over already. If the existence of a single dangerous passer is the only imbalance, there can still be plenty of fight left, even if that side is clearly superior. On the other hand, part of the appeal of a lone passer relative to connected passers is that it is easier to come by, and can often be obtained with no material investment or major positional concession. A lone passer’s ability to become a queen rests almost entirely on the ability of its supporting pieces to fight for control of the squares in front of it. Let’s look at a game I played last year as an example.
Sam Shankland – Aleksandr Rakhmanov Havana 2018 1.c4 e6 2.g3 d5 3.Bg2 g6 4.Nf3 Bg7 5.d4 Nc6 6.0-0 Nge7 7.e3 0-0 8.Nc3 b6 9.Qe2 Ba6 10.b3 dxc4 11.Ba3 Re8 12.Rac1 Qd7 13.Rfd1 Rad8 14.bxc4 Qc8
100
15.Nb5 Na5 16.Nd2 Qd7 17.Nb3 Nxb3 18.axb3 Nc8 19.d5 e5 20.Nc3 Nd6 21.Qa2 Bc8 22.b4 a6 23.c5 Nb5 24.Nxb5 Qxb5 25.Qc2 e4 26.Bf1 Qd7 27.d6 bxc5 28.bxc5 cxd6
White has an excellent position thanks to his superior pieces and his progress in the center, while Black’s passed pawn on a6 hardly terrifies anyone. However, White now has to make a critical decision. Clearly he will recapture on d6 – but with which piece? 29.Rxd6! Correctly choosing the c-file for the passed pawn. It will easily get to c6, and then advancing to c7 is far easier than advancing to d7 would have been.
101
29.cxd6? is far less effective. True, White is clearly better here as well, but he will have a hard time advancing his pawn any further, as Black simply has too many pieces controlling the d7-square. By contrast, in the game White was easily able to reach the seventh rank. 29...Qc7 30.Rxd8 Other moves are possible but I saw no reason not to exchange rooks – especially as it affects Black’s coordination, as will soon become clear. 30...Qxd8 30...Rxd8 is the move Black would have liked to play but 31.Qxe4! gobbles up an important center pawn, after which White should win without much discussion. White’s c-pawn is obviously menacing, but he should take care to maintain control of the key squares ahead of it. If Black can set up a blockade, the win will become much harder, if it’s still possible at all.
31.Qa4! A very important move. White would like to advance his c-pawn but doing so prematurely would enable the black queen to sit on c7. Before this happens, White increases his activity to the maximum by improving his queen, jailing Black’s queen to the defense of the e8-rook and threatening Rd1. It is much less effective to advance the pawn immediately: 31.c6?! Qc7!
102
White will have to work hard to boot the black queen off her perch. The computer insists White is still winning with slow moves such as 32.Bg2, 32.Bc4 or 32.Qd1, but none of them looks that terrifying and it will take patience and accurate play to break the blockade on the c7-square. Much like we saw in my game with Zherebukh from the previous chapter (page 43), the first mistake is the one that makes the win harder to achieve. 31...h5? Black was losing no matter how he proceeded; but for our purposes, it’s nice that he chose a move that allowed White to execute his threat. The computer claims the best way to offer resistance is 31...Bf8 32.Rd1 Qe7, pointing out that the c5c6 advance is no longer possible. Still, 33.Rd6 should win easily enough: White will pick off the a6pawn next, and perhaps follow up with a relocation of the queen and dark-squared bishop to the long diagonal. We have reached another instructive moment. Again, White does not rush to push the pawn, but instead brings his pieces to the best possible squares to make the pawn advance as effective as possible.
103
32.Rd1! White hits the black queen, which cannot go to the ideal blockading square on c7 due to the hanging rook on e8. Her only move is: 32...Qe7 But now White is ready to advance under optimal conditions. 33.c6! The queen is hit again, as White’s passed pawn advances with gain of tempo. The key difference is that the blockading square is no longer secure. 33...Qc7
104
Compare this position with that after 31.c6?! Qc7! in the notes above. Since White has prioritized activating his pieces, while conveniently gaining time by attacking the queen, he now has the d6-square available to the bishop, which in turn enables him to force the pawn all the way to c7. 34.Bd6! Qb6 35.c7! White’s pawn now faces a blockade on the c8-square, but this can be easily broken since Black’s pieces are unstable and can be immediately attacked. The black rook is forced off the back rank. 35...Re6 36.Bf4! Black cannot stop Rd8†.
105
36...g5 Black could have tried one last desperate attempt to blockade the queening square: 36...Qb7 While he can stop the pawn for now, it requires so much of his resources to keep it under lock and key that White simply wins the game on the other side of the board. 37.Rd8† Kh7 White is winning every which way, but I like deciding the game with a direct mating attack. 38.Bc4!
Black’s rook would love to go back to e7 to keep White’s queen off e8; but doing so would allow the c-pawn to become a queen. 38...Rf6 A sad necessity. 38...Re7 39.Rxc8! Qxc8 40.Bxa6 shows why the black rook was needed on the sixth rank. For the moment, Black’s blockade seems to hold – but leaving both his queen and bishop passive on the queenside means White can easily launch a mating attack, despite Black’s seemingly solid pawn cover around his king. 39.Be5 Rf3 40.Bxg7 Kxg7 41.Qe8 Black is mated. 37.Rd8† Kh7 38.Rxc8 gxf4
106
39.Qd7! Now Rb8 is coming, and Black does not have enough counterplay to make any trouble. 39...fxe3 40.Rb8 exf2† 41.Kg2 Qe3 42.Qxf7!
The final nail in Black’s coffin. The check on f3 has been prevented, and Black is facing devastating threats such as c8=Q, the flashier Rh8† with mate to follow, and even simple ones like Qxe6 and Qxh5†. He understandably resigned. 1–0 This was a pretty straightforward case, and my moves were not so difficult. The tougher and more 107
interesting parts of the game had come earlier on, when I played well to reach such a strong position. But still, the game allows me to introduce the first guideline. If you want to queen a lone passed pawn, your pieces need to be ready to fight for every square that your opponent can potentially blockade. When applying this guideline retrospectively, we can see that I did what I was supposed to do. I correctly chose to give myself the c-pawn instead of the d-pawn, as Black would have a harder time blockading on the c7-square than on the d7-square; and then I made sure my pieces were ready to fight for c7 before I advanced my pawn to c6. This is all easy to understand, but there is a more subtle undertone to the game that I highlighted once the pawn reached c7. While it was easy to gloss over that phase as White was obviously winning easily, the principle was still clearly on display. Often, the best way to clear out a blockade or promote a far-advanced passed pawn is to create threats elsewhere to overwork your opponent’s defensive pieces. Once again, we can apply the guideline retrospectively to the 36...Qb7 line given in the notes. White’s easiest winning plan was to poke the e6-rook, pointing out that it needed to go to the undesirable f6square in order to keep the c-pawn under control. This enabled White to deliver mate to Black’s lonely king, as all of his pieces were preoccupied with the c7-pawn. All of this is relatively easy to understand, though at times less easy to apply. But what about in a less clear case, when it took some investment to get a pawn all the way to the brink of promotion?
Peter Leko – Maxime Vachier-Lagrave Batumi (ol) 2018
108
We join the game long after Black had sacrificed some material to get a passed pawn on b2. There is a notable difference between this position and the one I had with Rakhmanov: White has a ton of extra material and is not trying to contain a pawn on the seventh rank with the same number of pieces as his opponent. It looks like Black should be lost. He is down by a rook for just two pawns, and while one of his pawns has made it all the way to b2, it clearly will go no further. White has three major pieces fighting for control of the b1-square, and the dark-squared bishop surely won’t offer any help. But in fact, Black is winning! This is because he has a decisive attack against the white king, made possible by White’s pieces being overworked. 37...Rxe1! 38.Rxe1 Qh2†! 39.Kf1 39.Ke3? Bh6† 40.Kd4 Qf2† costs White his rook. 39...Qh1† 40.Kf2 Qh2† 41.Kf1 Having now reached the time control, MVL can choose whether to continue the game or not. He landed on the right decision.
109
41...Bf6!! Black has a decisive attack, and the b2-pawn is one of the most valuable attacking pieces. This might seem strange since a pawn is a shortrange piece that can only influence squares right in front of it, but the danger of it promoting at any moment renders White’s heavy pieces unable to fight against the blunt threat of ...Bh4 followed by ...Qf2 mate. Obviously if the queens were to vanish from the board, White would be completely winning; the pawn constitutes no danger on its own, but combined with Black’s other pieces it plays a decisive role. 42.Rd1 White could have offered a little more resistance by giving his rook a more active role, hitting the pawn from behind, but he still loses against best play. 42.Re8† Kh7 43.Rb8 Bh4 This leads to a similar situation, as White’s overworked queen cannot prevent ...Qf2 mate while keeping the b2-pawn in check at the same time. Still, he can make Black find some moves. 44.Qd4! In the game, the same position was reached, but with White’s rook on d1 instead of b8. Now White is threatening mate on h8, meaning Black does not have time to safeguard his bishop with ...Bg3. Still, he wins with direct moves. Always examine checks and captures...
110
44...Qh1†! 45.Ke2 Qe1†! Black pushes White’s king to a square where it will be checked by the new queen. 46.Kd3 b1=Q† Black wins. 42...Bh4 43.Qd4
43...Bg3! Another excellent move. Black is in no rush. He simply moves his bishop to a square where it is no longer attacked before sending the pawn through.
111
Queening right away is not recommended as the bishop on h4 will hang: 43...b1=Q?? 44.Rxb1 Qh1† 45.Ke2 Qxb1 46.Qxh4! and White wins. 44.Nb4 44.Qg1 is met by 44...Qc2! and White cannot prevent a second queen from appearing. 44...b1=Q! 45.Rxb1 Qh1† 46.Ke2 46.Qg1? loses to 46...Qxf3† and mate. 46...Qxb1
Finally, at the end of all that, Black emerged a clean pawn up and with a safer king. He went on to win. 47.Nd3 Qc2† 48.Kf1 Qd2 49.Qe4 Bh4 50.f4 Qd1† 51.Kg2 Qg4† 52.Kf1 Kf8 53.Qe3 Qf5 54.Qf3
112
54...g5! Creating a passed pawn. 55.Ke2 g4 56.Qg2 Qg6 57.Qh1 Bf6 58.Ke3 Kg7 59.Qg2 Bd8 60.Qb2† Kh7 61.Qh2† Kg8 62.Qb2 Ba5 63.Qg2 Bb6† 64.Ke2 g3 65.Ne1 Ba5 66.Nd3 Kf8 67.Ke3 Bb6† 68.Kd2 Qg4 69.Kc3 Be3 70.Kc2 Bxf4 71.Ne1 Be5 0–1 When we picked up the game, it seemed like queening the pawn was a ridiculous concept. White had the promotion square firmly under control, and none of Black’s pieces could fight for b1. But MVL still managed to queen the pawn! This is because he was able to distract White’s defending pieces by making threats that his opponent could not answer while keeping the b2-pawn under control. There’s more than one definition of a middlegame, but in general I would characterize it as a position with queens, a fair number of other pieces, and some pawns. It’s not unheard of for a lone passed pawn to launch deep into enemy territory and ultimately reach the final rank simply by fighting for its advancing squares, as we saw in my game with Rakhmanov, but a much more common scenario is the one we saw in Maxime’s game. Ultimately, the way you clear a path for a passed pawn in the middlegame usually has more to do with distracting the blockading pieces than forcefully pushing them aside. Let’s examine another case where a 2800 player was able to push a pawn all the way to the finish line in the middlegame. Again, he did it by overworking his opponent’s defensive pieces as opposed to trying to control every square until the back rank.
Ding Liren – Jan-Krzysztof Duda 113
Batumi (ol) 2018
Black seems to have a comfortable position. His last move, ...a6-a5, prepares ...Nxc4 followed by ...Ba6. Should this happen, White will soon find himself in trouble. Ding Liren charges ahead and makes a passed pawn. 22.d5! exd5 23.e6! The e6-pawn cramps Black’s position and is starting to look dangerous. 23...Bd6 24.Qh3 White could also have tried the computer’s recommendation of 24.Bf4!?, although after the accurate 24...Rb7! Black is more or less okay. I like Ding Liren’s move: it may not be technically best, but it is ambitious and leads to some instructive moments. 24...Qf6 At this point, it seems like White is in some trouble. The bishop on c4 and knight on c3 are both hanging, and if he takes on d5, he loses his e6-pawn and is in horrible shape. Ding Liren thought for a long time, indicating that he hadn’t worked everything out before advancing d4-d5, but he unearthed an absolutely fantastic sequence, highlighting the strategic dangers a far-advanced passed pawn can make for an opponent trying to deal with threats in another part of the board.
114
25.Nb5!! A brilliant shot. White insists on pushing his pawn even further. Trying to save the material is capitulation. Following 25.Nxd5? Black wins easily with 25...N4xd5 26.Bxd5 Nxd5 27.Rxd5 Rxb3 when ...Rb1 is a nasty threat and the e6-pawn falls next. The game is over. 25...dxc4 The desirable 25...Bxe6 is refuted by: 26.Bb2! Qg6 27.Nxd6 cxd6 (27...dxc4? loses to 28.Ne5 Qg5 29.f4!) 28.Bb5± White has more than enough compensation for the two pawns. 26.Nxd6 Black has reacted well up to this point, but now he underestimates the danger posed by the e-pawn.
115
26...cxd6? The dangerous passer absolutely had to be eliminated. 26...Bxe6! My computer with its nerves of steel claims that Black is better, but it certainly looks dangerous to the human eye. For instance: 27.Nxc4 Nxc4 28.bxc4 White intends Bb2 and it appears that Black’s king will come under a deadly assault... unless Black has foreseen the only move.
28...Nc6! Bringing the knight back to the center and securing the b2-square.
116
29.Bg5 Qg6 30.Bf4³ One can’t expect Ding Liren to beat the computer, but his imaginative idea was enough to take down a formidable human player. 27.e7! Re8
This is the point that is so important to drive home. White has given up a piece to get his pawn all the way to e7, but at this point, the pawn is stopped in its tracks. If the only thing Black had to do was prevent the pawn from promoting, he would win easily with his extra piece. However, the presence of the pawn on the 7th rank means the typical moves he would play to defend his king are now ineffective, due to the possibility of the pawn promoting. 28.Ng5! White makes a primitive mating threat. Normally, Black would shut down the open h-file with the natural ...h6, but here it does not work due to the danger of the e7-pawn. 28...Qg6 A sad necessity. 28...h6 This certainly looks like the natural move, but it fails to save Black.
117
29.Qh5! Certainly not 29.Rxd6?? as Black can turn the tables with 29...f4!!, counterattacking the white queen. 30.Qh5 Otherwise ...Qxg5 wins easily. 30...Bg4! The final accurate move, defending the rook on e8 with gain of tempo. Black takes on g5 next and wins. After the text move, the far-advanced pawn suddenly earns White the critical tempo he needs to take on d6 without allowing the ...f4 trick. Black can easily defend the rook on e8, but it will take more than that to save him. 29...Bd7 29...Rxe7 30.Qe8†! leads to a quick mate. 30.Rxd6! Now and only now. The danger of the e7-pawn becoming a queen gave White the critical tempo he needed to get the queen off the h3-c8 diagonal – and now he is winning, as Black cannot move his queen on pain of Rxh6†, with mate to follow.
118
29.Rxd6! f4 30.Qh4! White had an amusing draw available with 30.Rxg6 Bxh3 31.Nf7† Kg8 32.Nh6†, but Ding Liren was in no such mood, and for good reason. 30...Qb1 31.Re1 The machine finds an even more brutal win with 31.Qxf4! Bd7 32.Rf6!! with Rf8† on the way, thanks once again to the pawn on e7. But I take no issue with Ding Liren’s choice. 31...Bf5 Black could have offered some resistance with 31...Bd7, but he is still losing after 32.Bd2 Qc2 33.bxc4!.
119
32.Rd8! Black can easily stop White from promoting, or he can easily stop White from delivering mate, but he can’t do both. The e7-pawn has left the black pieces overworked. 32...Bg6 33.Rxb8! Rxb8 34.Qxf4!
34...Rg8 To illustrate my point once again, I’ll mention that after 34...Re8 White has no way to push e7-e8, as the promotion square is too firmly defended. However, none of that matters since 35.Qf8† Rxf8 36.exf8=Q is mate. The text move avoids the immediate mate but at a heavy cost, as Black sacrifices his blockade of the 120
promotion square. 35.Nf7†! Bxf7 36.Qxf7 Finally, promotion is inevitable. 36...Nd7 37.e8=Q Nf6
38.Bg5 1–0 Once again, a powerful passed pawn being used as a decisive attacker turned out to be a winning concept. Much like the MVL game, Ding Liren surely realized that his pawn on e7 would not be able to advance to e8 if Black dedicated all of his resources to the square’s defense. The rook sat on e8, and ...Bd7 would soon follow, leading to three defenders of e8 compared to zero attackers. But he was able to stretch the defenses by attacking his opponent’s king and, just like MVL, he was finally able to queen the pawn when his opponent was forced to choose between being mated and allowing the promotion.
Even when well blockaded, a far-advanced passed pawn can significantly strengthen attacking prospects. These two high-class games set the stage for the final guideline for handling positions with a lone passed pawn. The previous two cases were extreme examples, where heavy material was invested to get a pawn to reach the seventh rank. But the principle can apply equally to less volatile positions. For instance, I remember being impressed by what Chucky was able to do to me from what I felt should have been a safe position. 121
Vassily Ivanchuk – Sam Shankland Edmonton 2014 1.d4 Nf6 2.c4 g6 3.Nf3 Bg7 4.g3 c5 5.Bg2 0-0 6.Nc3 cxd4 7.Nxd4 Qc7 8.Qd3 Nc6 9.0-0 d6 10.b3 Bd7 11.Bb2 Rfc8 12.Nc2 a6 13.Ne3 Qa5 14.Rfb1 Rab8 15.Ncd5 Nxd5 16.Nxd5 b5 17.Bxg7 Kxg7 18.b4 Qd8 19.c5 dxc5 20.bxc5 Be6 21.Rd1 Bxd5
I got an unpleasant position from the opening, and had defended pretty well to get to this point. I remember thinking during the game that I must be completely fine. White’s space advantage was gone, his c-pawn was under control and I had no weaknesses. What could go wrong? 22.Qc3†! An excellent decision. Black can easily keep the c-pawn under control, but it will keep his pieces somewhat busy. Ivanchuk clearly understood this and proceeded to start a kingside attack. If White had been complacent and allowed a queen trade, everything in my previous assessment would have been correct, and Black would indeed have had nothing to worry about. 22.Bxd5? e6! White cannot avoid a trade of queens. 23.Be4 23.Qc3† is too late! White needed to do this before 23...Qf6!= was a legal move. 23...Qxd3 24.Rxd3 Rc7= Black will play ...Rbc8 next and be fine.
122
22...Kg8 23.Bxd5 Even here, I was pretty satisfied with my position. I simply didn’t appreciate the danger.
23...Qc7 24.Rac1 Rd8 While I did not yet realize just how problematic White’s play on the long diagonal would be, I definitely understood that I should try to take it under my control if at all possible. But this is where the c5-pawn shines as an important asset. 24...Qe5? Black would love to reclaim control of the long diagonal, but he cannot as the blockade will be broken. 25.Qxe5! Nxe5 26.c6! Black is in big trouble. The passed pawn is hard to control, for instance:
123
26...Rc7 27.f4! Ng4 28.Bf3! Nf6 29.e4! e4-e5 is on the way and a rook comes to d7 next. Black is lost.
25.h4! White starts a kingside attack. He does not have enough pieces to smash through under normal circumstances and it feels like Black should be able to avoid getting mated, but the c-pawn does a great job of tying down the defensive pieces, most notably by preventing ...Qe5. By contrast, if White had tried to immediately remove the blockading knight before loosening the kingside, Black would be in much better shape. 25.Qf3 Ne5 26.Qe3 e6 27.Be4² The positioning of the h-pawns on their starting squares makes Black’s kingside much more secure. 25...Rbc8?! Again, Black would dearly love to contest the long diagonal; but again, it fails as the c-pawn becomes a huge problem: 25...Qe5? 26.Qxe5! Nxe5 27.c6 Black is no longer in danger of being mated, but the c-pawn will win the day.
124
27...Rbc8 28.c7! Rd6 28...Rd7 loses to 29.f4! when, once the knight moves, Bxf7† will decide. 29.f4! Ng4 30.Rd3!+– Black has no satisfactory defense against Bb7. The most resilient defensive try was to block the h4-h5 advance, but Black is still facing serious problems: 25...h5 26.Qf3! White combines his attacking intentions with trying to remove the blockading knight.
26...Ne5 27.Qe3 e6 28.Be4 We saw an analogous position in the note to White’s 25th move above, where the pawns were still on 125
h2 and h7. The difference is not huge, but it definitely favors White. For instance, after 28...Nc4 29.Qg5± Black can never play ...f5 and must constantly be on the lookout for Bxg6.
26.h5 e6? I’d like to think I would not make such an idiotic move if I was not under pressure from a lot of angles at once. What exactly did I think was coming if White’s last two moves were h2-h4 and h4-h5? 26...Qe5? runs into 27.Qf3! and White wins material. For better or for worse, Black absolutely had to remove the h5-pawn. After 26...gxh5 27.Qf3 e6 28.Be4 I do not like his chances for survival, but he can keep fighting. 27.h6! The mate threat is decisive. 27.Bxc6 Qxc6 (27...Rxd1† 28.Rxd1 does not change anything) 28.h6 was also good enough. The game continuation allows Black to block on e5, but Ivanchuk had of course planned for it. 27...Ne5
126
28.Bb7! Using the whole board. Black now faces a third problem: in addition to the mating threats around his king and the dangerous passed c-pawn, he is losing his queenside as well. I probably should have resigned here. 28...b4 Trying to confuse the issue, as 28...Rb8 loses trivially to 29.Rxd8† Rxd8 30.Bxa6. 29.Qxb4 Rxd1† 30.Rxd1 Rb8 31.c6 Black was able to stop the direct assault on his king but, much like Duda and Leko, I found that avoiding mate meant lifting the blockade. Now White intends Qd6 when the c6-pawn will cost Black a piece, and there is absolutely nothing to be done about it. I opted for a different way of losing a piece and soon resigned:
127
31...Nxc6 32.Qc3 Qe5 33.Qxc6 Qxe2 34.Qd6 Rf8 35.Bxa6 1–0 My encounter with the Ukrainian legend did not contain the flashiness exhibited by MVL and Ding Liren, but it was instructive nonetheless. White was able to create decisive threats on the kingside with little to no resistance, because my optimal defensive moves were rendered impossible due to the danger of his passed pawn. It had only reached the fifth rank when we picked up the position, but it still promptly decided the game once the blockade was broken. Using a passed pawn as an attacking unit is an advanced skill, but an important one. Try to break through your opponent’s defenses in the next problems.
128
Exercises
Sam Shankland – Timur Gareev USA 2012
Black’s passed pawn is menacing, but it takes effort and sophistication to secure the win. How should he proceed? Show/Hide Solution > Black could have put the cherry on top of a brilliant game had he played for mate. Instead, Gareev thought he was queening his pawn on the spot by pushing White’s queen off her defensive perch. 43...Bxb2? What could be more natural? The queen is hit, she cannot go to b1 due to ...Qd1†, and going to a5 fails to ...Bc3. So the pawn should queen – right?
129
44.Rd7!! Nope! With this vital defensive resource, White ensures the elimination of the e2-pawn and is fighting back. In fact, considering that Black completely overlooked this move, he is quite lucky that his position is still winning rather than losing. 44...Qxd7 45.Qxb2 Qd1† 46.Kf2 White is ready to take the pawn and would win easily if he got another move. Black reacted well to the change of pace, but his previous error has clearly made the winning process a lot more difficult. 46...f5! 47.Rxe2 fxg4†
130
48.Ke3 A sad necessity. 48.Kg3? Qd3†! 49.Kxg4 Rf4† 50.Kh5 Qh7† 51.Kxg5 Qh6# obviously had to be avoided. 48...Re8† 49.Be4 gxh3 50.Qa2† Kh8 51.Qc4 Qg1† 52.Kd2 Black is winning here but his task is not easy, and requires some only moves. His next one let White off the hook, and could have even lost the game.
52...Rd8†?? An understandable yet completely wrong decision. In fact, Black is now losing! Black would have won with 52...h2! pushing the pawn as forcefully as possible, since 53.Qf7 can be countered by 53...Qd4†!. 53.Bd3 It looks like Black has achieved a great deal by forcing the white bishop to d3. After all, it can no longer stop the pawn, so ...h3-h2 should promote, right? 53...Qa1 53...h2? runs into 54.Qe4!! when the tables have been turned. 54...h1=Q may prevent mate on h7 but is allows another neat finish: 55.Qe8†! Rxe8 56.Rxe8#
131
Quite the final position!
54.Qe4? Having been miserably defending for hours on end and running short of time, I took the draw at the first opportunity. But I could have gotten more... White could have won with 54.Re3! when the attack rages on. Black’s checks promptly run out: 54...Qb2† 55.Kd1 Qb1† 56.Ke2 Qb2† 57.Bc2
132
No more checks and no more discussion: the rook threatens to deliver mate on h3, and if 57...g4 58.Qe4 Black is mated. (58.Rxh3†!? also works.) 54...Qa5† 55.Kd1 Qa1† 56.Kc2 Qa2† 57.Kc1 Qa3† 58.Kd2 Qa5† 59.Kd1 Qa1† 60.Kd2 Qa5† ½–½ Returning to the start of the exercise, the correct solution is: 43...Qd1†! 44.Kf2
44...Bd4†! White’s king is getting taken for a ride. 133
45.Kg3 White would dearly love to sacrifice his rook on d4 to eliminate one of the attacking pieces, but 45.Rxd4? allows 45...e1=Q#. Once again, the advanced passed pawn proves to be a key player in the attack. 45...Bxc5! Simple and strong. Black has an obvious threat and a less obvious but even deadlier one, and White cannot stop both. 46.Raa4 White tries saving his rook, because what else could be do? If White notices the mating threat, he could try 46.b3 to clear a route to e5, but then the simple 46...Bxa7 47.Qxa7 e1=Q† 48.Rxe1 Qxe1† leaves him in a hopeless situation. White made the choice to save his king at the expense of controlling the e1-square, allowing the pawn to promote with decisive effect. 46...Qd6†! 47.Kf3 Qd3† Mate follows.
Peter Prohaszka – Zoltan Varga Budapest 2009
White has a promising position thanks to his passed pawn, but it seems firmly blockaded. 134
What is the best course of action? Show/Hide Solution > Much like some of the other cases we have seen, the best way to get a single pawn through a blockade is to play for a direct attack. 45.Rf3! Black’s queen is short of squares and his king is starting to look vulnerable. 45...Qa1† Trying to keep the queen closer to the defense with 45...Qd8 also offered no hope of salvation. 46.Re5! Black cannot stop the twin threats of Re6 and Re7†. 46...Kh6 47.Re7
White is not threatening to take the rook, but rather threatening mate, which compels Black to break his blockade and let the pawn reach the seventh rank. 47...Rxe7 48.dxe7 Black has a hopeless position, as he is unable to restrain the pawn while guarding his king against mating threats. 46.Rf1 Qb2 47.Kh2 Rcd8 White now decides the game with a direct attack.
135
48.Qe6! Qxb3 Black could have tried to avoid mate with 48...Kh7 49.Rf6 Rg7, but it would not save him. My computer is a party pooper and shows mate in two with 50.Rxh5† gxh5 51.Rh6#, but I will continue along with our theme by showing that the mate threats compelled Black to abandon the blockade and let the d-pawn run wild. 50.d7 The passed pawn will have no trouble reaching the final rank. 49.Rf6 Qc2 50.Rg5 Mate follows. 1–0 Ivan Cheparinov – Bassem Amin Zagreb 2018
136
Suggest a plan for White. Show/Hide Solution > White has several strong moves, but I like Cheparinov’s choice. 34.f4! The passed d-pawn is firmly blockaded for the moment. It will be hard to attack the d7-rook and force it to move away, so White instead goes after the king to overwork the defensive pieces. The computer’s choice is 34.Re3!, which surely wins as well. The idea of playing for mate is essentially the same, but instead of breaking open the kingside with f4-f5 White utilizes the h-file. 34...Qc2 35.Rh3! Black will be mated in short order, thanks in no small part to his rooks being unable to join the defense, since they are busy and stuck blocking the d6-pawn. 34...b5 35.Re4 Before pressing ahead to give mate, White prevents ...Qc4. 35...Qc2 Trying to push White’s queen off her perch comes at a heavy price: 35...Qc4 36.Qxc4 bxc4 37.Rxc4 Rxd6 38.Rxd6 Rxd6 39.Rxa4 and Black has no hope against the connected passed pawns. 36.Re7 Qc6 37.Qe5 h5
137
38.f5! Boom boom, mate incoming! 38...Rxe7 The blockade is now broken, but what choice did Black have? 39.fxg6† fxg6 40.Qxe7† Kh6 41.Qg5† Kh7 42.Qxd8 Qxd5 43.Qc7†
Black resigned. He was able to stop mate, but in order to do so he had to break the blockade, which has left him helpless against d7-d8. 1–0 138
After examining the merits of a far-advanced passed pawn and how blockades can tend to be broken, it only follows logically that the next thing we should do is figure out how to set up effective blockades ourselves. The first guideline needs no introduction as it is rather self-explanatory. When facing down a passed pawn in the middlegame, the further back you can keep the pawn blockaded, the better off you are. This guideline holds especially true for middlegames because when a lot of pieces remain on the board, a far-advanced passed pawn can represent extra space. In addition, you will rarely be able to include your king in the defense due to the danger he may face. This is less likely to be a concern in endgames, when the queens and a bunch of other pieces are off the board. Straightforward as the guideline may be, plenty of strong players have come unstuck after violating it. Let’s see one such case.
Evgeny Bareev – Peter Svidler Moscow 2005 1.d4 Nf6 2.c4 g6 3.Nc3 d5 4.Nf3 Bg7 5.Qb3 dxc4 6.Qxc4 0-0 7.e4 Na6 8.Be2 c5 9.d5 e6 10.0-0 exd5 11.exd5 Nb4 12.Rd1 b6 13.Bg5 h6 14.Bxf6 Bxf6 15.Rd2 Ba6 16.Qb3 Bxe2 17.Nxe2 Qd7 18.Qc4 Rfe8 19.Rad1 a5 20.Nc3 Na6 21.d6 Nb4 22.a3 Bxc3 23.bxc3 Nc6 24.Rd5 Re6 25.h3 Rae8 26.Qb3 Rb8 27.a4 Rb7
139
White has played well up to this point and enjoys a pleasant advantage due to his strong passed dpawn. Note that Black’s pawn structure on the queenside is far from ideal as the b6-pawn is backward and vulnerable, while Black is unable to make a passed pawn. With that being said, how does White actually win the game? The d6-pawn seems to be perfectly well blockaded and it is hard to suggest a plan to break through. White’s knight has no way to challenge the d7-square, and while the d6-pawn is strong, it also demands constant protection, keeping the white rooks busy. In the previous chapter we saw that often the best plan to push a pawn through is to attack the other side the board (specifically the king, if possible) to stretch the defenses. Some kind of h4-h5 plan comes to mind. But watch how the game proceeds. 28.Qc4 As previously mentioned, I would be tempted to start a kingside attack with 28.h4!?. Still, after something like 28...Kg7 29.h5 g5± it is not that easy to break though, although the weakened f5-square makes Nh2-f1-g3-f5 a promising idea. 28...Kg7 29.Qf4 Rb8 30.Qc4 Rb7 31.Qa2 White has done absolutely nothing in the previous four moves and has applied no further pressure to Black’s position. He has simply moved his queen back and forth, eventually landing on a2, where it could have gone immediately. Black has been sitting tight – and should continue to do so.
140
31...Qd8?? Black breaks the blockade and gives White the chance to push the pawn deeper into Black’s position. This move must have been based on a miscalculation, as a player of Svidler’s class would surely not have voluntarily allowed the pawn to advance. As I previously mentioned, you can use direct variations to justify a move that violates a positional principle – but if you do, you really need to make sure you are calculating correctly. 32.d7! Simple and strong. This advance doesn’t really threaten to make a queen since the d8-square is under Black’s control, but it gains more space and renders Black’s pieces more passive. His most powerful piece will be stuck on the back rank until the end of the game, and White can look to invade with a rook to d6. 32...Ne7 This is obvious capitulation. My guess is that Svidler chose 31...Qd8 in order to bring his rook to d7, and had planned on meeting the game continuation with: 32...Re7 Black hopes to harass and perhaps win the pawn, but the concrete variations favor White.
141
33.Qd2! Of course, White keeps the pawn protected. 33...Nb8 Black adds another attacker... 34.Ne5! White adds another defender. Black has two resources to pick up the d7-pawn here, neither of which works. It’s possible that Svidler was counting on being able to play:
34...f6 The knight has to leave the defense of the d7-pawn but it has done what far-advanced pawns so often do: it has distracted Black’s pieces enough to enable White to launch a decisive attack against the lonely king. 142
34...Rxe5 35.Rxe5 Rxd7 sees Black sacrifice an exchange to set up a skewer. It almost works... but not quite. 36.Rd5! Without this move White would lose; but with it, he wins. 35.Ng4! g5 Black has no other way to cover h6. 36.Ne3! Rexd7 Black has won the pawn, but in the meantime his kingside has become irreparably damaged and he will soon face unstoppable threats. White has many routes to victory but I like the following solution:
37.Nf5†! Kh7 38.Nd6 Ra7 39.Qd3† Kg7 40.Re1! White will soon invade with Re8, and Black is crushed. 33.R5d3 Ng8 34.c4 Ne7 35.Qb2† Kh7 36.Ne5 Kg8
143
White has firmly maintained the pawn on d7. He is winning every which way; but as is often the case with such a far-advanced pawn that can’t actually become a queen, the best plan is to deliver mate. 37.Rd6! 1–0 Svidler understandably resigned. This was a good decision, as the final moves would have been painful for Black to endure, but for our purposes, I’ll show how mate would be delivered: 37...Rxd6 38.Rxd6 Black is stuck. His rook can only shuffle between b7 and b8 since the b6-pawn requires protection, the queen cannot leave d8, and the knight can’t leave e7 on pain of Nc6. So all he can do is shuffle the rook back and forth. 38...Rb8 White can win any which way, but by far the simplest is to target the f7-pawn.
144
39.Qd2 Kg7 40.Qf4 f5 For the sake of completing the pawn’s journey to the back rank, I’ll point out that Black can avoid mate by 40...Qf8 or 40...Nf5, both of which allow the d-pawn to promote. 41.Qg3 41.Nxg6 is a fancier way to win. 41...g5 42.Qc3 Kg8 42...Kh7 43.Nf7 is equally brutal. 43.Ng6 White wins everything. Svidler was undoubtedly aware that, from a positional point of view, he should not have allowed the pawn any further into his position, and I would wager a lot of money that he miscalculated some line after 32...Re7. While he was in for a rough ride no matter what he played, if he had realized that 31...Qd8 would allow White to carry out the d6-d7 advance, he could have continued to pass and asked Bareev to find a better plan than Qb3-c4-f4-c4-a2. We will never know if Svidler would have ultimately saved the game or not, but his prospects surely would have improved considerably. While Bareev quickly punished 31...Qd8?, it is useful to think about why such a move would even occur to Svidler in the first place. When considering what happens if White does not play d6-d7, the answer is clear.
145
32.Qd2? As we previously saw, White can and should play 32.d7!. But if he falls asleep at the wheel for one critical moment, Black’s last move will suddenly look like an excellent decision. 32...Rd7!= Black has immediately equalized because he was able to put a better blockading piece in front of the d6-pawn. The rook on b7 was not doing anything anyway, and now that it stands on d7, it can perform the role the queen was previously fulfilling, which means Black’s queen is now free to roam. In addition, the d6-pawn is under more pressure than it was before and White will need three pieces to protect it at all times instead of just two. Thus, Black is no longer worse. What a difference getting the rook to d7 makes! It turned out to be a much better blockader. The next guideline follows logically. When facing a single passed pawn that needs to be blockaded, the lower the material value of the blockading piece, the happier you will be. If the pawn is not a protected passer, a rook is often an excellent blockader, as the pawn will then require constant attention from your opponent’s pieces to keep it safe. One can apply this guideline even down to the lowest possible piece. If a passed pawn is blockaded by an opposing pawn, in fact it is not a passed pawn at all! The concept of a passed pawn is derived from the pawn having an easier route to promotion. In other words, the value of a passed pawn is largely linked to the way it demands the attention of a more valuable enemy piece to keep it under control. When considering the second guideline, Svidler’s move makes perfect sense. He simply wanted to get his rook to d7, but it failed for concrete reasons.
146
Let’s examine a case where the defending side was able to successfully rearrange the pieces when given enough chances to do so.
Aleksandr Rakhmanov – Sam Shankland Havana 2018 1.d4 Nf6 2.Nf3 d5 3.c4 e6 4.e3 b6 5.b3 Bb7 6.Bd3 dxc4 7.bxc4 c5 8.0-0 cxd4 9.exd4 Be7 10.Bb2 00 11.Nbd2 Nc6 12.Qe2 Re8 13.Rad1 g6 14.Rfe1 Bf8 15.Ne4 Nxe4 16.Bxe4 Bg7 17.Ne5 Qc7 18.Nxc6 Bxc6 19.d5 exd5 20.cxd5 Ba4 21.d6 Qd7 22.Bxg7 Kxg7 23.Qb2† Kg8 24.Bxa8 Bxd1 25.Rxd1 Rxa8
My maiden game as a 2700 player was not an easy one, and I was definitely in some trouble around here. 26.h4! True to the plans highlighted in the previous chapter, White is using his far-advanced passed pawn to try to tie down Black’s pieces while he launches an attack. This is certainly a more likely plan to succeed than somehow dreaming up a way of driving Black’s queen off the d7-square. 26...h5 27.Qd4 Re8 White has played well so far, but now he slips up and lets me back into the game. He should have remained patient and kept on overprotecting the d6-pawn.
147
28.Rc1?! White makes the not-so-subtle threat of Rc7, which can be easily parried. I would prefer a simple move like 28.Kh2² when Black can only sit and wait, and his queen is stuck on d7. It will take a long time, but the eventual plan of Rd2, f2-f3 and g2-g4 is one way to open up Black’s kingside. 28...Rd8! Black targets the d6-pawn. 29.Re1? White would have been best advised to admit his error with 29.Rd1!, hoping to repeat the position and find a better plan the second time around. White has lost some time but Black still has problems to solve. My guess is that White’s Rd1-c1-e1 plan was chosen because he missed my next move. In fact, Black’s position will be almost resignable if he does not find it! Black cannot take the d6-pawn for tactical reasons, and Re7 is coming next. However, Black can save himself by threatening to take on d6 for real.
148
29...Qc6! 29...Qxd6? 30.Re8†! would have been a bad way to leave the 2700-club after a one-game visit! After the game continuation, the e8-square is covered and so ...Rxd6 is a real threat. White will lose his passed pawn if he does not come back to d1 immediately. 30.Rd1 At this point, I missed a chance to follow the above guideline.
30...Qd7? Of course I should have taken the opportunity to play 30...Rd7!, blockading with the weaker piece, in 149
accordance with the aforementioned guideline. I was probably worried about 31.Qf6, but 31...Kh7!= is a good answer, stepping off the back rank in advance, thus killing any hopes for a Re1-e8 tactic. Black is absolutely fine and can follow up with ...Qc8-d8 or ...Qc5-f5. 31.Qf4? The comedy of errors continues. White was surely frustrated that in this promising position, all he could manage to do in the last few moves was Rd1-c1-e1-d1, but this would have been a good time to reassess and get back on track. White should have preferred 31.Kh2! with the same ideas as in the note to move 28 above. Black’s queen remains stuck on d7 on pain of the d6-d7 advance, and White can gradually aim for f2-f3 and g2g4 to loosen the black kingside. 31...Qe6! I did not have to be asked twice. My queen is now ideally placed, monitoring the d-pawn while keeping control of f6. For one critical tempo, White is unable to advance his passed pawn, enabling Black to put his rook on d7 next. 32.a3 Rd7 Black has equalized. The rest of the game contained as many mistakes as the preceding moves, but it is outside our topic. 33.Qd4 Qg4 34.Qxg4 hxg4 35.Kh2 f5 36.Kg3 Kf7 37.Kf4 Kf6 38.Rd2 b5 39.Rd5
39...a5? 39...a6 was totally fine. 150
40.Rxb5? He also missed 40.h5!. Thankfully, this winning move was available on White’s 40th move, and not his 41st. It’s better to be lucky than good sometimes. 40...Rxd6 41.Rxa5 Rd4† 42.Ke3 Re4† 43.Kd2 g3 44.fxg3 Rg4 45.Ke2 Rxg3 46.Kf2 Rg4 47.g3 f4 48.gxf4 Rxf4† 49.Kg3 Rc4 50.a4 ½–½ I had quite a scare in this game, and my survival was largely due to the fact that I heeded the second guideline... at least when offered a second chance to do so. If I had been unable to rearrange my pieces with the rook blockading on d7, I would have faced a long, difficult and possibly unsuccessful defense. I am not sure if there is any reason for it, but Aleksandr Rakhmanov seems to get a lot of positions where the value of a passed pawn and the blockade around it play a pivotal role. Perhaps it is his style of play, his opening choices, or pure coincidence? Both of my games with him from the 2018 Capablanca Memorial were instructive examples involving the same themes; and now, I find myself presenting another game of his to introduce the next guideline.
Aleksandr Rakhmanov – Robert Hess Moscow 2011 1.d4 Nf6 2.c4 e6 3.Nc3 Bb4 4.e3 0-0 5.Bd3 d5 6.Nge2 dxc4 7.Bxc4 c5 8.0-0 cxd4 9.exd4 Nc6 10.a3 Bd6 11.Qd3 b6 12.Ba2 Bb7 13.Qh3 h6 14.Be3 Ne7 15.Rad1 Rc8 16.Bc1 Ned5 17.f4 Ba6 18.Rfe1 Qc7 19.Qf3 Bc4 20.Bxc4 Qxc4 21.f5 exf5 22.Qxf5 Rfe8 23.Rf1 Rc7 24.Nxd5 Nxd5
151
We pick up this game at a phase when much of the battle has already been fought. Black has played well up to this point and stands better. White’s d4-pawn feels like much more of a weak isolani than a dangerous passer because it is firmly blockaded. Black has his two lower-value pieces performing the blockading role, and his heavy pieces are showing impressive activity. Still, accurate play is needed, and Robert did not disappoint. 25.Nf4 White makes a very sensible move. Passed pawns must be pushed, and his pawn is blocked. What could be more natural than attacking the blockading piece? Black now made an excellent strategic decision. 25...Bxf4! Black would remain better if he traded all the minors, but the text is more convincing. 25...Nxf4 26.Bxf4 Bxf4 27.Qxf4 Re2 28.Rf2
152
Black is clearly more comfortable here, but it’s not so easy to contain the d-pawn. The computer gives a solid edge with 28...Rce7, aiming to play for an attack and mostly just letting the d-pawn run. It may well be right, but Robert’s choice is simpler and stronger as it maintains Black’s clear superiority without allowing any counterplay. 26.Bxf4
By exchanging the bishop for the knight, Black has left a pair of minor pieces on the board that favor him, because White has no chance to challenge his control of the blockading square. 26...g6?!
153
But this is inaccurate. The loose pawn on h6 now means that Black will have to trade off his knight for the bishop. He will still be better, but it’s a step in the wrong direction. The simple 26...Rce7!µ would have maintained all of Black’s advantages. 27.Qd3? White repays the favor. Black’s positional superiority will continue long into the endgame, while White’s main hopes had to lie with a kingside attack. Of all the pieces that could be exchanged, the queens were the worst ones to choose. Black would still have had a lot of work to do after 27.Qg4! Re4 28.Qg3!, when the double threat of Bxc7 and Bxh6 compels Black to trade minor pieces:
28...Nxf4 29.Rxf4 Re2! 30.Rf2 We reach a similar situation to that in the note to Black’s 25th move above. Black is still better but he faces some counterplay due to the mobile d-pawn. 27...Qxd3 28.Rxd3 Black now took the chance to exchange one advantage for another and slam his rooks into the second rank. His move is certainly not a mistake, but it’s also important to point out that he could have maintained his existing advantages with a more normal move.
154
28...Nxf4!? The d-pawn is free to run now, but Black abuses the second rank before it can make any trouble. I would likely have chosen 28...Rc2µ in a small fraction of a second. 29.Rxf4 Re2 30.b3 Rc1† 31.Rf1 Rcc2 32.Rg3 Red2 33.h3
The passed d-pawn was always under control, and it never got to move once in between arriving on d4 on the first move of the game and ultimately being captured for no compensation some 32 moves later. Black went on to win.
155
33...Rxd4 34.Re1 h5 35.Kh1 Rf4 36.Rge3 Rff2 37.Rg1 Ra2 38.a4 Rab2 39.Kh2 Kg7 40.h4 Rf4 41.Kh3 Rb4 42.Rd1 R2xb3 43.Rxb3 Rxb3† 44.g3 Ra3 45.Rd4 Kf6 0–1 A fine game from a long-time friend of mine. Robert’s success largely came from his good judgment about which pieces to trade, specifically that he needed to keep his blockading knight alive and uncontested. His instructive play is a good way to introduce the third and final guideline about blocking singleton passers.
If you need to keep a passed pawn blockaded, one of the best things you can do is aim to make piece trades that lessen your opponent’s ability to fight for the blockading square. Another simple principle, but at the same time a useful one for players of all levels. Let’s look at a case where another American could have been helped by following the third guideline.
Hikaru Nakamura – Alexander Morozevich Moscow 2013 1.d4 Nf6 2.c4 e6 3.Nf3 d5 4.Bg5 Bb4† 5.Nbd2 dxc4 6.e3 b5 7.a4 c6 8.Qc2 Bb7 9.Be2 Nbd7 10.0-0 0-0 11.b3 c3 12.Ne4 h6 13.Bh4 g5 14.Nxf6† Nxf6 15.Bg3 c5 16.Bxb5 Be4 17.Qe2 Rc8 18.Ba6 cxd4 19.Nxd4 Rc5 20.Rad1 Nd5 21.Nc2 Qb6
As one might expect with such dynamic and imaginative players, the game has been interesting and double-edged up to this point. Black has a dangerous-looking passed pawn on c3 and a superior queenside structure, but his kingside is left largely unattended and he has played the weakening ...g7-g5 156
advance. Hikaru had a chance here to bring the pain to his opponent, but he did not choose the right move. 22.Bc4? A hard move to understand. What does the bishop do on c4? White has only two goals in this position. First, he needs to keep Black’s c3-pawn under control; and second, he needs to attack Black’s king. The bishop on c4 doesn’t contribute towards either goal, while Black’s bishop on e4 certainly does. White would therefore have been much better off exchanging light-squared bishops. 22.Bd3! Black is in a bad way for several reasons. The first one is that the e4-bishop is a valuable defender of Black’s weakened kingside, and he will have a harder time holding it together once it is exchanged. Even more importantly, White strengthens his blockade on the c2-square by getting rid of the piece that was threatening the knight, thus freeing up his queen for more active duties. 22...Bxd3 Let’s suppose that Black trades bishops and then continues in a similar manner to the game. 23.Rxd3 a5
The usefulness of exchanging off a piece that was threatening the blockading knight is clearly on display, as now White’s queen is free to roam. 24.h4! After one last preparatory move to loosen Black’s kingside pawn cover even further, White is ready to slam through with Qe2-h5, with mate to follow shortly. This is not a luxury he enjoys in the game because the queen is stuck defending the blockading knight. 22...a5 23.Rd4 Bg6 24.h4 White has played in largely the same manner as I have recommended, except he has not exchanged 157
the light-squared bishops. The difference clearly favors Black, for two reasons: his kingside is more secure with the bishop on g6, and White’s queen is severely restricted due to her constant need to keep an eye on the c2-knight. The position remains complicated and White is not worse, but he could have made a much better strategic decision by trading those bishops.
24...Rcc8 25.hxg5 hxg5 26.Rg4 Be7 27.e4 Nf4 28.Bxf4 gxf4 29.e5 Kg7 Things have not gone well for White in the last several moves. At this point he realized that trading the bishops would be positionally desirable after all, but the best time had already passed, as now Black is ready to slam down on the h-file.
30.Bd3? 158
Too little, too late. White could have kept the game going by throwing all of his pieces at the enemy king. Strategically he has a horrible position, so going nuts to try to make something happen becomes a more attractive proposal. The best try was: 30.Qe4! Rh8 31.Nd4! c2! Welcome to the jungle!
32.Nxe6† Qxe6 33.Bxe6 c1=Q 34.Bxc8 Qxc8 35.Qxf4 Rh5³ Black is a bit better here, but anything could still happen. Of course, it takes several precise moves from both sides to reach this point, and even super-GMs can easily slip up. An error along the way would have likely been fatal for either side. Hikaru should have pressed the chaos button and gone for something wild like this, and hoped for the best. 30...Rh8! 31.g3
159
31...Rh6! Simple and strong. White has nothing to say about Black doubling on the h-file. 32.Be4 Rch8 33.Qc4 fxg3 34.Rxg3 Rh4 35.Qc6 Trading queens avoids the immediate mate, but will not save White in the not-so-long run. 35...Qxc6 36.Bxc6 Bc5 I would have preferred to challenge the rook immediately, even if for no other reason than it serves our instructive purposes well. 36...Rh3 37.Rxh3 Rxh3
It has taken a long time, but the presence of light-squared bishops not only saved Black’s king, but 160
also ensures the promotion of the c-pawn. White’s defensive prospects would have been a lot better if the bishops had been exchanged; in fact, he would barely have been worse at all if they were removed from the board at this moment. As things stand, his knight is not secure on the blockading square and must move away, with fatal consequences. 37.Rc1 Rf4 38.Ne3 Bd4 39.Bb5 Kf8 40.Bc6 Bxe5 The time control has been reached, and Morozevich cleans up easily.
41.Nd1 Rb4 42.Rxg6 fxg6 43.Nxc3 Ke7 44.Bg2 Rxb3 45.Ne4 Rd8 46.Re1 Rbd3 47.Kf1 Rd1 48.Nc5 Rxe1† 49.Kxe1 Rd4 0–1 Finally, it is important not to forget the last piece. Everyone knows about the famous king marches of the past, be they Short – Timman, Tilburg 1991, Wang Hao – Bologan, Bilbao 2014, or more recently Hillarp Persson – Laurusas, Batumi (ol) 2018. All of those games featured an aggressive king march to threaten the enemy king. But it is important to know that if the king is perfectly safe, it can also make a more modest march to become a highly effective blockader. Blockaders often end up being passive, but the king seldom has an active role in the middlegame anyway! This brings us to the final guideline.
If you are completely sure that your king will remain safe, it can be an excellent blockader in the middlegame. The most common scenario involving a king blockading a passed pawn occurs in opposite-side castling Sicilians where one side or another has launched a flank attack, a pawn has reached the 7th or 2nd rank, and his opponent has just left it there. White’s decision on move 16 in the following example is easy enough to understand. 161
Andrei Volokitin – Shakhriyar Mamedyarov Eilat 2012 1.e4 c5 2.Nf3 d6 3.d4 cxd4 4.Nxd4 Nf6 5.Nc3 a6 6.Be3 Ng4 7.Bc1 Nf6 8.Bg5 Nbd7 9.Qe2 e6 10.00-0 Qc7 11.f4 b5 12.f5 b4 13.fxe6 bxc3 14.exd7† Nxd7 15.Qc4 cxb2†
16.Kb1! White avoids capturing the pawn and instead uses it as a shield to block the open b-file. He needs to be sure that the king is secure, because if a check comes, it could easily be mate, but in this instance it is easy to see that no black pieces are close to pulling that off. In the meantime the passed b-pawn is firmly blockaded, and White can take it whenever he wants: for instance, if an endgame arises and he no longer has to fear for his king’s safety. Taking the pawn would subject White’s king to some harassment: 16.Kxb2? Rb8† 17.Ka1 Nc5µ 16...Nc5 17.e5 White opens the center and went on to win with some highly imaginative play. The black pawn on b2 did a good job from White’s perspective of keeping the king secure, and the king turned out to be a fine blockader. 17...Rb8 18.exd6 Bxd6 19.Re1† Kf8 20.Bd3 h6
162
21.Bd8!! Very nice! 21...Qxd8 22.Rhf1 Rb7 23.Bg6 f6
24.Qd5? White could have won on the spot by doubling his rooks with 24.Re3! followed by Rfe1, when Black can resign. 24...Re7 25.Nc6 Bb7 26.Qxc5 Bxc5 27.Nxd8 Bd5 28.Rd1 Be4 29.Nf7 Rxf7? 29...Bxg6 30.Nxh8 Be8! was necessary. White has an extra exchange and he keeps the upper hand 163
with 31.Rd8! when the cornered knight will escape via g6, but Black is still very much in the game.
30.Rfe1!! Bxc2† 31.Kxc2 Kg8 32.Rd8† Rf8 33.Rxf8† Bxf8 34.g4 Black’s king and rook are stuck in the corner for the rest of time. White’s winning plan is to capture the b2- and a6-pawns with his king, followed by promoting the a-pawn; and there’s not a single thing Black can do about it. 1–0 Although the game featured some spectacular moments, the part of it which related to our theme was easy to understand. White’s king remained on the back rank and did an excellent job of blockading the passed pawn, and could rest assured that nothing bad was going to happen to him. But unless we are specifically dealing with positions involving opposite-sided castling and a pawn storm, such a blockade – with an enemy pawn taking the place of one of the protective pawns in a castled position – is a rare occurrence. Let’s consider a completely different scenario, where a king takes on a blockading role in another part of the board. Once again, this should only be attempted when the king’s safety is ensured.
Tomi Nyback – Anish Giri Wijk aan Zee 2010 1.d4 d5 2.c4 c6 3.Nf3 Nf6 4.e3 Bf5 5.Nc3 e6 6.Nh4 Be4 7.f3 Bg6 8.Qb3 Qc7 9.Bd2 Nbd7 10.cxd5 Nxd5 11.Nxd5 exd5 12.Nxg6 hxg6 13.0-0-0 Qb6 14.Qa4 a5 15.e4 dxe4 16.fxe4 Bb4 17.Bg5 Be7 18.Bxe7 Kxe7 19.Qa3† Qb4 20.Qe3 c5 21.d5 White’s passed d-pawn has the potential to become dangerous. It threatens to advance to d6, after 164
which the blockade on d7 is not totally secure, since White’s bishop can put pressure on that square. Giri finds the right way to keep the pawn under control and stuck on the same color square as the bishop.
21...Kd6! When a king takes on the role as the blockader of a passed pawn in the middlegame, getting checked is almost equivalent to getting mated. But when considering the piece assortment in the present position, it is abundantly clear that this will not happen. Black’s next move will be ...Ne5, at which point he could even offer White the chance to take the queen or bishop or a rook off the board, and let White play bughouse for a move and drop it back on whatever square he wished. Even given free access to any square he desires – which he could never dream of in a normal chess game – the king will remain completely safe and unchecked. The computer claims that 21...f6 is equally good, but I strongly disagree. Play continues: 22.d6† Kf8 23.h4
165
No matter how many zeroes Stockfish wants to spit at me, I would be terrified of the simple plan of g2-g3 followed by Bh3. Giri’s choice is much stronger and keeps the pawn firmly under control. 22.a3 Qa4 23.Rd3 b5 24.Rc3 Rhc8 25.Be2 Ne5 Black has perfectly restrained the passed d-pawn, and is ready to send the queenside death star down the board to claim victory.
26.Kd2 b4 27.Rc2 bxa3 28.bxa3 Rab8 The computer prefers to force a winning endgame right away, by means of 28...Qd4†! 29.Qxd4 cxd4 30.Rd1 Rab8 when Black should win without much trouble, with ...f5 coming soon.
166
This time I’m sure the machine suggestion is best, but I don’t mind Anish’s choice either. 29.Rhc1 c4 30.Rc3 Rb2† 31.R1c2 Qb5 32.Rxb2 Qxb2† 33.Rc2 Qb1 34.Qc3 Rc5 35.g3 The success of Black’s strategy is complete. The d-pawn never posed any threat; and now that Black has broken through on the queenside, it can be undermined and captured.
35...f5! 36.Rb2 Qxe4 37.Kc1 Nd3† 0–1 In this example, the king’s ability to keep the d5-pawn under control freed Black’s other pieces to take on more active roles, enabling Giri to win an excellent game. Let me repeat the cautionary point – when a lot of pieces remain on the board you need to be certain that your king will be safe when bringing him up the board to blockade a passed pawn. In this case, the king clearly was safe. If the same strategy is applied wrongly and the blockading king can be removed in any way, the passed pawn will easily advance, most likely with gain of tempos as the king will have to move again, and the threats against the king will most probably prove decisive. It’s rare to see this happen because hardly anyone is foolish enough to march their king into the center unless they are confident that he will be safe, so let’s take a doctored version of a previous game we saw.
Aleksandr Rakhmanov – Sam Shankland Havana 2018
167
As a reminder, at this moment, I should have followed the second guideline and played: 30...Rd7! 31.Qf6 Kh7!= But what if I could ignore the rules of chess for a moment and play ...Kg8-f8-e8-d7? The king would then blockade the pawn, and my heavy pieces would be free to do their work. Let’s see what that would look like.
Black’s king is not secure, and is therefore the worst possible blockader. At this point, despite the limited material with only two pieces remaining for each side, White easily has enough firepower to put the king out of his misery. 1.Qf4! 168
Hitting f7. 1.Qf6 also wins, although 1...Kc8 keeps Black alive for a few more moves. 1...Rf8 1...Kc8 loses the queen after 2.Rc1; and 1...f5 loses to 2.Qh6, not only hitting the g6-pawn, but also threatening Rc1 followed by Qg7† with a mating attack. 2.Qf6 Game over. In addition to the threats to the black king, White also has the option of winning via promotion on d8, as the blockade on the d7-square will not hold. The conclusion is obvious. In open positions where the king can potentially be checked, he only becomes a reasonable blockading piece once a lot of piece exchanges have happened, particularly the queens. As always, the practice of playing these positions is as important as the theory of understanding them. Try your hand at the following puzzles.
169
Exercises
Fritz Gygli – Aron Nimzowitsch Winterthur 1931
White’s passed d-pawn is hardly dangerous now, but it is still something Black needs to think about. What should he do? Show/Hide Solution > Keeping in line with the second guideline of trying to blockade passed pawns with lower-value pieces, Nimzowitsch found an excellent and thematic maneuver. 21...Rf8! Simple and strong. Black intends to transfer his knight via e8 to d6, where it will blockade White’s passed pawn while exerting pressure against the c4- and e4-pawns. In addition, although the d-pawn was not threatening to advance in the short term, Black’s queen and d8-rook will be free to roam without a care in the world. 22.Rfe1 Ne8 23.Bf1 Nd6 24.Qc2 Black can capture the c4-pawn but Nimzowitsch does not even bother, and instead organizes his 170
pieces for a kingside attack.
24...Qd7 There was certainly nothing wrong with grabbing the pawn, but I like Nimzowitsch’s choice just fine. 25.Bc1 f6 26.Rf3 Rf7 27.Rf2 Rdf8 28.Qd1 Bc8 29.Bd3 Qg4 30.Be2 Qd7 31.Bd3 Qe8 32.Be2 Bd7 33.Bd3 Qc8 34.Bf1 Bg4 35.Qc2 Bh3 36.Bd3 Qd7 37.Qd1 Bg4 38.Qc2 h5 39.Nf1 Naxc4 40.Bxc4 Nxc4 41.Qb3 Nd6 42.c4
After some maneuvering, the final breakthrough comes. Note that Black could easily afford to bring his rooks away from the d-pawn, which never had a chance to advance because the d6-knight was the 171
perfect blockader. 42...f5 43.Nd2 Nxe4 0–1
Hikaru Nakamura – Teimour Radjabov Moscow (1.3) 2019
How should Black deal with the passed pawn? Show/Hide Solution > This game was particularly amusing to me as it was played about a week after I had finished writing the current chapter, and Radjabov made a critical mistake in a position where one of the guidelines could have helped him out, so I just had to include it in the puzzles section! Black would have been well advised to follow the second guideline and blockade the d-pawn with his lowest-value piece. 32...f6? Fearful of Ne5, Black tries to stabilize his rook to blockade the d-pawn on its current square. But he should have been blockading with the knight instead. The best move was 32...Rd8!, intending ...Nd7. Black looks okay to me, although the computer offers White some edge after 33.Ne5 Nd7 34.Nxd7 Rxd7. Still, I don’t see a great plan to break through, and Black’s odds of drawing are certainly a lot higher compared to the game continuation. 33.Nh4! 172
White immediately eyes the weakened g6-square and Black will soon regret the ...f6 advance. Pawns do not move backwards... 33...Kf7 34.f4 Ke8 35.f5 e5
36.Qd5! As we have previously seen, often the best way to exploit a far-advanced passed pawn in a middlegame or a heavy-piece ending is to threaten the king. This position is no exception: Ng6 is on the way and Black will be mated. 36...Qe3 37.Ng6 Nxg6 38.hxg6 Qf4† 39.Kh3 Qf1† 40.Kh4 Qe1† 41.Kh5 1–0 Alexander Grischuk – Michal Krasenkow Saint Vincent (3.3) 2005
173
Black is facing unpleasant pressure. What should he do? Show/Hide Solution > 41...Rd7?? I consider the double question mark a little too harsh an evaluation, but Krasenkow did give it to himself in his own annotations of the game, so I’ll just go with it. Allowing White’s passed pawn to advance is a serious mistake. 41...Qc7!² was the right idea, guarding the rook and maintaining the blockade while preparing ...Qd8 to pressure the d5-pawn and defend f6. Black is still under pressure but I think his position should be holdable. It is important to note that 42.Rxf6? fails to 42...Rxf6! 43.Qxc7 Rxf2 when White must take a draw. 41...Qc5?! is not a correct solution in view of 42.Rd2± although this would still have been an improvement over the game continuation. 42.d6! White gains more space by advancing the passed pawn. Grischuk continued to play well before blowing the win at the final moment. 42...Rg6 43.Re2! Kg7 44.Rd5 Qc6 45.Rdd2 45.Qe4!? was also good enough. 45...Qc5 46.Re6 Qg5
174
47.Qf2? White could have won with 47.Qd4!, preventing ...f5 and leaving Black without a good defence against Rde2 and Re7†. 47...f5 48.Qd4† Kf7 49.Rxg6 Qxg6 50.Qf4
50...Qe6? Missing White’s threat. 50...Kg7² was called for.
175
51.g4! Ke8 52.gxf5 Qf6 53.Qe4† Kf8 54.Qe6 Qg5 Grischuk needs just one more good move to seal the deal. His rook is hanging and ...Rg7 is in the air, with mate threats.
55.Rf2? White only responds to one threat. I assume Grischuk was short on time, both because he often is, and because with time on the clock he would surely have found 55.Rd4! which wins, as 55...Rg7 is met by 56.Rg4 Qd2† 57.Kg3 when the checks quickly run out. 55...Rg7! White is compelled to give a perpetual. 56.Qc8† Kf7 57.Qe6† Kf8 58.Qc8† Kf7 59.Qc4† Kf8 60.Qc8† ½–½ Sam Shankland – Richard Rapport St Louis (rapid, 10) 2019
176
Black played 20...c5, forcing a structure where White has a passed c-pawn. What do you make of his decision? Show/Hide Solution > 20...c5! Black can and should transform the pawn structure in this way. The piece assortment left on the board suggests that the passed c-pawn will be easily blockaded on the c5-square, as Black has three minor pieces that can fight for it while White only has two. Black has the more comfortable side of equality and, especially considering the fast time control, it is hard for White to hold on. 21.Kh1 cxd4 22.Bxd4 Bc5 23.Bc3 Rb8 24.Rd1 Bf8 25.Bc2 Ra8 26.h3 Bg7 27.Kh2 Nc5
177
Black’s strategy has clearly succeeded. The c4-pawn is firmly under control and will never make any trouble, while White’s kingside is a little loose. 28.Bd4 Nh5? A bad move, but it was a rapid game after all. Black could have increased his advantage with 28...Nfd7!, challenging the active knight on e5 and aiming for more piece trades, hoping to eventually be left with a knight on c5 against the ineffective light-squared bishop. 29.Qf3 Rc8 30.g3 Nf6 31.Qe3 Ncd7 32.Bd3 Ra8 33.Rd2 Bf8 34.Bf1 Ra3 35.Qe1 Qa5
178
36.Qe2?? In a rapid game, holding slightly uncomfortable positions becomes much harder. After 36.Nxd7! Nxd7 37.Bb2 White should hold easily, since 37...Ra2 38.Qe2 is nothing to worry about. 36...Ne4! Well spotted. White’s position collapses. 37.Qxe4 Qxd2† 38.Bg2 Bg7 39.Nxd7 Qxd4 40.Qb7 h5 41.Qb8† Kh7 42.Nf8† Kh6 43.g4 hxg4 44.hxg4 g5 45.Qb5 Qxf4† 0–1
Alexander Shabalov – Rohan Talukdar Chicago 2019
Black is under a lot of pressure. How should he proceed? Show/Hide Solution > The game continued: 35...Re4? This does not do much to stop White from breaking the blockade with Ne5 and sending the passed pawn through. White is winning. 179
Black should have been looking for a way to put his lowest-value piece in front of the passed pawn instead of his highest-value one. This guideline would have led him to the correct candidate move: 35...Be8! 36.Ne5 It would be easy to stop calculating here and dismiss the line as losing for Black. But slowing down and looking just slightly deeper leads to the correct evaluation: 36...Qc7!
The tactics along the back rank save Black. This is not such a hard variation to find, but it does require considering ...Bc6-e8 as a candidate move, which is much easier to do when you know the guideline about using a lower-value piece to blockade your opponent’s passed pawn. 37.f7† Bxf7 38.Rxf7 38.Nxf7? Re1† wins for Black so the text move is forced. 38...Qxe5 39.Qxe5 Rxe5 40.Rxa7³
180
White should hold this endgame pretty easily as his rook can stand on b7 and Black’s king is cut off. But only Black can think about winning; and in any case, this is a massive improvement over losing immediately to the Ne5 jump. 36.Qc3 Rc4 It is too late for 36...Be8 as after 37.Ne5 there are no ...Qc7 tactics, and f6-f7† will win a piece and the game for White.
37.Qb2 Re4 38.Ne5 The f-pawn is too strong, and Black could already have resigned.
181
38...Rxe5 39.Qxe5 h5 40.Qd6 Bd5 41.Re2 Black resigned rather than suffer the pain of the rook landing on e7. 1–0
182
As we approach the end of the first section of the book, dedicated to middlegames, it makes sense to address one of the more transitional topics: that of the protected passed pawn. By this I mean a passed pawn that is protected by another pawn. Unlike most of the other types of passed pawns we have seen thus far, a protected passed pawn will not rush to advance, unless it cannot be stopped from promoting, simply because it is such a great longterm asset. For instance, look at the following two positions:
183
The positions have identical and pretty normal-looking pawn structures, yet one is a straight pawn ending and the other is littered with pieces. The pawn ending is easily winning for White, which we will go over later on page 263. On the other hand, the middlegame is a normal, balanced position with chances for both sides. The protected passed pawn may matter someday if White outplays his opponent, but it is hardly an important factor now. It took me less than a minute to compose the above two positions, which do not seem abnormal in any way. The lack of time needed on my part to find a structure and piece assortment where exchanging everything off changes the evaluation from balanced to winning for the side with the protected passed pawn is indicative of the fact that most protected-passed-pawn positions share this characteristic to some degree. While there are obviously some exceptions, the enormous difference in the evaluation of the respective positions before and after removing the pieces leads us to the first guideline. A protected passed pawn’s value in the endgame is significantly higher than it is in the middlegame. If you have a protected passer in the middlegame, your best strategy is often to try to simplify towards an ending. Although I think it generally makes sense to go through this book chapter by chapter, I should point out that much of playing with protected passed pawns in the middlegame is predicated on making a favorable transition to the endgame. As such, it helps to understand the role of protected passed pawns in the endgame before looking at them in the middlegame, so you may wish to skip ahead to Chapter 11 before giving this one a crack. Let’s see a case of the first guideline in action.
184
Aleksandr Betaneli – Li Ruifeng St Louis 2017 1.d4 Nf6 2.Nf3 g6 3.e3 Bg7 4.c4 0-0 5.Be2 c5 6.dxc5 Na6 7.0-0 Nxc5 8.b4 Nce4 9.Bb2 b6 10.Nbd2 Bb7 11.Nxe4 Bxe4 12.Rc1 Qc7 13.Nd4 Rac8 14.Nb5 Qb7 15.f3 Bc6 16.Nd4 d6 17.Nxc6 Qxc6 18.Qb3 Nd7 19.Bxg7 Kxg7 20.f4 Nf6 21.Bf3 Qd7 22.e4 e5 23.f5 g5 24.g4 h6 25.Rfd1 Qe7 26.Qe3 Rc6 27.Be2 Rfc8 28.a4 a5 29.b5 Rc5 30.h3 Kf8 31.Kg2 Qc7 32.h4 d5 33.hxg5 d4 34.Qf3 hxg5 35.Rh1
Black has played a good game up to this point and enjoys the pleasant long-term advantage of a protected passed pawn as well as potentially a good knight against bad bishop. His play in the upcoming moves may not have been perfect, but it was great for our purposes as it clearly illustrated the first guideline in action. 35...Ke7! Black clears the 8th rank. He is planning on swinging his rooks over to the only open file, forcing White to either surrender it completely or agree to a lot of trades. 36.Bd3? Too slow. White needs activity at all costs. After the correct 36.Rh6! his position is hardly a bed of roses, but at least he is able to double on the h-file to avoid mass exchanges. 36...Qb8! The computer indicates that 36...Kd6 was better by almost half a pawn but I find this assessment 185
ridiculous. Black’s play is crisp, clear and strong. He simply wants to contest the open file and trade some pieces. 37.Kg3 Rh8 I actually like 37...Rd8!? even more. Black plans to retreat his rook from c5 to c8 before playing ...Rh8 so that his rook rather than his queen will lands on the open file at the end. The text move does not spoil anything though.
38.Rxh8 Qxh8 39.Rh1 One pair of rooks has been traded. What’s next? Trading the other pair! 39...Qb8! The right square. Black wants to leave the 8th rank clear to facilitate ...Rc8-h8. 40.Rh6 Rc8 Seeing the ship sail into the rock if Black’s rook is allowed to come to the h-file, White understandably prevents it. But as a result, his queenside is mortally weakened.
186
41.Qh1 Suppose White had foreseen the invasion on the a3- and b4-squares and decided to bring his queen to b2 to defend them: 41.Qe2 Black would then be able to execute the previously discussed plan of continuing to trade pieces. 41...Rh8! 42.Rh2 After 42.Rxh8 Qxh8 the queen will land on h4 with devastating effect. 42...Nd7
Black is absolutely winning. His knight will come to c5 and he will keep on trading until the game is over. White could resign here but I made a sample variation to show how Black wins if
187
White sits and waits. 43.Qd2 f6 44.Qe2 Nc5 45.Bc2 Qf8 46.Qf3 Now the easiest win is:
46...Rxh2! 47.Kxh2 Qd8! White has to allow the devastating ...d3, since 48.Bd3 allows 48...Nxa4 with a second protected passed pawn. 41...Qd6! White may have kept the h-file under control but it came at a heavy price. Black’s queen eyes the juicy a3- and b4-squares, and she cannot be prevented from entering White’s camp with devastating effect.
188
42.Rh8? White was lost anyway, but there was no reason to trade rooks and do Black’s job for him. Following 42.Kg2 Qb4 43.Qc1 Black still has to do some work to win the game, but it should be within reach. 42...Rxh8 43.Qxh8 Qa3 0–1 This game may not have been the best example to illustrate our theme, because Black’s victory had as much to do with the superiority of his knight over White’s bishop as with his protected passer. Still, it was the pawn structure itself that made the knight so superior in the first place; and removing all the pieces would still have given Black a winning pawn endgame. While Li’s play was instructive, it was also pretty straightforward as he enjoyed a dominant position when we picked up the game. Unfortunately, chess is seldom so simple! Let’s examine a case where a little more work was needed.
Jon Ludvig Hammer – Alexander Zubarev Eretria 2011 1.d4 Nf6 2.c4 e6 3.Nc3 Bb4 4.f3 d5 5.a3 Bxc3† 6.bxc3 0-0 7.cxd5 exd5 8.e3 Re8 9.Bd3 b6 10.Ne2 Qd7 11.0-0 Ba6 12.Ng3 c5 13.Bxa6 Nxa6 14.Qd3 Qa4 15.Bb2 c4 16.Qe2 Re6 17.e4 g6 18.Qf2 Rae8 19.Bc1 Qc6 20.e5 Nd7 21.f4 f5
189
White has a strong protected passed pawn on e5, but we are a long way from a pawn endgame. More importantly, it seems like it will be hard to trade pieces in such a closed position. Jon Ludvig puts on a strategic clinic. 22.a4! First things first – White clears the a3-square for his bishop, activating his last piece. 22...R6e7 23.Ba3 Rf7 White has more than one strong move here, but I really like our lutefisk-loving friend’s decision for its simplicity and clarity. 24.Bd6! The main point of this move is not so much to install the bishop on a central outpost, but rather that Black will now find it impossible to bring the a6-knight back to the game without allowing it to be traded for the bishop.
24...Nf6 Black is posing some practical challenges, as the knight’s arrival on e4 might be annoying. But Hammer is all over this one, and finds the right way to keep on exchanging. 25.Qb2! A high-class move. Black cannot do a thing about Qb5. 25...Ne4 26.Nxe4 fxe4 Again, White has more than one good way to continue. And again, I like Hammer’s choice for its simplicity and for how well it illustrates the point I am trying to make. 190
27.Qb5! A more direct, less strategically minded player might consider sending the kingside pawn mass in motion: 27.g4!? Black cannot prevent f4-f5, so I find it hard to imagine him surviving for long. 27...Qxb5 28.axb5 Nc7 29.Bxc7! Of course. 29...Rxc7 The pawn structure has changed. Black now has a protected passed pawn as well, but he faces the detriment of being a pawn down on the kingside while his a7/b6 pawn duo is easily restrained by the single b5-pawn. A pawn ending is therefore winning for White – and it is within reach.
191
30.f5! Opening a file. 30...Rf8 31.fxg6 Nice and simple. White could have won with connected passers as well: 31.g4 and White will use the e5/f5 duo to bring the game to its conclusion. 31...hxg6 32.Rxf8† Kxf8 33.Rf1† Kg7 34.Rf6 Black is in a hopeless dilemma. There is only one open file on the board for a rook to operate along, but it belongs to White. Challenging it is not possible since the pawn endgame is lost, but passive defense is equivalent to resigning.
192
34...g5 35.Kf2 Rf7 36.Rxf7† Kxf7 37.h3 Kg6 38.g3 Kh5 39.h4 Kg6 40.Ke2
Black resigned. He is in a deadly zugzwang as no matter where his king moves, he has to let the epawn or the h-pawn through. 1–0 Hammer’s play in this game was extremely instructive, but one element which could easily be overlooked is that he had to make the right exchanges. The way the game unfolded, the right exchanges meant more or less any trade possible; but in particular, the good decision that stood out to me the most was bringing the bishop to d6. If Black had been able to swing his a6-knight around to e6, then one pair of minor pieces would always have been left on the board, and the knight would have been ideally 193
placed. The hopelessness of the rook endgame Black found himself in leads to the next guideline.
When playing with a protected passed pawn, the most favorable trades to make are those involving minor pieces. Protected passers are best in rook and queen endings, and much less effective in minor piece endings. If you must leave minor pieces on the board, try to keep them the same for both sides. Let’s examine a case where a great player did just that.
Boris Gelfand – Hicham Hamdouchi Cap d’Agde (rapid) 1998 1.Nf3 c5 2.c4 Nc6 3.Nc3 g6 4.e3 Bg7 5.d4 d6 6.d5 Ne5 7.Nxe5 Bxe5 8.Bd3 Bg7 9.e4 e5 10.b4 Nf6 11.bxc5 dxc5 12.0-0 0-0 13.a4 b6 14.a5 Ba6 15.Bg5 h6 White has a protected passed pawn on d5, which he hopes will be a strong long-term asset. Black’s last move poses a question to the bishop on g5 – what should White do?
16.Be3! Gelfand correctly decides not to trade for the knight on f6. The more balanced the piece assortment is, the more likely he is to triumph. White remains better after 16.Bxf6 Bxf6, but he has lost a lot of his advantage. It will be hard to remove the bishop from the d6-square should Black choose to set up a blockade there, and there is 194
some potential for opposite-colored bishops to exert a drawish influence. 16...Ne8 Black brings his knight to d6. It is well known that knights are the best pieces to blockade protected passed pawns – a topic we will discuss in more detail in the next chapter. 17.Qb3 f5 18.f3 Nd6 White’s position looks dominating, but breaking through is far from trivial. It’s easy to say that White should be aiming to make symmetrical minor piece exchanges, but how exactly will that happen? Gelfand answers this for us.
19.Ra4! An excellent move. White prepares Rfa1, when the threat of axb6 will force the bishop off the a6square. As a result, Nb5 can be played to accomplish White’s goal. By contrast, it would be a big mistake to try to make trades right away without ensuring they are the same pieces. Following 19.Nb5? Black is immediately given a reprieve with: 19...Bxb5! 20.cxb5
195
The different sets of minor pieces have greatly increased Black’s prospects of blockading the protected passed pawn, and decreased White’s chances of reaching a favorable endgame. Black is fine. 19...Qc7 20.Rfa1 Bb7
21.Nb5! Now and only now. Black must make a symmetrical trade. 21...Nxb5 22.Qxb5 Rad8 A sad necessity, as Black could not maintain control of the a-file. 23.axb6 axb6 24.Ra7 196
24...Rf7 This loses material, but Black’s position was strategically lost anyway. Let’s see what happens if Black hangs tight and tries to keep some kind of a fortress together: 24...f4 25.Bd2 g5
26.Rb1! Rd6 27.Ba5! Black is forced to place his rook awkwardly. Following 27...Rff6 28.Bc3 Black has no active plans at his disposal and his pieces are terribly passive, desperately trying to keep his weaknesses defended. For now, White has no direct win, but he should eventually be able to break through by preparing g2-g3 and Bh3.
197
25.Rb1 Rd6 White wins a pawn with an elementary tactic.
26.Bxc5 Qxc5† 27.Qxc5 bxc5 28.Rbxb7 Rxb7 29.Rxb7 Black was not able to offer any further resistance. The game only lasted as long as it did because of the rapid time limit. 29...fxe4 30.Bxe4 Ra6 31.h4 Bf6 32.g3 g5 33.h5 g4 34.fxg4 Bg5
35.Bf5 Kf8 36.Kg2 Ra2† 37.Kh3 Rd2 38.Rc7 Rd4 39.Rxc5 e4 40.d6 Rxd6 41.Bxe4 Rd2 42.Rf5† Ke7 43.c5 Re2 44.Bf3 Rc2 45.c6 Ke6 46.Be4 Rc3 47.Kg2 Ke7
198
48.Re5† In a slow game Gelfand would surely have played 48.Rxg5! hxg5 49.h6 Kf6 50.h7 Kg7 51.Kf2+– when Black’s king is tied to the h-pawn and he can do nothing to stop White from walking his king to the queenside and pushing the c-pawn through. 48...Kf6 49.Rb5 Ke6 50.Rb7 Ke5 51.Rb4 Be7 52.Ra4 Kd6 53.Ra7 Ke6 54.Bf5† Kd6 55.Rd7†
1–0 Gelfand only needed to trade off one minor piece – the blockading knight on d6 – before his position became overwhelming. But what is most instructive is how he managed to pull that off in the first place. The knight on d6 looked so secure since the position was closed, but everything changed when 199
Gelfand opened an avenue of attack along the a-file. That is why White’s position in the above game was so much more promising than in the next one, which has a similar pawn structure but one crucial difference.
Loek van Wely – Gata Kamsky Dagomys 2008 1.d4 Nf6 2.c4 g6 3.Nc3 d5 4.cxd5 Nxd5 5.e4 Nxc3 6.bxc3 Bg7 7.Bc4 c5 8.Ne2 Nc6 9.Be3 0-0 10.00 Na5 11.Bd3 b6 12.Qd2 e5 13.d5 f5 14.Bg5 Qe8 15.f3 Much like Hamdouchi in the previous game, Kamsky is facing down a potentially dangerous protected passed pawn on d5. Obviously it poses no danger of becoming a queen at the moment, but if enough pieces come off the board, perhaps one day it may. However, there is a major difference between this position and the previous one, which is that Black has the ability to keep the queenside closed.
15...c4! An excellent strategic decision. Before gaining space with ...f4, Black takes the opportunity to prevent c3-c4, which White needs to play in order to challenge the knight on a5. By contrast, the immediate 15...f4 would have been well met by: 16.c4! h6 17.Bh4 g5 18.Be1
200
The position is similar to the game, except that White rather than Black has advanced a pawn to c4. But what a difference this makes! White has an easy plan to challenge the a5-knight with Qd2-b2 or even Nc1-b3. Once the black knight is exchanged or forced to retreat, a4-a5 becomes an obvious plan. Lines will be opened, exchanges are likely to take place, and the protected passed pawn will become more dangerous. Black still has plenty of counterplay on the kingside to keep the game double-edged, but anything could happen. By contrast, the continuation chosen by Kamsky makes the game a one-sided affair. 16.Bc2 f4 17.Kh1 h6 18.Bh4 g5 19.Be1 Bd7
White is strategically busted. He is facing a slow but steady kingside pawn storm in the style of the King’s Indian; and more importantly, he has no realistic way to open any lines on the other side of the 201
board. His only asset is his protected passed pawn on d5, which, as previously discussed, would be most effective with all the minor pieces off the board. But as things stand, White cannot dream of trading a single pair of pieces! The only conceivable way to challenge the a5-knight would be to maneuver the bishop via d2-c1-a3-b4, but it would be extremely slow. 20.g3 20.Qd1 prepares the plodding bishop maneuver to b4. Black has many good moves and plans at his disposal, but I like the following simple regrouping: 20...Kh8 21.Bd2 Rg8 22.Bc1
22...Bf8! Black is ready for ...g4 next, and White’s intended Ba3-move has also been prevented for the time being. Black will still have to calculate well and execute properly once the kingside is inevitably opened; but strategically speaking, the game has already been decided. 20...Qh5
202
21.Ng1 Rf7 22.Qg2
22...Kh8! One has to admire the patience that Kamsky exhibits. He is in no rush at all, and simply prepares to bring his rook to g8 to help smash through with ...g4. 23.Bd1 Rg8 24.Rb1 Bf8 25.Be2 Bc5 26.Bf2 Bd6 27.Rb2 Rf6 28.Be1 Black wants to play ...Rg6 to support the ...g4-thrust, but he can’t just yet.
203
28...Qe8! Simple and strong. 28...Rfg6?? would ruin all of Black’s good work due to 29.g4, when the queen is trapped. 29.Nh3 Rfg6 30.Nf2 h5
White has been strategically lost for a long time, but now it’s starting to look as though the decisive blow that ends the game will land sooner rather than later. White understandably did not want to allow the ...g4 advance, but the cure was no better than the disease. 31.g4 204
This closes the g-file, but Black is ready to attack along the h-file instead.
31...Rh6 32.gxh5 Rxh5 33.Ng4 Kg7 34.Bd1 Rgh8 35.Rff2 Rh3 36.Qf1 We have reached the last noteworthy decision of the game. So far, Kamsky has expertly avoided trading any minor pieces through the entire time we have been following the game. Finally he chooses to do so, and the conditions are favorable for many reasons: the trade is not symmetrical, but rather a bishop for a knight; the knight in question is White’s best-placed piece and a valuable defender of h2; and finally, the trade will leave Black with a protected passed pawn of his own.
36...Bxg4 37.fxg4 Qg6 38.Bf3 Bc5 39.Rfe2 Nb7 40.Qg2 Nd6 41.a4 Qh7 42.Qf1 Kf6 43.Qg2 Qd7 44.Ra2 R8h6 45.Qf1 Qh7 46.Qg2
205
46...Rxf3 47.Qxf3 Rh3 48.Qg2 Black has a million winning moves, but I like the one chosen for its sadistic nature. 48...Ke7 Black has all the time in the world, so why not move the king to a better square? Faced with the threat of ...f3 and massive material losses, White resigned. 0–1 Perhaps Kamsky’s efforts would have been better placed in the following chapter about playing against protected passed pawns in the middlegame, but nonetheless I consider this game a good cautionary tale of how useless they can be if you are unable to trade pieces due to the position being too closed. This brings us to the next guideline.
When playing with a protected passed pawn in a closed position, it will usually be in your favor to open the game. Let’s see this principle in action.
Alexander Onischuk – Bassem Amin Ningbo 2011 1.d4 Nf6 2.c4 e6 3.Nc3 Bb4 4.e3 c5 5.Nge2 b6 6.a3 Ba5 7.Rb1 Na6 8.d5 exd5 9.cxd5 0-0 10.Ng3 Bb7 11.Bxa6 Bxc3† 12.bxc3 Bxa6 13.f3 d6 14.e4 Nd7 15.Bf4 Ne5 16.Bxe5 dxe5 17.Kf2 g6 18.Re1 Qd6 19.Qd2 Rad8 20.Rbd1 Qe7 21.Qa2 h5 22.c4 Qh4 23.Kg1 Rd6 206
For a third consecutive game, we see a structure with a protected passed pawn on d5. While there are many possible structures where a protected passed pawn matters, examining the same one and seeing the difference between favorable and unfavorable versions is ideal for our purposes. This time White has a good version of the position, since only one pair of minor pieces remains. True, they are asymmetric pieces, but White’s knight is more useful than the enemy bishop. Unlike the previous game, ...c4 was not an attractive idea for Black, as there was no blockading knight on a5. How should White proceed from here? 24.a4! Simple and strong – White looks to open the queenside. 24...Qf4 25.Nf1! White is in no rush and kills all counterplay before it can even begin. The computer suggests the more direct 25.a5!? but I prefer Onischuk’s choice for its simplicity. Why allow 25...h4 26.Nh1 h3 when White’s kingside structure will be fractured? The machine might not care, but I do! 25...h4
207
26.h3! Black is left with no way to make further progress on the kingside, and a4-a5 is on the way. 26...Qg5 27.Qd2
27...Qd8 Given the massacre Black soon faced on the kingside, he might have tried exchanging queens, but after 27...Qxd2 28.Nxd2 Rd7 29.a5± his position is hardly a bed of roses. White will take on b6 and double rooks on the b-file. Black will struggle to keep his position together and I suspect White is winning with accurate play.
208
As we have discussed previously, when playing with a protected passed pawn in the middlegame, the best things you can do are trade pieces and open the position. Black has avoided a dismal endgame by declining the queen trade, but his decision presents White with another opportunity.
28.f4! White should also be winning after something simpler like 28.Qc3 Re8 29.a5 followed by opening the a-file, but I like Onischuk’s decision to pivot and open another avenue into the enemy position. Black has put so much energy into trying to keep the queenside closed that he made himself vulnerable to getting steamrolled in the center. 28...Re8 29.Nh2 f6 30.fxe5 fxe5
209
31.Rc1 Rf8 32.Ng4 Qe7 33.Rf1 The game continued with a losing move, so I will substitute in another line which I find to be more instructive.
33...Bc8 In the game, Black continued with 33...Rdd8? but after 34.Qh6 he had to resign (1–0). 34.Rxf8† Kxf8 35.Rf1† Ke8 36.Qh6 Bxg4 37.Qh8† Kd7 38.hxg4
Material remains equal and Black has managed to escape towards the queenside with his king. Nevertheless, my engine offers an evaluation of +24! Black is indeed absolutely lost, as White’s heavy pieces have infiltrated Black’s position and will make short work of his king – for instance, after 210
38...Kc7 White can choose between 39.Qa8 and 39.Rf8, both of which win without much hassle. This was a fine example showing how opening the position can quickly reap dividends for the side with the protected passed pawn. Amin surely could have avoided the disaster he faced on the kingside, but at a heavy cost – trading queens and entering a difficult endgame with a4-a5 on the way was hardly a picnic either. I think White’s win had more to do with Onischuk’s strong play than Amin’s crumbling too easily or not defending well. This game was also an excellent demonstration of the earlier guideline regarding the side with the protected passed pawn exchanging minor pieces while keeping some major pieces on the board. In the game White won with a kingside attack; and in the illustrative line of analysis above, White obtained an easily winning position by infiltrating with his queen and rook. Those pieces produced devastating threats towards the black king, in a way that bishops and/or knights would not be able to. It’s good to be sceptical about what you read, so I’d like to address a potential criticism of these two guidelines when playing with a protected passed pawn: firstly about the benefit of opening the position; and secondly about exchanging minor pieces while keeping heavy pieces on the board. Wouldn’t it be just as easy to find games in which the opposing side opened lines and won by activating his heavy pieces to support the opposite points of view to those in our guidelines? What use are general principles at all, when everything depends on the specific details of the position under discussion? Even though contrary examples surely exist, I would argue that, in positions involving a protected passed pawn in which other factors (general piece activity, king safety and so on) are roughly equal, the side playing against the protected passed pawn will probably have to use one or more of their pieces to keep an eye on the pawn. This should generally make it easier for the side with the protected passed pawn to exploit any open files – and once the heavy pieces infiltrate, they can inflict terrible damage. In the last illustrative game, the success of White’s kingside attack can be traced back to the presence of his protected passed pawn. When considering the initial position where we picked up the game, it seemed unfathomable that Black’s king’s cover would be torn apart and he would have to resign in just ten more moves. Indeed, Black could easily have spared his king the grief he endured at several moments by acquiescing to some exchanges, but this would have led to problems in the endgame instead. The strategic value of the protected passed pawn is what caused Black to retreat his queen on move 27, which led to his kingside becoming vulnerable. As usual, let’s conclude with some puzzles.
211
Exercises
Ding Liren – Rauf Mamedov Shamkir 2018
How should White proceed? Show/Hide Solution > 21.Bf1! An excellent decision. White looks to trade off minor pieces and do battle in a heavy-piece ending. 21...b5 Black could have considered 21...Bd5 to keep the bishops on the board at all costs, but it is clear that he is ceding ground. Of course he doesn’t want the bishops to trade, but a second ago his bishop was the more active one on c4, while White’s was the passive one on g2 – and now their roles are reversed. It’s a tough spot to have to choose between an unfavorable trade or letting your piece become worse and your opponent’s become better. After 22.Rab1² White has good winning chances. 22.axb6! Not a difficult move, but an instructive one nonetheless. White does not want to allow Black a 212
protected passed pawn of his own after ...a6. 22...Rxb6 23.Qa3 Qxa3 24.Rxa3 Bxf1 25.Kxf1±
We have a four-rook endgame, and White has a protected passed pawn. Despite the drawish nature of rook endgames and the equal material, Black is in for a long and miserable defense. A large part of this is because once White’s rooks get active, Black will not be able to exchange them without entering a losing pawn endgame. 25...a6 26.Rc5?! I dislike giving Black the time to play ...f5, which enables him to defend his a-pawn laterally rather than from the passive a8-square. White would have been better off forcing passivity with 26.Rca1! Ra8, and now 27.g4! to prevent ...f5. The king is on the way to f4. Black is not out of defensive resources, but I think he should eventually lose. 26...f5 27.h3 Rff6 28.Kg2 h5 29.Raa5 Kg7 30.Rc7† Rf7 31.Rc8 Since White has the initiative, he avoids simplifying to a single-rook endgame. With both his rooks on the board, he can attack Black’s weaknesses with more force. 31...h4 32.Re8 hxg3 33.Kxg3 Rb3 34.Kg2 Rb2 35.Rxa6 f4 36.exf4 Rxf4 37.Ra7† Despite the difficult endgame, Black defended extremely well up to this point and the half point was within reach. But with the seconds ticking down as move 40 approached, he made a critical error.
213
37...Kh6? The king is not safe here. Black should hold after the accurate 37...Kf6!. 38.Kg3! Well spotted by Ding Liren. Black cannot take on f2. 38...Rf6 38...Rf3† loses to 39.Kg4 followed by Rh8 with mate. 38...Rbxf2 39.Rh8† Kg5 40.h4† Kf5 41.Rf8† Checks and captures all the way through! The rook is lost. 39.h4! Another excellent move, threatening mate on h8. 39...g5 40.Rh8† Kg6 41.Rg8† Kf5 42.Rxg5†
214
Black resigned, rather than see 42...Ke6 43.Re5† Kd6 44.Ra6† when his rook would be lost on f6. 1–0
Ivan Cheparinov – Gawain Jones Bratto 2013
Black doesn’t technically have a protected passed pawn yet, but he surely will someday when his pawn advances to c3. What should he do? Show/Hide Solution 215
> Black had more than one good choice, but I like what Jones did best. 26...f5! Black blasts open the position and is looking to trade some minor pieces. My computer prefers to establish the protected passer right away, but I disagree. After 26...c3 27.Nd4! it will not be easy to open the position, and I would seriously worry if the knight lands on f5. 27.Re1? White crumbles immediately. The c4-pawn is obviously taboo, as 27.Qxc4?? Bxf2† wins the queen. White could have offered more resistance with 27.Nd2!. Perhaps Cheparinov saw this option and was understandably worried about 27...c3, but his queen suddenly springs to life with 28.Qb5!, when White has enough counterplay. 27...c3 28.Qe2
As discussed earlier, the best thing to do when you have a protected passed pawn is to trade pieces! So... 28...fxe4! 29.Bxe4 Bxe4! 30.Qxe4 Qg6!
216
The game score ends here. My guess is that White lost on time and did not resign. Still, he is clearly lost, as Black is forcing the c-pawn through and can easily control the c1-square by means of ...Bc5-f8h6. 0–1
217
Just like in Chapters 2 and 4, we will once again study the same kinds of positions that we saw in the previous chapter, but from a reversed perspective. The previous chapter hopefully showed that even with a lot of pieces on the board, a protected passed pawn is an asset that the opposing side should respect. It promises your opponent a degree of inevitability in the event of an endgame. In the middlegame, however, there are plenty of ways of trying to deal with it. The first method we will discuss is the most straightforward, and the guideline needs no introduction due to its obvious nature. If you undermine the defending pawn successfully, the protected passed pawn will become just a passed pawn. Let’s see this guideline in action.
Evgeny Bareev – Jonathan Speelman Debrecen 1992 1.d4 g6 2.e4 Bg7 3.f4 c5 4.d5 d6 5.a4 Na6 6.Nf3 Nc7 7.c4 f5 8.e5 e6 9.dxe6 Nxe6 10.Ra3 Nh6 11.Rd3 Nf7 12.Nc3 Bd7 13.Rxd6 Nxd6 14.Qxd6 Kf7 15.h4 Bc6 16.Qxd8 Raxd8 17.Kf2
218
Black is better in this queenless middlegame, as White does not have enough compensation for the exchange. An extra protected passed pawn is valuable, but usually not worth two material points when there are no other major imbalances. However, the pawn on e5 is both a short- and a long-term annoyance. It severely restricts the bishop on g7 and may later restrict Black’s other pieces, as the threat of becoming a queen can never be fully ignored. Speelman has more than one good move here, but I like the one he chose for its simplicity. 17...h6!? Easy peasy lemon squeezy. Black prepares the ...g5 advance, breaking down the defenses of the e5pawn. Although the text move fits perfectly with our theme, it would be remiss not to point out that 17...Bf8!³ would have been objectively stronger, as the resource mentioned in the note to White’s next move is less effective against it.
219
18.Be2?! 18.Nd5! would have given White serious counterplay, partly based on the possibility of a timely h4h5 to undermine the f5-pawn, which highlights the drawback of Black’s last move. Still, it is hard for a human player to play such a committal move while leaving another pawn hanging on a4. In any case, the rest of the game is a perfect demonstration of the effectiveness of undermining a protected passed pawn. 18...g5! 19.hxg5 hxg5 20.Rxh8 Rxh8 21.fxg5
21...Nd4 Speelman’s move is not a bad choice by any stretch, but I would have preferred immediately 220
removing the e5-pawn. 21...Bxf3! 22.Bxf3 Bxe5 would have been most consistent with previous play. Black should win, and without much stress at that. 22.Bf4 Nxe2 23.Kxe2 Ke6
White’s previously protected passed pawn now depends upon pieces to keep it defended. Black quickly set about trading them off, and went on to win easily. 24.Nb5 Bxf3† 25.gxf3 Bxe5 26.Nc7† Bxc7 27.Bxc7 Rh1 28.Kd3 Rd1† 29.Kc2 Ra1 30.b3 Ra2† 31.Kc3 Rf2 32.f4 Rf3† 33.Kb2 Kd7 34.Be5 Rg3 35.Bb8 Rg4
221
36.a5 Kc6 37.Ka3 b5 38.axb6 axb6 39.Ka4 Rg2 40.b4 Rb2 41.b5† Kd7 42.Ka3 Rb4 43.g6 Rxc4 44.g7 Rc3† 45.Ka4 Rg3 46.Be5 Ke6 47.Bc7 Rxg7 48.Bxb6 Kd5 49.Bd8 Ra7† 50.Kb3 Rb7 51.Ka4 Kc4 0–1 Speelman faced very little resistance when undermining the e5-pawn, and the powerful protected passer soon became a weak isolani. But not all positions see a protected passed pawn vanish so easily. Let’s examine a case where undermining the protected passer with pawns was not a realistic objective, and a different strategy was called for. We have already encountered the game in the exercise section of Chapter 4.
Fritz Gygli – Aron Nimzowitsch Winterthur 1931 1.d4 Nf6 2.c4 e6 3.Nc3 Bb4 4.Qb3 Qe7 5.Nf3 b6 6.g3 Bb7 7.Bg2 Bxc3† 8.bxc3 Nc6 9.Ba3 d6 10.Qa4 Qd7 11.Nd2 0-0 12.e4 e5 13.0-0 Rfe8 14.Bb2 Na5 15.Qc2 c5 16.f4 Rac8 17.fxe5 dxe5 18.d5 Qe7 19.Qd3 Ba6 20.Rae1 Rcd8 21.Re3
222
Hopefully by this point, you have already tried your hand at solving this position and found the best move. Black’s choice to bring his knight to d6 fits well with the guideline already presented in Chapter 4 on page 91: undeniably, he is happy to appoint a low-value piece to perform the duty of blockading the passed d-pawn. Although that guideline would help Black to find the right idea, there is another reason that the knight should come to d6 that has nothing to do with stopping the d-pawn. 21...Rf8! 22.Rfe1 Ne8 23.Bf1 Nd6 Black could have easily placed his queen or rook on d6 at any moment, or simply continued to leave the square unoccupied. But consider the active usefulness of a queen or rook on the d6-square: neither piece would accomplish much there. By contrast, the knight on d6 is a marvelous piece, not only blockading the d5-pawn but also attacking its two defenders – especially the one on c4, which is painfully weak. The rest of the game is hardly interesting as Nimzowitsch cruised to an easy victory.
223
24.Qc2 Qd7 25.Bc1 f6 26.Rf3 Rf7 27.Rf2 Rdf8 28.Qd1 Bc8 29.Bd3 Qg4 30.Be2 Qd7 31.Bd3 Qe8
32.Be2 Bd7 33.Bd3 Qc8 34.Bf1 Bg4 35.Qc2 Bh3 36.Bd3 Qd7 37.Qd1 Bg4 38.Qc2 h5 Black could have taken the pawn on c4 at more or less any moment, but instead he patiently improved all his pieces in preparation for the ...f5 break. In addition to undermining the defending e4pawn, White would then be facing a dangerous open f-file as well. Facing the prospect of ...f5 on the next move, White even surrendered the c4-pawn voluntarily.
224
39.Nf1 Naxc4 The blockading knight on d6 finally takes out one of the pawns which had been protecting the passer on d5. 40.Bxc4 Nxc4 41.Qb3 Nd6 42.c4 f5 43.Nd2 Fittingly, on the final move of the game, Black’s blockading knight takes out another pawn defending the d5-passer.
43...Nxe4 0–1
225
A knight is usually the best possible blockader of a protected passed pawn, since it will not only contain the pawn but also threaten the defending pawn(s). In addition, it can support pawn breaks to undermine the defenders. Black’s straightforward victory and easy-to-understand strategy in the above game make it an ideal example to introduce the second guideline of the chapter. Note that this guideline can be retroactively applied to the Bareev – Speelman game. In that case, Black’s knight already stood on the blockading e6-square, but it did a great job of not only pressuring the f4-pawn but also supporting the ...g5 break. The reader may already have surmised that the above guideline might be the case, since the second guideline in Chapter 4 stated that lesser-value pieces tend to make the best blockaders. This is indeed the case when dealing with passed pawns in general; but when dealing with protected passed pawns, it is specifically the knight that performs the duty best. Just consider the following basic, kingless position:
Example 1
Imagine you have to stop the d-pawn. You can choose to place a bishop or knight on d6, and then whichever piece you choose, White can get one of those pieces as well. The knight will obviously be the better choice, since it not only blocks the passer but also attacks the two other enemy pawns. Unless White can put his knight on specifically d2, his pawns will start dropping. This is a simple principle, but one that goes a long way. But don’t take my word for it – let’s instead consult the greatest player who ever lived.
226
Alexander Huzman – Garry Kasparov Tel Aviv (clock simul) 1998 1.d4 Nf6 2.c4 e6 3.Nf3 b6 4.g3 Ba6 5.b3 d5 6.Bg2 dxc4 7.Ne5 Bb4† 8.Kf1 Bd6 9.Nxc4 Nd5 10.e4 Ne7 11.Bb2 Nbc6 12.Nbd2 e5 13.d5 Nd4 14.Nf3 c5 15.Kg1 Bxc4 16.bxc4 0-0 17.h4
An interesting position has arisen. White has the bishop pair and a protected passed pawn on d5, but his bishop on g2 is passive and Black has an excellent knight on d4. Capturing it would leave Black with a protected passed pawn as well. There are no tactics flying around, but the position is strategically dynamic and unbalanced. I really like the plan that Kasparov came up with. 17...Nc8!? The start of a maneuver to replace the bishop with the knight on d6. The passed d-pawn poses no threat of becoming a queen anytime soon and it is blocked by one of the lowest-value pieces, but Kasparov knows that the knight will be better placed on d6 where it will harass the c4- and e4-pawns. I don’t believe Black is equalizing, but he has figured out the best way to proceed and where his pieces belong. 18.Bh3 Re8 19.Kg2 Bf8 Huzman has an important strategic decision to make. Despite my machine’s indifference, I strongly believe he chose incorrectly.
227
20.Rc1? White anticipates the knight’s arrival on d6 by protecting the c4-pawn in advance, but I think he had a better option. When considering the guidelines set out in Chapter 5, one would immediately consider trading off the knight on c8 to exchange some minor pieces and leave a symmetrical piece balance on the board. Not to mention that White would be trading off his potentially bad bishop for a knight which will soon be perfectly placed. Perhaps I have been too lenient on Huzman by only attaching one question mark to his last move. 20.Bxc8! Qxc8² would have been pleasant for White.
Black can forget about maneuvering his remaining knight to d6. Though theoretically possible, in 228
practical terms it simply won’t happen. The knight certainly looks nice on d4 and is decently placed, but it has no sensible moves available and White can improve his position while playing around it. He looks pleasantly better to me, and can follow another guideline from the previous chapter by opening the queenside with a4-a5. Black has no obvious counterplay in sight and he faces a long and difficult defense, although his position is still solid and it will take a lot of work by White to break it down. 20...Nd6! I don’t have the timestamp for this move, but I suspect Kasparov played it as quickly as one might recapture with 8...Kxd8 in the Berlin Defense. The move is so obvious, and it is clearly what Black had been planning for some time. 21.Re1 Rb8 My computer, in its infinite wisdom, claims that White is still better here. I think nothing could be further from the truth. White has no plan, and the excellent knight on d6 means that Black is unlikely to have problems in a future endgame, even if White could force enough simplifications to reach one. Moreover, Black can prepare the ...b5 break to improve the prospects of his pieces. Huzman’s play in the coming moves suggests that he felt the same way, as he opted to change the position dramatically.
22.a4 g6 23.Nxd4!? Rather than waiting for Black to strengthen his position with moves like ...Bh6, ...a6 and ...b5, White changes the character of the position. He even wins a pawn, but his strategic deficits will soon be on full display. 23...cxd4 24.f4 Kasparov is a fine positional player. This is often overlooked since his best games were nearly all tactical in their nature, but one of his most valuable assets was his feel for the initiative and knowing 229
when to sacrifice.
24...Bg7! Black doesn’t mind losing a pawn. His control of the dark squares will render the extra pawn unusable and White’s loosened king cover will be his undoing. If Black wanted to keep material equal at all costs, he could have tried 24...f6? but this is wrong on so many levels. Most notably, the stupid bishop on h3 suddenly has a wonderful outpost on e6, and Black’s kingside cover is weakened. After something like: 25.h5! g5
26.fxg5 fxg5 27.Be6† Kh8 28.Rf1 Black will not survive for long.
230
25.fxe5 Bxe5 26.Bxd4
Jacob Aagaard, my coach and publisher, has famously written about the “three questions” in Grandmaster Preparation – Positional Play. Most of what he writes is obviously not only wrong but also ridiculous to the point of being comical. But a broken clock is right twice a day, and this one he nailed on the head: 1. Where are the weaknesses? 2. What is my opponent’s idea? 3. Which is my worst-placed piece? 26...Rb7! Black improves his worst-placed piece. The rook had no future on b8, so Kasparov transfers it to the much more active e7-square. From there, it not only bolsters the e5-point – thereby anticipating White’s main positional threat of Bxe5 followed by Qd4 – but also eyeballs the weak e4-pawn. Consider the three questions answered! 27.Bf2? This sad retreating move was the start of White’s doom. His position is still fine objectively, but difficult for a human player to handle. My machine points out a clever tactical resource, and I think White should have gone for it. 27.Bxe5! Rxe5 28.Qd4 Rbe7
231
The power of the blockading knight is on full display. It harasses the defending e4- and c4-pawns, and White is about to lose everything, if not for a tactical stroke that keeps him alive. 29.Be6! White disturbs the coordination of the black rooks. Without this move he can almost resign, so if he did not see it in advance, avoiding the bishop trade on e5 becomes a completely understandable decision. 29...Rh5 Now White has a chance to force some trades. 30.e5! 30.Bg4 Rhe5 31.Be6= forces an immediate draw if White wants it.
30...fxe6 31.exd6 Qxd6 232
Black should be fine. Still, White has the marginally more comfortable side of a likely draw, so this would have been a big improvement over the game.
27...Rc7?! 27...Rbe7© would have been the consistent move, when I prefer Black. 28.Qd3 Nb7 This move was necessary since a4-a5 was a serious positional threat. Retreating the knight from d6 takes pressure off the c4- and e4-pawns, but White was doing a good job of defending them anyway. His more significant weaknesses are on the dark squares, as Kasparov demonstrates. 29.Qa3 Bd6 30.Qb2 Rce7 White’s position is undoubtedly difficult, but panicking only makes matters worse.
233
31.a5? Why? 31...Nc5! I see nothing wrong with 31...Nxa5!?µ, clipping the pawn. Still, Kasparov’s move is stronger and more to the point. 32.Rcd1 After 32.Bxc5 bxc5! (rather than 32...Bxc5? 33.e5!) White’s extra pawn is irrelevant, while the pawns on a5, e4 and g3 are all weak, as is White’s kingside generally. 32...Rxe4 33.Rxe4 Nxe4 34.axb6 Nxf2 35.Qxf2 axb6
234
The difference in quality of the opposite-colored bishops is on full display. White’s bishop on h3 is an aimless, oversized pawn. Conversely, Black’s bishop on d6 firmly blockades the passed d-pawn, which will never be a concern for Black again, while eyeing White’s loose kingside. Hindsight is 20/20 and White made more than one mistake in this game, but the big one that stands out to me was not taking the knight on c8 when he had the chance. The h3-bishop has not moved since, and White perished before it could move again. 36.Re1 Rxe1 37.Qxe1 Qc7 38.Qe3
38...h5 There was nothing wrong with pawn-grabbing. After 38...Qxc4! Black will stretch White’s defenses 235
by combining the threats of mating the white king and advancing the passed b-pawn, as we frequently saw happen in Chapter 3. White would be hard pressed to stop either plan; and when both are combined, he has no chance whatsoever. Black wins easily. 39.Qd3 Qe7 40.Kh1 Qe5 41.Kh2 Qf6 42.Kg2 Qb2†
White resigned. The queen will invade on either h2 or f2 and take the entire kingside, and 43.Kg1 does not help in view of 43...Bc5†. 0–1 I had more reasons for including this game than just trolling my other favorite Norwegian by introducing Kasparov as the greatest player of all time. The plan of ...Nc8-d6 may not have been enough to secure equality as White had the option of taking the knight, but Kasparov clearly felt it was worth investing several tempos to replace the d6-bishop with a more effective blockader. The way the game played out, the knight on d6 did not manage to take either of the c4- or e4-pawns (at least while it stood on d6), but there were several side variations that White had to avoid in which the knight would have been able to flex its muscles and show why it was the best available blockader. The knight’s great effectiveness as a blockader of a protected passed pawn is closely intertwined with the concept of undermining the defending pawn(s). While it is often a pawn thrust that gets rid of the defending pawn, a blockading knight automatically supports such a thrust. Let’s look at another kingless position.
Example 2
236
We saw this pawn structure before but without the b6- and f6-pawns. While being a pawn up is surely better than a pawn down, these pawns would not help much if Black dropped a bishop on d6 and White got a dark-squared bishop as well. On the other hand, with a knight on d6 Black would not only be eyeballing the weak c4- and e4-pawns, but would also be ready to break them down with either ...b5 or ...f5. However, sometimes we find ourselves facing protected passed pawns which are part of a strong chain that cannot be broken down. In such circumstances, the protected passer is there to stay, and it is better to try to minimize its effectiveness rather than to eliminate it or remove the defender. Let’s examine a game previously seen in Chapter 5 where Black could have played better.
Ding Liren – Rauf Mamedov Shamkir 2018 1.d4 d5 2.c4 e6 3.Nf3 c5 4.cxd5 exd5 5.g3 Nc6 6.Bg2 Nf6 7.0-0 Be7 8.Nc3 0-0 9.Bg5 c4 10.e3 Be6 11.b3 cxb3 12.Qxb3 Na5 13.Qb2 Ne4 14.Nxe4 dxe4 15.Bxe7 Qxe7 16.Nd2
237
We pick up the game several moves before the puzzle arose in Chapter 5. Ding Liren has established a protected passed pawn on d4, and Black has no real hope of breaking down its defenses. Instead he must realize the pawn is there to stay, and plan accordingly. 16...f5! Black could have done himself a favor by keeping minor pieces on the board and instead aiming to trade heavies. As usual, when considering previous guidelines, the opposite is true when you are on the other side of the board. When facing a protected passed pawn, it is in your best interest to keep minor pieces on the board and trade heavy pieces, not the other way around. In the game, Mamedov committed a significant mistake: 16...Nc4? Black voluntarily trades one set of minor pieces, which he could and should have avoided. 17.Nxc4 Bxc4 18.Rfc1 Rac8
238
White will trade bishops with Bf1, as we saw previously, but first he makes sure that Black cannot respond with ...b5. 19.a4! g6 20.a5 Rc6 21.Bf1! The rest of the game can be found on page 130. 17.Rfc1 It’s hard for me to imagine anything for White other than bringing a rook to the open file. 17...Rac8 White will have to either acquiesce to a lot of heavy-piece trades or leave Black with full control of the only open file. Black is still a little worse, but his position should not be too hard to defend. By contrast, what he got in the game was miserable. Note that White has no good way to force the exchange of any minor pieces. 18.Rxc8 Rxc8 My computer is dissatisfied with White’s winning chances if the position remains static, and wants to make a mess right away.
239
19.g4!? 19.Rc1 would be a safer choice although I think Black should be fine after 19...Rxc1† 20.Qxc1 g6. 19...Nc4 20.Nxc4 Bxc4 21.gxf5
White got what he wanted to some degree: his 19th move more or less forced the exchange of knights, since Black had no other way to relieve the pressure against his e-pawn. But one look at White’s king should be enough to confirm that his position is not without risk. This is in stark contrast to the game, where Black never had an ounce of counterplay. Although this game featured two extremely strong players, the positional factors at play were
240
reasonably simple. Black needed to avoid the exchange of minor pieces, but instead he did White’s work for him. Let’s see a case with a similar pawn structure where both sides played in accordance with our guidelines for a long while.
Iryna Zenyuk – Anna Zatonskih St Louis 2012 1.d4 Nf6 2.c4 e6 3.Nc3 Bb4 4.e3 0-0 5.Bd3 d5 6.Nf3 c5 7.0-0 Nc6 8.a3 Bxc3 9.bxc3 dxc4 10.Bxc4 Qc7 11.Bb2 b6 12.Qe2 e5 13.h3 e4 14.Nd2 Bb7 15.a4 Rfe8 16.Rfd1 Na5 17.Ba2 Bc6 18.Bb1 Qd7 19.Bc2 cxd4 20.cxd4 Bd5 21.Rdc1 Rac8 22.Bd1
At first glance, White seems to have a pleasant position. She has a protected passed pawn on d4 that will be a long-term asset in the endgame, and her only ‘bad’ piece, the bishop on b2, can find a better diagonal on a3. Upon closer examination though, we realize that several factors are in Black’s favor as well. The minor piece assortment is not symmetrical, and though White’s dark-squared bishop may become active on a3, it will not fight for the blockaded d5-square in the short or long term. Finally, no minor pieces are in any position to be traded – but major pieces can be, as Zatonskih demonstrates. 22...Rxc1! 23.Rxc1 Rc8! Black exchanges one pair of rooks, then another! Simple principles can go a long way. 24.Rxc8† Qxc8 25.Qb5 h6 26.Qb4 Qd7 27.Ba3 Qc8 28.Qb2 Qc6 The last few moves have not been too noteworthy, but now both players clearly show they were thinking in accordance with the guideline stating that the side with the protected passed pawn should try to exchange minor pieces. 241
29.Be7 White wants to exchange her unopposed dark-squared bishop for a black knight, not only trading a pair of minors but also leaving a symmetrical piece assortment on the board. Naturally, Black says no. 29...Ne8! 30.Bb4 White again threatens to trade her bishop for a knight, this time on especially favorable terms as it would force Black to double her pawns. Clearly Black should move the knight from a5 – but where?
30...Nc4! Retreating to b7 would not be ideal. Black would quite possibly follow up with ...Nd6, when the knight would be exchanged anyway. 242
Zatonskih’s move has another advantage: by trading the a5-knight for the d2-knight instead of the white bishop, she maintains an asymmetric distribution of minor pieces. 31.Nxc4 Bxc4 32.Qc3 Qd5 33.Bc2 f5 34.Ba3 Kh7 35.Qb4 Nf6 Both sides have played quite well thus far, but White blinks first and offers a poor exchange.
36.Qd6? A do-nothing move such as 36.Qc3 would have kept the position balanced. As previously mentioned, the exchange of heavy pieces is in Black’s favor. Zatonskih did not have to be asked twice. 36...Qxd6! 37.Bxd6 Nd5 38.g4 g6
243
White has a difficult position but it may be holdable with accurate play. Her protected passed pawn is firmly blockaded, and the king is stuck on g1 with no good way to join the fight. As a result, the simple plan of ...a6 and ...b5-b4-b3 is hard to stop. 39.gxf5 39.h4!? is an interesting attempt to create counterplay but 39...h5! keeps Black’s pawn chain intact, and after 40.gxf5 gxf5 the play develops along virtually identical lines to the game continuation. 39...gxf5 40.Kg2? On the last move before the time control, White makes an aimless king move. Although her position was extremely difficult, White could have put up a lot of resistance by trying to organize counterplay at all costs. This could have been achieved in a most surprising way with: 40.Ba3! White brings the bishop back to c1, which might seem terribly passive but actually has a vital purpose of overprotecting the e3-pawn to try to force f2-f3 through. With the bishop pair and some pawns exchanging, it may just barely be enough to hang on. For instance: 40...a6 41.Bc1 b5 Overprotecting f5 with 41...Kg6 does not help because 42.f3! can be played anyway, and after 42...exf3 43.e4 White should not lose.
244
42.axb5 axb5 43.f3! White could also play 43.Bd2 followed by f2-f3 so that ...Nb4 is not available for Black, but I find the direct option more appealing. Black is not quite fast enough to advance the b-pawn while holding her center together. 43...Nb4 44.Bb1 Bd5 This is the computer’s best try, but White can still resist with:
45.Bd2 Nc6 46.fxe4 fxe4 47.Kg2 The weakness of the e4-pawn and the more open nature of the position promise White decent saving chances.
245
40...a6 White has no way to get her king into the game or create any other counterplay. Black finished the game in fine style. 41.Bf4 A sad move, but an understandable one. White wants to play f2-f3 without losing the e3-pawn, but this involves a fatal weakening of the pawn structure. 41...Nxf4†! 42.exf4 Kg6 White has nothing to say about the king coming to d5.
246
43.d5 Bxd5 44.Kf1 Bc4† 45.Ke1 Kh5 46.Kd2 Kh4 47.Kc3 Be6 48.Kd4 Kxh3 49.Bd1 Kg2 50.Ke3 b5 51.axb5 axb5 52.f3 exf3 53.Bxf3† Kg3 0–1 Both sides knew which exchanges to make, but eventually White blinked first. The trade of queens was not in her favor, as can be highlighted by the third guideline. As usual, the chapter will conclude with some puzzles. Happy solving!
247
Exercises
Evgeny Tomashevsky – Peter Svidler Moscow 2009
Black’s pieces look passive and the pawn structure looks unfavorable. How should he proceed? Show/Hide Solution > 34...f5! Black should not fear a protected passed pawn arriving on e5, as the uneven assortment of minor pieces ensures he will have a very firm blockade. In addition, the sad knight on h7 will find an ideal home on e6. The computer claims that 34...Be6 is roughly as good a move as the text. This is ludicrous. After 35.f5! Black has forever lost his ability to play ...f5, and will always have to worry about an e4-e5 thrust blasting his kingside apart. Following 35...Bb3 36.h4! the knight on h7 is dominated, and Black has a difficult position. Once I added those moves and allowed the machine to think, it soon changed its mind. Svidler’s play was much stronger. 35.e5?! 248
In view of the strategic disaster White soon faced, I think he should have accepted the pawn sac with 35.exf5, when play continues: 35...Qd5 36.Rxe7 Rxe7 37.Bb1
37...b5! Black has good compensation, with ...Nf6-e4/g4 on the way. The position is balanced, and both sides have their chances. 35...Nf8! Simple and strong. Although every other Black piece controls the e6-square, the knight is the one that should occupy it. 36.Qb2 Bd5 37.Bf1 Ne6 38.Bd2 We have arrived at the fourth puzzle.
Mikhail Kobalia – Alexander Areshchenko Isle of Man 2006
249
Black faces some long-term strategic danger. How should he react? Show/Hide Solution > The passed pawn on d5 looks secure, but the defenses can be broken down. Areshchenko handled the next phase of the game most admirably, presumably helped by accurate calculation. 20...f5! 21.Ng3 exf4! 22.Bxf4 Nxe4! 23.Nxe4 fxe4 24.Bxe4 Step one is complete: the formerly protected passed d-pawn has been ‘downgraded’ to a mere passed pawn. The next step is to remove the defending pieces as well.
24...Bf5! 250
Well spotted. Black abandons the b5-pawn but justifies his play with concrete tactics. 25.Bxf5 Qxf5 26.Kg1? A bad move, but White’s position was very difficult. 26.Rxb5?? loses to 26...g5 of course. According to the machine, the only way for White to continue fighting was 26.h4!, trying to hold back the ...g5 advance at all costs. I would take Black but the game goes on. Black now has a nice tactical shot at his disposal.
26...b4! A fine breakthrough. The pawn can be captured in two different ways, both of which lead to misery for White. 27.Rxb4 If 27.cxb4 c3 28.Qc1 Qxd5 Black’s c-pawn should easily decide the game. 27...g5! The bishop on f4 is lost.
251
28.Rxc4 Be5! Areshchenko has to be commended for going for the maximum over and over again. Black should be winning if he takes the bishop right away, but White will at least keep his kingside structure intact. 28...gxf4 29.Rcxf4 Qe5 30.c4 It will not be easy for Black to reel in the full point, though it should definitely be doable. 29.g3 gxf4 30.gxf4 With White’s structure in shambles, Black’s extra piece was way too strong.
30...Kh8 31.Kh1 Rad8 32.Re1 Bf6 33.Rd1 Rg8 34.Qd3 Qg4 35.Qf1 Rde8 36.d6 Re2 37.h3 Qg3 0–1 252
Alexander Moiseenko – Baadur Jobava Gothenburg 2005
Black continued 12...Ne4, changing the pawn structure. Was this a good idea? Show/Hide Solution > 12...Ne4! Yes, the decision is a good one! This is Black’s one and only chance to change the pawn structure in his favor. Black is probably okay after a simple move like 12...Re8, but White is certainly doing fine too. It is worth noting that, following 13.0-0 Ne4, White is no longer compelled to take the knight:
253
14.Bh4! Black will not get the pawn structure he desires. The key point is that 14...Qxc3 15.Nxe4 Qxc2 16.Bxc2 dxe4 17.Rfb1² would give White a great deal of activity for the sacrificed pawn. 13.Nxe4 A sad necessity. Unlike the note above, 13.Bh4? Qxc3 leaves White unable to take on e4 because he has not castled, so he is simply a pawn down. 13...dxe4 14.Bh4 14.Qxe4? is ill-advised due to 14...g6 when White cannot prevent both ...Qxg5 and ...Qxc3†. When examining this pawn structure, we see that the imbalanced piece assortment is heavily in Black’s favor. The bishop on h4 is unrestricted but aimless, and the b1-bishop doesn’t have much of a future. By contrast, Black will pillage the light squares, starting with the thematic knight maneuver to d5. 14...Nb6 15.0-0 Re8 16.Bg3 Nd5 17.Rc1 Qa3 18.Qd2 Bf5 White’s next move feels like desperation, but what else is there to do? If he sits and does nothing, Black can strengthen his position in a number of ways, including ...b5, ...a5 and ...b4, or even a rook maneuver to b6 and b2. 19.f3 f6 20.Bf2 b5 21.fxe4 Bxe4 22.Bxe4 Rxe4 23.Rab1 a6 Black has an absolute dream position to play against a protected passed pawn, mainly due to his knight being so much better than White’s bishop. He continued to build his position patiently and winning took a while, but the result was never in doubt.
254
24.Qb2 Qxb2 25.Rxb2 Nb6 26.Kf1 Kf7 27.Ke2 Ke6 28.Kf3 Kd5 29.g4 Rae8 30.Ra1 Kc6 White was so desperate to change the course of the game that he pitched a lot of material instead of waiting to die slowly. He did change the course of the game, but not the evaluation or result. 31.a4 Nxa4 32.Rxa4 bxa4 33.Rb4 a5 34.Rxc4† Kb5 35.Rc5† Kb6 36.Rc4 R4e6 37.Rxa4 Kb5 38.Ra3 Ra6 39.d5 a4 40.e4 Kc4 41.Bg3 Kd3 42.d6 Rd8 43.g5 Kc2 44.c4 Kb2 45.Re3 a3 46.gxf6 gxf6 47.e5 a2 48.exf6 Rdxd6 49.Be5† Kc2 50.Re2† Kb3 51.Rb2† Kxc4 52.Rxa2 Rd3† 53.Ke4 Rxa2 54.f7 Rf2 0–1
Evgeny Tomashevsky – Peter Svidler Moscow 2009
255
The protected passed pawn on e5 is very annoying. What can Black do about it? Show/Hide Solution Black has played well up to this point, giving White the protected passer and then blockading it with the knight. The next step is to carry out a pawn break to erode the e5-pawn’s support. 38...g5! 39.fxg5 This is far from ideal but it is hard to suggest another move, considering that White faces the prospect of ...gxf4 followed by devastation along the g-file. I would probably have tried 39.Bg2 in order to trade off the mighty d5-bishop at all costs, but White’s position still looks horrendous after 39...Bxg2 40.Kxg2 Rd8!. Black dominates the only open file and has the superior minor piece, which should add up to a decisive advantage. 39...hxg5 40.Re2 f4! 41.Rf2 Qh5 42.Be2 Qh7 43.Bf3 Bxf3 44.Rxf3 Qe4
256
Just a few moves after Black carried out the ...g5 break, the e5-pawn is clearly falling – that is, if Black even wants to take it. In the game he decided he had more important priorities. 45.Qb3 Rd7 46.Bb4 Rd5 47.Re1 Qf5 48.Bc3 The computer finds many forced wins here, but I take no issue with Svidler’s simple approach.
48...Nxc5 48...g4 49.Rff1 Ng5 is a direct approach, when White will be checkmated in short order. 49.Qa2 Trading queens with 49.Qb1 stops the mate threats, but leads to a routinely lost ending after 257
49...Qxb1 50.Rxb1 fxg3 51.hxg3 b5. 49...Ne6 50.gxf4 gxf4 51.Kh1 Kf7 52.Qb2 Re7 53.Qg2 Red7 54.Rg1 Ke7 55.Bb4† c5 56.Be1 Black could have taken the pawn at any moment, and Svidler finally decides the time is right.
56...Rxe5 57.Qg8 Qe4 0–1
258
Part II Passed Pawns in the Endgame
We have already seen in Chapter 1 that connected passed pawns can be a potent short- or long-term asset. This remains just as true in the endgame as it does in the middlegame, but there are some notable differences in how the positions should be approached when fewer pieces are on the board. The most obvious one is that the reduced material tends to imply less counterplay for the opposing side, and connected passers can often cruise straight through with little to no resistance. The first guideline of the book, found on page 19, reads: A passed pawn in the middlegame often poses no threat of becoming a queen, but connected passers can sometimes run straight down the board. It is often worth investing material to gain connected passed pawns, or to advance existing connected passers towards promotion. This guideline remains just as valid in the endgame, and is the only guideline in the book that I have not modified in any way when the number of pieces have been reduced. Let’s look at a case where an elite player correctly gave some material to send his pawns through.
Hikaru Nakamura – Boris Gelfand London 2012 1.e4 c5 2.Nf3 Nc6 3.d4 cxd4 4.Nxd4 Nf6 5.Nc3 e5 6.Ndb5 d6 7.Nd5 Nxd5 8.exd5 Nb8 9.a4 Be7 10.Be2 0-0 11.0-0 Nd7 12.Kh1 f5 13.f4 a6 14.Na3 exf4 15.Bxf4 Ne5 16.Qd2 Bd7 17.Qb4 Rb8 18.c4 a5 19.Qb3 Ng6 20.Be3 b6 21.Nb5 Bxb5 22.axb5 Bg5 23.Bg1 Ne5 24.Qa3 Bd2 25.Rad1 Bb4 259
26.Qh3 Qg5 27.Be3 Qf6 28.Bd4 Bc5 29.Bc3 Qg5 30.Bxe5 dxe5 31.g4 fxg4 32.Qxg4 Qxg4 33.Bxg4 Bd6 34.Be6† Kh8 35.Kg2 g6 36.b3 Kg7 37.h3 e4 38.Bg4 h5 39.Be2 Rf6 40.Rde1
Black has played a fine game up to this point and has good prospects in the ending. White’s 4–2 queenside/central pawn majority is largely ineffective due to the blockade on the dark squares, and one should note that the protected passed pawn does not promise much, since Black has managed to keep an uneven minor piece assortment – a little throwback to Chapters 5 and 6. But how will Black progress further? White is fighting for control of the only open file, and Black is unlikely to win if all the rooks are exchanged. In addition, the e4-pawn might look nice, but it clearly will not promote anytime soon. Gelfand found the best way to continue. 40...Rf5! Black intends to bring his other rook to f8 to fight for the open file, and he is ready to take back with the pawn if White ever exchanges on f5. White is in a tough spot: he will have to either surrender the only open file while leaving all four rooks on the board, which hardly feels like a recipe for success, or allow Black to obtain connected passed pawns. Note that Black’s last move involves a pawn sacrifice, as h5 will hang if White exchanges the rooks. But Gelfand does not care at all, and instead prioritizes getting connected passed pawns. 41.Bd1 Rbf8 42.Rxf5 I am sure Hikaru was loath to take on f5, but he did not have much of a choice. In fact, he was nearly in zugzwang! The attempt to put pressure to the e4-pawn would not work either: 42.Bc2 Rg5†! 43.Kh1
260
43...Rf3! Far from the only winning move, but an attractive one nonetheless. 44.Rxf3 exf3 Black threatens ...Rg3, taking everything, and if 45.Rg1 f2 46.Rf1 Bc5 White can resign. 42...gxf5 43.Bxh5 Black has achieved his goal of acquiring connected passers. It cost him a pawn to get them, but this is of no consequence. All that remains is to send them through.
43...Kf6 44.Rh1 Kg5 Gelfand’s move is surely good enough to win and there is no reason to criticize it. Still, I would have preferred 44...Ke5 to support the pawns more directly, after which 45.Rg1 f4 wins comfortably.
261
45.Bd1 Kh4 46.Rf1 Rg8† 47.Kh1 Rg5 48.Bc2
48...Kxh3 White has no counterplay whatsoever, so Black is in no hurry. I doubt that Gelfand would have bothered to take on h3 if there was any race to be had or if White had anything proactive to do. 49.Rf2 Kg3 50.Rh2 Rg4 51.Rg2† Kf4 52.Rf2† Kg5 53.Rd2 Rg3 54.Re2 Rh3† 55.Kg1 Kf4 56.Kg2 Gelfand finds a nice simplifying tactic to bring the game to its conclusion.
56...Rh2†! 57.Kf1 57.Kxh2 Kf3† regains the rook with an easy win.
262
57...Rxe2 58.Kxe2 Ke5 With ...f4-f3 followed by ...e3-e2 on the way, Nakamura had seen enough. 0–1 Gelfand’s play was not difficult once he found 40...Rf5!, and one does not need to be a former World Championship challenger to close out such an game. He should, however, be praised for his excellent play leading up to that point. Giving up an insignificant pawn on h5 to obtain the connected passers was an easy decision. But often, it takes more material than that to get them. Teenagers are always looking to show off, and Magnus did just that in the following example.
Magnus Carlsen – Alexander Grischuk Linares 2009 1.e4 c5 2.Nf3 d6 3.d4 cxd4 4.Nxd4 Nf6 5.Nc3 a6 6.Be2 e6 7.0-0 Be7 8.a4 Nc6 9.Be3 0-0 10.f4 Qc7 11.Kh1 Re8 12.Bf3 Bf8 13.Qd2 Rb8 14.Qf2 e5 15.fxe5 dxe5 16.Nb3 Nb4 17.Ba7 Ra8 18.Bb6 Qe7 19.Rad1 Be6 20.Nd5 Bxd5 21.exd5 e4 22.d6 Qe6 23.Nc5 Qf5 24.Be2 Qxf2 25.Rxf2 Nbd5 26.a5 Nxb6 27.axb6 Rab8 28.Rxf6 gxf6 29.Nd7 f5 30.c4 a5 31.c5 Bg7 32.Nxb8 Rxb8 White does not need to do anything special to win the game. The simple 33.b3 followed by Rd5 or Rf1, taking all the pawns, would be quite enough. But I like Magnus’s choice for the way it illustrates our theme.
33.Ba6! Once the b7-pawn is removed, White will no longer have a strong and dangerous passed pawn, but instead have three connected passers that will immediately decide the game.
263
33...Bf6 33...bxa6 would let the pawns go through even faster: 34.c6 Rxb6 35.c7 and queens are on the way. Black does not want to let the b-pawn leave its post, but Magnus insists. 34.Bxb7! Rxb7 35.c6 Rxb6 White needs just one more important move to close out the game.
36.Rc1! Black is not allowed to take the c-file, and he cannot stop the pawns. Switching the move order with 35.Rc1 followed by 36.c6 would have been just as good. One should never be too hasty though, as 36.c7?? Rc6! stops the pawns in their tracks. Black will follow up with ...Be5, trading his bishop for the pawns and remaining two pawns up. 36...Bxb2 37.d7 1–0 Carlsen’s 33.Ba6! finesse was not strictly necessary, but it was the most direct way to bring the game to its conclusion. One of the reasons it worked so well is that there is much less scope for counterplay in the endgame. White’s king did not have so many defenders, but the reduced material made this irrelevant. If there was more material on the board, giving up a bishop which might have been used to defend White’s king could have been asking for trouble, especially with the black bishop ready to go to e5 to threaten the kingside. Let’s alter the position slightly. 264
The pawn structure has remained virtually unchanged, the one exception being the h2-pawn sliding up to h3, which would have been inconsequential in the endgame which occurred in Carlsen – Grischuk. The main difference, however, is that queens have been added in my composition, and the black king has been nudged to h8. As a result, White must play in an entirely different manner to bring in the full point, because more material on the board means more potential for counterplay. Without queens, the safety of White’s king was of no concern, but here it should be White’s top priority. 1.Qb3! White is best advised to bring his queen to e3, which will make it hard for Black to get his queen to h2 supported by the bishop on e5. By contrast, if White had ignored the kingside and aimed to promote the queenside pawns as Carlsen did, the evaluation would quickly change. 1.Ba6? Be5! 2.Bxb7 Qg3! 3.Kg1 Rxb7 The situation on the queenside has played out in a similar manner to Carlsen – Grischuk, but the presence of queens changes the position enormously. White’s king is in serious danger, and although his pawn mass cannot be held back, neither can Black’s attack. Instead of cruising to victory with no counterplay, White has an all-out race on his hands, and he is not poised to win it.
265
4.c6 Black has more than one decent move but my favorite idea is to include the rook in the attack. 4...Rb8! 5.c7 Rg8
Now ...Qh2† is a grave threat, so White does not have time to start making new queens. 6.Kf1! The only move. After 6.c8=Q? White succumbs to a mating attack with two queens on the board, which would be especially painful: 6...Qh2† 7.Kf1 Qh1† 8.Kf2 Qxg2† 9.Ke1 (or 9.Ke3 f4#) 9...Bg3† and mate. 6.Qf2? Qh2† 7.Kf1 also comes unstuck after:
266
7...e3! Black crashes through. 6...Qh2 White’s only saving move is an absolute miracle from outer space that no human would ever find.
7.Re1!! White clears a path for his king to run to d1. 7...Bg3 8.Qc3†! Be5 9.Qc2! Black has nothing more than a draw.
267
1...Be5 2.Qe3! Black’s attack is stopped dead in its tracks. My computer offers a funny line: 2...Rg8 Threatening ...Rg3.
3.d7! With the threat of a new queen hanging over Black’s head, he has no choice but to accept passivity. 3...Rd8 4.Ba6! Now and only now. The winning mechanism is the same, but White had to pay much more attention 268
to containing potential counterplay before bringing the game to its conclusion. Compositions can help drive a point home, but often a real game is needed to see the principle fully in action. To make a brief comparison to the kind of middlegames we previously saw, let’s revisit a position from the puzzles section of Chapter 1.
Vladimir Kramnik – Erwin L’Ami Isle of Man 2018
Hopefully you have already tried your hand at solving this position – but if not, I refer you to page 33 for your chance to do so. White’s connected passed pawns will surely promise him victory in a future endgame, but there are some serious threats to his king that he must deal with first. Kramnik continued admirably. 25.Qb3! The hasty 25.d5?? would be a disaster: 25...Rc1†! One of several winning moves. 26.Rxc1 bxc1=Q† 27.Kxc1 Qxa2 White will be mated in short order. 25...Rc7 25...Bc3 defends the b2-pawn but blocks Black’s activity along the c-file, so 26.e6 followed by d4-d5 wins easily for White. 26.Qxb2! Safety first. White prevents any mating threats before advancing his pawns.
269
26...Bc3 27.Qb3 Rhc8 28.Rhd1 Having brought the last piece into play and with everything under control, White is ready to advance his pawns.
28...b4 29.e6 Rb7 30.d5 Bf6 31.Nxg4 Bg7 32.d6 Rc3 33.d7 Rxb3† 34.Rxb3 Qd8 35.e7 1–0 We have seen this example already, but the point I want to drive home is that White had to be patient about pushing his connected passed pawns because Black was threatening the only thing more important than making a bunch of new queens: the white king. When the queens and/or several other pieces are off the board, counterplay is much harder to come by, and can often be ignored completely. As such, the first new guideline is rather straightforward. If you have connected passed pawns in the endgame, it is often in your best interest to push them through at all costs and forget anything else exists. Let’s take a look at a somewhat silly example to see what I mean.
Example 1
270
The position is symmetrical when rotated by 180 degrees. Each side has a pair of connected passed pawns which cannot be stopped. Both sides also have hanging central pawns. Let’s see what happens in two scenarios: in the first White goes pawn-gobbling, and in the second he pushes his passers. 1.Rxe7? White should not be wasting his time like this. 1...b5 2.Rxd7? Continuing along the wrong path. 2.Re5 is a better try although White is still in trouble. 2...b4 Black is completely winning. The number of pawns is not relevant in the slightest: all that matters is who will queen first. By concerning himself with unimportant pawns, White lost two vital tempos and will now lose the game. Of course, the passed pawns must be pushed immediately as the central pawns are of no significance. 1.g4! White gets to move first, making him favorite to win the race. Black needs some amazing resources just to stay in the game at all. 1...b5 2.g5 b4 3.g6 Black cannot keep playing copycat, since ...b4-b3 would be met by g6-g7 and White will queen first, and with check. The computer finds a way for Black to continue the game, but it feels desperate. 271
3...Rc1†!! Forcing the king to the g-file is the only way for Black to resist. The immediate 3...Rc6 fails to 4.g7 Rg6 5.Rf8† and White wins. 4.Kg2 Rc6! 5.g7 Rg6† By pushing White’s king to g2, Black gained the time he needed to bring his rook to g6 without allowing Rf8† to queen the pawn in response. 6.Kf3 Kb7
272
7.Rxe7! Now and only now. This move is not about grabbing a pawn but rather about bringing the rook to the third rank to stop Black’s passers. 7.h4 b3 8.h5 Rg1 offers Black an easier route to a draw. 7...Kc6! The only way to survive. 7...b3? 8.Rxd7† Kb6 9.Rd3+– is essentially the same thing but with a second extra pawn for White. 8.h4 b3 9.Re3 a5 10.Rxb3 Rxg7
Black should be able to hold from here. It is not so surprising that White was unable to force victory from a symmetrical position with just a single extra tempo, although Black had to play extremely accurately to save the position by the skin of his teeth, and a single mistake along the way would have cost him the game. Of course the starting position of this example was unrealistic, but the principle remains on full display. Often some exaggeration is needed to make the point completely clear. Had there been a bunch more pieces on the board, it would have make a lot more sense for White to start snacking on central pawns. He soon had the black king cut off along the last rank, which would have given him a lot of mating threats if he had more firepower to work with, not to mention Black voluntarily exposing his own king by advancing his queenside pawns. But this was not a middlegame – it was an endgame! In the 1.Rxe7? line Black’s king was never in any danger, and the loss of the central pawns did not cede control of any key squares that his opponent’s pieces could use. All that mattered was sending the connected passed pawns through, and in the pawn-grabbing line White was quickly punished for failing to adhere to this 273
thought process. By contrast, in the 1.g4! line White took the lead in the race and forced Black to find a near-miraculous defense in order to save the game. Let’s examine a real game where White mishandled his connected passed pawns.
David Pruess – Evgenij Miroshnichenko Cappelle-la-Grande 2007 1.e4 c5 2.Nf3 d6 3.d4 cxd4 4.Nxd4 Nf6 5.Nc3 Nc6 6.Bg5 e6 7.Qd2 Be7 8.0-0-0 Nxd4 9.Qxd4 0-0 10.f4 Qa5 11.h4 Rd8 12.Bc4 Bd7 13.e5 dxe5 14.fxe5 Bc6 15.Qf4 Rxd1† 16.Rxd1 Nh5 17.Qg4 Bxg5† 18.Qxg5 g6 19.Be2 h6 20.Qe3 Ng7 21.g4 Ne8 22.Bf3 Bxf3 23.Qxf3 Qxe5 24.Qxb7 Qf4† 25.Kb1 Rb8 26.Qxa7 Qb4 27.b3 Rc8 28.Na4 Qxg4 29.Qd7 Qe2 30.Rd2 Qf1† 31.Kb2 Rb8 32.Qa7 Qf4 33.Rd7 Qf6† 34.c3 Rd8 35.b4 Nd6 36.Qd4 e5 37.Rxd8† Qxd8 38.Qd5 e4 39.c4 e3 40.Nc3 Qe7 41.c5 Nb5 42.Ne2 Qxh4 43.Kb3 Qe1 44.Qd3 Qxe2 45.Qxe2 Nd4† 46.Kc4 Nxe2 47.c6 Nf4 48.c7 e2 49.c8=Q† Kg7 50.Qc7 e1=Q 51.Qxf4 Qe6† 52.Kc5 Qe7† 53.Kc6 Qe8† 54.Kc5 Qc8† 55.Kb6 Qd8† 56.Kc5 g5
Both sides must be prepared for an all-out race. White mishandled the position by worrying about his opponent’s pawns rather than doing everything he could to send his own pawns through. Both sides are destined to queen pawns and they cannot be stopped; all that can be done is to get there first. It is important to note that connected passed pawns in a queen endgame are nearly always impossible to stop, and no attempt should be made to stop them. Rather, aim to accomplish your own goals first. 57.Qe4? White could have secured a draw by forcing a queen exchange, as his more active king will compensate for Black’s extra pawn. 274
57.Qd4†! Qxd4† 58.Kxd4 Black now loses the race if he starts pushing.
58...Kf6! After 58...g4? 59.b5 g3 60.Ke3 White wins. 59.b5 59.a4 Ke7 60.a5 Kd7 61.b5 Kc7 62.Kc5 g4 63.a6 g3 64.b6† Kd7 transposes to the main line of this note. 59...Ke7 60.a4 Kd6
David told me he reached this far in his calculations and thought White would lose. Indeed, if he were to retreat his king, he would – but he can send his own pawns through. 61.a5 Kc7 275
62.Kc5! The only move to draw. Trying to stop Black’s pawns would not have worked. In general, a lone king can hold two connected passers at bay, but not three. After 62.Ke4 h5 63.Kf3 f5 64.Kg3 h4† 65.Kh3 f4 66.Kg4 we reach the following position:
If either the h4- or f4-pawn was removed from the board, we would have a draw, as White could shuffle his king back and forth without allowing the pawns any further. As things stand, Black has that luxury but White will succumb to zugzwang. 66...Kb7 67.b6 Ka6 Black is free to shuffle his king between b7 and a6 whenever he needs to pass. 68.Kf3 h3 69.Ke2 Now 69...h2 promotes on the spot, but if Black is feeling particularly sadistic he can repeat the process: 69...g4!? 70.Kf2 f3 276
71.Kg3 Kb7! Zugzwang again – Black wins. 62...g4 63.b6† Kd7 64.a6 g3 65.a7 g2
66.a8=Q g1=Q† 67.Kb5 Despite being a pawn down, White’s b-pawn is far too dangerous and Black needs to take a perpetual check right now: 67...Qb1†= Before moving on to the game continuation, it is worth pointing out a secondary improvement over the game. Exchanging queens was the clearest way to draw, as demonstrated above. However, if White erred in his calculations of the above line and decided it was necessary to keep the queens on, the best way of doing so would have been: 57.Qe5†!? f6
277
58.Qe6! This way, White not only keeps his queen centralized but also keeps both of his pawns protected. After analyzing this for a while I believe Black is winning with best play, but the finer details are not so relevant for our theme. The main point is that using the queen to guard the hanging a-pawn helps White a lot, whereas in the game he is hampered by the looseness of that pawn. 57...Qc7†!
58.Kd4? Losing one of the pawns. White needed to keep both of his pawns alive at all costs. 58.Kb5! was correct, when Black cannot win the a2-pawn. Black is still winning, in part because White’s king is awkwardly placed in front of the bpawn. Still, after something like 58...h5 59.a4 h4 60.a5 h3 61.a6 Black still has work to do. 58...Qa7† 59.Kd3 Qa3† In a losing position, White chooses the path of less resistance.
278
60.Ke2?! I’ll take this chance to point out that you should pretty much never try to stop connected passers with your king when there are queens on the board. The king will be subjected to mating threats as the pawns advance, making them even faster in their quest to end the game. White is still losing after 60.Kc4 Qxa2† 61.Kc5, but he can still dream that his b-pawn might cause Black some trouble. Note that in the game he got his pawn to b7 before any black pawn could reach even the third rank, and it didn’t matter at all. 60...Qxa2† 61.Kf3 Qb3† 62.Kg2 Qb2† 63.Kg1 h5 64.Qd5 Qc1† 65.Kg2 Qf4 66.b5 h4 67.b6 g4 68.b7 h3† 69.Kh1 g3
279
The point is clear: Black didn’t need to promote his pawns at all. Two ranks away was quite enough, as White’s king was caught in a mating net. 0–1 Miroshnichenko showed fine technique, but he did not face the most resistance. If White had tried to keep both connected passers alive, Black would have had to give some clever checks to force the white king in front of the b-pawn in order to pull in the full point. This brings us to the next guideline. Lone passed pawns generally need a lot of help from pieces to get down the board, and in many endgames it is important to keep your king in front of your pawn. But protected passers face much less resistance, and you really do not want to have your own pieces blocking them. Let’s see an example of this principle in action.
Mohamed-Mehdi Aithmidou – Li Chao Batumi (ol) 2018 1.e4 c5 2.d3 e6 3.f4 d5 4.Be2 dxe4 5.dxe4 Qxd1† 6.Bxd1 Bd7 7.Be3 Bc6 8.Nd2 Nd7 9.Bf3 0-0-0 10.0-0-0 h5 11.e5 Ne7 12.Bxc6 Nxc6 13.Ne4 f6 14.exf6 Nxf6 15.Rxd8† Nxd8 16.Nxf6 gxf6 17.Nf3 h4 18.Kd1 Bd6 19.Nd2 b6 20.Ne4 Be7 21.Ke2 Nf7 22.a4 Rg8 23.Kf2 f5 24.Nd2 Nd6 25.a5 Bf6 26.axb6 axb6 27.c3 e5 28.fxe5 Bxe5 29.Kf3 Nf7 30.Ra1 Bb8 31.Bg1 Ne5† 32.Kf2 Nd3† 33.Kf3 Ne5† 34.Kf2 Kb7 35.Kf1 h3 36.gxh3 Nd3 37.Nf3 Bf4 38.b3 Nc1 39.b4 c4 40.b5 Nd3 41.Ra6 Bc7 42.Ra4 Nf4 43.h4 Rd8 44.Bd4 Nh5 45.Rxc4 Ra8 46.Rc6 Ra1† 47.Kf2 Ra2† 48.Ke3 Ra5 49.c4 Ra3† 50.Kf2 Ra2† 51.Kf1 Ra3 52.Ng5 Ra2 53.Ne6 Bxh2 54.Rxb6† Kc8 55.Rc6† Kd7 56.Bf2 f4 57.Kg2 Bg3 58.Nc5† Ke7 59.Ne4 Bxh4 60.Kf3 Bxf2 61.Nxf2 Ng7 62.Rc7† Kf6 63.Ne4† Ke5 64.Re7† Kf5 65.Nd6† Kf6 66.Rf7† Ke5 67.Rxg7 Ra3† 68.Kf2 Kxd6 69.Rg6† Kc5 70.Rc6† Kd4 71.b6 Ke4 72.c5 Ra2† 73.Kg1 Rb2
280
White has connected passed pawns but his rook is clumsily placed, and his king is obviously not offering any help. Clearly his pawns cannot be stopped, but it will take them several tempos to reach the 8th rank and Black’s counterplay is coming fast. White’s only route to victory involved getting his rook as far out of the way as possible. 74.Rc7? This is too slow. It should be noted that the triangular formation White has set up – involving one passed pawn protecting the other passed pawn, which protects the rook which protects the first passed pawn – is guaranteed to eventually queen the pawns in a pure rook endgame, but it is painfully slow. If Black had no counterplay then the slowness would not matter – but as things stand, Black’s f-pawn should save the day. Best was: 74.Rc8! White remains flexible about which pawn to push. The plan of Rc7, b6-b7, c5-c6 and Rc7-c8 takes five moves to promote the first pawn while keeping the second pawn alive. But keeping the second pawn alive is hardly relevant when you already have an extra rook (assuming Black trades his rook for the newly promoted queen)! The upshot is that White can save a critical tempo. Let’s suppose Black continues in the same manner that he did in the game. 74...Rb1† 75.Kh2 f3 76.Kg3
281
76...Rg1† It should be noted that in the analogous position in the game, Black played the weaker 76...Ke3, but in both cases the rook check offers more resistance. 77.Kf2 Rg2† 78.Kf1 Rb2 Black could have reached this position in the game, but with the white rook on c7 instead of c8. That would have been a draw, but here the pawns come through faster.
79.c6! Rxb6 Without the rook blocking the passer, White wins with: 80.c7! Followed by a rook check and pawn promotion.
282
74...Rb1† 75.Kf2 Rb2† 76.Kg1 Rb1† 77.Kh2 f3 78.Kg3
78...Ke3? Although this is not technically a losing move, it is a serious mistake. Black should not let the white king sit on g3 unmolested, nor should he give White time to bring his rook to the side, where it not only keeps an eye on the f-pawn but also gets out of the way of his own passers. 78...Rg1†! Black should have harassed the king without delay. 79.Kf2 Rg2† 80.Kf1 Rb2 We saw an almost identical position just a moment ago, but with White’s rook on c8 instead of c7. Due to its clumsy placement, White is now one tempo too slow to send his pawns through. For instance: 81.b7 81.c6 Rxb6! is an easy draw, unlike the position with the rook on c8, where White would have been winning. 81...Rb1†! 82.Kf2 Rb2† 83.Kg3 Rg2† 84.Kh3
283
84...Rg8! We see that failing to control the queening rank comes back to bite the first player. Now White has to make a draw and not get too ambitious. 85.Rf7 85.Re7† Kd5 is also a simple draw; but 85.Rc8?? f2! wins for Black! 85...Kd5! With a draw.
79.Rf7! Kd4 80.Rf5! Ke4? Technically this is the move that loses the game, but Black was facing a nearly impossible task anyway.
284
Armed with my silicon friend and a tablebase to boot, I will note the position is drawn after 80...f2! 81.Kxf2 Rb3! when White’s king is cut off along the third rank. But even here, Black would have to defend perfectly for another fifty moves, which I think is probably outside of human capability with the clock ticking down.
81.Rf8! White did not need to be asked twice about jumping onto the back rank. 81...Kd5 82.Rc8 Rb3 83.Rc7 Ke4 84.b7 Rb2 85.c6 Rg2† 86.Kh3 Rg8 87.Rf7 1–0 It is important to note that having one or more of your pieces in front of your connected passers usually does not mean they will not promote – rather, it means the process of advancing the passers is liable to be clumsy and slow, which gives your opponent one or more extra tempos to press their counterplay. But if there is no counterplay to be had, having pieces in front of the connected passers can even be a good thing, because everything is protected and the pawns will advance slowly but surely. By pure coincidence, I found myself in this exact situation in the USA – Azerbaijan match at the same Olympiad.
Rauf Mamedov – Sam Shankland Batumi (ol) 2018 1.e4 e5 2.Nf3 Nc6 3.Bc4 Bc5 4.c3 Nf6 5.d3 d6 6.Bb3 a5 7.Nbd2 0-0 8.Nf1 Be6 9.Ng3 h6 10.0-0
285
Although it is not relevant to our endgame topic, it is worth mentioning that this position is nearly identical to the Abrahamyan – Erenburg game which I wrote about in Small Steps to Giant Improvement, beginning on page 232. As such, I was familiar with the ideas and knew how Black should play. 10...Bxb3 11.axb3? 11.Qxb3 would have maintained approximate equality. Much like Abrahamyan, Mamedov made the wrong choice. The pawn on b3 is a long-term weakness since White now has a set of doubled pawns where the forward doubled pawn cannot be defended by another pawn, in violation of a guideline I had proposed. Indeed, Mamedov’s queenside subsequently became vulnerable and eventually fell. I made a cheeky post on Twitter about how Rauf should have bought the book. The story was simply too good not to share, but it was hard to do so in a way that wouldn’t seem insensitive to my opponent, who lost a tough game. So, I made sure to send him a copy of the book for free. But I digress, and we must fast-forward to the phase of the game relevant to our topic, which only occurred much later. 11...d5 12.Qe2 Re8 13.Bd2 Bf8 14.Rfd1 Qd7 15.exd5 Qxd5 16.c4 Qe6 17.Bc3 Nd7 18.Qc2 Nc5 19.Ne4 Na6 20.Re1 Rad8 21.Rad1 Nab4 22.Qb1 Qg6 23.Nh4 Qh5 24.Nf3 Qg6 25.h3 b6 26.Nh4 Qh5 27.Nf3 Bc5 28.Kh2 Nd4 29.Bxd4 Bxd4 30.g4 Qg6 31.Nh4 Qc6 32.Nf5 Bc5 33.Nxc5 Qxc5 34.Re3 Nc6 35.Rde1 Nd4 36.Nxd4 Rxd4 37.Qc2 Qd6 38.Kg2 f6 39.Rf3 Rd8 40.Ree3 Kf7 41.Kf1 Ke7 42.Ke2 Qc6 43.Qc3 Kd7 44.Qc2 Kc8 45.Kf1 Kb7 46.Rg3 Rf4 47.Kg1 g5 48.Re1 Qe8 49.Kg2 h5 50.Re4 Qc6 51.Rf3 Qd7 52.Rg3 Qh7 53.gxh5 Qxh5 54.c5 Rd4 55.b4 Rxb4 56.Rxb4 Rxb4 57.Rf3 Qf7 58.Kg1 Qe6 59.cxb6 Qxb6 60.b3 Ka7 61.Qa2 Kb7 62.Qc2 Kc8 63.Qa2 g4 64.hxg4 Rxg4† 65.Kf1 Qc6 66.Ke2 Qb6 67.Kf1 Rb4 68.Qc2 Kb7 69.Kg1 Qd6 70.Qc3 Qd4 71.Qc2 Rb6 72.Rg3 Qd5 73.Qc4 Qxc4 74.dxc4 Kc6 75.Kf1 Kc5 76.Ke2 Kb4 77.Kd2 Rd6† 78.Kc2 Rd4 79.Rg7 a4 286
80.bxa4 Rxc4† 81.Kd3 e4† 82.Ke3 f5 83.Rf7 Rc3† 84.Kd4 c5† 85.Kd5 Rf3 86.a5
This game took place just eight days after Li Chao’s hiccup. Of course I had noticed the game – when a 2244-rated player prevails over a 2708, it tends to make headlines! – and by random chance, I had the opportunity to think about the constellation of rook in front of connected passers for a couple of minutes while reading a round report from the first day. It was a good reminder of what I already knew: that the previously described triangle constellation is cumbersome to advance, but it guarantees the pawns a safe passage to promotion almost every time. The only exceptions are certain drawing positions where the defending king is in front of the rook and the pawns are at the edge of the board, neither of which applies here. With this in mind, I had no reservations about taking on a5 and letting my king become passive. 86...Kxa5! 86...Rxf2 is also good enough to win, but why would Black allow White to get a pawn to a7 if he knows that his central pawns will inevitably promote? 87.Kxc5 Ka4! 88.Kc4 Ka3! Black escapes the mate threats and will take f2 next. 89.Rb7 Rxf2
287
The difference between this position and the one Li Chao had is that the defending side has no meaningful counterplay. White can make a few one-move mate threats but, since he has no passed pawn of his own, there is no specific region of the board that Black must keep his king on. He is instead free to roam wherever he wishes, and no major mating threats materialize. 90.Kc3 Rf3† 91.Kd4 e3 92.Kc3 Ka4 93.Kd3 f4 94.Kc4 Instead of making mate threats, White could have tried to sit passively with the king in front of the pawns to keep Black’s rook from getting away. But it will not work: 94.Ke2 Rf2†
95.Ke1 f3 96.Re7 Re2† 97.Kf1 Black’s only problem is that his rook gets in the way of the pawns promoting. If he could just 288
achieve better coordination he would win easily – his pawns are on the sixth rank after all! The winning plan is actually quite simple when you know how.
97...Kb3! The king marches to d1. 98.Re8 Kc2 99.Re7 Kd1
The threat is mate on e1. A check along the d-file can be blocked on d2, after which White cannot stop ...Rf2†, so it is time to resign. As easy as this was, the main reason why the plan of bringing the king to d1 was successful was that White had nothing constructive to do and could only wait on the e-file with his rook. If he had a pawn on virtually any square, he could have simply started pushing it in order to distract one of Black’s 289
pieces, leading to a draw.
94...Ka5 95.Rb1 White could have followed me for one more move with 95.Kc5, but after 95...Ka6 he finally has to make a move that does not threaten mate. 96.Kc6 e2 Black wins. 95...e2 96.Kc5 Rf1 0–1 My pawns were indeed slow. I created connected passed pawns on move 89, and then had to make three rook moves and four king moves just to nudge the pawns a couple of squares forward. The process was slow, but I had all the time in the world as I was not facing any counterplay. Let’s imagine that in the key position after 97.Kf1, a white pawn magically appeared on the board.
290
The presence of the d5-pawn makes all the difference. It is a full three moves away from queening and it can be stopped by either Black’s king or his rook, but the crucial point is that Black cannot execute his winning plan of ...Kb3-c2-d1 without letting the pawn run wild. 1...Kb5 Running towards the pawns with 1...Kb3 would help them to queen, but Black is too slow and White gets there first: 2.d6 Kc2 3.d7
Black needs to make a draw before it is too late: 3...Rd2 4.Rxe3 Rxd7= 2.d6 Kc6 3.Re6 Kd7 4.Rf6 Rf2† 5.Ke1= 291
Black cannot make progress. The only way to free his rook from eternal clumsiness would be to bring the king to support the pawns, but obviously the king is stuck babysitting the d-pawn. What a difference the slightest bit of counterplay makes! White had no realistic hope of promoting his d-pawn in the hypothetical example above – but it was still enough of a distraction to save half a point. Now, put your newfound knowledge into action and solve some puzzles!
292
Exercises
I. R. Ortiz Suarez – Gregory Kaidanov Mar del Plata 2012
White is winning this race. How should he bring in the full point? Show/Hide Solution > 57.b7?? White misses Black’s idea. His rook is horribly placed and unable to defend against the most rudimentary threats. Out of White’s many winning moves, my favorite is: 57.Rc7! White gets his rook out of the way, clearing the road for the pawns to advance while also being ready to perform defensive duties. 57...Rb2 58.g4 hxg4† 59.Kxg4 Rb3
293
This position is analogous to the game – but instead of losing, White now wins by parrying Black’s only threat. 60.Rc6! No counterplay, no questions asked; a5-a6 is threatened and Black can resign. 57...Rb2! Mate in two is a lot of counterplay! White surely will queen his pawns if given enough time, but he is facing devastating threats. 58.g4 hxg4† 59.Kxg4
294
59...Rb3! Another excellent move. Threatened with mate on the next move, White is forced to give up a pawn immediately. 60.Ra6 Despite White’s earlier blunder, the position remains interesting and will be discussed in more detail in the next chapter. Sam Shankland – Felix Rudyak San Francisco 2007
Which way should White go with his king? Show/Hide Solution > 48.Kd4! Forward ho! White pays absolutely no heed to the kingside and rushes to support the connected passed pawns as soon as possible. If White had remained passive instead, he would have seriously jeopardized his winning chances: 48.Ke2? f5 49.Ra5 Kc6
295
White’s passed pawns, if they can advance at all, will be painfully slow. He needed the king’s help as the rook is badly placed in front of the pawns. White’s only serious winning attempt will be to abandon his queenside pawns in the hope of winning on the kingside, but I am unconvinced if it will work. 50.Ra7 Kd5 51.Rd7† Kc4 52.Rxh7 Rxa3 53.Rg7 Black certainly has problems but he can offer serious resistance with:
53...Rb3! 54.Rxg6 Kd5! The point is that White will have to place his pieces extremely clumsily in order to hang on to both of his extra pawns. For instance: 55.Rb6 Ke4 56.f3† Kd4 Black is ready for ...Rb2† with ...Ke3 to follow. Perhaps White is still winning, but the game 296
continuation is far clearer and more certain. 48...Rf3 49.Ra6† Kc7 50.Kc5 Rxf2 Now I took my chance to get my rook out of the way of the pawns.
51.Ra7†! Kb8 52.Re7 Rf3 53.a4 Again, White pays no heed to anything but the passed pawns.
53...Rf5† 53...Rxg3 gives Black passed pawns of his own, which are guaranteed to queen. The problem is that White’s are as well – but they are about ten tempos faster. 54.a5 f5 55.b5 and White wins.
297
54.Kb6 Rf6† 55.Ka5 h5 56.b5 g5 57.b6 h4 58.gxh4 gxh4 59.Ka6 1–0
Michael Casella – Sam Shankland Los Angeles 2010
White played 45.Rd7†, forcing Black’s king to the c4-square, in front of the passed pawn. What do you think of his decision? Show/Hide Solution > 45.Rd7†? White wastes time and forces my king to where it wants to go anyway. Putting the king in front of the c-pawn doesn’t hurt Black that much since its best square is b4. And while you generally don’t want your king in front of connected passed pawns, it is often fine to put it in front of a lone passer. White cannot push any pawns just yet: after 45.h5? Rh6! the pawn is lost and Black is fine. White had played a good game up to this point, including correctly choosing to decline a repetition a few moves back. He could have set himself up to score a nice upset with: 45.Kg5! Preparing h4-h5 with g3-g4 to follow. There is still a lot of work to do, but I think the connected passers should be enough to win. The following variation is not forced, but it’s certainly a plausible way for the game to continue. 45...a5 46.h5 a4 298
47.Ra7! The rook is ideally placed behind the pawn. Connected passers can cruise straight through, but loners are slower and require support from their pieces. 47...Rb3 48.g4 a3 49.Bb7†! Kd6 50.Ra6† Kc7 51.Bd5 Re3 52.Kf4
The position is still messy, but White is definitely winning. His pawns will go through and Black’s are stuck. 45...Kc4
299
46.Rc1†? Continuing along the wrong path. The way White played in the game, he spent all of his time forcing my pieces to go to their best squares! 46...Kb4 47.Rd5? Nb3–+ In just three moves, the evaluation has swung from lost to winning for Black. White wasted a lot of time with his rooks while now Black’s pieces are perfectly placed to support the advancing pawns.
48.Re1 a5 49.Bd7 c4 49...a4 also works, as 50.Re4† c4 51.Bxa4 Nc5! wins the exchange while preserving Black’s last pawn. 300
50.Ree5 a4 White resigned. Since we picked up the game, his own pawns never even moved once! 0–1
Oscar Humberto Castro Rojas – Laszlo Szabo Costa Brava 1976
Black’s king is stuck in the corner and he must push his pawns to victory. But which one should move first? Show/Hide Solution > 54...a3! The right pawn. The threat of ...b4-b3 with mate to follow forces White’s rook to move. We will see in the next chapter why advancing the b-pawn would have been wrong. 55.Rg8 Rxh7 56.Rg4 Now Black must make another decision: should his rook go behind or in front of the b-pawn?
301
56...Rb7! 56...Rh1†? 57.Ka2 Rh2† 58.Ka1 Rb2 enables White to draw with perpetual checks, since his suicidal rook cannot be taken on pain of stalemate. 59.Rg7† Kb6 60.Rb7†= The checks will never stop.
302
Moving on, it follows that our next logical topic should be playing against connected passed pawns in the endgame. I think the best place to start is by picking up on the final exercise from the previous chapter, where it was noted that pushing the wrong pawn would have enabled the defending side to draw. Rather than revisiting the previous game (Castro Rojas – Szabo) and analyzing the relevant variation, we are fortunate enough to have another game in the database featuring an identical endgame, but with colors and left/right orientation reversed, in which the stronger side mishandled the pawns.
Dean Ippolito – Surya Shekhar Ganguly Philadelphia 2006 1.d4 Nf6 2.c4 g6 3.Nf3 Bg7 4.g3 0-0 5.Bg2 c6 6.Nc3 d5 7.Qb3 dxc4 8.Qxc4 Bf5 9.0-0 Nbd7 10.Re1 Ne4 11.Qb3 c5 12.Nh4 Nxc3 13.Nxf5 gxf5 14.bxc3 cxd4 15.cxd4 Bxd4 16.Rb1 Qb6 17.Qd3 Ne5 18.Qxf5 Qg6 19.Qxg6† fxg6 20.Rf1 Rad8 21.Bg5 Rd7 22.Rxb7 Rxb7 23.Bxb7 Kg7 24.Be4 Ng4 25.Bf3 Ne5 26.Rd1 Nxf3† 27.exf3 Bc5 28.Rd5 Bb6 29.Kg2 Rc8 30.Re5 Rc2 31.Rxe7† Kg8 32.Be3 Kf8 33.Re4 Bxe3 34.Rxe3 Rxa2 35.Rb3 a5 36.Rb7 h5 37.Ra7 a4 38.f4 a3 39.Kf3 Kg8 40.h4 Kf8 41.Ra5 Kf7 42.f5 gxf5 43.Rxf5† Kg6 44.Ra5 Kh6 45.Ra6† Kg7 46.Ke3 Kh7 47.f3 Ra1 48.Kf2 a2 49.Kg2 Kg7 50.g4 hxg4 51.fxg4 Kh7 52.g5 Kg8 53.Ra7 Kh8 54.Kh2 Kg8 55.h5 Kh8
303
56.g6? As was noted before, it was correct to advance the rook’s pawn first. Thus White would win after 56.h6! Rb1 57.Rxa2 Rb5 58.Rg2!, as Szabo demonstrated. Advancing the g-pawn allows Black to draw, but only with extremely precise and instructive play. Ganguly does not disappoint. 56...Rb1! 57.Rxa2 Rb5 We see the difference when comparing the g5-g6 advance with the h5-h6 one. Now the pawn on h5 cannot be saved from behind by means of Rh2, so the rook must instead run to h7, where it will be poorly placed.
304
58.Ra8† 58.h6 Rh5† picks up the pawn and draws. 58...Kg7 59.Ra7† Kg8! The right square. Leaving the back rank would lead to a quick promotion and going to f8 or h8 would allow a checking tempo that would lead to Black’s demise. We will cover those details later; for now, let’s focus on the correct defensive technique. 60.Rh7 White would be routinely winning, if only he could get his rook out of the way of his connected passed pawns. As things stand, its presence on h7 is extremely clumsy. Nevertheless, Black must still play with great accuracy to hold the game. If White’s king is allowed to support his pawns, the white rook will be free, and Black will lose. For that reason, the king must be cut off.
305
60...Rb3! Black’s rook does it all. White’s king is cut off along the third rank, and there is no point in repositioning his rook along the 7th rank since ...Rb5 would force it straight back to h7. Nevertheless, Black is still not out of the woods. 60...Rg5? sees Black trying to cut the king off along the g-file, but this plan is doomed to fail:
61.Kh3 The king simply walks up to h4 to free up the rook. 61...Rg1 62.Kh4 Rg2 63.Ra7 Mission accomplished. It still takes a bit of work to win the game as the king is passive, but the end is in sight. White can use his rook to free the king, for instance:
306
63...Rg1 64.Ra4 Kg7 65.Rg4 The king escapes and White wins. 61.Kg2 It would be foolish to try: 61.h6?! This enables Black to make an easier draw with: 61...Rb6! 62.Rg7† Kh8!
We saw a similar endgame in a variation Mamedov could have tried against me in the previous chapter (see page 172), but here there is a key difference. The basic winning plan for White would be walking his king to f8, when he could meet a check along the file with Rf7. But here things are different, since the pawns are at the edge of the board and Black’s king has no legal moves. Thus, 307
Black will have a suicide rook and perpetual check. Let’s see how this might play out: 63.Kg3 Rb3† 64.Kf4 Rf3† 65.Ke5 Rf5† 66.Ke6 Re5† 67.Kf7 Rf5† 68.Ke8
68...Rf8†! Certainly not 68...Re5†?? 69.Re7 when White gets his rook out of the way and wins. 69.Ke7 Re8† 70.Kd6 Re6†!= White will not escape the checks. 61...Ra3 62.Kf1! The best practical try. White threatens Rb7. White could have tried the straightforward 62.Kf2. Now that his king is no longer on the g- or h-files, he is threatening to bring his rook to the queenside without worrying about ...Ra5, and it will no longer be in the way. Black cannot bring his rook back to a5 as it would allow White’s king to advance, but he also has to jail the rook on h7. Thus, the only move is:
308
62...Rh3! White’s king is still cut off, and his rook is still stuck defending the h5-pawn. But note that h3 is the only suitable square for Black’s rook. As such, the position is a reciprocal zugzwang. It is also worth mentioning that 63.Ke2 Rg3! is another only move, and another reciprocal zugzwang. A famous Kasparian study beautifully illustrated the ideas in this endgame. Returning to the game continuation, Black is in a serious dilemma. White is threatening to swing the rook away from its horrible spot, and Black must keep it tied down. But ...Ra5 allows White’s king to advance, and ...Rh3 would leave him on the wrong side of the previously discussed reciprocal zugzwang following Kf2. Ganguly finds the only move.
62...Rf3†!! Black’s rook and White’s king do a little dance along the second rank. If White chooses f2 for his 309
king, Black must then respond with ...Rh3. Similarly, if Black places his rook on h3 prematurely, the response Kf2 would win. As such, f2 and h3 are corresponding squares. Other pairs of corresponding squares include e2 and g3, d2 and h3, c2 and g3, b2 and h3, and even a2 and g3. White’s trick was that by sliding the king to the first rank, he hoped to make Black choose between the g3- and h3-squares for his rook. No matter which square he chooses, White can then place him in reciprocal zugzwang. But Black knows what to do: he will continue checking along the third rank, and the only way for White to escape the checks is to go to the second rank, when Black can choose the better of the two squares. To illustrate this concept, let’s see what happens if Black commits his rook prematurely: 62...Rg3? 62...Rh3? 63.Kf2 reaches the same position a move faster. 63.Ke2! Rh3 64.Kf2
Black is to move now, which means he loses. 64...Kf8 Rook moves are no better: staying on the h-file allows Kg3-g4, while staying on the third rank allows White’s rook to move to a better spot on the 7th rank. 65.Rf7†! Kg8 66.Rf5
310
The rook supports the pawns from a better position, and Black cannot hold.
63.Ke2 White leaves the first rank immediately and so Black will choose the appropriate square for his rook. It would have been slightly trickier to stay on the first rank, when Black must continue checking: 63.Ke1 Re3† 64.Kd1 Rd3† 65.Kc1 Rc3† At some point White will have to move to the second rank, when Black will have to stay on the right side of the reciprocal zugzwang. 66.Kb2 66.Kb1 Rb3† 67.Ka2 Rg3! draws similarly.
311
66...Rh3! The rule for this particular endgame is that once White’s king comes to the second rank, Black needs to put the rook on either g3 or h3, the correct choice being the opposite-color square to the white king. That narrows him down to one drawing move every time. 67.Kc2 Rg3 68.Kd2 Rh3 69.Ke2 Rg3 70.Kf2 Rh3
White is to move, so it’s a draw. 63...Rg3 64.Kf2 Rh3 65.Ke2 Rg3 66.Kd1
312
66...Rd3†! Ganguly checks again. 67.Kc2 Rg3 68.Kd2 Understandably White offered a draw, as Black had demonstrated proper defense. ½–½ Black’s defense was not easy; but for a strong grandmaster, it was definitely possible. The reason White was unable to win was that his rook was so horribly placed, and Black was able to keep it there. The first guideline follows logically. If protected passed pawns cannot be firmly blockaded, the best way to keep them from advancing is to force your opponent’s pieces in front of them. Ganguly did an excellent job of this. There were many possible ways in which Black might have slipped up, some of which were covered in the notes above. Another crucial moment came when Black first had to make a decision with his king. Let’s return to move 59 to see why moving to g8 was the only way to save the game.
313
59...Kf8? At first this doesn’t seem too bad. Just like in the game, White’s rook is forced to come to h7, where it will be badly placed. The only drawback is that White’s rook may switch to f7 with check at some point, and this enables White to win. Other moves (apart from 59...Kg8!) lose even more quickly: 59...Kh6? 60.Rh7†! Kg5 61.g7 and White promotes on the spot. 59...Kf6? 60.Rf7† Ke6 61.Kg3! Rxh5 62.Kg4+– with the Lucena position. 59...Kh8? This is another obvious mistake. White’s rook would have had to come to h7 anyway if the king was on g8, so White simply gains a tempo which can be used to improve his king. 60.Rh7† Kg8 61.Kg3 Now that his king has reached the third rank, White wins easily. For instance:
314
61...Rb4 62.Ra7! Rb5 White was threatening h5-h6. The text move would have been the standard drawing resource if the king was on g2, but here White continues: 63.Kg4 Winning easily. 60.Rh7 Rb3 The king’s presence on f8 instead of g8 enables White to gain a valuable tempo, which makes all the difference after:
61.h6! Rb6 62.Rf7†! 315
The h-pawn will inevitably promote. A final nice detail occurs after: 62...Ke8 63.h7 Rxg6
64.Rf3! In a practical game this would likely force Black’s immediate resignation, which makes life far easier than converting queen versus rook. When applying the first guideline retroactively to the queen endgame from the previous chapter, it was clear that Black played very well not only with his own connected passers, but also against his opponent’s.
David Pruess – Evgenij Miroshnichenko Cappelle-la-Grande 2007
316
We rejoin the game after 57.Qe4?. We did not discuss the strength of Black’s next move in the previous chapter as we were mostly focusing on the game from White’s point of view, but his play was extremely effective in slowing down White’s passers. 57...Qc7†! If Black had started running immediately with 57...h5?, he would not necessarily have won the race: 58.b5 h4 59.b6 h3 60.a4
Both sides have taken a direct approach in the last few moves, advancing their passed pawns at every juncture. Compared with the game, Black has missed out on the chance to force the white king in front of the pawns, slowing them down. Consequently, both sides have reached the sixth and fourth ranks 317
with their pawns, nobody is really ahead in the race, six queens may end up on the board, the extra pawn on f7 is virtually irrelevant, and my computer screams 0.00 – although either side could easily blunder and lose. 58.Kb5! In the game, White lost without much of a fight after 58.Kd4? Qa7†. Instead he needed to keep his apawn alive at all costs, which is why blocking the b-pawn with his king would have been the lesser evil.
In the previous chapter I noted that Black would win due to the awkwardly-placed king. The position shares a common theme with the Ippolito – Ganguly game, namely that the passed pawns are blocked by one of their own pieces. In the aforementioned game, it meant White was unable to promote his connected passers. Here, that is obviously not the case: Black will not be able to stop the a- and bpawns in the long run. Rather, the king on b5 obstructs their advance for long enough for Black to win the race. 58...h5 59.a4 h4 60.a5 h3 61.a6 In the previous chapter, I ended the analysis here and commented that “it is clear that Black still has work to do.” The next step should be:
318
61...h2–+ Black has an extra pawn and his passers are further advanced, so he is winning the race. White would love to play b4-b5, but the poor placement of his king means he has to lose time to do so. Miroshnichenko was not tested by 58.Kb5 and instead won without any real resistance after 58.Kd4?, but playing 57...Qc7†! in the first place suggests he had the right plan in mind. It is important to note once again that White’s pawns could not be stopped, but only slowed down. When defending with no counterplay, slowing down a winning plan is not sufficient to save the game. But in this case, Black had three connected passed pawns of his own, and forcing White to spend just one additional move getting his king out of the way was enough for him to win the race. As such, the next guideline should make perfect sense. Even if connected passed pawns cannot ultimately be stopped, if your opponent’s pieces are stuck in front of them, they will be slowed down considerably, and you should look for counterplay in the meantime with no time to waste. Let’s see this principle in action with a game we have not discussed previously.
Sam Shankland – Akshat Chandra St Louis 2016 1.e4 e6 2.d4 d5 3.Nd2 c5 4.Ngf3 cxd4 5.exd5 Qxd5 6.Bc4 Qd6 7.0-0 Nf6 8.Nb3 Nc6 9.Nbxd4 Nxd4 10.Nxd4 a6 11.Re1 Qc7 12.Bf1 Bd6 13.Nf5 Bxh2† 14.Kh1 Kf8 15.Qd4 exf5 16.Qxf6 h6 319
17.Qd4 Bd6 18.Bc4 Bd7 19.b3 Qc5 20.Qh4 b5 21.Be3 Qc7 22.Bd5 Bc6 23.Rad1 Kg8 24.Qh5 Bxd5 25.Rxd5 g6 26.Qd1 Bf8 27.Bd4 Rh7 28.Bf6 Qb6 29.Bd4 Qc6 30.Bb2 f6 31.Rd8 Rxd8 32.Qxd8 Rf7 33.Re8 Qxc2 34.Ba3 b4 35.Bxb4 Qc1† 36.Re1 Qc7 37.Qxc7 Rxc7 38.Re8 Rf7 39.Ra8 Kg7 40.Bxf8† Rxf8 41.Rxa6 g5 42.b4 Rd8 43.b5
Material is equal, but it is clear that Black has a tough defensive task ahead of him. White’s pawns on the queenside are destined to promote, and they cannot be stopped. But due to the poorly-placed rook on a6, Black should be able to slow the pawns down just enough to create meaningful counterplay on the kingside, despite having no passed pawns of his own yet. First, let’s see how the game ended: 43...Rd2? Chandra’s move is too slow: Black loses a vital tempo. 44.b6! White has a massive threat of Ra3-b3, fixing his poorly-placed rook and ensuring that his pawns will promote easily.
320
44...Rb2 44...Rxf2? 45.Ra3! Rd2 46.Rb3 Rd8 47.b7 Rb8 48.a4+– illustrates the above point. Perhaps this is what my opponent missed when making his 43rd move. Since the threat to capture the f2-pawn proved to be redundant, Black has lost a valuable tempo by choosing the slower route for his rook to get to the b-file. Time is all that matters, as White’s pawns will obviously promote at some point. Black needs counterplay and he needs it immediately, so this one tempo turns out to be decisive.
45.g3!? 45.a4 f4 46.a5 g4 47.g3! would also have been winning, but I decided to give my king some 321
breathing room and prevent the ...f5-f4 advance. Either option is good enough. 45...Kg6 46.Kg2 h5 47.a4 f4 48.gxf4 g4 49.a5 h4
In a little throwback to the previous chapter, I knew not to put my rook on the 7th rank where it would stay stuck, but instead all the way to the 8th rank, so it can get out of the way to enable one of the pawns to promote. 50.Ra8! The rook would be clumsily placed after: 50.Ra7? g3! White even has to be careful not to lose. 51.b7? Getting the rook out of the way with 51.Rd7! would be the way to salvage a draw. 51...Rxf2† 52.Kh1! h3 53.Rd1= Black should take a perpetual with ...Rh2† etc.
322
51...Rxf2† 52.Kg1 52.Kh3 loses more quickly to 52...Kh5 followed by ...Rh2 mate. 52...h3 53.b8=Q h2† 54.Kh1 Rf1† 55.Kg2 h1=Q† 56.Kxg3 Rf3† 57.Kg4 f5#
It’s deeply shameful to be checkmated by a pawn. White should take care to play more incisively than this and get his rook out of the way. 50...Kf5 50...g3 loses to 51.a6 Rxf2† 52.Kg1 when White promotes before Black can do anything meaningful on the kingside.
323
51.Rh8 h3† 52.Kg3 Rb3† 53.Kh2 Rb2 54.a6 White is winning the race, but only by one tempo. 54...Rxf2† 55.Kg1
55...g3 55...Rb2 reaches a position where Black to move would win with ...g3, but White to move wins. 56.a7 would be the most logical choice, although 56.b7 is also good enough. 56.Rxh3 Kg4 57.Rh8 Rb2
324
58.a7 Rb1† 59.Kg2 Rb2† 60.Kf1 g2† 61.Kg1 Kg3 62.Rg8† Kh3 63.a8=Q Finally White made a queen, so Black resigned. Returning to the moment where we joined the game, it was imperative for Black to get his rook to the b-file as quickly as possible. 43...Rd1†! 44.Kh2
44...Rb1! Black has effectively saved a tempo over the game continuation, as White’s king does not really stand any better on h2 than on h1, and he would have been much happier spending a move on any of 325
b5-b6, a2-a4 or g2-g3. 45.b6 f4! In stark contrast to the game, Black was able to play ...f4 before White could get g2-g3 in, and he has a lot of counterplay. Let’s see what happens if White tries to make a queen as soon as possible. 46.a4 g4 47.a5 h5! White would be completely winning if his rook was on a decent square (say c2). But as things stand, his pawns are too slow and he needs to start worrying about mating threats.
48.g3 Stubbornly trying to promote the pawns is asking for trouble. 48.Ra8?! This is not a losing move, but it puts White in a precarious situation. 48...h4 49.Rc8 f5 Threatening ...g3† with mate to follow, so White’s next move is forced.
326
50.g3 fxg3† 51.fxg3 Rb2† 52.Kg1 Black can now choose between forcing a draw right away with 52...Rb1† and a perpetual, or rolling the dice with 52...hxg3!?. The computer claims the latter is 0.00 as well, but in a practical game anything could happen. 48...Rb2! This final accurate move should secure the draw. For example:
49.Kg1 Rb1† 50.Kh2 Rb2= With a repetition. There are other possible drawing lines starting from move 49 but the general point is clear: Black could have saved the game by rushing his rook to the b-file. 327
Had Black considered the second guideline, he might have landed on the right move by realizing he needed to prioritize speed and counterplay due to the placement of White’s rook. The rook on a6 did guarantee eventual promotion, but it also was going to be painfully slow, and Black could have saved the game if he had played for counterplay faster. One tempo turned out to make all the difference. Unfortunately it is often the case that, when we are facing connected passed pawns, they are ready to rock and roll without any hinderance from poorly-placed pieces in front of them. On a bad day such pawns can mean the end of the world; but under the right circumstances, they can be blockaded. Let’s see one such example.
Isan Reynaldo Ortiz Suarez – Gregory Kaidanov Mar del Plata 2012
An earlier fragment of this game has already been discussed in the puzzles section of the previous chapter. (If you have not already attempted to solve the relevant exercise, you may wish to turn back to page 176 to do so before continuing here.) The roles are now reversed: having squandered a winning advantage just a few moves ago, White is trying to hang on for dear life. He will lose his b7-pawn and end up facing connected passers. Against best play, he should lose. But 60 moves into the tenth and penultimate round of an exhausting open tournament, Black faltered. 60...Rb4†? 61.Kg3 Rxb7 White’s only hope of saving the game is to blockade the connected passers, and the way he can pull this off is to ensure he has more pieces blockading than Black has available to try to break the blockade. As such, he needs to pacify Black’s rook.
328
62.Rb6! The only move. The rooks are engaged in an all-out race to get behind the a-pawn. If Black’s rook makes it to a square like a4, it can watch over the annoying a-pawn without a care in the world and simultaneously make any hope of a kingside blockade obviously futile. Conversely, if White’s rook gets to the a-file first, Black’s rook will become passive. Following 62.Rc6? Rb3† 63.Kg2 Ra3 White is completely lost as he cannot set up a blockade. After 64.a6 g4 we see why: the king cannot stand on g3, thanks to the active placement of the a3-rook. Had the rook been on a passive square in front of the a-pawn, as it had to be in the game, White would be holding. 62...Rc7 63.Rb3! Another important move. White defends the third rank in order to prevent Black from winning a tempo. If White leaves the third rank unguarded with a move like 63.Rb1?, Black wins easily by means of 63...Rc3† 64.Kg2 Ra3 when he gets to the a-file first.
329
63...Rc6 64.Kf3 Kf5 65.Ra3 Ra6 66.Ra4 White makes a draw since Black is unable to break the blockade due to the passive placement of his rook. If it could safely come to a square like c3 then the blockade would fail. But as is, it is much too busy babysitting the a5-pawn.
66...Ke5 67.Kg4 Kd5 68.Ra1 Kc4 69.Rf1 Kd5 70.Rf5† Ke6 71.Rb5 Kd7 72.Kf5 White did not have to change his set-up when Black’s king went wandering, but do note that he wedged his king between Black’s pawns when they were not side-by side, thereby preventing ...g5-g4 while preparing Kxf6 in the event that Black were to leave the pawn unguarded. This is the best way to blockade, and by now White would be holding even without the a5-pawn.
330
72...Rd6 73.Rb1 Kc6 74.a6 Kc7 75.a7 Ra6 76.a8=Q ½–½ Ortiz badly messed up a winning position earlier in the endgame (as we saw in the previous chapter), but he must be given credit for keeping a cool head when things went wrong, and finding all the best moves to save half a point. But as mentioned, this was only possible due to a mistake by Black which gave him another chance at life. Now that we know how White can try to save the game, let’s see how Kaidanov should have played on move 60.
60...Rxb7! By taking the pawn immediately, Black guarantees that he will reach the a-file first. The difference is 331
that with the white king on g4, Black will not only have a checking motif, but also a mate threat. Either way, he will earn the crucial tempo he needs. 61.Rb6 Rc7 We saw a near-identical position in the game, the only difference being the placement of White’s king, which is much worse on g4 than g3.
62.Rb3 62.Rb4 prevents the check but gives Black two winning options. 62...Rc3! threatens ...f5 mate and so 63.Rb6 is forced, when 63...Ra3 wins comfortably. Black can also exploit the position of White’s king in a different way with 62...f5†! followed by 63...Rc3† and ...Ra3. Either way, the placement of the king on g4 makes all the difference. 62...Rc4† 63.Kg3 Ra4 Black wins. Despite Ortiz’s good fortune, his resourceful defense provides a good occasion to introduce another guideline. When trying to blockade connected passed pawns, you need to have more pieces supporting the blockade than your opponent can use to try to break the blockade. Assuming you don’t have more pieces than your opponent to start with, the only way to achieve this goal is to render one or more of their pieces ineffective in assisting their connected passers. As we saw in the previous example, Ortiz followed the guideline well. He made sure Black’s rook on a6 remained passive and unable to help. 332
Given enough time, most pieces can maneuver themselves into position to help connected passed pawns to advance, no matter how they stand. However, bishops present a special case, as each one can only operate on a single color complex. As such, if connected passed pawns are forced onto the same color as the bishop, the bishop can become redundant. The following position is a simple example.
Example 1
White’s bishop is a useless piece, and Black makes a draw. This was an extreme example where even three connected passed pawns failed to win the game when bishops of opposite color were introduced. Obviously this was only the case because White’s pawns were already committed to the wrong color complex. Had they been on the right color complex, or side by side, things would have been dramatically different!
333
Black is obviously lost.
Black is even more lost! Since the only pawn structure where the connected passed pawns can be blockaded is when all of them are on the wrong color square, you are unlikely to chance upon such a situation by accident, and a strong opponent will not advance their pawns foolishly. You will instead have to make the effort to force the enemy pawns onto the color complex on which they can be blockaded. In the following game, my opponent did just that.
Sam Shankland – Roman Yankovsky Santa Clara 2012 334
1.d4 Nf6 2.Nf3 g6 3.Bg5 Bg7 4.Nbd2 c5 5.c3 Qb6 6.Nc4 Qc7 7.e3 0-0 8.Bd3 d5 9.Ncd2 Qb6 10.Qb3 Nc6 11.0-0 Re8 12.Bxf6 Bxf6 13.Qxd5 cxd4 14.Nc4 Qc7 15.cxd4 Bg4 16.Qc5 Bxf3 17.gxf3 Rac8 18.Rfc1 Ne5 19.Nxe5 Qxc5 20.dxc5 Bxe5 21.Rc2 Red8 22.Be4 Rc7 23.f4 Bf6 24.Rac1 e6 25.b4 Be7 26.a4 Rdc8 27.a5 Kf8 28.Kf1 Ke8 29.Rc4 a6 30.Ke2 Kf8 31.Kd3 Bh4 32.R1c2 Ke7 33.Kc3 Rd8 34.Kb3 Rd1 35.c6 bxc6 36.Rxc6 Rxc6 37.Bxc6 Rb1† 38.Kc4 Rf1 39.Bb7 Rxf2 40.Rxf2 Bxf2 41.e4 Be3 42.f5 exf5 43.exf5 gxf5 44.Bxa6 Bd2 45.Bc8
Black faces a menacing pair of connected passed pawns on the queenside that are on the opposite color of White’s bishop. But all is not lost: with accurate play, Black can force them onto light squares. 45...Kd6! An excellent decision. The f-pawn is of no consequence, but White’s king must be kept out of c5. 45...f4? would be a decisive mistake: 46.Kc5 f3 47.a6
335
White is winning. He has succeeded in playing a5-a6 without losing control of the b6-square, and his pawns cannot be stopped. For instance, after 47...f2 48.Bh3 Be3† 49.Kc6 Black is powerless to stop b5-b6. 46.Bxf5 h6
47.Be4 White has a hard time making progress, as the strategically desirable b4-b5 advance cannot be achieved while the pawn on a5 needs protection. In the event of 47.a6 Be3 Black blockades on the dark squares and draws. 336
47...f6 48.Kb5 Bc3 49.h4 Be1 50.h5 Bd2 51.Bf3 Bc3 52.Ka4 Bd2 53.b5 White needed to bring his king to the passive a4-square to ensure the advance of the pawn to b5, and now Black follows the third guideline in multiple ways.
53...Kc5! White’s king is boxed out and unable to help his pawns. If the rules of chess allowed White to move his king outside of the board, to the hypothetical ‘square’ to the left of the a5-pawn, he would be able to win by playing b5-b6 and then stepping his king around the outside to a6. 54.b6 Be1
337
½–½ The game was agreed drawn here as White has no plan to win. Obviously a5-a6 is a non-starter, and if 55.b7 Bg3 56.a6 Kb6 Black holds, as the pawns have been successfully blockaded. Note how Black’s accurate defense ensured both the passivity of the white king and the uselessness of the white bishop due to the fact that the pawns would eventually have to step onto light squares. Blockading passed pawns with an equal number of pieces usually only works when your opponent has coordination problems. As we saw in the previous two games, the stronger side had their pieces pushed to bad squares, without an effective way to regroup them. This final part is crucial; had the misplaced pieces been able to find better squares, the blockade would have proved unsuccessful. When you are defending against protected passed pawns and your opponent has lost coordination, it is imperative that they not be allowed to find it again. Let’s see a case where this happened.
Jesse Kraai – Florin Felecan Internet (rapid) 2009 1.Nf3 Nf6 2.c4 g6 3.Nc3 Bg7 4.e4 d6 5.d4 0-0 6.Be2 Nbd7 7.0-0 e5 8.dxe5 dxe5 9.Qc2 c6 10.b4 Re8 11.Rd1 a5 12.b5 Qc7 13.Rb1 Bf8 14.Bg5 Nh5 15.Na4 Nf4 16.b6 Qb8 17.Bf1 Ne6 18.c5 Nexc5 19.Nxc5 Nxc5 20.Rd8 Rxd8 21.Bxd8 Bf5 22.exf5 Qxd8 23.fxg6 hxg6 24.Nxe5 Qd4 25.Re1 Bg7 26.Nf3 Qc3 27.Qd1 Bf6 28.Re3 Qb4 29.Qd6 Kg7 30.Ne5 Qxb6 31.Nxf7 Rf8 32.Nh6 Qd8 33.Nf5† gxf5 34.Qxc5 Bd4 35.Rg3† Kf6 36.Qc1 Rg8 37.Rf3 Qd5 38.Qh6† Ke7 39.Qh7† Rg7 40.Qxf5 Qxf5 41.Rxf5 b5 42.h4 Ke6 43.Rf3 a4 44.Kh2 Kd5 45.Kh3 b4 46.g4 Rb7 47.Bg2 Kd6 48.Rd3 Kc5 49.Bxc6 Kxc6 50.Rxd4 b3 51.axb3 axb3 52.Rd1 b2 53.Rb1 Rb3† 54.Kg2 Kd5 55.h5 Ke5 56.h6 Kf6 57.f4 Kg6 58.g5 Kh7 59.Kf2 Kg6 60.Ke2 Kf5 61.Kd1 Kg6 62.Kc2 Rb4 63.Rh1 b1=Q† 64.Rxb1 Rxf4 65.Rg1
338
After an interesting game, Black has reached a drawn ending, but one that requires a degree of precision to hold. White’s pawns are not side by side and the king is on the best square, wedged between them, while White’s king and rook are passive. On the other hand, Black can neither liquidate the enemy pawns nor improve his pieces further, while White has various ideas such as approaching with his king and possibly playing Rh1 at an opportune moment to try to force Black’s pieces back. Long story short: there are ways for White to try to improve his coordination, while Black must try to stop him from doing so. 65...Ra4 65...Rf3 and 65...Rd4 are also fine. 66.Kd3 Rh4 67.Ke3 Rh3† 68.Kf4 Rh4† 69.Kf3 Ra4 Having brought the king to the best possible square, White improves his rook.
339
70.Rh1! The best practical try. 70...Ra8 71.Kf4 Ra4† 72.Ke5 White threatens h6-h7 in a situation where Black will not be able to scoop it up with ...Ra8-h8, since White’s king is too close.
72...Ra8? Now White starts making progress. The position is still drawn but Black’s margin for error is much smaller.
340
Black could have easily avoided the threat by pointing out that White’s king is totally unstable: 72...Ra5†! Where will the king hide? The only option is to go all the way to the b-file. 73.Kd6 Ra6† 74.Kc5 Ra5† 75.Kb6
75...Ra8! Now and only now Black brings his rook to the 8th rank. The difference compared to the game continuation is revealed after: 76.h7 76.Rg1 is possible of course, but in that case White is in essentially the same situation as at move 65 where we first joined the game. 76...Rh8= Black simply takes either pawn next. This is not a luxury he enjoys if White’s king is on e6, for example. 73.h7! Re8† 74.Kd6
341
74...Rh8? By some miracle, Black can still barely hold a draw with 74...Kg7! 75.g6 Ra8!, but I would challenge any human to find these moves at the end of a rapid game. In practical terms, it should be lost. 75.Ke7 White has succeeded in advancing his pawn to h7 and getting his king to an active supporting square. Black would draw if he could avoid moving indefinitely, but in reality he is in zugzwang and will lose. White’s pieces don’t look great, but their current squares are far better than c2 and g1, where they stood when we first joined the endgame! Black could have prevented this improvement of White’s coordination by checking relentlessly.
342
75...Kg7 76.Rh6 Ra8 77.h8=Q† Rxh8 78.Rxh8 Kxh8 79.Kf7 1–0 Felecan’s heroic defense fell short when he failed to follow the final guideline. When trying to maintain a blockade with no counterplay, your top priority should be keeping your opponent’s pieces passive and preventing them from improving their coordination. Playing against connected passed pawns is never fun, but give it a try in the puzzles section.
343
Exercises
Irina Krush – Sam Shankland Edmonton 2014
Black’s pawns look menacing but White has a narrow route to victory. How should she proceed? Show/Hide Solution > 49.Kb4? White slips up and allows a draw. I expected the text move during the game and had no idea that White had a winning continuation, perhaps in part because I had not yet written this book! 49.h6! White’s pawns clearly will queen. The only thing she has to do is prevent Black from also getting a queen, and the way to do that is to make sure that the knight is passive. If Black’s knight can participate in the fight on the queenside, he should easily break the blockade. 49...Nxh6 50.d6! Nf7 50...a3 loses to 51.d7 b2 (if 51...Nf7 52.Kb4 White takes on a3 next and wins) 52.d8=Q b1=Q 53.Qd2† Ka1 54.Nxa3 with mate to follow. 51.d7 Nd8 344
51...a3 52.Kb4 never helped anyone.
It is important to recognize that Black’s pawns are stopped in their tracks, as ...b2 will be captured immediately while ...a3 allows Kc3-b4. But the difference between this position and the game one is that Black’s knight is unable to help break the blockade, since it has to monitor the d7-pawn at all times as it is a lot closer to becoming a queen than when it was on d5. 52.f5! Nf7 53.f4! White advances the f-pawns to their best positions before going for the kill. 53...Nd8 54.f6! Nf7 After a precise sequence of six ‘only winning moves’ which only a silicon brain can fully understand, White is ready to close out the game.
345
55.Ne5 b2 56.Nxf7 b1=Q 57.d8=Q White wins. 49...a3! 50.Nxa3 b2=
Black is down to one passed pawn, but it is on the seventh rank and White doesn’t have a good way to coordinate. The knight on f5 funnily keeps all the white pawns at bay, although there is still a question about a potential zugzwang if White shuffles her king. 51.Ka4 51.h6 Ne3! should lead to the same position as the game. 51...Nd6 52.h6 Black’s next move makes it clear that his knight is not merely a blockader but rather a blockadebreaker.
346
52...Nc4! Black makes a queen too. Thanks in no small part to the knight not being stuck on d8, one of his originally connected passed pawns will reach the finish line, so White’s blockade proves to be unsuccessful. 53.h7 53.Nb5? would be a grave error. White hopes for 53...b1=Q?? 54.Nc3† with a simple win, but 53...Nb6†! 54.Ka5 (54.Kb4 allows Black to promote with check) 54...Nxd5 wins for Black. 53...Nxa3 54.h8=Q b1=Q
347
55.Qh2† White is rather fortunate to have this check. If her pawn were on f2 instead of f3, Black would be winning. 55...Nc2 56.Qd2 Qb3† 57.Ka5 Qc4 58.Kb6 Kb3 59.d6 Nd4 60.Qd1† Kb4 61.Qe1† Kb3 62.Qb1† Ka3 63.Qa1† Kb3 64.Qb1† Ka3 65.Qa1† Black’s threats are dangerous enough that White has to accept the perpetual. ½–½ Sergey Kudrin – Alexander Onischuk San Diego 2006
It looks like Black is winning the race. How can White fight back? Show/Hide Solution > 37.h4?! White will lose the race if he pushes his pawns directly. The best move was: 37.Re6†! Forcing Black to choose where to put his king – either on a passive square or in front of the pawns, slowing them down. 37...Kd3 37...Kf5 makes it hard for Black to promote his pawns without the support of the king, and after 38.Re8 d4 39.g4† White is holding. 348
After the text move Black’s pawns are sure to become queens, but they are slowed significantly by their own pieces which block their path. Now that Black is uncoordinated, White no longer makes any attempt to stop the pawns but instead chooses to race. 38.g4 c4 39.g5 The computer says this is a draw, although in practical terms anything could happen. In any case, we can clearly see that White is no longer so far behind in the race, as Black has to spend some time getting his pieces out of the way of his pawns. 37...d4 38.h5? White should once again have tried: 38.Re6†! But now Black has a nice square for his king that is not in front of his pawns. 38...Kd5! 39.Re8 c4 The computer finds a way to draw this position, but it looks absurdly difficult for a human. It was much better to check first on e6 and not let the king sit on d5. 40.h5! d3 41.Rd8†! Ke4 42.Re8† Kf5
349
43.Ke1! Rc1† 44.Kd2 Rc2† 45.Kd1 c3 46.Re3! White draws – but no human can defend like this. 38...d3 Now the game is finished. Black’s pawns promote effortlessly and his king can always hide on the d4-square.
39.Ke1 Rc1† 40.Kd2 Rc2† 41.Kd1 c4 42.h6 c3 43.Re6† Kd5 44.Re5† Kc4 45.Re4† Kb3 46.Re3 Rd2† 0–1
350
Gata Kamsky – Alexander Onischuk St Louis 2010
Black looks to be in horrible shape, but he can save the game with accurate play. How should he proceed? Show/Hide Solution Black needs counterplay at all costs. He clearly will not survive by defending, as White has too many dangerous passers. 48...Kc5? The only way to draw was to ignore everything White was doing and try to queen the c-pawn at all costs. The connected passers could not be stopped effectively, therefore they should have been ignored. 48...Rb4! Black prepares ...Rc4. I suspect he considered this idea but rejected it on account of: 49.a6 c2 50.a7 White will queen with check, seemingly giving mate – but Black has a saving resource.
351
50...Rxf4†! 51.Kg3 Of course not 51.Kxf4?? c1=Q† when White has no time to promote, due to Black having done so with check. 51...Rf8! 52.Rb8 52.Rc6 Ra8 also draws. 52...Rxb8 53.axb8=Q c1=Q Black is holding. 48...c2 holds as well. Again, Black needs to prioritize promoting his own passed pawn instead of worrying about stopping White’s. After 49.Rc6 Rxb5 50.Rxc2 Rxa5 51.Re2, Black still has some work to do, but he should not lose. 49.Rc6† Kxb5 50.Rxc3 The far-advanced f-pawn wins the day.
352
50...Rxh2 51.f5 h5† 52.Kg3 Rh1 53.f6 Rg1† 54.Kf4 Rg8 55.Ra3 h4 56.a6 Ra8 57.a7 h3 58.Kg3 Kc6 59.f7 Kb7 1–0
Alexander Shabalov – Joshua Friedel New England 2007
Is it time for Black to resign?
353
Show/Hide Solution > Black’s f-pawn will clearly cost White his rook, but it seems like that will not be enough to save Black since White’s connected passers are so far advanced. However, despite how far advanced they are, they can be slowed down just enough to enable Black to save himself. 62...Rf4†! Black’s only way to draw is by forcing White’s king to step in front of one of the pawns. The game continued with 62...Ke3? when Black’s king is shouldered out and White’s king is not in the way of his pawns, thus enabling them to cruise straight through. After 63.Rxf2 Rxf2 64.b6 Ke4 65.b7 Rf1 66.a6 Rc1† 67.Kb3 Black resigned. 63.Kc5 Rf5†! Where can White’s king hide? There is nowhere safe to go except in front of the pawns or away from them. He cannot approach the rook as there is enough of a checking distance, and running to the second rank will allow ...Rf5. Therefore the only option is to step in front of the pawns.
64.Kc6 64.Kb6 Kd3! is similar to the mainline; after 65.Rxf2 Rxf2 66.a6 Kc4 67.a7 Rf6† Black draws. In the event of 64.Kc4 Rf4† 65.Kc3 Rf3† 66.Kc2?! White has escaped the checks but his king is too far from the action. After 66...Rf5! White is lucky to still be able to draw with 67.Kb3 Rxb5† 68.Ka4= etc. 64...Rf6† 65.Kb7 If 65.Kd5 Rf5† White cannot approach the rook as it is too far away, and the pawns will hang: he 354
even loses after 66.Ke6? Rxb5. Now that White’s king has stepped in front of the pawns, Black has a much better opportunity to run back with his king.
65...Kd3! 66.Rxf2 Rxf2 67.a6 Kc4 68.b6 68.a7 Rf7† 69.Ka6 Rxa7† draws immediately. The position after the text move clearly highlights that White’s king is on the wrong square. In fact – with the exception of squares like a4, a1 and h6, which suffer from obvious drawbacks – you could place White’s king virtually anywhere on the board away from the pawns and he would be winning; even somewhere silly like h1. But being in front of the pawns, he slows them down enough to give Black the time he needs to come back and defend.
355
68...Kb5 In fact, White even has to be careful not to lose! A sensible finish might be: 69.Ka7! But not 69.a7? Rf7† 70.Kb8 Kxb6 and Black wins. 69...Rf6 70.b7 Rxa6† 71.Kb8= Black is unable to do anything with his extra rook.
356
Having covered connected passed pawns from both perspectives, we can move on to lone passers. Whereas connected passed pawns tend to have similar characteristics in the middlegame and the endgame, individual passers can be completely different. To recap, in Chapter 3 we found that it is rare to be able to promote a pawn in the middlegame simply by fighting for control of every key square it could advance to until it promotes. In the endgame, this is a more common occurrence. Let’s look at a basic example:
Alexander Onischuk – Pavel Eljanov Dresden (ol) 2008 1.d4 Nf6 2.c4 g6 3.Nc3 d5 4.Nf3 Bg7 5.cxd5 Nxd5 6.e4 Nxc3 7.bxc3 c5 8.Rb1 0-0 9.Be2 b6 10.0-0 Bb7 11.d5 Bxc3 12.Bc4 Bg7 13.Qe2 Nd7 14.Bf4 Nf6 15.Rfd1 Qd7 16.Ne5 Qc8 17.h3 Ne8 18.Nc6 Bxc6 19.dxc6 Bd4 20.Rbc1 e5 21.Bh6 Ng7 22.Bd5 Qc7 23.Rd3 Kh8 24.Rf3 f5 25.Qa6 Rab8 26.Ra3 fxe4 27.Qxa7 Rxf2 28.Kh2 Ne8 29.Bxe4 Bb2 30.Rc2 Qxa7 31.Rxa7 Rxc2 32.Bxc2 e4 White has a strong passed pawn on c6, and he can simply promote it by fighting for the c7- and c8squares. His pieces are well prepared for the task.
357
33.Bf4! White takes control of the h2-b8 diagonal before taking on e4. White is probably still winning after the simple 33.Bxe4?! but it will take a bit more work to push the pawn through after 33...Be5† 34.g3 Nc7, when Black’s blockade is at least mildly annoying. 33...Rc8 34.Bxe4 Nf6 35.Bf3 All too easy. White intends c6-c7 next, followed by either Bb7 or Ra8. He wins, no questions asked.
35...g5 36.Bxg5 There was also nothing wrong with the direct 36.c7 gxf4 37.Ra8 when it is time to resign. 358
36...Be5† 37.g3 c4 For a moment, the c7-square is under Black’s control. But all it takes is a slight poke to the e5-bishop to point out that it is overworked.
38.Re7 Bd4 39.c7 Ng8 40.Re4 Bf6 41.Bf4 Black resigned instead of waiting for Bg4. 1–0 Obviously this was a rather simple case where White’s victory was not due to his brilliant play in the endgame, but rather because he played well to reach such a position in the first place. Still, it is a good game to introduce the first guideline.
The best way to make a lone passed pawn matter in the endgame is to fight for the squares in front of it. Plain and simple: if you can turn a pawn into a queen, then do it! Nothing could be more natural, and you don’t need to be over 2700 to figure that out. A passed pawn turning into a queen represents a huge swing in the evaluation of a position; if there is a clear and easy path to achieving it, then the game is practically over already. That was certainly the case in the Onischuk – Eljanov encounter. So far, so good – but in practice this often proves to be harder than it sounds, particularly when there are variations to calculate. When the opponent has counterplay, finding ways to advance a lone passer can be both crucial and difficult. In the following game, which all but clinched a spot for me in the 2015 World Cup, I was able to demonstrate the first guideline in action.
359
Sam Shankland – Gilberto Hernandez Guerrero Praia da Pipa 2014 1.d4 Nf6 2.c4 c5 3.d5 g6 4.Nc3 Bg7 5.e4 d6 6.Nf3 0-0 7.Be2 e6 8.0-0 exd5 9.exd5 Bg4 10.Bf4 a6 11.Qd2 Qb6 12.Rae1 Bxf3 13.Bxf3 Nbd7 14.b3 Rfe8 15.g4 Qb4 16.Bxd6 Nxg4 17.Ne4 Qxd2 18.Nxd2 Nge5 19.Bg2 Nd3 20.Re7 Rxe7 21.Bxe7 Bf6 22.Bxf6 Nxf6 23.Rd1 b6
White has a big decision to make. His 4–3 queenside/center majority has already netted him a passed pawn, but it is clear that Black only requires a move or two to establish a blockade on the d6-square, in which case the pawn will have a hard time advancing. As such, if White wants to advance d5-d6, it is now or never. 24.d6!± A lot of calculation went into this move, but it is definitely best. The pawn certainly has the potential to become vulnerable; but with accurate play, White can successfully fight for the d7- and d8-squares. By contrast, safe moves will not yield White any advantage. For example, after 24.Ne4 Nxe4 25.Bxe4 Nf4 he is even a bit worse. He cannot play d5-d6 as the pawn will be easily surrounded, while Black can easily improve his position with moves like ...Rd8 and ...Kf8-e7-d6, after which he can start to advance on the kingside. 24...Rd8 25.Nf3! Nf4 Of course, not 25...Rxd6? 26.Bf1 and White wins.
360
26.Ne5! White is clearly fighting for the d7- and d8-squares. Black has a difficult defensive task ahead. 26...Ne2† This looks natural but it doesn’t solve Black’s problems. I needed to see in advance that my pawn is not lost after the knight comes to d4; and upon that realization, I knew that my position was extremely promising. White’s task is much simpler after: 26...Nxg2? 27.Kxg2 Nd7 It is natural to try to trade off White’s pieces that can fight for the pawn’s advancing squares, but now the king comes in too fast.
361
28.Nxd7 Rxd7 29.Kf3! Just in time. White will get his king to d5 before Black can get his king to e6. 29...f5 30.Kf4 Kf7
If White were to fall asleep at the wheel for just one move, he would have a tough defensive task ahead of him due to the simple plan of ...Kf6 followed by ...g5† and ...Ke6. Instead, he wins on the spot with: 31.Ke5 And the king comes to c6. Trying to set up a blockade on the d7-square also fails to save Black: 26...Nd7 362
White will have to be accurate, but he does win after:
27.Nc6! White wants to trade the knight on d7 for his bishop, not his knight. 27.Nxd7? Rxd7 28.Bc6 Rd8 is nowhere near as good. As impressive as the d6-pawn looks, it clearly will get blockaded once it reaches d7, and then ...Ne6-d4 might lead to its demise. The bishop is ineffective against the dark-square blockade. 27...Re8 28.Ne7† Kf8 29.Bc6 Rd8 30.Bxd7! Rxd7
We saw a similar position a moment ago in the 27.Nxd7? note above, but in that case White was left with his bishop instead of his knight, which made it hard for him to force the pawn through to the final rank. The knight is much more effective. 31.Nc8! 363
White not only is attacking the b6-pawn, but also helping the d-pawn to advance further. 31...b5 32.Nb6 Rd8
The rook on d8 will be hard to move off its perch, but White now wins by making a second passed pawn. 33.cxb5! axb5 34.a4 White wins. There’s no stopping the a-pawn. 27.Kf1 Nd4 At first it might look like White is just losing a pawn, but he has a nice resource:
28.d7! 364
The key point is that the pawn cannot be comfortably taken on d7. This presents Black with an awkward dilemma, as if he does not take on d7 now, White will have time to bring his bishop to h3. Once that happens, the pawn will be secure and White will be well placed to fight for its advance to the final rank. 28...h5? Preparing ...Ng4 seems logical, but it proves insufficient due to an excellent tactical resource. I think the lesser evil would have been taking the pawn: 28...Nxd7 29.Nc6! Re8 (if 29...Nxc6? 30.Bxc6+– Black loses a piece and the game) 30.Nxd4 cxd4 31.Rxd4±
White’s bishop is suddenly an excellent piece, and some combination of Rd6 and/or a b3-b4 and c4c5 advance will cause Black a lot of headaches. Still, all is not lost yet, and I think Black should have given this a try.
365
29.Bh3! Ng4 Trying to box out the bishop with 29...g5 leads to a nice refutation30.Rxd4! cxd4 31.Bf5
Black is essentially stalemated. He can never move his rook or his knight, and he cannot bring his king to e7 on pain of Nc6†. So, what can he do? Absolutely nothing. White wins easily with Ke2d3xd4 and advancing the b- and c-pawns. 30.Bxg4 hxg4 I had to see the following resource before committing to 24.d6!, but it is not too difficult.
366
31.Rxd4! In a little throwback to the section on connected passers, we get to see their power on full display. 31...cxd4 32.b4 1–0 Black resigned. Had he continued, the game might have concluded with something like: 32...d3 32...f6 33.c5! fxe5 34.c6 Kf7 35.c7 Ke7 36.c8=Q! is over. 33.c5 d2 34.Ke2 f6 35.c6 fxe5 White has one last trap to avoid.
367
36.Kd1!+– Avoiding 36.c7?? d1=Q†! 37.Kxd1 Rxd7† when it is Black who wins. Although my play was quite convincing in this game, it should to be noted that the difficulty I faced, and the accurate calculation that was required of me before making the d5-d6 advance, was largely due to Black’s pieces being pretty well placed to stop the pawn. There was one variation where I had to sacrifice the d7-pawn, and two where I had to give up the exchange. When accurately calculated, it became clear that d5-d6 was the right move, but it would not have been possible to justify the decision on principles alone. The idea that having more pieces fighting to promote a pawn than the opponent has defending pieces is simple to understand, which brings us to the second guideline. Whenever possible, try to prevent your opponent’s pieces from playing active roles in stopping a passed pawn. This often helps you even more than controlling the squares in front of the pawn with your own pieces. The most basic example of this guideline would be a lone passed pawn. If you have no pieces supporting it and your opponent has no pieces obstructing it, the pawn will become a queen. As such, it is often more valuable for you to push a defender away than it is to bring in resources of your own. As simple as this guideline sounds, it was very nearly responsible for ending the World Championship reign of the highest-rated player in history.
Magnus Carlsen – Sergey Karjakin New York (8) 2016 368
1.d4 Nf6 2.Nf3 d5 3.e3 e6 4.Bd3 c5 5.b3 Be7 6.0-0 0-0 7.Bb2 b6 8.dxc5 Bxc5 9.Nbd2 Bb7 10.Qe2 Nbd7 11.c4 dxc4 12.Nxc4 Qe7 13.a3 a5 14.Nd4 Rfd8 15.Rfd1 Rac8 16.Rac1 Nf8 17.Qe1 Ng6 18.Bf1 Ng4 19.Nb5 Bc6 20.a4 Bd5 21.Bd4 Bxc4 22.Rxc4 Bxd4 23.Rdxd4 Rxc4 24.bxc4 Nf6 25.Qd2 Rb8 26.g3 Ne5 27.Bg2 h6 28.f4 Ned7 29.Na7 Qa3 30.Nc6 Rf8 31.h3 Nc5 32.Kh2 Nxa4 33.Rd8 g6 34.Qd4 Kg7 35.c5 Rxd8 36.Nxd8 Nxc5 37.Qd6 Qd3 38.Nxe6† fxe6 39.Qe7† Kg8 40.Qxf6 a4 41.e4 Qd7 42.Qxg6† Qg7 43.Qe8† Qf8 44.Qc6 Qd8 45.f5 a3 46.fxe6 Kg7 47.e7 Qxe7 48.Qxb6 Nd3 49.Qa5
Black’s passed pawn on a3 is obviously dangerous, but it is not clear how it will advance further. Black’s knight is weirdly placed in a way where it neither protects the pawn (to free the queen) nor can go anywhere useful to control the a2-square. Objectively, the position is a draw, but Karjakin found the best way to apply pressure. 49...Qc5! Before anything else, he puts the queen on a better square. Trying to box in the bishop right away with 49...Ne5 is much less effective. White has many moves which are holding, of which I like 50.Bf1 the most. A crucial point is that Black is unable to deliver a check on f2 here, due to not having placed his queen on c5 before playing ...Ne5. 50.Qa6 Ne5! If Black rushed to try to promote the pawn as soon as possible, White would easily hold by activating the bishop: 50...Qc3 51.e5! Nxe5 52.Qa7† Nf7 53.h4
369
The absence of the e4-pawn means the bishop is participating again, and Black cannot make progress as his king is too open. For example, the direct 53...Qb2 fails after: 54.Kh3 a2? (54...Qc3=) 55.Bd5± Karjakin’s choice is much stronger. Black locks White’s bishop out of the game, preventing him from pitching the useless e4-pawn to make the e4- and d5-squares available for defensive and/or counterattacking purposes. White must now be extremely precise to hold, and even Magnus did not manage.
51.Qe6? A natural move, getting the queen closer to the king while still keeping an eye on the a2-square. It certainly stops any hope Black may have had involving running with his king to b2. But Karjakin now takes a page out of Chapter 3 and plays for an attack against the white king, thus creating decisive 370
threats on both sides of the board. According to the computer, White holds with 51.Qb7† Kf6 52.Qa6† Ke7 53.Qb7† Kd8 54.Qa8† Kc7 and now the only move is:
55.h4! I do not fully understand why this is the only move, but I guess it has something to do with being able to hide the king on h3, so that the bishop can come back to f1 without allowing the queen to come to f2 with a forced mate. Even so, in a practical game I would still be worried about the possibility of Black’s king running to b2. 51...h5! Black plans to open a line to White’s king with ...h4. Once this happens, he will have a lot of checks available to make progress, most notably with his queen capturing a pawn on e5 once the knight comes to f7 to avoid a perpetual. 51...Qc3? allows 52.Qe7† Nf7 53.Qa7 Qb2 54.e5! when White once again draws by activating his bishop. 52.h4 Continuing to wait would not have changed the result: 52.Qa6 h4! 53.gxh4
371
53...Qc3! Now that the white king has been exposed, Black is ready to run to b2 with the queen. 54.Qa7† Nf7 Black wins because 55.e5 Qxe5† comes with check – which is why ...h5-h4 was so important. White’s last move prevents the ...h4 idea but allows a different win.
52...a2! Blending the attack on the white king with threats of queening the pawn. Magnus resigned instead of facing 53.Qxa2 Ng4† 54.Kh3 Qg1 55.Qb2† Kg6 when he is out of checks and out of luck. 0–1 Karjakin would not have won against perfect defense, but he must be credited for finding the best 372
chance. He surely knew that the knight on e5 was not going to help the a-pawn promote, but it did stop the g2-bishop from getting into the game, and this turned out to be even more important. Magnus came back and won his next White game to tie the match, and subsequently managed to hold on to his crown. But he could have done himself a favor by considering the relevant guideline from his opponent’s point of view. Had he done so, he could have sacrificed his e-pawn on move 49, right before we picked the game up. His bishop would have been active, and he would almost certainly have made a draw. The deeper into the endgame we get, the more this principle may apply to the king as opposed to another defensive piece. I was happy to have figured this out in an important game in my first exclusively 2700+ tournament.
Sam Shankland – Jan-Krysztof Duda Danzhou 2018 1.e4 c5 2.Nf3 e6 3.d4 cxd4 4.Nxd4 Nf6 5.Nc3 d6 6.Be3 Be7 7.f3 0-0 8.Qd2 Nc6 9.0-0-0 d5 10.Be2 dxe4 11.Nxc6 bxc6 12.Qxd8 Bxd8 13.Nxe4 Nxe4 14.fxe4 Bb6 15.Bxb6 axb6 16.Kb1 Ba6 17.Bxa6 Rxa6 18.Rd6 Rfa8 19.Rhd1 g5 20.Rxc6 Rxa2 21.c4 R2a4 22.Rd7 g4 23.h3 h5 24.hxg4 hxg4 25.Rd3 Kf8 26.Kc2 b5 27.cxb5 Rxe4 28.b6 Rb8 29.Rb3 Ke8
The b6-pawn looks menacing but getting it all the way to the final rank proves difficult. Pushing it directly does not work, so White must be a bit more sophisticated. 30.Kd3! Before anything else, White activates his king and tries to keep the enemy rook off the d-file. 373
Pushing the pawn prematurely would allow Black to blockade it: 30.b7? Kd7! Black activates the king and easily contains the pawn.
31.Ra6!? After 31.Rc5 Rd4 Black is perfectly solid and can even think about ...Rd6-c6 and ...Kc7 to pressure the b7-pawn. He doesn’t risk losing. The text move sets a small trap, but Black is fine after: 31...Kc7!= 31...Re2† is also playable, but after 32.Kc1 Black must avoid getting greedy, as 32...Rxg2? loses to 33.Ra8 Kc7 34.Rc3†! Kxb7 35.Ra4!+– when the mating threats will cost Black a rook. My first instinct was: 30.Rc7? This is another case of right plan, wrong execution. Black’s king is indeed cut off along the final rank, but Black can bring his rook back just in time to save the day.
374
30...Rd4! 31.Kc3 Rd6! Black forces the pawn to b7 before White’s king is ready to support it. Pawns don’t move backwards, after all... 32.b7 Rd7! White has nothing better than a draw, for instance with:
33.Rc8† Rd8 34.Rc7= With a repetition. (34.Rxb8!? Rxb8 prolongs the game but it’s still a clear draw.) The move played in the game places Black in a tough spot. If his rook leaves the 4th rank, White will run his king to a6, bringing decisive support to the advanced b-pawn.
375
30...Ra4 30...f5? loses without much of a fight after:
31.Rc7! Black has an even worse version of the game, and White wins easily. 30...Re1 is also not much good after 31.Kc4 when the b-pawn will promote without much discussion. For example: 31...Kd7 32.Rc7† Kd6
33.Rxf7!?+– Why not? No counterplay, ever. (33.Kb5+– also wins, of course.)
376
31.Rc7! An important move. Black’s king is unable to join the defense, and White wins fairly easily. Once again, the premature 31.b7? allows Black to activate his king, turning it into a valuable defensive piece. 31...Kd7! Black stops the pawn in its tracks, and threatens to scoop it up with ...Ra7 and/or ...Kc7. White must play precisely to avoid being worse: 32.Rcb6 Kc7 33.Ke3 Ra7 34.Kf4= 31...Ra6 32.b7 What a difference it makes now that Black’s king is unable to help!
32...Rd6† 33.Kc4 Rdd8 377
Black could have tried 33...Rd7 but with the white king closer it would not hold. White only has one route to victory, but the moves are not at all difficult: 34.Rc8†! Rd8 35.Rxb8! Rxb8 36.Kc5 Black can resign, as Kb6-a7 is on the way and he is one tempo too slow to stop it. 34.Rd3 White’s victory can be chalked up to correctly boxing the king out at the right moment, as the pawn otherwise would have been stopped. 1–0 Sometimes, fighting directly for the squares in front of the passed pawn proves impossible. We may recall from Chapter 3 that one of the best ways to promote a passed pawn is to create threats against the enemy king. Karjakin’s win over Carlsen was a good demonstration of this concept, but it is unusual to be able to target the enemy king with so few pieces remaining – and this is especially true in endgames without queens. In reduced material situations, it is generally harder to drum up a mating attack. Nevertheless, the same principle of stretching your opponent’s ability to defend against two problematic threats can be highly effective. Let’s see an example of this in action.
Alexander Grischuk – Hikaru Nakamura Thessaloniki 2013 1.e4 e5 2.Nf3 Nc6 3.Bb5 a6 4.Ba4 Nf6 5.0-0 b5 6.Bb3 Bc5 7.c3 d6 8.d4 Bb6 9.a4 Rb8 10.Na3 0-0 11.axb5 axb5 12.Nxb5 Bg4 13.Bc2 exd4 14.Nbxd4 Nxd4 15.cxd4 Re8 16.Re1 Bxf3 17.gxf3 Nh5 18.Ba4 Rf8 19.Bc6 Qf6 20.Ra4 Nf4 21.Kh1 d5 22.exd5 Ng6 23.Re4 Ne7 24.Rc4 Qd6 25.Bf4 Qd8 26.Bg5 f6 27.Bf4 Nxd5 28.Bxd5† Qxd5 29.Qe2 Rf7 30.Kg2 Rbf8 31.Qc2 g5 32.Be3 Ra8 33.b3 Kg7 34.Rc6 Ra5 35.Qc4 Rb5 36.h4 h6 37.Rce6 Ba5 38.Re8 c6 39.Ra8 Bb4 40.Re6 gxh4 41.Qxc6 Qxc6 42.Rxc6 Bf8 43.Rc3 Rfb7 44.Rcc8 Be7 45.Rg8† Kf7 46.Rh8 h5 47.Rh7† Kg6 48.Rh6† Kf7 49.Rah8 Bf8 50.Rxh5 Rxh5 51.Rxh5 Rxb3 52.Rxh4 Rb5 53.Kf1 Ke6 54.Ke2 Bd6 55.Kd3 Rb3† 56.Kc4 Rb4† 57.Kc3 Rb5 58.Rh6 Ra5 59.Kd3 Bf8 60.Rh8 Bd6 61.Kc4 Ra4† 62.Kb3 Ra3† 63.Kb2 Ra5 64.Bd2 Rf5 65.Rh3 Bf4 66.Be3 Bd6 67.Kc3 Ra5 68.Rh6 Ra3† 69.Kc4 Ra4† 70.Kd3 Bf8
378
White is two pawns up, which is usually enough of a material advantage to win the game. However, his doubled f-pawns don’t look so useful and his lone, isolated passed d-pawn seems well under control. The key to White’s victory is to fix a second weakness in Black’s position, and Grischuk’s technique was extremely instructive. 71.Rh5! An excellent choice. White takes control of the fifth rank, rendering Black incapable of stopping the f4-f5(†) advance, which will fix Black’s f6-pawn as a long-term weakness on the same color square as the bishops. If White were to go to another square, Black’s defensive chances would immediately increase. For instance, 71.Rh7? Ra5! and White will really struggle to get f4-f5 in, or d4-d5 for that matter. In a practical game I would still expect White to win because he can torture Black for 50 moves, play f3-f4, then play another 50 moves, and defending this forever feels like an impossible task with energy levels dropping and the clock ticking down. Nevertheless, in a higher chess sense, I believe this is objectively a draw, as I can’t see a convincing way for White to make inroads. 71...Ra3† 72.Ke4 Ra4 73.f4 The following variation does not represent best play (or anything close to it) for either side, but I include it in order to drive a key point home: 73.Bd2 Bd6 74.Ra5 Rxa5 75.Bxa5
379
We reach a similar endgame to the one from the game, except that here White has not yet carried out the f4-f5 advance. As a result, Black will play 75...f5†! first, and after 76.Kd3 Kd5= he does not suffer from a second weakness. Black’s king cannot be removed from d5 and the f5-pawn cannot be attacked, so the position is clearly drawn. 73...Be7 74.Rb5 Bd6 75.f5† Kd7 Step one of White’s masterplan is complete. The f6-pawn is fixed as a weakness, and Black’s king has been booted away from the preferred e6-square. But what comes next? It still looks very hard to advance the d-pawn down the board.
76.Rb7† Ke8 77.Kd5 Be7 78.Rb5 Ra2 79.Rb8† Kd7 80.Rb7† Ke8 81.Ke4 Bd6 82.Kd3 Ra5 83.Ke4 380
Ra2 84.f3 Be7 85.Bf4 Ra4 86.Bd2 Kd8 87.Kd5 Ke8 Grischuk has wasted a fair amount of time making aimless moves, but since he never had to face any counterplay, he was not in any rush to win the game. At this moment he landed on the right plan.
88.Rb5! Kd7 89.Ra5! Black is forced to trade rooks. 89...Rxa5† 90.Bxa5 At first glance, it may look like Black is holding. After all, White only has one passed pawn, and he has no piece capable of pushing Black’s king off the blockading d7-square. However, White can stretch the defenses by targeting the f6-pawn. In Chapter 3 we often saw that attacking the opponent’s king was a good way to divert defensive resources from a passed pawn. King safety is obviously not an issue here but the same general strategy applies, as White will create threats in another area of the board in order to distract the defending pieces from the passed pawn.
381
90...Ba3 91.Bb6 Bc1 92.Bc5 Be3 93.Bb4 Bf2 94.Bf8 Be3 95.Bc5 Bg1 96.Ba3 Be3 97.Ke4 Bd2 98.Bc5 Ke8
Again, White has wasted a fair amount of time on the preceding moves, but he has not spoiled his advantage in any way because Black could do nothing but sit tight and shuffle his pieces back and forth. Perhaps Grischuk was in his customary time trouble and was trying to build up some time on the clock before taking direct action. 99.d5! Kd7 The next step of White’s plan is complete. Black’s king is held firmly at bay by the d-pawn, which cannot be approached. White’s next objective is to bring the king around to harass the f6-pawn. 382
100.Be3 Ba5 101.Bd4 Bd8 102.Bc3 Be7 103.Kf4 Bd6† 104.Kg4 Ke7 105.Bd2 Bc5 106.Bf4 Bb4 107.Kh5 White’s strategy finally bears fruit, as Black finds himself in a painful dilemma. The king threatens to infiltrate to g6 and the only way Black can stop it is by moving his king to f7, but this allows White’s d-pawn to advance. Either threat is enough to win the game, and Black’s king is only wide enough to prevent one of them.
107...Kf7 The alternative of watching the d-pawn and allowing the king in to g6 loses more quickly: 107...Ba3 108.Kg6 Bb2 109.Bg3 Bc3 110.Bh4+–
383
Even if Black keeps defending the f6-pawn, White can capture it on the next move and win back the bishop with d5-d6†. 108.Bg3 Bc5 109.d6! Bd4 110.Bh4 Bb6 111.d7 Bd8 White has made enormous progress. His passed pawn has made it all the way to the 7th rank, not because he was able to force the king away by fighting for the d7-square, but because he stretched Black’s defenses by making equally devastating threats on the other side of the board. The white king’s march to the kingside has served its purpose and lured the black king away from d7. Now all that remains is to bring the king back around to the center to support the pawn’s advance to the final rank.
112.Kh6! Zugzwang. Any king move will allow Kg6, so Black must move his bishop somewhere. 112...Ba5 112...Be7 113.Bg3 Bd8 114.Bd6 is essentially the same as the game. 113.Be1! White wins a tempo and brings the bishop to the a3-f8 diagonal next. 113...Bb6 114.Bb4 Black’s king is now frozen on f7 and thus can do nothing to threaten the d7-pawn. White brings his king back, and wins.
384
114...Bd8 115.Kh5 Kg7 116.Bd6 Kh7 117.Kh4 Kh6 118.Kg4 Kg7 119.Kf4 Kh6 120.Ke4 Kg5 121.Bf4† Black resigned as Kd5-e6 is on the way. A fine technical effort from Grischuk. 1–0 Grischuk’s technique was extremely instructive and convincing from start to finish. First he created a second weakness; then he traded rooks; then he attacked the second weakness to stretch Black’s defenses; and finally he was able to break the blockade. This brings us to the next guideline. If you are unable to fight directly for the squares in front of your passed pawn, you can try to fight for those squares by making threats in other parts of the board. As mentioned, this is seldom about attacking the king in the way we saw in the middlegame. That is why fixing any weaknesses, as Grischuk did by advancing his f3-pawn to f5, can be crucial. Although Grischuk’s methodical play was textbook in its execution, it took place in a heavily simplified position where Black had no counterplay whatsoever, and Nakamura could only sit and await his fate. Still, the same principle can apply to more complicated positions as well.
Penteala Harikrishna – L. Dominguez Perez Wijk aan Zee 2014 1.e4 c5 2.Nf3 d6 3.d4 cxd4 4.Nxd4 Nf6 5.Nc3 a6 6.Be2 e5 7.Nb3 Be7 8.0-0 0-0 9.Be3 Be6 10.Qd3 Nbd7 11.Nd5 Bxd5 12.exd5 Ne8 13.Bg4 Nef6 14.Bh3 Re8 15.c4 e4 16.Qe2 Nc5 17.Rad1 Qc7 385
18.Nxc5 dxc5 19.g3 Bd6 20.Bg5 Qe7 21.Bg2 h6 22.Bxf6 Qxf6 23.Bxe4 Qg6 24.Bxg6 Rxe2 25.Bh5 Rxb2 26.Rb1 Rb4 27.Rfc1 b6 28.a3 Rxb1 29.Rxb1 Rb8 30.a4 Kf8 31.Kg2 g6 32.Be2 a5 33.Bd3 h5 34.f4 Kg7 35.Kf3 Rb7 36.h3 Rb8 37.g4 hxg4† 38.hxg4 Bc7 39.g5 Rh8 40.Kg4 Rb8 White is obviously better, as Black’s 3–2 majority on the queenside will not yield a passed pawn. Still, it does prevent any pawn breaks to allow the rook in, and White’s one passed pawn seems virtually impossible to advance due to the opposite-colored bishops and the blockade on d6. I believe the position should be a draw, but Hari found the way to apply the maximum amount of pressure.
41.Re1 Bd6 42.f5! White opens the kingside to try to make a second weakness. There was no way he was ever going to kick the bishop off d6 by normal means. 42...gxf5† 43.Bxf5 Rh8 Black looks like he is ready to get somewhat active, but White quickly sends him back where he came from.
386
44.Rb1! Rb8?! An understandable yet incorrect decision. 44...Bc7 Black should have preferred this move, even though if offers White the following tempting option. 45.d6! Bxd6 46.Rxb6 Rd8
47.Be4! White intends to put his bishop on d5 and king on f5, placing Black’s position under an enormous amount of pressure. The rook can come to b7 or b5 and it will be hard to defend all the weaknesses. Still, with hyper-accurate play, Black should hold.
387
47...Bc7! 48.Rb7 Rd7 49.Kf5
49...Re7! 50.Bd5 Re5† White’s king is forced back. Best play continues: 51.Kg4 Re7 52.Rb5 Kg6! 53.Rxc5 f5†! 54.gxf6 Kxf6 Despite being a pawn down Black should be able to hold, though there is still some work to do. 45.Bd3 Bc7 By trading the f-pawn for the g-pawn, White has opened the 6th rank. Indeed, if he can land a rook on h6, he will be winning. This is not easy to do though! Hari finds a brilliant triangulation.
46.Re1! 388
White would like to put his king on f5 so that after Rh1, Black will not be able to reply with ...Rh8 due to the simple winning plan of Rxh8 (even Rh6!? would be good enough) followed by Kf6 with a decisive penetration of the king. However, the immediate 46.Kf5? would be premature in view of either 46...Re8! followed by a check on e5, or 46...Rh8! when Black takes the h-file first, and he even has a mating threat of ...Rh4-f4. In either case, Black should be fine. 46...Bd6 Obviously Black cannot allow Re7. 47.Rh1! Rh8 48.Rb1! The position is almost the same as move 44, except that White’s bishop has moved from f5 to d3. Once again, Black is in a tough spot and must decide which way to defend the b-pawn.
48...Rb8 Again 48...Bc7! should have been preferred, when 49.d6 leads to variations similar to those in the note on 44...Bc7, but this is much easier to understand with an engine running! After the text move, we have the same position as after Black’s 45th move, except that Black’s bishop has shifted from c7 to d6. As a result, Black’s rook is tied to the defense of the b6-pawn. 49.Kf5! For one key moment, Black is unable to meet this move with ...Re8 or ...Rh8. This single spare tempo is all that White needs to get his rook to h6. 49...Bc7 50.Re1 Bd6
389
51.Rh1! Re8 With the king on f5, 51...Rh8? does not actually prevent the threat: 52.Rh6! (52.Rxh8 Kxh8 53.Kf6 Kg8 54.g6+– also breaks the blockade) 52...Rxh6 53.gxh6† Kxh6 54.Kf6+– Followed by Kxf7 and Ke6. 52.Rh6
52...Re5† Black correctly opts for active defense. It is instructive to see how White would have broken the blockade had Black opted for a passive 390
approach: 52...Rd8 White has a few ways to win but I especially like the following maneuver. 53.Be2! Bc7 54.Bh5 White simply attacks the f7-pawn. He already threatens to take it because of the check on h7, and Black’s defenses are too stretched. 54...Rd7 55.Rf6
Despite White’s inability to forcefully take over the d6-square, attacking f7 is quite enough. For instance: 55...Bd6 55...Bd8 loses to 56.Rc6 followed by g5-g6. The text move is an attempt to maintain the blockade, but it allows a nice tactical refutation: 56.Bxf7! Rxf7 57.Ke6 Black can resign. 53.Kg4 The rest of the game was interesting, but the main instructive value for our purposes was in the previous phase, where White’s skillful maneuvering enabled him to make inroads. Therefore we will not spend much time on the remaining moves.
391
53...Be7 54.Rxb6 Rxg5† 55.Kf4 Rh5 56.Bf5 Rh1 57.d6 Rf1† 58.Kg4 Rg1† 59.Kh3 Bg5 60.Be4 Ra1
61.Rc6! Connected passers, here I come! White makes a decisive threat to the c5-pawn. Black can defend it with ...Be3, but that would allow the d-pawn to run free. 61...Rxa4 62.Rxc5 Bf6 63.Rc8 Ra3† 64.Kg4 a4 65.c5 Rc3 66.c6 a3 67.Ra8 Rc4 68.Kf4 Rc5 69.d7 Bg5† 70.Kg3 f5 71.Bf3 Kf7 72.Bd5† Kg6 73.Rg8† Kh6 74.Rxg5 Rxd5 75.Rg8 1–0
392
Hari’s play was extremely instructive. The blockade on d6 looked airtight with opposite-colored bishops, but once White opened the kingside, the plan of bringing the rook to the sixth rank turned out to be decisive. Understandably, Dominguez looked for counterplay instead of passive defense that would not have held anyway, but ultimately the same plan of attacking something unrelated to the passed pawn with Rxb6, Rc6 and Rxc5 was what concluded the game in White’s favor.
393
Exercises
Vladimir Kramnik – Judit Polgar Madrid 1993
White’s d-pawn may or may not carry the day. How should he continue? Show/Hide Solution > 35.Bd2! 35.d7? would have been premature due to 35...Ke7 when the pawn will fall, although White still draws of course. The text move is far stronger: White simply threatens Ba5. 35...Nb3 What else is there? In the event of a neutral move the bishop would have gone to a5 next, not only providing decisive support to the passed pawn but also incidentally threatening mate on d8. Some calculation is required after 35...Bf8 but it’s not too hard: 36.d7 Ke7
394
37.Bb4! Black is unable to take on d7 due to the hanging bishop on f8, and otherwise is unable to stop Nxe6†. 36.Nxb3 Bxb3
37.d7! Now and only now! The pawn will be secure on d7 for long enough for White to take control over the promotion square. 37...Ke7 38.Bc6 Bf6 After 38...Be6 39.Bb4† Kd8 40.Ba5† the finish line is reached just in time. 395
39.Ba5 Kd6 40.Bb5 Black was losing a piece and soon had to resign.
40...Bc2 41.d8=Q† Bxd8 42.Bxd8 f5 43.gxf5 Bxf5 44.Bf6 Ke6 45.Bg7 h5 46.Bc4† 1–0
Georg Meier – Aryan Tari Helsingor 2014
White’s passed pawn on c5 is firmly blockaded and Black may be ready to continue with ...Bf8. How 396
should White proceed? Show/Hide Solution > 27.Rd7! White will break the blockade by making unrelated threats. Black certainly cannot allow White to double rooks on the 7th rank. 27...R6c7 Understandably, Black refuses to allow the seventh rank to be invaded. However, the exchange of one pair of rooks is the first step towards the blockade of the c-pawn being broken. 27...Bf8 is also no picnic for Black after 28.Rb7 R6c7 (28...Bxc5? loses more quickly to 29.Rdd7+– when the rooks are too powerful) 29.Rxb5 Bxc5 30.Rxa5± with an extra pawn, not to mention connected passers. 28.Rxc7 Rxc7 29.Rd6! Again, White breaks through with unrelated threats. The rook is coming to harass the queenside pawns. 29...e5 I think Black should have eliminated the c5-pawn, no matter the cost: 29...Bf8 30.Ra6 Bxc5 31.Rxa5 Bxe3 32.Kxe3 b4 33.Kd3
The computer insists White is completely winning here, but I think there is still some work to do. Tari’s choice in the game did not put up much of a fight. 397
30.fxe5 Bxe5
31.Ra6 Bxb2 32.Rxa5 b4 Just six moves after our starting position, White has made a great deal of progress. The unrelated threats along the seventh rank forced Black to exchange a pair of rooks, and then the pawn exchanges have presented White with the easy plan of marching his king to b5 or d5 to support the passed c-pawn. It’s remarkable that Black’s blockade, which initially looked airtight and impervious to any kind of attack, was broken down so quickly. 33.Kd3 Ke7 34.Ra6 Be5 35.Ke4 The rest was easy for Meier. Had I been in Tari’s spot, I might have even resigned here.
398
35...Bg3 36.Bd4 Bxh4 37.Bf6† Kd7 38.Kd5 Rc8 39.Rb6 h5 40.gxh6 Bxf6 41.Rxf6 Ke7 42.Rb6 Rd8† 43.Ke5 f6† 44.Rxf6 Rd2 45.Rxg6 Re2† 46.Kd5 Rxa2 47.Rb6 Rd2† 48.Kc4 Rh2 49.Kxb4 Kd7 50.Rg6 Kc7 51.Kc4 Kd7 52.c6† Kc7 53.Kd5 Rh5† 54.Ke6 Kxc6 55.Kf7† Kd7 56.Kg7 Re5 57.h7 Re7† 58.Kh6 1–0
Erwin L’Ami – Yu Yangyi Batumi (ol) 2018
What should Black do? 399
Show/Hide Solution > To win the game, Black must be able to fight for the g2- and g1-squares with his king. Once it comes to h2, matters are all but decided. For that to happen, White’s king most certainly cannot be allowed to come to f1. 77...Bd3! Zugzwang. The only other way to try to prevent Kf1 is the faulty tactical idea: 77...Bf5?? This was actually played in the game. It’s unusual to see a blunder this ghastly from such a strong player, but it can happen when under a lot of pressure and fatigued from a long game. 78.Bxf5! Well spotted. Meekly retreating with 78.Bf1? would not have saved White. Among other things, Black can simply repeat the position with 78...Be4 79.Bh3, before improving with 79...Bd3! the second time around. 78...g2 79.Be4†! Kxe4 80.Kf2 Kf4 81.Kxg2 ½–½ 78.Bc8 78.Bf1 Bf5! is all over. The only other option is 78.Kd2, but now 78...Bf5! is a good solution, as after 79.Bxf5 g2 White’s king is too far away for the Be4† trick to work.
400
78...Kg2! 79.Bb7† Kh2 Now the win is easy; Black simply brings his bishop around to g2. 80.Bc6 Bf5 81.Bb7 Bh3 82.Bc6
82...Bg2! White’s bishop is booted off the long diagonal. Then once Black’s bishop moves, its counterpart will only be able to control the g2-square using the f1-h3 diagonal, which is painfully short. 83.Bb5 Bd5 84.Bf1 Bc4! Since Be0 and Bi4 are not legal moves, Black wins. 401
Varuzhan Akobian – Dmitry Zilberstein Los Angeles 2003
How can White ensure the promotion of the d-pawn? Show/Hide Solution > 36.Ra8†! With a couple of checks, White not only advances his pawn all the way to d7, but also prevents Black’s king from approaching the d-pawn. 36.Ra6? would not have done the trick. Black should hold after: 36...Bxg5 (36...Be2!? is also good enough) 37.Bxg5 h5
402
Followed by ...Bg4(†) and ...Kf7-e6, when White’s winning chances are slim. Trading on f3 is tempting but wrong, as Black’s king will not be kept passive: 36.Nxf3? exf3 37.Ra8† Kf7! This is the key difference between checking first as opposed to taking on f3 and then checking: Black’s king gets to e6.
38.Ra7† Ke6 39.Rxh7 e4² Black has good drawing chances, though he is not fully out of the woods yet. 36...Kg7 37.Ra7† Kg8
403
38.d7 There’s nothing wrong with this move, but I would have preferred to insert 38.Nxf3 exf3 right away – even if for no other reason than it offers an instructive comparison to the situation in the previous note when White exchanged on f3 prematurely:
In the aforementioned note, we saw a similar position but with Black’s king on e6 rather than g8, which massively increases his drawing chances for obvious reasons. As is, Black can resign after 39.d7, when Bb6 is on the way. Black’s paralyzed king is unable to pressure the d7-pawn or play any kind of active role in the defense.
404
As usual, after discussing a topic, the next step is to look at the same topic again but from the alternate side. Containing an opponent’s lone passed pawn is every bit as important as pushing our own through, and while some of the same principles can simply be inverted, the thought process should change somewhat when playing defense. Trying to stop a passed pawn can come in any situation. You could be a pawn down and trying to save the game, or you could be winning elsewhere and just need to stop the pawn to bring the game to its conclusion, or anything in between. But in all cases, the goal is to make sure the pawn stays a pawn. Broadly speaking, you can attempt to stop a passed pawn with active defense or passive defense. Please note that “passive” is a somewhat misleading word: it means that you are not trying to make counterplay in any way, shape, or form, but it does not necessarily mean that your pieces are worse than your opponent’s. Rather the contrary: your pieces will generally have to be well placed and defending efficiently if you are hoping to save the game without counterplay. I remember being frustrated by “passive” defense leaving me playing without a key piece in a vital game that played a part in costing the United States the gold medal at the 2018 Olympiad.
Sam Shankland – Jacek Tomczak Batumi (ol) 2018 1.e4 c6 2.d4 d5 3.exd5 cxd5 4.Nf3 Nc6 5.Bb5 Qa5† 6.Nc3 Bg4 7.Bd2 Qd8 8.Ne5 Bd7 9.Bxc6 Bxc6 10.Qf3 Nf6 11.g4 h6 12.h4 e6 13.0-0-0 Bd6 14.Bf4 Qc7 15.Bh2 0-0-0 16.Nxc6 Qxc6 17.Bxd6 Qxd6 18.g5 hxg5 19.hxg5 Rxh1 20.Rxh1 Ne4 21.Qxf7 Nxc3 22.bxc3 Rd7 23.Rh8† Kc7 24.Qe8 Kb6 25.Qf8 Re7 26.Rg8 Qc7 27.Kb2 Qd7 28.Qd8† Qxd8 29.Rxd8 Kc6 30.g6 e5 405
I had played a good game thus far, including my earliest ever queen sacrifice. White should win with best play, but I underestimated how effective passive defense could be. 31.dxe5? At this point I was confident about winning, but my last move actually squandered half a point. White should have preferred: 31.Rg8! Preventing ...Re6, while leaving the central pawns as they stand for the moment. I thought about this but was concerned about: 31...Kd6 32.Kb3 Ke6
406
I did not see how to stop ...Kf6, but White wins easily with: 33.Rf8! Pointing out that the rook is no longer needed on g8, since Black’s king is occupying the e6-square and preventing the rook from gobbling up the g6-pawn. 31...Rxe5 32.Rg8 Rf5 33.Rxg7 Rxf2 34.Rf7 Rg2 35.g7
I had seen this far when I took on e5 and thought White was absolutely winning. His pawn on the 7th rank will tie Black’s rook on the g-file forever, so I hardly need to worry about a move like ...Rxc2 once my king runs over to the kingside. In addition, the active placement of the rook on the 7th rank means Black’s king will be slow to come forward since his pawns require protection. Black has no counterplay and White wins easily by simply bringing his king to the kingside. Or so I thought... 35...Rg1! This is a vital part of Black’s defensive scheme. White’s king is cut off along the first rank and has no way to join the fight on the kingside. The endgame is too complex to be 100% certain, but I am pretty sure any other move would lose. For instance, if Black lets the king free with a move like 35...a5, White should be winning after: 36.Kc1 b5 37.Kd1 Kc5 38.Ke1
407
White’s king will slowly but surely kick the rook back and force the g-pawn through. Since ...Kc4 is not to be recommended, I don’t see what Black can do about it in the meantime. After the move played in the game, I realized I would not be able to bring my king in without making some kind of sacrifice. I spent some twenty minutes calculating the pawn sacrifice with c3-c4 to clear a route for the king, and ultimately (wrongly) concluded that White would win. 36.c4 Unfortunately, my opponent immediately responded with the best move.
36...d4! I had not even seriously considered the possibility that Black might not take my pawn; after all, I will 408
go c4-c5 and then the king can enter the position from c4. Right? All of my time was burned working out what happens if Black defends actively by taking my pawn and looking for counterplay. 36...dxc4 This actually draws as well, but Black’s margin for error is extremely thin and the game continuation is undoubtedly the simplest route to half a point. Play continues: 37.Kc3 Rg4! 38.Kd2 a5! 39.Ke3 b5! 40.Kf3 Rg1 41.Kf4 b4 42.Kf5 Kc5 I had reached this far in my long think, and believed White could win with:
43.Re7! Threatening Re5† when Black’s king will be forced to allow another check from either e4 or e6, followed by a quick transfer to the g-file. Had this position been reached on the board, I’m sure I would have noticed the holding move. 43...Rf1†! But not 43...a4? 44.Re5† Kd4 45.Re4† Kc3 46.Rg4 and White wins. 44.Kg6 Rg1†! 45.Kf7 Kd4 Black’s counterplay is sufficient for a draw. 37.c5 Preparing Kb3-c4, according to plan.
409
37...b6! Black trades off his vulnerable pawns on the 7th rank, so that his king will be free to come forward and put an end to any hopes of Kb3-c4 winning the game. 38.cxb6 axb6 39.Kb3 White threatens Kc4, but Black still has the necessary resources to keep him out.
39...Kc5! It was at this moment that I understood I was not winning the game. I more than pulled my weight at the Olympiad, but had I better anticipated the passive defensive possibilities that were available to my opponent, I may have refrained from 31.dxe5? and won this game, in which case the US would not 410
have lost the critical 9th round match to Poland. Had that been the case, we might have ended up in sole first place, rather than a tiebreak zoo. I moved around a bit more, for no particular reason. 40.Ka4 Rg2 41.Kb3 Rg3† 42.Kb2 Rg1 43.Ra7 Kc6 44.Ka3 Kc5 45.Ka4 Rg4 46.Rc7† Kd6 47.Rc4 Rxg7 48.Kb5 Kd5 49.c3 dxc3 50.Rxc3 Rg2 51.Kxb6 Rxa2 ½–½ A painful game, but a highly instructive one. It is rare that an extra passed pawn on the seventh rank defended laterally by a rook will fail to win, but it turned out to be the case because I was unable to bring my king into the action. This introduces the first guideline when playing against lone passers in the endgame. “Passive” defense will only work if your pieces are more effective at stopping the pawn than your opponent’s are at supporting its advance. When applying this guideline retroactively it should be clear that, before choosing to take on e5, I would have been well advised to consider how easily my king could join the game. Had I noticed the ...Rg1 resource, I would have known that the win would at least be difficult (in fact, it was impossible). But I wasn’t on the lookout for moves like ...Rg1, simply because I failed to appreciate that passive defense might actually work. Black’s defense was only successful because my king had no route in. Imagine the position changed slightly:
Moving the c3-pawn over to b3 gives the white king access to the c3-square as a route to reach the kingside, as well as the c1-square. White is simply winning, as Black cannot keep the king out. The 411
following variation is far from forced but a good example of what the winning plan should be. 1...Rg3 1...Rg1 2.Kc3! highlights the difference compared to the game. White’s king is free, since he is not hindered by the clumsy doubled pawns. 2...Rg4 3.Kd3 The king is heading for f3 where it will force the rook to give way, enabling the king to advance further. 2.Kc1 a6 3.Kd2 b5 4.Ke2 Kd6 5.Kf2 Rg5 6.Kf3 White’s king is coming up the board, and he will win. Judging whether passive defense will hold can be difficult to do, but the first guideline helps a lot. For instance, in our next example, even a really lousy chess player was able to correctly distinguish when passive defense would hold and when it would not.
Wang Yue – Magnus Carlsen Dresden (ol) 2008 1.d4 Nf6 2.c4 e6 3.Nc3 Bb4 4.Qc2 d5 5.cxd5 exd5 6.Bg5 h6 7.Bxf6 Qxf6 8.Nf3 0-0 9.e3 Bf5 10.Bd3 Bxd3 11.Qxd3 c6 12.0-0 Nd7 13.a3 Bxc3 14.Qxc3 Nb6 15.Ne5 Qf5 16.Rfc1 f6 17.Nd3 Nc4 18.Nc5 Nd6 19.Qc2 Qxc2 20.Rxc2 Rae8 21.g3 g5 22.Kg2 Kg7 23.a4 Re7 24.Rh1 Kg6 25.Rc3 h5 26.h4 Rh8 27.Rcc1 Rhh7 28.Rh2 Nf5 29.hxg5 fxg5 30.Nd3 g4 31.Rch1 Kg5 32.Nf4 Ng7 33.b4 a6 34.b5 axb5 35.axb5 Rh6 36.Ra1 Nf5 37.Ra8 h4 38.gxh4† Nxh4† 39.Rxh4 Kxh4 40.Rg8 Rf7 41.f3 Rxf4 42.exf4 cxb5 43.Rxg4† Kh5 44.Rg5† Kh4 45.Rg7 Kh5 46.Rxb7 Ra6 47.Rxb5
White is two pawns up, but they are doubled and don’t seem so threatening, despite being passed. 412
Still, Black must take care to make the correct decision here, as his d5-pawn is hanging. 47...Kh4! The right choice. As the above guideline suggests, passive defense hardly ever works if your pieces are less active than your opponent’s. 47...Rd6?
Defending passively by holding on to the pawn fails, as Black’s rook becomes a worse piece than its counterpart. 48.Rb8 White will transfer the rook to e5, where it will maintain pressure against d5 while restricting Black’s king and supporting White’s passers at the same time. White wins easily, for example: 48...Kg6 49.Kg3 Kf5
413
50.Rf8† Kg6 51.f5† The immediate 51.Re8 is also fine. 51...Kg7 52.Re8 The rook approaches its ideal square. 52...Kf7 53.Re5
A position such as this is a perfect example of how passive defense will fail. Black’s rook is stuck defending the d5-pawn, which renders it useless in the fight to stop White’s f-pawn. White’s king is coming to g5 and there is nothing Black can do about it. 53...Rd7 54.Kf4 Black can comfortably stop the clock.
414
48.Rb2 Of course, taking the pawn was critical, but also not too challenging for Black to disarm. 48.Rxd5 Ra2† 49.Kf1 Kg3 White’s pawns rapidly start dropping and his king is not helping. In fact, he is just losing time as Black makes incidental mate threats.
50.f5 Kxf3 51.Re5 (after 51.Ke1 Ke4 White will lose both of his pawns) 51...Rd2 Black holds with ...Rd1† or ...Kf4 coming next. 48...Ra4 49.Rd2
Now Black can defend passively because his rook is more active than White’s. Note the stark contrast between this position and the one with White’s rook on b5 and Black’s on d7. White had free rein to move his king wherever he wanted and could transfer the rook to e5. As is, his rook is permanently 415
stuck defending the d-pawn and he has no way to send the f-pawns through. 49...Kh5 50.Kg3 Rb4 51.Rd1 Ra4 52.Kh3 Ra3 53.Rh1 Rd3 54.Kg3† Kg6 55.Rh4 Rd2 56.Rg4† Kf6 57.f5 ½–½ The examples featured so far in this chapter have been relatively easy to understand, but passive defense can be more complex. This is especially true in situations where you have to passively defend for a while, but then pivot and play actively if your opponent invests enough resources into breaking down your defenses in a way that allows counterplay. While working on the previous chapter, I was following an event live, and got to see firsthand that I am not the only 2700 guy to mess up a rook endgame by underestimating or misevaluating the merits of passive or semi-passive defense.
Alexander Grischuk – Wesley So Moscow 2019 1.d4 Nf6 2.c4 e6 3.Nf3 d5 4.Nc3 c5 5.cxd5 cxd4 6.Qxd4 exd5 7.e4 Nc6 8.Bb5 dxe4 9.Qxd8† Kxd8 10.Ng5 Be6 11.Nxe6† fxe6 12.Bxc6 bxc6 13.Ke2 Bb4 14.Na4 Ke7 15.Rd1 Rhd8 16.Rxd8 Rxd8 17.Be3 Ra8 18.Rc1 Kd7 19.Rc4 Bd6 20.b3 Nd5 21.Rxe4 Nxe3 22.Kxe3 Rf8 23.h3 Rf5 24.Ke2 h5 25.Nb2 Bc5 26.Nd3 Kd6 27.h4 Bb6 28.g3 Ra5 29.a4 g5 30.b4 Rd5 31.hxg5 Rxg5 32.a5 Bc7 33.Nc5 e5 34.Re3 Rg4 35.Ne4† Ke7 36.f3 Rg6 37.Rc3 Kd7 38.Rc1 Bd6 39.Rd1 Kc7 40.Nxd6 Rxd6 41.Rh1 Rg6 42.Rxh5 Rxg3 43.Rxe5 Kd6 44.Re4 Rg5 45.Rc4 Rg1 46.Ke3 Kd5 47.Rc5† Kd6 48.Ke4 Re1† 49.Kf5 Rb1 50.Rc4 Kd5 51.Re4
Black has a tough defensive task ahead of him, and the rapid time control certainly won’t make his 416
job any easier. Nevertheless, with accurate play and some luck, he still has practical chances to save the game. Since Black has no passed pawns of his own and no ways to make a passed pawn, he has to rely on passive defense. The only way that this will be feasible is if he can make sure his pieces are better placed than those of his opponent. Black should therefore have tried to prevent White’s pieces from coordinating properly. This could have been achieved with: 51...Rb3! The game actually continued: 51...c5? I suspect that So simply missed the check on e5, which obviously wins on the spot. This kind of thing can happen in a rapid game when playing on a small increment. However, in addition to being a concrete blunder, the move is also wrong for positional reasons. 52.bxc5!? In the game Grischuk correctly played 52.Re5†! and won easily, but I have presented the alternative as the main line to illustrate a point. The remaining moves were: 52...Kd4 53.bxc5 Rb5 54.f4 Rxa5 55.Ke6 Ra6† 56.Kd7
It’s obvious that the c-pawn will not be stopped. 56...Rf6 57.c6 Rxf4 58.Ra5 Rf7† 59.Kc8 Kc4 60.c7 Kb4 61.Rxa7 Black resigned. 52...Kxc5 The exchange of the b4- and c6-pawns is in White’s favor, as now his rook on e4 is free from its obligation to stay on the 4th rank and keep the b4-pawn protected. Black’s king is cut off and the f-pawn cannot be stopped.
417
53.f4 Ra1 54.Ke6 The a5-pawn is immune due to the Re5† skewer. 54...Kc6 55.Re5+– White will easily promote the f-pawn. Black can offer no resistance as White’s pieces coordinate well, and can help the f-pawn promote while still keeping the a5-pawn defended and avoiding any hope of counterplay. 52.f4 a6!
White cannot send his f-pawn through without losing the b4-pawn. In fact, he cannot even save the b4-pawn! He is still objectively winning, but exceptional precision is required.
418
53.Re8! An extremely difficult move. Trying to place Black in zugzwang by triangulating would not have helped White’s cause, as Black has room to shuffle along the b-file with his rook. After: 53.Re5† Kd6 54.Re6† Kd5 55.Re4 Rb1
White still needs to find 56.Re8! to win in the same manner as the main line below. To me, it appears more natural to bring the rook to the 1st rank, but it turns out to be wrong. Black holds after: 53.Re1 Rxb4 54.Kg5 Rb5 55.f5 Rxa5 56.f6 Kd6† 57.Kg6 Ra2 This variation shows why the rook was needed on e8.
419
58.f7 Rg2† 59.Kh5 Rf2= Had the rook been on e8, the pawn would promote on the spot. 53...Rxb4
54.Kg5! The only winning move, and another difficult one. Even if White manages to find it, he still has a lot of work to do after: 54...Rb1 55.f5! Rg1† 56.Kh6 Rf1 57.Kg6 Rg1† 58.Kf7 c5 59.f6 c4
420
60.Re2!! Again the only winning move. The c-pawn is attended to and White is ready for Ke7 next. If White finds all of 53.Re8!, 54.Kg5! and 60.Re2!!, you just have to shake his hand and accept that you will generally lose to an opponent who plays perfect chess. You could also demand a thorough and highly personal search for an engine. 60.Ke7? allows 60...Re1† 61.Kd7 Rxe8 62.Kxe8 c3= when Black makes a queen too. 60.Re3? Kd4 61.Re2 reaches the same position a tempo down, and does not win for White. In fact, after 61...c3 62.Ke7 Kd3, White needs to find 63.Re6! to avoid losing. 60...Kd4 61.Ke7 The race is on, and White comes out on top by the narrowest of margins. 61...Kd3 62.Re6 c3 63.f7 Rf1 64.f8=Q Rxf8 65.Kxf8 c2 66.Rc6 Kd2 67.Ke7 c1=Q 68.Rxc1 Kxc1 69.Kd6 Kd2 70.Kc5 Ke3 71.Kb6 Kd4 72.Kxa6 Kc5 After all that perfect play, White finally wins by one tempo.
421
73.Kb7 The pawn promotes. 1–0 In a way this was a less-than-ideal example, since So’s position could not have been saved against perfect play. But with no disrespect intended to Alexander Grischuk, a fantastic player who is well known to be capable of playing high-quality chess with little time on the clock, I don’t think he would have won the game if Black had correctly chosen the hybrid active/passive defense with 51...Rb3 and 52...a6. He would have had to find three totally ridiculous computer moves to win the race by a single tempo some ten moves down the line. Even the best players in the world have their limits. We’ll never know if Grischuk would have managed or not, but I can guarantee that it would have offered So more chances to save the game than the way he played, which lost routinely. One could argue that the best way for So to defend was to play actively, since he clearly was not able to stop the f-pawn in the long run. But I disagree. Although it is fair to say that Black needed to be ready to generate counterplay to try and save the game, the moves ...Rb3 and ...a6 clearly were not attempts at active defense. Rather, Black was simply pointing out that his pieces were better placed. And while the f-pawn could not be stopped forever, Black’s defensive set-up meant that White would have to sacrifice something to send the pawn through. This kind of hybrid approach combining passive and active defense is common in rook endgames. The defending side stops the passed pawn on a temporary basis, but also knows that if the attacking side dedicates all available resources to sending it through, it will succeed. This brings us to the next guideline. Passive defense can often be useful if it slows the opponent’s pawn down 422
enough that he will need to bring in more resources (often the king) to ensure its promotion. Once those resources start leaving their posts, you need to pivot to active defense. Undoubtedly this is a harder guideline to handle correctly than the first one, and even someone as strong as So failed to find even the first move to make White’s life difficult. But still, it can be a useful concept to think about. Let’s see a somewhat easier case, with more time on the clock, where a strong player still did not manage to find his way.
Radoslaw Wojtaszek – Anton Demchenko Batumi (ol) 2018 1.d4 Nf6 2.c4 g6 3.Nc3 Bg7 4.e4 0-0 5.Nf3 d6 6.Be2 e5 7.0-0 Na6 8.Be3 c6 9.Qc2 Ng4 10.Bg5 Qe8 11.Rad1 f6 12.Bh4 Kh8 13.h3 Nh6 14.Rfe1 Nf7 15.a3 Nc7 16.b4 Ne6 17.d5 Nf4 18.c5 cxd5 19.Bb5 Bd7 20.Bxd7 Qxd7 21.Nxd5 Nxd5 22.Rxd5 Qc7 23.Rc1 Rac8 24.Qa4 a6 25.Nd2 Qc6 26.Qxc6 Rxc6 27.Nb3 Rfc8 28.Rcd1 g5 29.Bg3 Bf8 30.Na5 R6c7 31.cxd6 Rd7 32.f3 b6 33.Nb3 Rc3 34.R1d3 Rxd3 35.Rxd3 Bxd6 36.Bf2 Rb7 37.Nd2 b5 38.Nb3 Rc7 39.Kf1 Kg8 40.Bc5 Bxc5 41.Nxc5 a5 42.Rd5 axb4 43.axb4 h5 44.Nd3 Rc3 45.Nf2 Rb3 46.Rxb5 Nd6 47.Rb6 Nc4 48.Rxf6 Kg7 49.Rc6 Ne3† 50.Ke2 Nxg2 51.Nd3 Nf4† 52.Nxf4 exf4 53.Rc5 Kg6 54.b5
Black has a tough defensive task ahead of him. The position is far more technical than the Grischuk – So game, as rook and three versus rook and three on the same side of the board with one side possessing a passed pawn on the other side is a thoroughly studied type of endgame. Still, the kingside pawn structure is asymmetrical, which gives the position some unique qualities. Demchenko would 423
have done well to follow the second guideline. 54...Kf6! I think this was the most reliable and most human route to a draw. Black could not prevent Rc6† followed by b5-b6, but if Black’s king moves to the 5th rather than the 7th rank, White will not be able to advance the pawn further without including the king. In the game, Black crumbled immediately with: 54...Rb2†? 55.Kd3 Rb3† 56.Kc4 Rxf3
Sure, Black won the pawn on f3. But he always was going to win that pawn if White ever wanted to try to win the game – the b-pawn would not have been able to promote otherwise. As is, now it cruises straight through. 57.b6 Rf1 58.Rb5! Easy peasy – game over. 58...Rc1† 59.Kd5 Rd1† 60.Kc6 Rd8 61.b7 g4 62.hxg4 hxg4 63.Rf5 g3 64.Rxf4 Kg5 65.Rf1 Black understandably resigned. Demchenko lost because he tried to force counterplay at all costs – even losing two tempos. White should have been made to fight to bring his king to c4 – and while fighting for it, he would have had to contend with counterplay connected with ...g4 or ...Rxf3 – but instead Black forced him to play the moves he wanted to make. The computer points out that it was also possible to draw by means of: 54...h4!? As we will see, this amounts to a hybrid passive/active defense. First Black blocks the kingside and kills any hope White ever has of playing h3-h4 to break up the pawn mass. Still, Black has to be extremely accurate and resourceful. 55.Rc6† Kg7! 424
We will soon see why this is the only correct square for the king. 56.b6 Black seems to be in trouble but he can miraculously save himself by making a passed pawn for counterplay.
56...g4!! Waiting will not work. 56...Kf7 57.Kd2! White’s passed pawn is far enough advanced that he can afford to abandon his kingside: 57...Rxf3 58.Rc3 and White wins. 57.hxg4 h3 Now we can see why the king needed to be placed on g7. If it were on f7, Rh6 would win, and if it were on h7, Rc5 followed by Rh5† would win. As is, the pawn provides enough counterplay to save the game. 58.Kf2
425
58...Rb1! Another only move, after which White must force a draw. This is a pretty silly and convoluted computer line, and I think my proposed ...Kf6 solution is far more natural and easier to understand for a human.
55.Rc6† The machine suggests 55.h4, but Black will hold without much trouble after 55...g4 56.Rf5† Kg6 57.Rxf4 gxf3† 58.Rxf3 Rxb5. 55...Ke5! 56.b6 Black has arranged his pieces in the best possible way. His king is not on the 7th rank, so White does 426
not have Rc7† available to push his pawn all the way to b7. Black also has the option of playing ...g4 at any time, in order to trade pawns and make a passer – but for now, his best approach is to defend semipassively and wait.
56...Rb1! Black should wait for White’s king to approach the queenside before advancing his counterplay. White’s king is bound to head in that direction – how else can he try to promote a pawn? Rushing with 56...g4? is not to be recommended in view of 57.Rc5†! Kd6 58.Rd5† Ke6 59.hxg4 hxg4 60.fxg4 Rxb6 61.Rf5 when White wins, mainly because his king is close enough to the action. If Black had waited for the king to come to d3, as in the main line, he would hold with ...Rb3†. 57.Kd3 g4! Now and only now, since White’s king is further away. 58.fxg4 Nothing else is worth trying. 58.Rc5† Kd6 59.Rd5† Ke6 60.fxg4 hxg4 61.hxg4 Rxb6 62.Rf5
427
Here we see the difference between the white king sitting on e2 and on d3. 62...Rb3†! and Black holds. 58...hxg4 59.hxg4 f3 60.Ke3 Rb3† 61.Kf2
61...Kf4! 62.Rf6† Kxg4 White has no more winning chances. Whether you are defending passively or actively, having your pieces performing valuable functions in stopping the opponent’s passed pawn and/or creating counterplay should be among your highest priorities. 428
Notably lacking in the previous cases is the presence of a second weakness. I suppose the Wang Yue – Carlsen game could have applied, as Black would have been tied down to defending his d5-pawn if he had chosen passive defense at the wrong time; but I would argue that this was more about the passivity of his rook as opposed to having a weakness in the position. As we saw in the previous chapter, when a lone passed pawn is blocked in such a way that it cannot realistically expect to promote, the best thing the attacking side can try to do is to stretch the defenses by fixing a secondary weakness to attack. The third guideline follows logically. Lone passed pawns are hard to push through on their own. In order to keep them at bay, you need to avoid any additional weaknesses in your position, which can stretch your defenses. Let’s see this principle in action.
David Vigorito – Mika Brattain Somerville 2014
White has an extra passed pawn on f5, but the opposite-colored bishops and the blockade on the f6square clearly prevent it from advancing any further. However, the position is still a long way from being agreed drawn, since White can try to stretch his opponent’s defenses by bringing his king to the queenside. 44...Kg7? Black misses his first chance to save the game. It was absolutely critical to understand that White’s plan was to bring the king to c8. The bishop will have to defend the c7-pawn from b6, and then Black will end up in zugzwang if his bishop does not 429
have another move. Therefore he should have played: 44...a4! Black vacates the a5-square before White can get a2-a4 in. White has no real winning chances, for instance: 45.Ke2 a3 46.Be4 Kg7 47.Kd3 Bg5
48.Kc4 Kf8 49.Kb5 Ke7 50.Ka6 Be3 51.Kb7 Bb6 The extra room for the bishop on a5 means Black is not in zugzwang and can simply shuffle with ...Bb6-a5-b6 etc. He holds with no further trouble, for instance:
52.Kc8 Ba5= 430
White can make no further progress. 45.Ke2? White gives his opponent a chance to correct his previous mistake. 45.a4! would have been better, as in the game. 45...Bg5? Black again could have made an easy draw with 45...a4!.
46.a4! This time White finds it. Black’s position can still be saved with sophisticated defense, but the details are not so important to our theme. The main point is that the fixing of the a5-pawn makes Black’s job much harder, and we will see in the game how his defenses became overstretched. 46...Bc1 47.Be4 Ba3 48.Kd3 Bc5 49.Kc4 Kf6 50.Kb5 Bb6 51.Ka6 Ke7 52.Kb7 Kf6 53.Kc8 Ke7
431
We saw a similar position earlier where Black had anticipated White’s plan and pushed his pawn to a3 to clear the a5-square. Since he has not done that here, the bishop is stuck on b6 and Black will slowly but surely end up in zugzwang. All White has to do to win is force the black king to leave the e7- and e8-squares, so that the king can penetrate to d7. 54.Bd3! The migration to h5, and eventually e6, begins. 54...Ke8 55.Bf1 Ke7 56.Bh3
56...Kf6 432
Allowing Kd7 amounts to immediate capitulation. There was no saving the position anyway, for instance: 56...Ke8
Black could have tried hanging tight, but eventually the bishop will swing all the way around to d7 or e6. From there, it will prevent ...Ke8 while keeping the f5-pawn protected. 57.Bg4 Obviously 57.f6? would be premature due to 57...Kf7 when the pawn falls, so White improves his bishop first. 57...Ke7
58.Bh5! Kf6 433
Black had to leave the d7-square unattended, but White can’t make use of it yet as the f5-pawn is hanging. He can solve that problem by completing the bishop’s grand maneuver. 59.Bg6! Ke7 60.Bh7! Ke8 61.Bg8 Ke7 62.Be6
Zugzwang has been achieved, so White wins. 62...Ke8 would allow 63.f6, while 62...Kf6 would lose to 63.Kd7 with a further zugzwang. 57.Kd8 Kf7 58.Bg4 Kf6
59.Kd7 Kf7 60.Bh5† Kf6 61.Bg6 Zugzwang. Once again, note that Black would draw trivially if only his pawn had gone to a3 earlier, as this would have allowed him to mark time with ...Ba5-b6. 434
In fact, Black could even donate his a-pawn for free and still draw with ease, if only it were legal to do so. Consider the following position where the pawn has been removed:
White has no way to force the a-pawn through or achieve zugzwang. If White brings his king back to a6, Black plays ...Be3 (for example) and meets a4-a5 with ...Bd2. And if Kb5, Black puts the bishop back on the g1-a7 diagonal, either immediately or after waiting for a5-a6. Returning to the game, the presence of the pawn on a5 means that Black is out of moves and soon has to resign.
61...e4 62.fxe4 Kg5 63.Ke7 Bd4 64.Ke6 Kf4 65.e5 Bxe5 66.Kd7
435
1–0 Black failed to save the game because he did not properly anticipate White’s plan. The only way to get the f-pawn through was to make unrelated threats that were far enough away that the king would be distracted. If Black had realized that, he could have prepared accordingly.
436
Exercises
Sam Shankland – Jan-Krysztof Duda Danzhou 2018
We pick up the game just before it reached the phase covered in the previous chapter. At this moment, Black made the decisive mistake. What should he have played? Show/Hide Solution > Black may defend passively or actively, depending on how White proceeds, but one thing is clear: he needs his king to join the action. 29...Ke7! Instead, Black tried 29...Ke8? but was lost after 30.Kd3!. The rest of the game was covered in the previous chapter; see page 221. Had Black centralized his king rather than allowing it to be cut off on the back rank, he would have been fine, as the following lines demonstrate. 30.Rc7† 437
In the event of 30.b7, Black replies with 30...Kd7 when passive defense works just fine, as White’s pawn is easily contained. 30...Kd6 31.Rd3† 31.Rxf7 sees White spend a tempo picking up a pawn, so the b6-pawn is not going anywhere. This enables Black to switch to active defense:
31...Re2†! 32.Kc1 Rxg2 33.b7 g3 Black has enough counterplay to save the game. 31...Ke5 32.b7 Rb4 33.Rdd7
White is poised to promote his pawn by advancing his king and second b-pawn, since the b4-rook 438
must stay on the b-file on pain of Rc7-c8. However, White had to bring his rooks to the 7th rank while the black king went to the center, and now the kingside goes wild. 33...f5! 34.Kc3 Rb6 35.b4 f4„ Black is not worse. Sam Shankland – Abhijeet Gupta Khanty-Mansiysk (2.2) 2011
Despite his extra pawn, White faces a tough defensive task. How should he proceed? Show/Hide Solution > Black is threatening ...Kb4-b3, when White will hardly be able to fight against the c-pawn. This plan had to be prevented at all costs. 53.Ne7? Fatigued from an already long defense, I failed to appreciate the danger. Running the king to c2 was imperative, as the loss of the g3-pawn is inconsequential. 53.Kd2! Kb4 54.Kc2! Black’s c-pawn is kept at bay, and it is his only really dangerous asset. White still has some work to do but he should not lose. For example:
439
54...Ne4 55.Ne7 Nxg3 Black has picked up a pawn, but White has more than one way to hold. The most convincing is to look for counterplay with: 56.e4! fxe4 57.f5 Kc5 After 57...e3 58.Nd5† White picks up the pawn. 58.f6 Kd6
59.Nd5! The pawns are stopped, the f6-pawn looks dangerous and Kc3 is on the way. White will hold with no further issue.
440
53...Kb4! 54.Kd2 Kb3! Further resistance is futile.
55.Kc1 Kc3 56.Nc6 Ne4 57.Ne5 Nxg3 58.Kd1 Kb3 59.Kc1 Ne2† 60.Kd2 Nc3 61.Kc1 Na2† 62.Kd1 Nb4 63.Nf3 c3 64.Nd4† Kb2 65.e4 fxe4 66.f5 Nd5 67.Nc2 e3 68.Nd4 Nf4 0–1
Karthikeyan Murali – Sam Shankland Biel 2017
I played 65...g4 here. Was this correct? 441
Show/Hide Solution > 65...g4? Black’s rook will not be able to move from a7, so he is clearly condemned to semi-passive defense. White can easily force his pawn through by walking his king up to b6, but this would leave him vulnerable to counterplay with ...Kh4-g3. Black is holding if he doesn’t do anything stupid... like advancing his g-pawn prematurely. Once the pawn is on g4, White can place his rook on the fifth rank and Black’s king will be short of squares. Black should wait passively, and be ready to rush in with his king if White’s king wanders too far: 65...Kg6! 65...Kh6! is equally good. However, Black must avoid 65...Kh4? when 66.g3†! exploits the pin along the 4th rank. 66.Ke2 Kh5
67.Kd3 This allows the king to get to g3, but what else could White try? 67...Kh4 68.Kc4 Kg3 Black’s counterplay is quite enough to hold. 66.Ra5! Kh4 The rushed ...g4 advance has given White options to play on the kingside which Black had no need to allow. Now Black’s king has a lot less freedom to maneuver. In fact, Black would already be in zugzwang if he had to play here. All White has to do is triangulate to win. 442
67.Ra1? White struggles to find the winning plan. 67.Kf1! The easiest win was triangulating. Black’s king cannot go to the 5th rank on pain of fxg4 when he cannot take back with a pawn, so his next moves are forced. 67...Kg3 68.Ra3 Kh4 If 68...Kh2 69.Kf2 Black will promptly get mated on the h-file.
69.Kg1! Black will soon be in zugzwang. 69...Kg5 443
69...Kg3 walks into a discovered check with 70.fxg4† when Black cannot take back with the pawn. 69...g3 also loses trivially after 70.Kf1. Without the g3-square, Black has no counterplay and White can simply walk his king to b6. Pawn’s don’t move backwards... 70.Ra5 This is exactly the kind of position that shows how much nicer Black’s life would be if his pawn was on g5 instead of g4. 70...Kh4 71.Kf2
If Black had not foolishly and impatiently advanced with ...g5-g4, he would be able to play ...Kh5 with an easy draw. As is, he is in zugzwang and loses. 71...Kg5 72.fxg4 Kxg4 73.Ra4 Kg5 74.Kf3 White wins. 67...Kg5 68.Ra4 Kh5 69.Ra5 Kh4 70.Ra1 Kg5
444
71.Ra4 I was rather lucky that my opponent did not realize this was a threefold repetition. If he’d had more time, I’m sure I would have lost. ½–½
Varuzhan Akobian – Yaroslav Zherebukh St Louis 2018
Black took on h5, grabbing a pawn but bringing the rook away from the b-pawn. What do you think of his decision? 445
Show/Hide Solution > 62...Rxh5! Black would not have held this position by sitting and waiting. He needs some level of counterplay, or at least to take enough pawns to ensure that sacrificing the knight for White’s b-pawn will be enough to save the game. In addition, by taking on h5, he makes sure not to be left with any kingside weaknesses. Waiting along the b-file would not save the game: 62...Rb1? 63.Kd4 Rb5 64.Rc5! Rb1
White has several ways to win, but I like the straightforward 65.Rg5! when Black’s kingside will fall too. 63.Rc8 Of course 63.b7? would fail to 63...Rb5, when the b-pawn would be lost for nothing and White would have to think about how to hold. 63...Kd7 64.Rc7† Ke6 65.Ra7 Rb5 Black has successfully bagged the h-pawn and brought his rook back. He still has a lot of work to do, and he may be objectively lost – but he also may not be. I am not sure. What I am sure of is that if he didn’t take on h5, he would have gone down easily. After a long struggle, he went on to save the game.
446
66.Ra5 Rb1 67.Rg5 g6 68.Rxg4 Nc6 69.Rg5 Rc1† 70.Kd3 Nb4† 71.Kd4 Rd1† 72.Kc5 Nd3† 73.Kc6 Rc1 74.b7 Rxc4† 75.Kb6 f5 76.Rxg6† Kf7 77.Rd6 Rb4† 78.Kc7 Rxb7† 79.Kxb7 Nxf2 80.Kc6 Ne4 81.Rd3 Kg6 82.Rd8 Kf6 83.Rd3 Kg5 84.Kd5 Kg4 85.Ke5 Nxg3 86.Rd4† Ne4 87.Ra4 Kg5 88.Ra7 Kg6 89.Kf4 Nc5 90.Ra5 Ne6† 91.Ke5 Nd8 92.Ra6† Kf7 93.Kxf5 Ke7 94.Ke5 Nf7† 95.Kd5 Nd8 96.Rh6 Nf7 97.Re6† Kd7 98.Re1 Nd8 99.Ra1 Nc6 100.Rd1 Nd8 101.Rh1 Nf7 102.Ra1 Ke7 103.Ra7† Kf6 104.Rd7 Ng5 105.Rd6† Ke7 106.Rg6 Nf7 107.Re6† Kd7 108.Re2 Nd8 109.Ra2 Ke7 110.Ra6 Nf7 111.Rb6 Nd8 112.Rb1 Nf7 113.Re1† Kd7 114.Re3 Nd8 115.Ke5 Ke7 116.Kf5† Kd6 117.Kf6 Nc6 118.Rd3† Kc5 119.Ke6 Nd4† 120.Ke5 Nc6† 121.Ke4 Ne7 122.Rc3† Kd6 123.Rh3 Nc6 124.Rh6† Kc5 125.Re6 Nb4 126.Re5† Kd6 127.Rb5 Nc6 128.Rd5† Ke6 129.Rd1 Ne7 130.Rh1 Kd6 131.Rh6† Kc5 132.Re6 Nc6 133.Rxc6† Kxc6 ½–½
447
Protected passed pawns in the endgame have the unique characteristic that they are often most useful in tying down the enemy pieces (most often the king) to defensive tasks while you can make trouble elsewhere. For instance, let’s examine the king-and-pawn endgame I cited in Chapter 5, back on page 113.
Example 1
White is easily winning, as his protected passed pawn on d5 prevents Black’s king from taking an active role. 1.Kf2 Kf7 2.Ke3 Ke7 3.Kd3 Kd6
448
In order for White to win the game, he needs to break up the queenside pawn mass so that his king can invade. But he also needs to do it intelligently. 4.Kc3! White takes care to avoid the possibility of ...c4 landing with check. Striking on the queenside prematurely would be a big mistake: 4.a4? This allows Black to obtain a protected passed pawn of his own. 4...c4†! 5.bxc4 5.Kc3 is also insufficient for a win, as after 5...cxb3 6.axb5 (6.Kxb3 b4!=) 6...a4 7.b6 Kd7 Black’s queenside pawns prevent White’s king from becoming active.
449
5...b4! The position is drawn. Black also has a protected passed pawn, which prevents White’s king from wandering too far. There is no way to push the pawns through and Black will shuffle with ...Kc5-d6 forever. 4...Kc7 5.a4! Now and only now, since ...c4 does not come with check. 5...Kb6 5...c4 is met by 6.axb5! cxb3 when Black needs to play ...a4 to be able to hold, but instead he loses after the simpl7.Kxb3. 6.axb5 Kxb5 White has opened the queenside. The rest of the win is simple yet instructive.
450
7.Kd3! White is ready for Kc4 once Black’s pawn moves run out. Note that the otherwise ideal ...Kb4 will always fail to d5-d6. 7...g5 8.Kc3 8.g4 would win more quickly but the text move drives home the point about the value of the protected passed pawn. White does not have to worry about a spare tempo here or there on the kingside. Eventually Black will run out of pawn moves, and his king will have to give way. 8...g4 9.Kd3 h5 10.Kc3 h4 11.Kd3 g3 12.h3 Time to move the king back.
451
12...Ka6 13.Kc4 Kb6 14.d6 Kc6 15.d7 Kxd7 16.Kxc5 White wins. Simple as this example may have looked, the only reason Black was losing was that White had targets to attack and a way for his king to enter the position. The a5-b5-c5 pawn constellation proved to be fragile, and White opened up the c4-square with the timely a2-a4 advance. From there, the protected passed pawn won the day as Black was unable to play ...Kb4. If White had not been able to make a route for his king to enter the game, things would have worked out a lot differently.
Example 2
452
This position is a draw, all because Black’s pawn has been nudged from a5 back to a6. As such, he can simply ignore the a2-a4 advance and White’s king has no way to pressure the queenside. This tiny tinker to the pawn structure causes a large change in the evaluation. 1.Kf2 Kf7 2.Ke3 Ke7 3.Kd3 Kd6 4.Kc3 Kc7 5.a4 Kd6
No further progress can be made. Note that Black’s queenside pawn mass may not feature a protected passed pawn but it fulfils the same function as one, since it cannot be approached and if White’s king wanders too far away (say to a square like f5) then a pawn will promote. The game is drawn. The difference between these two positions brings us to the first guideline.
453
A protected passed pawn is most valuable in that it can restrict an opponent’s piece to a confined area. If you cannot make threats in another area of the board, it loses its value. This is a simple principle to understand – so much so that I even managed to execute it in a 1-minute bullet game in the third ever Chess.com Deathmatch. (These have since been replaced by the Speed Chess Championship.)
Sam Shankland – Robert Hess Internet (bullet) 2012 1.d4 Nf6 2.c4 e6 3.Nf3 b6 4.g3 Bb7 5.Bg2 Be7 6.0-0 0-0 7.Nc3 Ne4 8.Bd2 c5 9.d5 Nxd2 10.Qxd2 d6 11.Rad1 e5 12.Nxe5 dxe5 13.d6 Bxg2 14.dxe7 Qxe7 15.Kxg2 Nc6 16.Nd5 Qb7 17.e3 Rad8 18.Qe2 e4 19.Qg4 f5 20.Qf4 Rde8 21.Qc7 Qa8 22.Rd2 Rf7 23.Qd6 Ne5 24.Nc7 Rxc7 25.Qxc7 Nd3 26.Qd7 Rf8 27.Rfd1 Rf7 28.Qe6 Qd8 29.Kg1 Kf8 30.b3 Rf6 31.Qe5 Qd7 32.Qb8† Kf7 33.Qa8 Rd6 34.Qb8 Kg6 35.Qf8 Rf6 36.Qb8 Rd6 37.Qf8 Rf6 38.Qg8 Qe7 39.Rxd3 exd3 40.Rxd3 Qe4 41.Qd5 Qg4 42.Kg2 h5 43.f3 Qg5 44.h4 Qh6 45.f4 Kh7 46.Qa8 Qg6 47.Rd8 Qf7 48.Rh8† Kg6 49.Qe8 Re6 50.Qxf7† Kxf7 51.Kf3 Kg6 52.Ra8 Re7 53.Rd8 Kf6 54.Rd2 g6 55.Rd5 Kf7 56.Ke2 Ke6 57.Re5† Kf6 58.Rxe7 Kxe7 59.e4 Ke6 60.e5
White has an extra protected passed pawn in a pawn endgame, but things are not so simple. The kingside is completely locked, and I clearly cannot use my king to help the e5-pawn go through. The only thing I can do is try to open the queenside. This does win, but it must be done correctly. 60...Kd7 61.Kd3!
454
White marches the king to a3 and a4 before taking any action on the queenside. It would be a grave error to touch the a-pawn: 61.a3? a5!
Suddenly Black is drawing with ease. White’s king has no route into the game, and b3-b4 is always met by ...a4. For instance: 62.Kd3 Ke6 63.Kc3 Kd7 64.b4 a4!= 61...Kc6 62.Kc3 Kd7 63.Kb2 Kc6 64.Ka3 a6 65.Ka4 Now that White’s king has come up the board, he can open the queenside as Black is no longer able to block things up.
65...Kd7 66.b4 Kc6 67.a3 b5† 68.Kb3 cxb4 69.axb4 bxc4† 70.Kxc4 Kb6 455
71.Kd5 1–0 Silly as it might seem to include a bullet game (albeit the one that won me the match, which was tied before the game began) in a serious book, the above guideline was clearly on display. This was a simple, one-sided example though. The protected passed pawn was also an extra pawn, and White only needed to realize he should not let the position become completely locked by depriving his king of access to the a3-square. Whereas the result of the above game was somewhat in question due to the absurdly fast time control, most games are slower and tougher. Let’s examine a case where a protected passed pawn would fail to achieve its desired goals.
Vladimir Akopian – Georg Meier Istanbul (ol) 2012 1.e4 e6 2.d4 d5 3.Nd2 c5 4.exd5 Qxd5 5.Ngf3 cxd4 6.Bc4 Qd6 7.0-0 Nf6 8.Nb3 Nc6 9.Nbxd4 Nxd4 10.Nxd4 a6 11.Re1 Qc7 12.Bf1 Be7 13.Qf3 0-0 14.Bf4 Bd6 15.Bxd6 Qxd6 16.Rad1 Qc7 17.c4 Bd7 18.h3 Rfd8 19.g4 Be8 20.g5 Nd7 21.h4 Rac8 22.Qe3 Nf8 23.h5 Rd7 24.Nf3 Rxd1 25.Rxd1 Rd8 26.Rxd8 Qxd8 27.Be2 a5 28.Ne5 Bc6 29.Nxc6 bxc6 30.Bf3 Qc7 31.c5 e5 32.Bg4 g6 33.h6 f5 34.gxf6 Kf7 35.a3 Kxf6 36.b4 axb4 37.axb4 Ne6 38.Bxe6 Kxe6 39.Qb3† Kf6 40.b5 cxb5 41.Qxb5 Qc8 42.f3 e4 43.Qb2† Ke6 44.Qd4
456
Akopian has played a good game up to this point and should be winning. Meier actually took on f3 while Akopian was away from the board, but immediately realized this hangs his queen to a skewer and resigned before White could return and play Qg4†. As embarrassing as this might seem, I think it is actually good fortune that the most egregious blunder of his career came in a position where he would have likely lost anyway. It certainly would have stung a lot more if he had been winning instead. 44...Qc6 I believe Black’s position is lost no matter how he plays, but it’s interesting to note that the following pawn endgame offers him no hope of salvation despite the protected passed pawn. 45.Qxe4† Qxe4 46.fxe4
457
Black has a protected passed pawn on g6 that restricts the movement of the white king. But we should ask ourselves: how much is the king restricted? The answer is basically not at all. The king cannot go to the a-file or the 7th rank without allowing the pawn to promote, but White has absolutely no need to ever move somewhere so ridiculous. White’s king can simply come to a square like d5 and push the pawns through. 46...Ke5 47.Kf2 Ke6 48.Ke3 Ke5
49.Kd3 Ke6 50.Kd4 Kd7 51.Kd5 Kc7 52.e5+– The pawns promote shortly. White’s technical task was not difficult at all. When applying the first guideline retroactively, it becomes clear that the pawn ending offered no hope 458
of salvation for Black because the protected passed was so far back that, for all intents and purposes, it didn’t exist. White’s king felt no restriction whatsoever since he did not need to use the a-file or the 7th rank to get the pawns through. This brings us to the next guideline. The farther up the board a protected passed pawn is, the more restrictive it will be. Let’s see an example of this in action.
Erwin L’Ami – Sergey Fedorchuk Hockenheim 2018 1.d4 Nf6 2.c4 e6 3.Nf3 b6 4.g3 Bb7 5.Bg2 Bb4† 6.Bd2 Be7 7.0-0 c6 8.Bc3 0-0 9.Nbd2 d5 10.Qc2 Nbd7 11.Rfd1 Qc7 12.Rac1 Rac8 13.b3 h6 14.Qb2 Qb8 15.Ne5 Rfd8 16.e4 Nxe5 17.dxe5 Nxe4 18.Nxe4 dxe4 19.Bxe4 c5 20.Qe2 Qa8 21.Bxb7 Qxb7 22.h4 Rxd1† 23.Rxd1 Rd8 24.Rxd8† Bxd8 25.Qd3 Be7 26.h5 Bg5 27.f3 Qc6 28.Kf2 Qb7 29.Ke2 Qc6 30.Kd1 Qb7 31.Kc2 Qc6 32.Kd1 Qb7 33.Ke1 Qc6 34.Kf2 Qb7 35.f4 Be7 36.Qf3 Qc8 37.Qe4 Bf8 38.Ke2 Be7 39.Bd2 Bf8 40.g4 Qe8 41.Be1 Qd8 42.Bf2 Be7 43.Qb7 Bh4 44.Be3 Qe7 45.Qxe7 Bxe7 46.f5 Bh4 47.Kf3 Kh7 48.Bd2 Be7 49.Ke4 Kg8 50.f6 Bd8 51.Bc3 Kh7 52.Kd3 Bc7 53.Kc2 Kg8 54.Kb2 Kf8 55.b4 gxf6 56.exf6 cxb4 57.Bxb4 Ke8 58.Kc2 Bf4 59.Kd3 Bg5 60.Bd2 Black is in a tough spot. He has to either enter a bad pawn ending or allow the h6-pawn to be captured.
Fedorchuk made the best practical choice and opted for 60...Bxf6 61.Bxh6 when he was still losing, but some play remained. The rest of the game will be discussed in Chapter 13 under the topic of 459
playing with an outside passed pawn – see page 317. Let us see why the pawn endgame would have been winning for White without much effort. 60...Kf8 The situation is virtually the same after: 60...Bxd2 61.Kxd2 White’s kingside pawn constellation may not officially contain a protected passer, but it fulfills exactly the same purpose, as Black’s king cannot run beyond e8 without g4-g5 deciding the game on the spot. 61...Kf8 62.Ke3 Ke8 63.Kd4 Kf8 64.Ke5 Kg8
The same plan of taking the queenside works well as White is free to bring his king to the b6pawn, while Black cannot do the same. 65.Kd6 Kf8 66.a4 Kg8 67.a5! White wins exactly as in the main line below. 61.Bxg5 hxg5 We see that both sides have a protected passed pawn, but only one really matters. The pawn on h5 restricts the black king enormously, as it cannot go to e8 and will therefore have to stay between f8 and h6 for the rest of the game. Conversely, the e6-pawn hardly restricts White’s king at all since it is such a long way from promoting. White’s king will easily win the game on the queenside as Black’s king cannot come to its aid.
460
62.Kd4 Kg8 63.Ke5 Kf8 64.Kd6 Kg8 65.a4 Kh7 Black’s pawn on e6 does prevent White’s king from reaching the seventh rank, so taking the a7-pawn at the base of the pawn chain proves difficult. But White wins easily by making the base closer to home.
66.a5!? White could also win more methodically with 66.Kc6 Kh6 67.Kb5 Kh7 (67...e5 loses to 68.Kb4 [or 68.c5] when White’s king gobbles up the e-pawn before returning to harvest Black’s queenside) 68.a5 bxa5 69.c5 when the c-pawn decides. 66...bxa5 461
After 66...Kg8 67.axb6 axb6 68.Kc6 White comfortably stays within the box of the e6-pawn, which did nothing to prevent the king from ransacking the queenside. The c4-pawn will win the game. 67.c5 a4 Black also promotes a pawn, but it does not save him.
68.c6 a3 69.c7 a2 70.c8=Q a1=Q 71.Ke7 White easily hides from checks and wins with a mating attack. Clearly, the pawn on h5 did a much better job of restricting the black king than the pawn on e6 did of restricting the white one. This is because it was much further advanced, and as such confined the king to a much smaller box. Being on the edge of the board also helped – and we will have more to say about outside passed pawns in Chapter 13. Pure pawn endgames with protected passed pawns are not too hard to understand. But transitions can be tough, and it is important to know which pieces tend to fare best for the side with the protected passer. I already mentioned in Chapter 5 that minor pieces do not combine as well with a protected passer as major pieces. This is certainly true, and the engine tends to confirm it. For example, look at the following positions with identical pawn structures but different sets of pieces. The engine evaluations speak for themselves. It is White to move in all cases.
462
0.00
0.00 Enough said.
463
+0.59 Black can probably hold but he is really struggling.
+0.76 White has excellent winning chances.
464
–1.99 Black wins.
+0.28 Marginal edge for White but an obvious draw.
465
–1.90 Black should win. White obviously does not want a dark-squared bishop in this structure, as it would be a bad piece and the a4-pawn could become vulnerable. But apart from that, it is extremely telling that the heavier the piece value becomes, the higher White’s winning chances are. With this in mind, I would like to repeat a guideline from Chapter 5, as I believe it applies to endgames just as much as it does to middlegames. When playing with a protected passed pawn, the most favorable trades to make are those involving minor pieces. Protected passers are best in rook and queen endings, and much less effective in minor piece endings. If you must leave minor pieces on the board, try to keep them the same for both sides. Let’s see an example of this guideline in action from one of the great technical players of our time.
Vladimir Kramnik – David Howell London 2010 1.d4 Nf6 2.c4 g6 3.Nc3 d5 4.cxd5 Nxd5 5.e4 Nxc3 6.bxc3 Bg7 7.Be3 c5 8.Rc1 Qa5 9.Qd2 0-0 10.Nf3 Rd8 11.d5 e6 12.Bg5 f6 13.Be3 exd5 14.exd5 Na6 15.Be2 Be6 16.c4 Qxd2† 17.Nxd2 Bd7 18.Ne4 b6 19.h4 Bf5 20.Nc3 Nb4 21.Kd2 Nc6 22.h5 Kf7 23.g4 Bc8 24.hxg6† hxg6 25.Ne4 Ba6 26.Rh7 Kg8 27.Rch1 Ne5 28.Kc3 Nf7 29.Bd3 Ne5 30.g5 fxg5 31.Bxg5 Rf8 32.Be2 Nf3†
466
The position is somewhat tactical in its nature, but the variations are not too difficult to calculate. Kramnik correctly aimed to trade a bunch of minor pieces. 33.Nf6†! While analyzing this game for ChessBase, Krasenkow suggested taking on g7 was equally strong. I must disagree – and disagree strongly. 33.Rxg7†?! Kxg7 34.Bh6† Kg8 35.Bxf8 Rxf8
We have the same material balance seen in the game, only with knights on the board as well. The third guideline suggests this may not be ideal, as we would like to trade off congruent minor pieces when playing with a protected passed pawn. This position is no exception, as White’s winning chances would be higher without those knights. 467
36.a4 Krasenkow ends his line here. Black has serious drawing chances after something like: 36...Rf4 37.Nd6 Rf6 38.Nb5 Ne5
The computer claims this is dead equal. I don’t fully buy that assessment; but when we compare this to the position White obtained in the game, it becomes clear that Kramnik’s choice is much stronger. 33...Rxf6 Of course Black must avoid 33...Bxf6†? 34.Bxf6 Rxf6 since 35.Rh8† Kf7 36.R1h7 is mate. 34.Rxg7†! The point. 34...Kxg7 35.Bxf6† Kxf6 36.Bxf3 White’s protected passed pawn on d5 will restrict Black’s pieces enormously, and he is ready to invade with Rh7.
468
36...Re8? Black will lose if the game continues normally. He absolutely needed to look for counterplay with 36...Rf8, although White remains in control after: 37.Be4! Ke5 38.f3²
Black has a tough defense ahead; but with some luck, he may save the game. 37.Rh7! The invasion begins.
469
37...Re7 38.Rh8! Kramnik again follows the third guideline well and refrains from trading the heavies. 38.Rxe7 Kxe7 reaches a pure bishop endgame, which would be a draw:
We may only be one trade away from a potentially winning pawn endgame, but how likely is it that White can get the bishops off the board? It simply won’t happen. Black’s king is somewhat confined to babysitting the d5-pawn, but it’s not as if it needs to go anywhere, and White’s king is also stuck defending his c4-pawn, which is fixed on a light square. The position is dead drawn and neither side has a sensible plan to make progress, thanks in no small part to White choosing the wrong pair of pieces to leave on the board. 38...Kg7 This would have been the best defensive try. The game actually continued: 38...Ke5?! This loses without a fight, but I think Black’s position was beyond saving anyway. 39.Bg4! b5 40.Rd8 There is nothing Black can do to prevent the d-pawn from promoting.
470
40...Rf7 41.Re8† Kf4 41...Kd6 42.Re6† picks up the bishop on a6. 42.Be6 1–0 Black resigned, and rightly so.
39.Ra8! White makes sure Black will not be able to take on f2. 39...Rf7 40.Bg4 Bb7 41.Rb8 Ba6 42.Re8! Rf8 Black would obviously love to take on f2, but he can’t, thanks to the danger of the protected passer. After 42...Rxf2? 43.d6 a new queen is incoming, so Black can resign. 471
43.Re4 The d5-pawn may not be immediately threatening to promote on the spot, but the note above clearly shows that Black’s rook is tied down to the job of babysitting it.
I have a hard time imagining Black holding this endgame. His bishop is too passive and cannot come anywhere useful without being exchanged, and the d-pawn is a constant cause for concern, particularly since the black king is cut off along the e-file. Howell could have tried this to offer more resistance, but I doubt it would have changed the result. Now, put yourself to the test with some puzzles!
472
Exercises
Puzzle 1
How should White continue? Show/Hide Solution The protected passed pawn loses almost all of its value when there is nothing else to attack, as the defenses cannot be stretched. As such, trading into a pawn ending would be a draw, but White wins the rook ending as Black’s king is too far away. 1.Rf8! White transfers his rook to f4 to harass the g4-pawn. Trading into the pawn endgame would throw away the win: 1.Rxd4†? Kxd4 Black has no weaknesses that require his king’s attention. He would certainly be lost if there were a pair of pawns on the queenside for White to come and harass, but as is, there is no reason for his king to leave the box from d4 to h8. He can maintain the opposition at all times by using the distant and diagonal opposition if White’s king roams too far towards the queenside. 2.Ke2 Ke4 3.Kd2 Kd4 4.Kc2 473
4...Ke4! Black cannot follow with ...Kc4 on pain of the h-pawn queening, but the diagonal opposition works just fine. 5.Kc3 Ke5! 6.Kc4 Ke4! 7.Kb5 Kd5 8.Ka5
By running to the a-file, White points out that Black’s king cannot follow him by going to c5, but the distant opposition works just as effectively. 8...Ke5! 9.Ka6 Ke6 10.Ka7 Ke7 11.Kb6 Kd6 White cannot make progress and the position is drawn. 1...Kd3 This is the best defensive try. 474
1...Kd5 2.Rf4 Ke5 sees Black offering the same drawing pawn endgame as above, but White avoids it and wins with:
3.Ke3! Black must either give up his g-pawn or exchange on f4 to reach a different type of pawn endgame; either way, he loses. 2.Rf4! Re4 3.h5! Re2† 4.Kf1 Re5 What else? 5.Rxg4 Rxh5 6.Kg2+–
475
Black’s king is cut off along the fourth rank, and White wins easily by means of Ra4 followed by g3g4, Kg3 and so on.
Sam Shankland – Josep Lopez Martinez Barcelona 2013
Black is under a little pressure due to the protected passed pawn. What is his most convincing route to a draw? Show/Hide Solution > Black can and should take over the c-file, but he has to do so knowing that a pawn endgame is coming, and that it will not be winning for White. 32...Rxc4! In the game, Black tried: 32...f4 After this move Black should still be able to hold with accurate play, but there is some work to do and he is under a bit of pressure. Eventually White prevailed. 33.Rgc1 Rxc4 34.Qxc4 fxe3 35.fxe3 Qd7 36.Qc2 Rf1!
476
Very nice! The machine evaluates it definitively as 0.00 at this stage, but I kept playing. 37.h4 h5 38.Qh2† Kb7 39.Qe5 Rxc1† 40.Kxc1 Qg4 41.Qf4! Well calculated – the pawn ending would be winning for White.
41...Qe6! Correctly avoiding 41...Qxf4 42.exf4 b5 (or 42...Kc6 43.Kd2 Kd5 44.f5 b5 45.Ke3 a5 46.f6 Ke6 47.Kxe4 Kxf6 48.Kd5+–) 43.Kd2 a5 44.Ke3 b4 45.Kxe4 a4 46.Kd3+– when White gets back in time. 42.Kb2 Qd5 43.Qf1 Kc7 44.Qa6 Kb8 45.Qa4 Qd8 46.Kb3
477
46...Qg8†?! Of course I understood that the position was still drawn, but around here I started to think I might have some practical winning chances. 46...Qxh4= was simplest, when White should take a perpetual before things get out of hand. 47.Ka3 Qf8† 48.Qb4 Qd8 49.Kb3 Qg8† 50.Kb2 Qd8 51.Kc3 Qc7† 52.Kb3 Qd8 53.a4 Some progress?
53...Qg8† Again 53...Qxh4 would have drawn easily; my opponent just never wanted to do this for some reason. 54.Ka3 Qd8 55.a5 Qc7 56.Kb2 Qh2† 57.Kb3 Qh1?? At long last, Black commits an error serious enough to change the result of the game. 478
Among other moves, 57...Qxh4 should still draw.
58.axb6 Qb1† 59.Kc4 Qa2† If 59...Qxb4† 60.Kxb4 axb6 61.Kc4 White gobbles up the e4-pawn and wins trivially. 60.Kc5 a5 61.Qc4 Qa3† 62.Kb5 1–0 33.Qxc4 Rc8
34.Rg8! This is White’s best try. Still, Black should be fine as long as he understands that the pawn ending is drawn. This is not too difficult, but it’s still a slightly scary prospect because of White’s protected 479
passer. 34...Qd7! 35.Rxc8† Qxc8 36.Qxc8† Kxc8 37.Kc2 Kc7 38.Kc3 Kc6 White’s protected passed pawn is insufficient for victory. He cannot approach the queenside pawns due to a lack of available squares, and he cannot run around to the kingside since Black would promote on the opposite flank. Play might continue:
39.a4 Kd5 40.Kb4 a6 41.Kb3 Kc6 42.Kc4 Kd6= White has no way to make progress.
Vassily Ivanchuk – Anish Giri Wijk aan Zee 2012
480
White can trade down to a pawn endgame. Should he do it? Show/Hide Solution > 48.Rh7†! Ivanchuk correctly realizes that he can make a protected passed pawn. No other move would have won. The tempting 48.Rxg5? fails after: 48...Rb4†! The only drawing move, but a convincing one. 49.Ke3 (after 49.Kd5 Rb5† White has to retreat anyway) 49...f4† With ...Ke6 coming next, Black holds easily. 48...Kc8 49.Rh8† Kd7 50.Rh7† Kc8 51.Rxb7 Kxb7
481
52.f4! The key point. Black is in a tough spot, as taking on f4 allows White to win the race, but ...g4 offers White a decisive protected passed pawn. We will focus on the latter possibility as it ties in with the theme of the current chapter. 52...g4 In the game, Black opted for the race: 52...gxf4 White has to be careful as the a-pawn has the potential to queen with check, but he wins with precise play. 53.h4 a5 54.e6! The e-pawn is fast, so Black’s king needs to run to stop it. 54...Kc7 After 54...a4 55.e7 a3 56.e8=Q White gets there first. 55.h5 a4
482
56.e7! Again, Black’s king must come and stop the e-pawn. 56...Kd7 57.h6 Black resigned in view of 57...a3 58.e8=Q†! Kxe8 59.h7 a2 60.h8=Q† when White queens with check. 1–0 In our main line Black has avoided the losing pawn race seen in the game, but the protected passed pawn is decisive. White can run his king over to the a-pawn without any fear of kingside counterplay, since Black’s king is restricted.
53.Kc5 483
53.e6 actually wins in a more forcing way, but I will take the text move as the main line in order to showcase the static value of the protected passed pawn. 53...Kc7 54.Kb4 Kb6 55.Ka4 a5 Black’s king is now far enough away that White can make a transition.
56.e6! Kc6 57.Kxa5 Kd6 58.Kb6 Kxe6 59.Kc6 White wins.
484
When playing against protected passed pawns in the endgame, it is important to consider why they are problematic. The simplest reason is that a protected passed pawn will constantly require the attention of your pieces to prevent it from promoting. And the pawn is there to stay – that much is implied in the definition including the word “protected”. However, the pawn may not always be there to stay. Undoubtedly, the easiest way to deal with a protected passed pawn is to undermine the defender. This is a pretty simple concept to understand, so let’s look at a game where it was used to good effect.
Igor Khenkin – Martin Forchert Bad Wiessee 2009 1.d4 d5 2.c4 c6 3.e3 Bf5 4.Nc3 e6 5.g4 Bg6 6.Nge2 Bd6 7.Qb3 Qb6 8.c5 Qxb3 9.axb3 Bc7 10.b4 Bd3 11.Ra3 Ba6 12.Bd2 Ne7 13.Nc1 Bxf1 14.Kxf1 Nd7 15.b5 0-0 16.f4 b6 17.b4 Rfb8
485
White has an excellent position, but he was a bit too eager to make a protected passed pawn and played impatiently. 18.bxc6? White should have preferred simple and slow improvement with a move like 18.Ke2. He can follow up with Nd3/Nb3 followed by Rha1 or Rb1, and eventually play for bxc6 followed by b4-b5 once he is ready. Black doesn’t have much to do in the meantime, since ...bxc5 will leave White with a protected passer anyway. 18...Nxc6 19.b5 Na5 20.c6 Nf6 21.g5 Ne8 22.Nd3 White has established a strong protected passed pawn on c6, but the defender on b5 is not secure. Black can easily break down the defenses.
486
22...Bd6 There was nothing wrong with the immediate 22...a6! when White must be careful to keep the balance. 23.Ra2 Nc7 24.Ke2 a6! The protector is removed, and the protection undermined. The c6-pawn may become a casualty rather than a dangerous passer before White knows it.
25.Rb1 axb5 26.Nxb5 Nxb5 27.Rxb5 Nc4!? The obvious continuation would have been 27...Nxc6 28.Rxa8 Rxa8 29.Rxb6 Rc8= when the peace 487
treaty can be signed. The move Black chose in the game implies that he was playing for a win. 28.Rxa8 Rxa8 29.Nb2 Black chose the wrong capture here. The c6-pawn cannot be allowed to be supported.
29...Nxb2? It was better to eliminate the bishop, pointing out that the knight on b2 is a lousy piece. 29...Nxd2 30.Kxd2 Bc7 Black can quickly run his king to d6 and try to take the c6-pawn. The computer claims the position is equal, but to me it looks more dangerous for White. 30.Rxb2 Now the rook can come to c2 and offer some support to the pawn. Black still shouldn’t lose but he is under some pressure. 30...Bc7
488
31.e4! White blasts open the center to let his king into the game. 31...f5? Black should not have allowed himself to be saddled with a weakness on d5. Correct was: 31...dxe4! 32.Ke3 f5
33.gxf6 gxf6 34.Kxe4 f5† 35.Kd3 Kf7² Black should not lose, although he will still have to defend accurately.
489
32.gxf6 gxf6 33.f5! Kf7 34.exd5 exd5
35.Rb5! Rd8 36.Bb4! Black is in trouble; his pieces are passive and it is hard to find a decent move for him. 36...Bxh2 37.Rxb6 Rb8 38.Rxb8 Bxb8
39.Ba5 1–0 Although Forchert eventually lost the game, he played admirably in the phase when he was playing against the protected passed pawn. Simple as it may have been, it does provide a good moment to 490
introduce the first guideline. A protected passed pawn can be a powerful long-term asset for your opponent. If you have the chance to undermine the pawn chain, it may well be worth doing. This guideline applies perfectly to Forchert’s play. The protected passed pawn on c6 was firmly blunted and Black was facing no immediate threats. As such, he was not compelled into action right away; yet he chose to pressure the b5-pawn anyway, probably due to a thought process along the lines of the above guideline. This was a relatively simple example, but the same guideline can apply to tougher situations as well.
Luke McShane – Magnus Carlsen London 2011 1.e4 e5 2.Nf3 Nc6 3.Bb5 a6 4.Ba4 Nf6 5.0-0 b5 6.Bb3 Bc5 7.c3 d6 8.a4 Rb8 9.d4 Bb6 10.axb5 axb5 11.Qd3 0-0 12.Bg5 h6 13.Bxf6 Qxf6 14.Qxb5 Na7 15.Qa4 Qg6 16.Re1 Bh3 17.g3 Qf6 18.Nbd2 Rbd8 19.Qc4 g5 20.Qd3 Bg4 21.Nc4 Nc6 22.Nxb6 cxb6 23.Re3 Kg7 24.Kg2 h5 25.h3 Bd7 26.Ba4 Ra8 27.Bxc6 Bxc6 28.Rxa8 Rxa8 29.Qc4 Rc8 30.Qa6 Rb8 31.d5 Bd7 32.h4 g4 33.Nd2 Qd8 34.Qa3 Qc7 35.Re1 b5 36.Ra1 b4 37.cxb4 Bb5 38.Qe3 f6 39.Qc3 Qb7 40.b3 Kg6 41.Rc1 Qb6 42.Kg1 Be2 43.Qc6 Qd8 44.Nc4 Rxb4 45.Nxd6 Rb6 46.Qc2 Qxd6 47.Qxe2 Rxb3 48.Rd1 Rb4 49.Qc2 Rb8 50.Qc3 Ra8 51.Qc6 Rd8 52.Rb1 Qd7 53.Kg2 Qd6 54.Rb3 Qd7 55.Rb1 Qd6 56.Rb3 Qd7 57.Qa6 Qc8 58.Qd3 Qc5 59.Rc3 Qb4 60.Rc4 Qe1 61.Qc3 Qxc3 62.Rxc3 Black has been under pressure for a long time, and now faces a difficult endgame. White has an extra protected passed pawn on d5, and we already know that the presence of major rather than minor pieces tends to favor the side with the protected passer. Magnus found the only way to draw the game.
491
62...Ra8! The rook is a poor blockading piece, and the pawn is not so far advanced that Black’s king cannot catch it. Black therefore intends ...Ra4, which will either undermine the defending pawn or force some degree of passivity. Considering the theme of the chapter’s first guideline, it may seem tempting to try to break down the protected passer’s defenses with: 62...f5? This creates too many weaknesses, enabling White to win by trading one type of advantage for another. 63.Rc6† Kg7
492
64.Re6! The easiest of many winning moves. 64...fxe4 65.Rxe5 Kg6 66.Kf1 White wins: Ke2-e3 is on the way and there is nothing left for Black to fight for. Maintaining passive defense would not save the game so long as the rook doesn’t threaten any of White’s pawns. White can and will break through if given enough time, and enough time in this case may mean a single tempo: 62...Rd7? 63.Kf1 63.f4! may be technically best but, for illustrative purposes, we will focus on a simple line involving passive defense by Black. It is also worth noting that White should not rush with 63.f3?! until his king is safe. After 63...Ra7! 64.fxg4 hxg4 Black will start to give some annoying checks, much like he did in the game.
493
63...Rd6? 63...Ra7! is still the right plan, though after 64.Ke2! Ra2† 65.Ke3 White has a significantly improved version of the game continuation due to the more active placement of his king, while any hope Black may have had for attacking the e4-pawn has gone out the window. I don’t see an immediate win, but White clearly has chances to score the full point. By contrast, Magnus’s continuation was definitively drawing. 64.Ke2 Rd7
65.f3! Now that White’s king is in no danger of being forced back to the first rank, he can break down Black’s space advantage and make another passed pawn. 65.Kd3 would be fine if Black kept snoozing for long enough to allow the king to walk to c6, but 494
65...Ra7! may still draw. 65...Ra7 After 65...gxf3† 66.Kxf3 White follows up with g3-g4 and wins. 66.fxg4 hxg4 67.Rd3 Kf7 68.h5 White’s pawns have overloaded Black’s defensive capabilities. The black king can stop one of the two passers, but not both. 63.Rd3 Kf7! Black wants to pressure the e4-pawn but is not ready yet, since 63...Ra4? runs into 64.d6 and White wins. But after the text move, Black’s king is ready to stop the d-pawn if it advances.
64.f3? McShane errs at the end of a long game and lets Black draw immediately. But even if he had played better, I doubt that the result would have changed. The most testing try was 64.Rd2, stopping any checks along the second rank and preparinoqwepowepoeoeoqweqwqwhk;g f2-f3 next. Nevertheless, Black still draws after: 64...Ra4! 65.f3 gxf3† 66.Kxf3 Ra3† 67.Kf2 Ke7!
495
Black has the d-pawn well under control and his next move will be ...Ra4, followed by checking back on a3 once White’s king moves to the third rank. The harassment of the e4-pawn secures Black a draw. To some extent this falls into the category of passive defense holding if your pieces are more active than your opponent’s; but as we frequently see in chess, a move can be right for more reasons than one. 64...Ra2†! 65.Kf1 Ra1†! 66.Kf2 Ra2†! White’s king cannot easily escape the checks, since moving to e3 would allow ...Rg2.
67.Kf1 Ra1† 68.Ke2 Ra2† 69.Rd2!? One must admire McShane for not giving up, although agreeing the draw would have seemed reasonable enough at this stage. 496
69...gxf3† 70.Ke1 Magnus now has one final trap to avoid.
70...Ra4! This move is far from the only drawing one, but the main point is that Black could not have relied on connected passed pawns of his own to draw a pawn endgame. Black would lose after: 70...Rxd2?? 71.Kxd2 f5 72.exf5 e4 73.Ke3 Ke7
At first glance, it may look as though the connected passed pawns will save Black, since White’s 497
king is unable to support his own passed pawns; but this is just an illusion. The e4- and f3-pawns do indeed keep White’s king out of the game, but they threaten nothing themselves, and White wins by making another passer. 74.Kf2! Black now has to let one of the passed pawns further up the board. The continuation might be: 74...Kf7 75.d6 Kf6
76.g4! hxg4 77.h5+– Black’s pawns are stopped in their tracks, whereas White will make a queen. Clearly White’s king is fine where he is, as he can blockade three pawns nicely. Unfortunately for Black, his own king does not have such a wide reach. 71.d6 Rxe4† 72.Kf2 Ke8 73.Kxf3 Ra4 74.d7† Kd8 75.Rd6 f5 76.Re6 Ra3† 77.Kf2 e4 78.Rd6 Rf3†
498
79.Kg2 f4 80.gxf4 Rxf4 81.Kg3 Rf3† 82.Kg2 Rf4 83.Kg3 Rf3† ½–½ Black threatening to capture the e4-pawn and activating his rook forced White to organize his pieces poorly to keep it protected, after which passive defense was good enough to hold. The key to the defense was that, when he needed to, Black was always able to harass the e4-pawn, which was the most important one in the position. The concept of undermining the protecting element of a protected passed pawn is all well and good – but more often than not, a protected passed pawn’s chain cannot be broken or harassed so easily. The protected passer’s main function is to restrict pieces; and when your pieces are restricted, it becomes harder to focus on undermining a pawn chain, particularly if your opponent’s pieces enjoy more freedom. Carlsen’s play was successful largely because the white king was boxed out of the game for just long enough for the defensive plan to succeed. As we saw, White got serious winning chances in the line where Black wasted one move on ...Rd7 before correctly going to the a-file, thereby allowing the king to come to e3. When undermining the pawn chain is impossible, alternative strategies must be sought out. In the previous chapter, we established a guideline stating that the side with the protected passer will generally prefer a major-piece endgame to one with minor pieces. Thus, the next guideline follows logically. When playing against a protected passed pawn in an endgame with both major and minor pieces, exchanging the majors may be a good way to minimize its effect. Let’s see an example of this principle in action. 499
Varuzhan Akobian – Yuri Shulman St Louis 2009 1.d4 d5 2.c4 e6 3.Nc3 c6 4.e3 Nf6 5.Nf3 Nbd7 6.Qc2 Bd6 7.Bd3 0-0 8.0-0 dxc4 9.Bxc4 a6 10.Rd1 b5 11.Bd3 Qc7 12.e4 e5 13.h3 h6 14.Be3 c5 15.dxc5 Bxc5 16.Nd5 Nxd5 17.exd5 Qd6 18.Rac1 Bxe3 19.fxe3 Qb6 20.Qf2 Bb7 21.e4 Qxf2† 22.Kxf2 Rfc8
Black has an unpleasant position thanks to the strong protected passer on d5. White would have been able to exert a lot of pressure, if only he had anticipated Black’s upcoming plan. 23.b4? I suppose White was aiming for Nf3-d2-b3-c5, but the plan is too slow and Black gets a chance to equalize immediately. White had several decent moves, but the one I like the most is 23.Ra1!?. To the untrained eye, this move looks bizarre! Yes, White voluntarily abandons the only open file – but when considering the second guideline, the point is clear. Black will not be able to chop all the rooks off, and White is ready to play a2-a4 next to activate his rook(s) along the a-file. In the meantime, the c-file doesn’t have any points of entry, and the c8-rook is far more passive than it looks. White has good winning chances. 23...Rxc1! 24.Rxc1 Rc8! Once the rooks disappear, Black will hardly have a care in the world.
500
25.Rxc8† Bxc8 26.Nd2 Nb6 Black also could have countered White’s planned maneuver with 26...Kf8 27.Nb3 Ke7 28.Nc5 Kd6 when White’s knight cannot be maintained and Black is fine. The way he played was also perfectly adequate though. 27.Nb3 Kf8 28.Nc5
When considering a position like this one, it becomes abundantly clear that White would be better off with rooks on the board. For example, if he had a semi-passive rook on a1 and Black had a rook on the c-file, as would have been the case had he avoided the exchanges by means of 23.Ra1!?, then a2-a4 would be on the way and Black would remain under a lot of pressure. As is, White has no credible plan 501
and the game was promptly drawn. 28...Ke7 29.a3 Kd6 30.g4 Nd7 31.Nxd7 Bxd7 32.Kf3 Be8 33.h4 ½½ Shulman’s play was convincing and he easily earned a draw. If he had not traded all the rooks, White’s Nd2-b3-c5 plan would have been considerably stronger. For example, they could have reached something similar to the following game:
Vassily Ivanchuk – Joel Lautier Horgen 1995 1.e4 c5 2.Nf3 e6 3.d4 cxd4 4.Nxd4 Nc6 5.Nc3 Qc7 6.Be3 a6 7.Bd3 Nf6 8.0-0 Ne5 9.h3 Bc5 10.Kh1 d6 11.f4 Ned7 12.Qe1 Qb6 13.Na4 Qb4 14.Qxb4 Bxb4 15.Nb3 b5 16.Nb6 Nxb6 17.Bxb6 Nd7 18.Bd4 e5 19.c3 Bc5 20.fxe5 Bxd4 21.cxd4 dxe5 22.d5 Nf6 23.Nc5 Ke7 24.a4 Bd7 25.a5 Rhc8 26.b4
We have a nearly identical pawn structure to the previous game, but the evaluation is markedly different due to the presence of the rooks. White’s protected passed pawn gives him a space advantage that allows him to make better use of his rooks than Black can with his. 26...Rc7 27.Rf3 Be8 Black could also have tried: 27...Bc8 Returning the bishop to its original square to guard the a6-pawn. This makes the position even 502
more similar to the Akobian – Shulman encounter; but once again, the rooks make all the difference. For example: 28.Kg1 Nd7 Without rooks, Black would be fine. But with rooks on the board, he cannot get rid of the c5knight and White can increase the pressure on all sides.
29.Rc1 29.Raf1!? may be even stronger for concrete reasons, but the text move is simpler and more illustrative of our theme. 29...f6 Preparing ...Kd6. 30.Be2 Kd6 31.Rfc3+–
503
Black is done for. He cannot effectively pressure the c5-knight: he can never exchange it on pain of giving White connected passers. And he faces the constant worry of White moving the c5-knight at the right moment to invade on the c-file. White can win with any number of plans, including but not limited to Bg4, Nc5-e6, or even trying to open the other flank with g2-g4, h3-h4 and so on. Despite the equal material, the computer offers a +5 advantage to White: a rather different evaluation from the equivalent rookless position!
28.Be2 Nd7 29.Rc3 Kd6 30.Rac1 Raa7 31.Kg1 Nf6 32.Kf2 Bd7 33.Rf3 Bc8 34.Ke3 Ne8
Lautier did end up bringing the bishop to c8 to keep the a6-pawn protected, but he also understood that the next part of the Shulman set-up with ...Nd7 would not work with all the rooks on the board. Instead he tries to turtle up in a fortress with the knight on e8, but Ivanchuk effortlessly opens the other flank. 504
35.Rcf1! f6 36.Rg3?! Right idea, wrong execution. 36.R3f2! White should have preferred this retreat with the same plan of Bh5 or Bg4, but while putting more force on the f-file to counter the ...f5 break. Black loses, for instance after: 36...Ra8 37.Bh5 g6
38.Rxf6†! This is the strongest and most stylish way, although the simple 38.Bg4 wins too. 38...Nxf6 39.Rxf6† Ke7 40.Rb6! Threatening d5-d6†.
505
40...Rxc5 What else? 41.bxc5 gxh5 42.Rh6 White will take on h7 and possibly h5 as well, and Black has no chance against the mighty passed pawns.
36...Ke7 Black had one chance to play 36...f5!. This certainly does not solve all of his problems but it is a step in the right direction. 37.exf5 Nf6± Black is still in trouble but he has a fighting chance. 37.Bh5 506
White now aims to exchange off minor pieces. As we well know, this tends to favor the side with the protected passer. 37...g6 38.Bg4 Nd6 39.Bxc8 Rxc8 40.Rgf3 Rf8 All that is left for White to do is open the kingside, and g2-g4 and h3-h4 are not difficult moves to find. 41.g4 Rf7 42.Kd3 Ra8 43.R3f2 Rff8 44.h4 Rf7 45.Rf3 Rc8 46.R1f2 Rc7 47.h5 gxh5 48.gxh5 Black finally tries to find counterplay but it is far too little and too late.
48...f5 49.exf5 e4† 50.Nxe4 Nxe4 51.Re3! No counterplay, no questions asked. Ivanchuk drifted a bit later on, perhaps due to fatigue from such a long game. I’m sure if he were on better form he would have won without issue. Presumably both players thought that after 51.Kxe4 Kd6 Black would have a blockade of sorts, and he threatens a check on c4 followed by taking some pawns – but the computer just laughs.
507
52.f6! Rc4† 53.Kf5 Rxb4 54.Re3 White wins. 51...Kd6 52.Rxe4 Kxd5 53.f6 Kd6 54.Rf5 Rc6 55.Kd4 Rc4† 56.Ke3 Rc6 57.Kd4 Rc4† 58.Ke3 Rc6 59.Kf4 h6 60.Rd4† Ke6 61.Re4† Kd6 62.Kf3 Rc3† 63.Kg4 Rc8 64.Rf1 Rg8† 65.Kh4 Rgf8 66.Rd1† Kc7 67.Re7† Rxe7 68.fxe7 Rf4† 69.Kg3 Re4 70.Rf1 Kd7 71.Rf6 Kxe7 72.Rxh6 Rxb4 73.Rxa6 Ra4 74.Ra7† Kf8 75.a6 Kg8 76.h6 Kh8 77.Kf3 b4 78.Ke4 b3† 79.Kd3 b2 80.Kc2 Rb4 81.Kb1 Rb6 82.h7 By some miracle Black has reached the Vancura position, and can hold by leaving his rook on the 6th rank.
82...Rb4? 508
Black lets the a7-rook run free. Staying along the sixth rank would have held: 82...Rh6! 83.Ra8† Kxh7 84.Kxb2 Rf6!
White’s king will never find a safe hiding square from the rook. The position is drawn, for example: 85.Kb3 Rg6 86.Kb4 Rf6 87.Kb5 Rf5†! The checks begin, and they won’t stop until White’s king is far away from the pawn. 88.Kb6 Rf6† 89.Ka7 Rf7† 90.Kb8 Rf8† 91.Kb7 Rf7†= And so on. 83.Rc7 Ra4
509
84.Rc8†? Just burning a tempo. 84.a7? allows 84...Rxa7! with an immediate draw due to the stalemate motif. I find it mind-boggling that White did not play 84.Rc6 right away. It turns out the one tempo should mean the difference between winning and drawing for White, but that is beside the point. Even without calculating the outcome, why give Black an extra move to get his king back into the action? 84...Kxh7 85.Kxb2 Kg7 86.Kb3 Ra1 87.Kb4 Kf7 88.Kb5 Ke7
Black to move here would draw with ...Kd7, but White to play can continue 89.Kb6! Kd7 90.Kb7! with an easy win. 510
84...Kxh7 85.Rc6 Rb4? The comedy of errors continues. Running the king to the queenside was the only way, and not a difficult plan to come up with. I imagine Lautier must have been severely fatigued and/or extremely short of time to miss this resource, as it holds easily with direct moves and no side variations. 85...Kg7 86.Kxb2 Kf7 87.Kb3 Ra1 88.Kb4 Ke7 89.Kb5 Kd7=
Black’s king is too close. 86.a7 Now White is winning again – and this time he doesn’t let Black off the hook.
511
86...Ra4 87.Rc7† Kg6 88.Kxb2 Kf6 89.Kb3 Ra1 90.Kb4 Ke6 91.Kb5 Kd6 92.Rc6† Kd5 93.Ra6 Rb1† 94.Ka5 Kc5
95.Rc6†! Kxc6 96.a8=Q† Kc7 97.Qa7† Rb7 98.Qc5† Kb8 99.Ka6 Rd7 100.Qe5† Kc8 101.Kb6 Kd8 102.Kc6 Rf7 103.Qg5† Ke8 104.Kd6 Kf8 105.Ke6 Rh7 106.Qf6† Kg8 107.Qg6† Rg7 108.Qe8† Kh7 109.Kf6 Rg4 110.Qh5† Kg8 111.Qxg4† 1–0 Despite Ivanchuk’s mishaps in the endgame, his play leading up to that was exemplary in showing the strength of a protected passed pawn when there are rooks on the board. He used his extra space to make threats on both sides of the board, and the way he traded the minor pieces and opened the kingside were textbook examples of the guidelines of the previous chapter on display. 512
I would not be surprised if Shulman had seen the Ivanchuk – Lautier game before and took care to trade all the rooks as a result. Whatever his thought process may have been, he certainly landed on the right plan. However, protected passed pawns often arise in blocked positions in which trading the rooks may prove difficult. When considering the guidelines from the previous chapter (as well as Chapter 5), we know that it tends to favor the side with the protected passer to keep the same minor pieces on the board for both sides. The next guideline follows logically. When playing against a protected passed pawn in the endgame, it is often in your best interest to make unequal minor piece trades, and to avoid equal ones. Given that we already know that knights are specifically the best blockaders of protected passers, it is often in your best interest to trade a bishop for a knight. In the following game, Black followed this guideline well up to a point. The moment he started to ignore it was the moment he lost the thread.
Vladimir Kramnik – Alexander Morozevich Dortmund 2001 1.d4 d5 2.c4 c6 3.Nf3 Nf6 4.e3 Bf5 5.Nc3 a6 6.Bd3 Bxd3 7.Qxd3 e6 8.0-0 Be7 9.e4 0-0 10.Rd1 b5 11.c5 dxe4 12.Nxe4 Nxe4 13.Qxe4 Qd5 14.Qxd5 cxd5 15.Bf4 Nc6 16.Ne5
The opening has not gone well for Black, and just 16 moves in, he finds himself in a precarious situation. He is already in an ending and facing down a protected passed pawn as the only serious imbalance in the position. Having reached a bad position though, Morozevich defends excellently, at
513
least for a while. 16...Nb8! Black does not want to trade off the knights, and he can boot the e5-knight away by means of ...f6 in order to bring his own knight back to c6. Or, as we will see in the game, he can try to trade his bishop for the knight. 17.Rd3! White anticipates ...f7-f6 and plays prophylactically. 17.Rac1?
This automatic move would be a mistake, as it allows Black to execute his simplest equalizing plan. 17...f6 18.Nf3 Nc6= The protected passer is firmly blockaded, and White has no sensible way to get rid of Black’s excellent knight. It is also important to note that White is too slow to harass the e6-pawn successfully.
514
19.Re1 Kf7 White cannot exert meaningful pressure and must even be careful not to become worse. For instance, the primitive 20.Re2? is well met by 20...g5!³ when White’s bishop is forced to the sad e3-square due to the threat of ...g4, winning the d4-pawn.
17...Rc8 17...f6!? This is just about playable although it is understandable that Black shied away from it. 18.Nf3 Nc6 19.Re1 Kf7 20.Rde3 Following this natural sequence Black would have to find:
515
20...Nxd4! 20...Nd8 cannot be refuted directly, since 21.Bc7 Re8 holds e6; but if Black had to resort to playing in this way, it would be a clear admission that things have gone wrong for him. 21.Nxd4 Bxc5 22.Rd3 Bxd4 23.Rxd4 e5 24.Bxe5 fxe5 25.Rxd5 Rfe8² Black may go a pawn down but he should get enough activity along the c-file to hold a draw, quite possibly in a rook endgame with three pawns against two on the kingside after further simplifications. 18.Re1 Black now had the right idea, but the wrong execution.
18...Bf6?! 516
It is only natural to try to trade the bishop for the knight, but going about it in this way allows White to cripple the pawn structure. The best move was 18...Bd8! intending ...Bc7. This way Black challenges the knight, which may struggle to retreat due to the pin, and can hope to trade on e5 and play ...Nc6 next, without allowing the kingside structure to be weakened. White may be well advised to make a less-than-ideal retreating move like 19.Nf3 to avoid this plan. After 19...Nc6² Black is still some way from equalizing, but he has fair defensive chances. 19.Ng4! Nc6 20.Nxf6† gxf6 Black has achieved the ideal trade of bishop for knight, but it came at a price as his kingside has been seriously weakened.
21.Bg3? Not the most incisive, though the plan of Bg3-h4 is not totally stupid. 21.Ree3! was best, intending Rh3 followed by doubling rooks along the h-file, when Black will have to make concessions to avoid being mated. 21...Kg7 22.Bh4 Ne7 23.g4 Ng6 24.Bg3 Black’s play thus far had not been perfect, but his ideas made a lot of sense. Now that he has pushed the bishop to g3 and alleviated the pressure against the f6-pawn, he needed to return his knight to its best square.
517
24...a5? Best was 24...Ne7! when the knight comes back to c6, taking advantage of the fact that White’s gpawn has been provoked to g4 where it blocks a would-be rook check along the g-file. Black still has some concerns on the kingside and this is likely why Morozevich played as he did, but it was better than reaching a strategically hopeless position immediately. Another important point is that after 25.Rf3 White menaces Bh4, and Black’s only move is 25...h5!, when he seems to be all right. My guess is that Morozevich missed this move, as I can’t really imagine him not understanding that the knight belonged on c6. 25.Bd6!± Kramnik takes his chance to dominate the g6-knight and prevent it from approaching c6 without being exchanged. And just like that, Black’s position is on the verge of being lost – especially since f4f5 is a concrete threat. This probably explains why Morozevich gave up a pawn on his next move, but he failed to gain compensation and soon went down.
518
25...h5 26.gxh5 Nh4 27.Rg3† Kh6 28.Be7 Nf5 29.Bxf6 Nxg3 30.fxg3 Rg8 31.Kg2 Kxh5 32.h3 Kg6 33.Rf1 Kh7 34.g4 b4 35.Kg3 b3 36.a3 Rac8 37.h4 Rg6 38.h5 1–0 After allowing White’s bishop to stand on d6, Black’s knight became marooned. His choice to open the kingside had more to do with desperation than anything else, and predictably he was unable to save the game. The last important technique for fighting against a protected passed pawn is to minimize its effectiveness by making the board smaller. For instance, take the following position:
Example
519
Obviously White is going to take on g5, and he can never lose. But the way in which he decides to capture on g5 will dictate whether or not he wins the game. Without calculating a single variation, White should realize that the only way Black can try to defend is by using the protected passed pawn on a5 to keep White’s king from straying too far away to help his pawns. As such, White should make a capture that minimizes the distance between the kingside pawns and the a5-pawn. 1.hxg5! White makes sure his pawn mass is as close to his king as possible. If White’s pawns were further away, he would not be able to win. This becomes clear after: 1.fxg5? Kg6 2.Kb3 Kf5
520
Black will shuffle with ...Kf5-g6-f5 (or -h5) forever. The only way White’s king can get involved is to come to the f-file, which will allow the a-pawn to run. 3.Kc3 Kg6 4.Kd4 Kf5 5.Kd5 Kg6 6.Ke5 Kh5
At this point, if White had an f-pawn instead of an h-pawn, his king would be close enough to shepherd the pawn though to the 8th rank. As is, he can only promote a pawn by stepping even further towards the kingside and letting the a-pawn go. 7.Kf6 a4 8.g6 a3 9.g7 a2 10.g8=Q a1=Q† Check! There is no time for Qg5 mate, so Black makes a draw. 1...Kg6 2.Kb3 Kf5 3.Kc4 Kg6 4.Kd5 Kf5 5.Kd4 Kg6 6.Ke4 The difference between the pawns being on the f- and g-files as compared to the g- and h-files is clearly on display. The distance separating the white f-pawn and the black a-pawn is small enough that the king can guide the f-pawn through without allowing the a-pawn to promote.
521
6...Kh5 7.Ke5 Kg6 7...a4? loses trivially to 8.Kd4 when White takes the a-pawn before coming back to win on the kingside. 8.f5† Kxg5 9.f6 Kg6 10.Ke6 By the time the a-pawn really has a chance to run, the damage has been done. White has gained a few tempos, since he was able to advance a pawn all the way to the 6th rank before he had to let the a-pawn loose. This was only possible thanks to the reduced distance between the a-pawn and his kingside pawn mass, which stems from the decision to play hxg5 rather than fxg5 on the first move.
522
10...a4 11.f7 a3 12.f8=Q White wins. Two connected pawns against a protected passer is not a new topic, but it is important to note that White was only successful due to the reduced distance between the connected passers and the opposing protected passer. Much like the Akopian – Meier game from the previous chapter, it became clear that the protected passer was not enough to save the game as it did not restrict White’s king enough, although this composition was closer because just one more file to the right would have rendered the position drawn. As such, the final guideline can be introduced. When playing against a protected passed pawn, particularly with short-range pieces, it is generally in your best interest to try to keep the action closer to the protected passer rather than further away. As usual, we will conclude the section with some puzzles.
523
Exercises
Miguel Illescas Cordoba – Evgeny Bareev Ubeda 1997
White is in a precarious situation. How should he continue? Show/Hide Solution > 36.Bxe5! With direct and concrete play, White can remove the protectors of the b4-pawn and save the game. The first step is to trade off the e5-knight that could have defended it from c6. White would of course like to take the pawn, but the immediate 36.Nxb4? fails concretely: 36...Bxb4 37.Rxb4 (37.Bxe5 Kxe5 38.Rxb4 Nxe4–+) 37...c2† 38.Kc1 Nd3† Black wins. 36.Nf2 does not lose immediately but after 36...Nc6 Black keeps an extra pawn, which is both protected and passed, and he also benefits from symmetrical pieces on the board. In short, he has excellent winning chances. 36...Kxe5 524
37.Nf2! But not 37.Nxf6? gxf6!µ when White will have a hard time removing the b4-pawn. The text move holds comfortably, as Black cannot stop Nd3(†), after which the b4-pawn will fall. 37...Rd8 38.Nd3† Kf5 39.Ne3† Ke6 40.Rxd8 Bxd8 41.Nxb4 Ba5 42.Na2 Nd5 ½–½
Sam Shankland – Ray Robson Saint Louis 2019
525
Black is in a tough spot as his protected passed pawn does not restrict White’s king nearly as much as the white pawn mass restricts his own king, and he risks losing in the manner of the L’Ami – Fedorchuk game. How should he proceed? Show/Hide Solution > 38...e5! Black would have lost to a king march to the queenside if he left the character of the position unchanged. Instead, he abandons his protected passed pawn, which was too far back to deter White’s king from marching to the queenside. 39.Ke4 39.g5 Kd6! 40.Ke3 Kd7! Black can shuffle ...Kd7-d6-d7 until White plays Ke4, when Black then puts his king on e6. He makes a draw. 39...Kd6! The right square. White will end up on the wrong side of a reciprocal zugzwang. 39...Ke6? 40.g5! is the position neither side wants to move in. Here it is Black to move, and it will remain his move after the queenside pawn moves are exhausted.
526
40...a6 41.a3 a5 42.a4 Kd6 43.Kf5 White is all set to break through and promote first. 43...Kd5 44.g6 fxg6† 45.hxg6 hxg6† 46.Kxg6 e4 47.f7 e3 48.f8=Q White wins by a single tempo.
40.Kf5 When comparing this position to the one in the note on 39...Ke6? above, we note that the pawn is on g4 instead of g5. This gives Black the tempo he needs to save the game. The other natural idea is to push the g-pawn and hope for Kf5 next, but this gets nowhere after: 40.g5 Ke6! The f5-square will always belong to Black. 41.b4 b5 42.a3 a6 Eventually White has to move, and he is lucky not to lose. 527
43.h6 Kd6
44.Ke3! Black cannot cross the sixth rank due to the threat of g5-g6, so the position is drawn. 44.Kf5? is a decisive mistake due to 44...Kd5! 45.Kg4 Ke6! when Black gets his king to f5 and wins. 44...Ke6 45.Ke4= Neither side can make progress. 40...Kd5 41.g5 e4 42.g6 hxg6† 43.hxg6 fxg6† 44.Kxg6 e3 45.f7 e2 46.f8=Q e1=Q
47.Qa8† Kd6 48.Qb8† Kc6 49.Qc8† 528
½–½
Jahongir Vakhidov – Sam Shankland Tromso (ol) 2014
Black must either allow a protected passed pawn on e5 or give White access to the only open file. Which option should he choose? Show/Hide Solution > 23...exd5! White’s protected passed pawn hardly matters. The position is closed, and the imbalanced minor piece assortment means Black can blockade on the e6-square with ease, and he has plenty of active prospects on the kingside and in the center. By contrast, Black would be struggling after: 23...cxd5? 24.Rac1! 24.Rc7 Rab8 25.Rac1 presents Black with some concrete problems but he can equalize with 25...b6! 26.Ra7 Rec8!. 24...Rab8
529
25.Be1! White removes his bishop from the soon-to-be-open b-file. Play may continue: 25...b6 26.axb6! Rxb6 27.b4!± White is ready for an invasion on the 7th rank and stands much better. 24.h3 h5 25.Ra4 Kf7 26.Ba3 Rad8 27.h4 Re6 28.Rb4 Rd7 29.Rb6
White’s protected passed pawn is meaningless. It is firmly blockaded and White cannot make unrelated threats on another part of the board to stretch the defenses. Black can already look for his own active chances on the kingside.
530
29...Rg6! 30.Bb2 c5! 30...Rg4 threatens the h-pawn but 31.b4! followed by b4-b5 gives White a lot of counterplay. The text move is stronger. White is under some pressure and his next move loses on the spot.
31.Rc1? White should have preferred 31.Rxg6! Kxg6 32.Kf1 Kf7 33.Ke2 Ke6 34.Kd3 when Black doesn’t have a great way to make progress. 31...Rxb6 32.axb6 Ke6 Seemingly out of nowhere, Black’s d-pawn is set to promote with little to no resistance. 33.Ba3 d4 34.Bxc5 d3 35.Bb4 d2 36.Rd1 Rd5 Black is winning, as ...a5 cannot be stopped. White gave up a piece in desperation but soon had to resign.
531
37.Bxd2 Nxd2 38.Rc1 Nxb3 39.Rc7 Rd7 40.Rc3 Nd2 41.Rc8 Ne4 42.Re8† Re7 43.Rh8 Kd5 44.Rxh5 g6 45.Rh6 Re6 46.h5 gxh5 47.Rxh5 Rxb6 48.g4 fxg4 49.e6† Kd6 50.f5 Rb1† 51.Kg2 Rb2† 52.Kg1 g3 0–1
David Anton Guijarro – M. Vachier-Lagrave Gibraltar 2017
What is Black’s cleanest route to half a point?
532
Show/Hide Solution > 28...Qe5! Trading the queens results in a minor-piece endgame where White constantly has to watch out for the possibility of Black trading his light-squared bishop for the knight. This defensive resource, combined with White’s own bishop being pretty lousy and the easy blockade on d6, means that White’s winning chances are close to zero. The computer prefers 28...Be5 29.g3 Qf6 which should also draw with accurate play, but I could imagine something going wrong. For instance, if the light-squared bishops are traded then Black is not going to hold. 29.Qxe5 Bxe5 30.Bd3 f5! 31.g3 hxg3 32.hxg3 MVL now continues with the policy of exchanging kingside pawns, making sure there is nothing to attack there so that White will not be able to stretch his defenses.
32...g5! 33.Na3 Kf6 34.Nb5 f4 Black could have played 34...Bd7 immediately as well, but the text was just fine. 35.Kg2 fxg3 36.fxg3 Bd7 White accepted there was no point playing on. With the minor pieces as they stand, he has no winning chances. ½–½
533
The final two chapters differ from the rest of the endgame section in that they each address types of passed pawns which were not covered in the middlegame section. This chapter will focus on split passed pawns. While they can occur earlier in the game, they are too rare to warrant a dedicated chapter in the middlegame section. But they are a common occurrence in the endgame, and the ability to handle them well is of the utmost important. Split passed pawns can come in two forms. The first scenario is where one side has two passed pawns on different files, with at least one file separating them; and the second is where each player has a lone passer. This chapter will focus on the latter case. If each player has one passed pawn, we are immediately introduced to the concept of the outside passed pawn. Take the following classic for example:
Bobby Fischer – Bent Larsen Denver (5) 1971 1.e4 c5 2.Nf3 d6 3.d4 cxd4 4.Nxd4 Nf6 5.Nc3 Nc6 6.Bc4 e6 7.Bb3 Be7 8.Be3 0-0 9.0-0 Bd7 10.f4 Qc8 11.f5 Nxd4 12.Bxd4 exf5 13.Qd3 fxe4 14.Nxe4 Nxe4 15.Qxe4 Be6 16.Rf3 Qc6 17.Re1 Qxe4 18.Rxe4 d5 19.Rg3 g6 20.Bxd5 Bd6 21.Rxe6 Bxg3 22.Re7 Bd6 23.Rxb7 Rac8 24.c4 a5 25.Ra7 Bc7 26.g3 Rfe8 27.Kf1 Re7 28.Bf6 Re3 29.Bc3 h5 30.Ra6 Be5 31.Bd2 Rd3 32.Ke2 Rd4 33.Bc3 Rcxc4 34.Bxc4 Rxc4 35.Kd3 Rc5 36.Rxa5 Rxa5 37.Bxa5 Bxb2 38.a4 Kf8
534
White has an outside passed pawn on a4 that is far away from the rest of the pawn mass. With accurate play, he can send the pawn through and Black will have to abandon the entire kingside to contain it. 39.Bc3! White forces a pawn endgame. 39...Bxc3 If Black were to avoid the bishop trade with 39...Ba3, he would not be able to stop the pawn at all, much less stop it at the cost of his kingside. 40.a5 Ke7 41.a6 Black’s king is not in the square, and after 41...Bc5 42.Bd4 White gets a new queen. 40.Kxc3 Ke7 41.Kd4 Kd6
535
42.a5 Black’s defenses are overstretched. When Black’s king goes to halt the a-pawn, his kingside will fall. All White has to do to win the game is advance his a-pawn while making sure Black does not obtain a protected passed pawn on the kingside to keep his king at bay. 42...f6
43.a6! White could still go wrong if he starts trading kingside pawns. 43.h3?! Kc6 44.g4? Since the a-pawn will not actually promote, White needs to keep at least one kingside pawn alive 536
to win the game. The foolish plan of h2-h3 and g3-g4 renders this goal impossible, as White will have to trade off his last pawn. 44...hxg4! 45.hxg4
45...f5! 45...Kb5 is equally good, as long as Black makes sure to play ...f5 before the white king eats the pawn on f6. 46.gxf5= 46.g5?? would gift Black a protected passed pawn, rendering his kingside completely safe, so after 46...Kb5 Black wins by gobbling up the a5-pawn before bringing his king back. White cannot capture the g6-pawn with his king, as the f-pawn promotes too quickly. In general, a protected passed pawn tends to trump an outside passed pawn. 46...gxf5 47.Ke5 With a draw. 43...Kc6 44.a7 Kb7 45.Kd5 h4 46.Ke6 Larsen understandably resigned. 1–0 White’s play was straightforward, but instructive nonetheless. It allows me to introduce the first guideline of the chapter. When you have an outside passed pawn, you should always be looking for ways to trade down to a king-and-pawn endgame. The concept of the outside passed pawn being a decisive factor in a pawn endgame has been well known for a long time. Fischer did not have much work to do because Black did not have a passed pawn of his own, and his queenside majority was already 1 to 0. Let’s examine a case where the 537
conversion of the advantage was a little tougher.
Csaba Balogh – Igor Khenkin Germany 2013 1.e4 c6 2.d4 d5 3.e5 c5 4.Nf3 cxd4 5.Nxd4 Nc6 6.c4 e6 7.Nc3 Bc5 8.Nxc6 bxc6 9.Bd3 Ne7 10.0-0 Ng6 11.Na4 Be7 12.f4 Ba6 13.Be3 dxc4 14.Be4 0-0 15.Qxd8 Rfxd8 16.Rfd1 Rd5 17.Bxd5 cxd5 18.b3 f6 19.exf6 Bxf6 20.Rab1 c3 21.Rbc1 Be2 22.Re1 Bd3 23.Red1 Be2 24.Re1 Bd3 25.Nxc3 d4 26.Rcd1 dxe3 27.Rxd3 Nxf4 28.Rdxe3 Bd4 29.Kf1 Bxe3 30.Rxe3 Rc8 31.g3 Nd5 32.Nxd5 exd5 33.Ke1 Kf7 34.Kd2 Kf6 35.Rc3 Rxc3 36.Kxc3 Ke5 37.Kd3 d4
White is winning. His two-on-one queenside pawn majority will make a passed pawn, and then he will be the one left with the outside passer that allows his king to decimate the enemy kingside, as Black’s king will be farther away. But care must be taken, as White does not yet have a passed pawn. With just a few moves to go before the time control and the clock ticking down, White drifted, losing both the thread and the game. 38.b4 h5 39.h4?? Since White had not yet made an outside passed pawn, each spare tempo had to be counted and calculated with the utmost care. Note that Black has a tempo to burn on ...g7-g6 if needed, while White does not. The text move not only throws away the win, but actually loses the game since White will soon find himself on the wrong side of a reciprocal zugzwang. The winning move was: 39.a3! Now Black has to decide what to do with the kingside. 538
39...g6 39...Kd5 40.a4! also causes Black to be on the wrong side of the reciprocal zugzwang, for instance: 40...g5 (40...g6 41.h4 transposes to the main line) 41.a5 a6 42.h3! g4 43.h4 Black loses, as 43...Ke5 44.b5 leaves Black’s king too far from the a-pawn; and otherwise, the d4-pawn falls. 39...g5 40.a4 Kd5 41.a5 a6 42.h3 g4 43.h4 reaches a similar zugzwang to the one shown below. 40.h4 Kd5 41.a4
Black is to move; and as such, he loses because White will be able to play b4-b5 and a4-a5 to make an outside passed pawn. However, White to move would also lose! He would be forced to cede ground with his king or push one of his queenside pawns before he can securely make a passer. Something similar happened in the game. 41...Ke5 42.b5 Kd5 43.a5 Kc5 Now we see the classical outside passed pawn finally bring the point home.
539
44.b6! axb6 45.axb6 Kxb6 46.Kxd4 Kc6 47.Ke5 Black loses his kingside, and the game.
39...Kd5 40.a3 If White were to advance his pawn further, we would see that Black’s reserve tempo matters enormously. 40.a4 If Black had to move his king then he would lose, but he has a spare tempo to burn. 40...g6! It’s a reciprocal zugzwang with White to move, so he loses. 40...Ke5 0–1 Upon reaching the time control, White resigned. The decision was justified, as he cannot make an 540
outside passed pawn. The game might have continued: 41.a4 Kd5
42.b5 Advancing the other pawn first would not change anything: 42.a5 a6! 43.b5 If White moves his king then ...Kc4 decides. 43...axb5 44.a6 Kc6 Black wins. 42...Kc5! Black’s king goes to b4 or c4 next, and he wins trivially. Csaba shared this brutally painful game with me at the end of the 2013 Cuitat de Barcelona tournament, where I had an equally horrible gaffe (albeit from a drawn, if advantageous position) in the final round. Hopefully he will one day forgive me for publishing what must surely have been one of the more agonizing games of his life, but the instructive value of the ending was too great to ignore. White’s undoing was that his queenside pawn mass was unable to make an outside passer after he blundered just before the time control. This allows the next guideline to be introduced. The value of an outside passed pawn is that it will lure your opponent’s pieces to a region of the board where they don’t have much else to accomplish. As such, you want to have the outside passed pawn be the only pawn in that area of the board. Let’s see this principle in action.
Annie Wang – Anna Zatonskih 541
St Louis 2019 1.d4 Nf6 2.c4 e6 3.Nc3 Bb4 4.Qc2 d5 5.a3 Bxc3† 6.Qxc3 0-0 7.Bg5 h6 8.Bxf6 Qxf6 9.Nf3 dxc4 10.Qxc4 Nc6 11.e3 e5 12.d5 Ne7 13.Be2 c6 14.dxc6 Nxc6 15.0-0 Bf5 16.Rfd1 Rfd8 17.Qb5 e4 18.Nd2 Ne5 19.Nb3 Bg4 20.Bxg4 Nxg4 21.Qe2 Ne5 22.Nd4 Rac8 23.Rac1 a6 24.Rc2 Nd3 25.Rxc8 Rxc8 26.f3 Re8 27.fxe4 Nc5 28.Rf1 Qg6 29.Nf5 Nxe4 30.Qd3 Qe6 31.Qd4 Qe5 32.Qd7 Nc5 33.Qd2 Ne4 34.Qe2 Re6 35.Qd3 Rf6 36.Rf4 Nd6 37.Nxd6 Rxd6 38.Rd4 Rxd4 39.Qxd4 Qxd4 40.exd4 Kf8 41.g4
Much like the Balogh – Khenkin game, Black has an outside pawn majority that can potentially make an outside passed pawn. But it must be handled carefully. Unlike Balogh, Zatonskih found herself in this situation on move 41, not 39. 41...f5! The right decision. Black trades her f-pawn for White’s g-pawn, getting one step closer to having a passed pawn on the kingside being the only kingside pawn. It would be a grave mistake to run to the center with the king and make a passed pawn later, as that would not liquidate the rest of the kingside. 41...Ke7 42.Kf2 Ke6 43.Ke3 Kd5?? It is not too late to transpose to the game by means of 43...f5!, when Black wins. 44.Kd3
542
Funnily enough, White is simply winning here. Black is unable to make an outside passed pawn and liquidate the rest of the kingside. For instance: 44...g6 45.h4 f5 46.gxf5 gxf5 47.Ke3 The point becomes clear. With the h-pawns off the board, Black would be easily winning because the outside passed pawn would distract White’s king from the queenside. As is, the “outside passed pawn” doesn’t do its desired job since once White takes the f-pawn, she will come and take the h-pawn next. The king will not be sidelined on a square like f5 because there is still something useful to be done on the kingside. In fact, I would argue that White is winning because she is actually the one holding the outside passed pawn now! The h-pawns are the real targets for both sides, and the d4-pawn is farther away than the f5-pawn. As such, White’s d4-pawn serves as an outside passer that keeps Black’s king away from what really matters. The following sample line is not forced, but illustrative.
543
47...b5 48.b4 Kd6 49.Kf4 Ke6 50.d5† Kxd5 51.Kxf5 Kc4 52.Kg6 White wins.
42.gxf5 Ke7 43.Kf2 43.d5 would work fine after 43...Kf6? 44.d6 when White draws, but 43...Kd6 wins easily, as Black simply gobbles d5 before coming back for the f-pawn.
544
43...Kf6 44.Ke3 Kxf5 Black has succeeded in trading down to 2–1 on the kingside, and she wins easily. Once the kingside is traded down to 1–0, Black will have an outside passed pawn and White will not have another pawn to target on the kingside. This is in stark contrast to what would have happened if Black had brought her king to d5 before advancing with ...f5. 45.Kf3 g6 46.b4 b5 47.Ke3 g5 48.Kf3 h5 The rest was textbook.
49.Ke3 g4 50.Kf2 h4 51.Ke3 g3 52.hxg3 hxg3 53.Kf3 g2 54.Kxg2 Ke4 55.Kf2 Kxd4 56.Ke2 Kc3 57.Ke3 Kb3 545
0–1 Zatonskih was undoubtedly helped by an extra 30 minutes on the clock following the time control, and she was able to find the path to victory by ensuring the presence of a lone passed pawn on the kingside to distract White’s king. Had she allowed another kingside pawn to survive, she would have even lost the game! The one thing we have seen in common in all these examples is that nobody was making a new queen anytime soon. This tends to favor the side with the outside passed pawn. Should both pawns end up becoming queens, it is actually the inside passed pawn that tends to be advantaged. The queening pawn will require the help of the king (and perhaps even other pieces) to promote. This leads us to the next guideline. When playing with an outside passed pawn against an inside passed pawn, you want the pawns to be stopped. When playing with the inside passed pawn, you want the pawns to promote. In a recent rapid game, a very strong player would have done well to heed this guideline.
Vladimir Fedoseev – Vidit Santosh Gujrathi Hengshui (rapid) 2019 1.d4 Nf6 2.Nf3 g6 3.b3 Bg7 4.Bb2 d5 5.e3 0-0 6.Be2 c5 7.dxc5 Qa5† 8.Nbd2 Ne4 9.Bxg7 Kxg7 10.Qc1 Nc6 11.a3 Qxc5 12.Nxe4 dxe4 13.Qb2† f6 14.Nd2 Qg5 15.g4 Qe5 16.0-0-0 Qxb2† 17.Kxb2 f5 18.gxf5 Bxf5 19.h4 Rad8 20.h5 g5 21.h6† Kf6 22.Nf1 Rxd1 23.Bxd1 Bg6 24.Ng3 Ne5 25.Kc3 g4 26.Ne2 Rc8† 27.Kb2 Nf3 28.Nf4 e5 29.Nd5† Kg5 30.c4 Rf8 31.Kc3 Nh4 32.Rh2 Nf5 33.Bc2 Nxh6 34.Ne7 Nf5 35.Nxg6 Kxg6 36.Bxe4 b6 37.b4 h5 38.c5 bxc5 39.bxc5 Kg5 40.Bxf5 Rxf5 41.Kc4 h4 42.c6 Rf8 43.Kd5 g3 44.fxg3 hxg3 45.Rh1 Kg4 46.c7 g2 47.Rc1 Kf3 48.Kxe5 Kxe3 49.Kd6
546
This position is dramatically different from the previous ones because the inside passed pawn is favored. Instead of White’s king going to the outside to take the outside passed pawn and Black’s king staying on the inside to take the inside passer and win, now the roles are reversed. The kings are helping their own pawns rather than trying to stop their opponent’s; and as such, if both pawns promote, White’s king will be the one in better shape. This was a rapid game and Vidit presumably had very little time, so a mistake is easy to understand. But heeding the third guideline would have saved him. 49...Kf2? Black tries to promote his own pawn – the wrong strategy. Black has more than one drawing move at his disposal, but my favorite is: 49...Rh8! This maintains checking distance as well as flirting with the idea of ...Rh1. By focusing on preventing White from making a queen rather than sending his own pawn through, Black holds a draw. 50.Kd7 Rh7†!
547
White’s king does not have a great place to hide. Going to the c-file will allow ...Rh1, and otherwise he cannot hide from the checks. 51.Kd6 If 51.Kc8?! Rh1! White should be precise to make a draw. 51.Kc6 Rh1! is also fine for Black. 51...Rh6† 52.Kd5 Rh8 White cannot promote his pawn, so Black draws. 50.Kd7! Now both sides will promote, and White will win due to his king’s proximity to the a-pawns. 50...Rf7† 51.Kc6 Rf8 52.Kb7 a5 53.c8=Q Rxc8 54.Kxc8 g1=Q 55.Rxg1 Kxg1
548
Thanks to the inside passed pawn, the white king is closer to the action and so White wins. 56.Kb7 Kf2 57.Kb6 a4 58.Kb5 Ke3 59.Kxa4 Kd4 60.Kb5 Kd5 61.a4 Kd6 62.Kb6 Kd7 63.Kb7 1–0 The difference between this game and the previous ones was staggering, and it all boiled down to the danger the pawns posed of becoming a queen. In each of the preceding games, no pawns could promote, but having the furthest pawn from the action would drag the enemy pieces away. Instead, if the pawns will promote, having the furthest one from the action would drag your own pieces away. Let’s see another case where the third guideline holds true. Erwin L’Ami – Sergey Fedorchuk Hockenheim 2018 1.d4 Nf6 2.c4 e6 3.Nf3 b6 4.g3 Bb7 5.Bg2 Bb4† 6.Bd2 Be7 7.0-0 c6 8.Bc3 0-0 9.Nbd2 d5 10.Qc2 Nbd7 11.Rfd1 Qc7 12.Rac1 Rac8 13.b3 h6 14.Qb2 Qb8 15.Ne5 Rfd8 16.e4 Nxe5 17.dxe5 Nxe4 18.Nxe4 dxe4 19.Bxe4 c5 20.Qe2 Qa8 21.Bxb7 Qxb7 22.h4 Rxd1† 23.Rxd1 Rd8 24.Rxd8† Bxd8 25.Qd3 Be7 26.h5 Bg5 27.f3 Qc6 28.Kf2 Qb7 29.Ke2 Qc6 30.Kd1 Qb7 31.Kc2 Qc6 32.Kd1 Qb7 33.Ke1 Qc6 34.Kf2 Qb7 35.f4 Be7 36.Qf3 Qc8 37.Qe4 Bf8 38.Ke2 Be7 39.Bd2 Bf8 40.g4 Qe8 41.Be1 Qd8 42.Bf2 Be7 43.Qb7 Bh4 44.Be3 Qe7 45.Qxe7 Bxe7 46.f5 Bh4 47.Kf3 Kh7 48.Bd2 Be7 49.Ke4 Kg8 50.f6 Bd8 51.Bc3 Kh7 52.Kd3 Bc7 53.Kc2 Kg8 54.Kb2 Kf8 55.b4 gxf6 56.exf6 cxb4 57.Bxb4† Ke8 58.Kc2 Bf4 59.Kd3 Bg5 60.Bd2 We have already discussed what happens if Black goes into the pawn ending with ...Bxd2 in Chapter 11. However, a bishop ending also offers no real hope of salvation, as the outside passed pawn will be 549
decisive.
60...Bxf6 61.Bxh6 Bb2 62.Ke4 f6 63.a4 Kf7 64.Bf4 Ba3
Before anything else, White fixes all of Black’s queenside pawns on dark squares. This will make them impossible to trade or protect once the time comes. 65.Bb8! a5 65...a6? 66.Ba7 wins immediately, since 66...Bc5 will allow 67.a5. 66.Bc7 Bc5 67.Bd8 Bg1 White should be routinely winning due to his outside passed pawn. The move he played does not 550
throw the win away, but it does make it much more difficult.
68.g5?! White had the right idea to try to trade off one pair of kingside pawns to end up with a lone outside passer, but this was a somewhat faulty execution. The move definitely wins, but it feels wrong to me, as it gives Black the opportunity for counterplay with connected passers. By far the cleanest route to a full point was: 68.h6! Kg6 69.h7 By pushing the h-pawn directly, White will end up with one outside passed pawn against one inside passed pawn. 69...f5† 69...Kxh7 loses after: 70.Bxf6 Kg6 71.Bd8 Bf2 72.Ke5 Kf7 73.Kd6
551
White is ready for g5-g6(†) and wins routinely. 70.gxf5† exf5† 71.Ke5 Kxh7 72.Kxf5
Again, the outside passed pawn did its job. Black’s king is sidelined and White will feast on the queenside. 68...f5†! Both sides’ passed pawns just became connected and much more dangerous; and as we discussed, this should not favor the side with the outside passer. Luckily for White, his pawns are still stronger due to being further advanced. Had Black taken on g5 instead, the power of the outside passed pawn would have been on full display: 552
68...fxg5 69.Bxg5 Black cannot prevent the simple plan of h6-h7 to lure his king away, followed by Ke5xe6 followed by eating the queenside. 69...Kg7 70.Ke5 Kf7 71.h6 Kg6
72.h7 Kxh7 73.Kxe6 Kg6 74.Bd8 White has an easy winning plan of Kd5-c6. The outside passed pawn did its job by pulling Black’s king away from the key area of battle. 69.Kf4
69...Bh2†? This method of mobilizing the passed pawns amounts to capitulation, as White’s c-pawn will decide the game.
553
A better try was: 69...Bd4! Despite my computer screaming a +8 evaluation, the win is not so easy to come by. For instance, the machine suggests: 70.g6† Kg7 71.Be7! White is unable to force the pawns through directly, for instance: 71.Kg5? Be3†! 72.Kh4 Bf2†! 73.Kh3 e5
Again my computer insists White is winning; and again, I don’t think it will be that easy, nor do I see a convincing plan. Why should White ever have to deal with connected passers if he is not making a new queen on the spot? 71...Bc3
554
72.c5! White prepares for the bishop rerouting to e5 by stretching Black’s defenses. The immediate 72.Bd6 would be met by 72...Kf6! when Black is ready for ...e5† and further progress will be hard to come by. 72...bxc5 73.Bxc5 Kf6 74.Bb6 e5† 75.Ke3 White will win by destabilizing the enemy bishop with Kd3, forcing it to abandon control of either a5 or e5.
75...Kg7 76.Kd3 Bb4 77.Bc7 e4† 78.Ke3 Bc3 79.Kf4 Kf6 80.Bd8†
White wins – but why go to all this trouble when 68.h6! was so much simpler? 70.Kf3 e5 71.g6† Kg7 72.Kg2 Bf4 73.Bxb6 555
The c-pawn will win easily.
73...e4 74.c5 Be3 75.Ba7 Bf4 76.c6 Bc7 77.Kh3 Kh6 78.Bd4 f4 79.Kg4 Bd6 80.Bb6 f3 81.Be3† 1–0 Perhaps this was not the best example because Black’s newly-made connected passers were well under control, and White was still winning. It’s possible that L’Ami had worked out all the details of how to win before deciding on 68.g5, and any criticism I have is unwarranted. But I do still think it was much easier to play h5-h6, immediately making use of the outside passer to bring the game to a swift conclusion with no need for any variations. To conclude this segment, have a go at three puzzles that even the world’s most inept 2700 managed to get right.
556
Exercises
Sam Shankland – Tsegmed Batchuluun Philadelphia 2012
What should White do? Show/Hide Solution > 36.Rxe5! White can and should take the pawn. It costs him his extra exchange, but the outside passer, or at least the potential to make one, will win the day. White will not stand better if he retreats. Following something like 36.Kd3? e4† 37.Ke2 Nf5 Black has good counterplay and material is balanced. The game should end in a draw. 36...Nf5† 37.Rfxf5 gxf5 38.h5!? It was also fine to continue with the simple 38.Rxf5±. 38...Rf7 The full power of the outside passer would be on display after 38...Rxe5 39.Kxe5 Ke7 40.Kxf5 Kf7 557
41.h6+–, when Black’s king will have to attend to the h-pawn while White ransacks the queenside. After the text move White should be careful, as the f-pawn is dangerous. Since we already know the side with the outside passer does not want both pawns to queen, but rather both to be stopped, White’s next move is easy.
39.Ke3! Focusing solely on the outside passed pawn would be wrong. After 39.h6? gxh6 40.gxh6 f4 41.Re1 f3 42.Rf1 Rh7 Black is the only one with winning chances, although of course White should make a draw in the resulting rook endgame with two pawns against three on the same flank. 39...f4† 40.Kf3 Kd6 41.Rxa5 b6 42.Ra8 Ke5 Finally it’s time to set the outside pawn mass in motion!
558
43.g6! Rd7 44.Kg4! Black cannot prevent Re8† followed by the loss of the f-pawn. The game is finished. 44...Rd2 45.Re8† Kf6 46.Rf8† Ke5 47.Rf5† Ke6 48.Rxf4 Rg2† 49.Kh3 Rxb2 50.h6 Rb3† 51.Kh4 Rxa3 52.hxg7 1–0
Maxime Vachier-Lagrave – Sam Shankland Doha 2014
559
Black is potentially facing a dangerous situation, as White’s outside passed pawn is trying to distract his king. Should he take it? Show/Hide Solution > An outside passed pawn is a valuable asset, and if it can be captured, it should be. 42...Kxb4! 43.Kd4 It might look like Black’s king is too far away from the action, but he can bring it back pretty fast. 43...Nc6†! 44.Kxd5 Kc3! This is the key point that Black needed to see before taking on b4. His king comes into the action extremely quickly, while White’s cannot go to either e5 or e6.
45.Kxc6 A draw was agreed in view of 45...Kd2 or 45...Kd4. ½–½
Dale Haessel – Sam Shankland Edmonton 2015
560
Black has a great position. What is the cleanest way to bring in the full point? Show/Hide Solution > 34...Rc2! With some basic tactics, Black can force a winning pawn ending with an outside passer. A simple retreat was also probably good enough to win, but it would have been a step in the wrong direction. For example: 34...Nb5 35.Bb2 Nc3† 36.Bxc3 Rxc3 37.Re1! Ra3 38.Re2!
Black may well be winning but there is still a lot of work to be done. Transitioning into the pawn 561
endgame was clearly the better way. 35.Bxa3 Rxa2! 36.Bc1 b3! The twin threats of ...Ra1 and ...b2 are impossible to meet. 37.Re1 b2 38.Bxb2 Rxb2
White can either play a hopeless rook endgame with his king cut off and his kingside falling, or he can enter a lost pawn endgame where the power of the outside passed pawn is clearly on display. 39.Re2 Rxe2 40.Kxe2 Ke6 41.f4 Kd6 42.Kd3 Kc5 43.h4 h5
562
White resigned. The game might have continued 44.Kc3 a4 45.g3 a3 46.Kb3 Kd4 and Black wins. 0–1
563
The final chapter will cover the topic of split passed pawns in the endgame when you are either holding both of them, or fighting off an opponent holding both of them. As with outside and inside passed pawns, this topic is extremely rare in the middlegame, so I have decided to focus solely on the endgame when discussing it. When you have two extra pawns that are both passed and split, it’s likely that you are simply winning with no discussion to be had, or lost if you are on the opposite side of the board. But there are exceptions, like the following famous type of rook endgame:
Melikset Khachiyan – Daniel Naroditsky Internet (rapid) 2012 1.e4 c5 2.Nf3 d6 3.d4 cxd4 4.Nxd4 Nf6 5.Nc3 a6 6.Be3 e5 7.Nb3 Be6 8.Qd2 Nbd7 9.0-0-0 Be7 10.f4 exf4 11.Bxf4 Ne5 12.Nd4 0-0 13.Nf5 Bxf5 14.exf5 Rc8 15.Kb1 Qc7 16.Bg5 b5 17.Bxf6 Bxf6 18.Nd5 Qd8 19.Be2 Bg5 20.Qd4 Nc6 21.Qb6 Re8 22.Bf3 Ne5 23.Qxd8 Bxd8 24.Rhe1 Bh4 25.Re3 Nxf3 26.Rxf3 Re2 27.g3 Rcxc2 28.Rb3 Bf6 29.Nxf6† gxf6 30.Rxd6 Rc5 31.a4 bxa4 32.Rb8† Kg7 33.Rxa6 Re1† 34.Ka2 Rcc1 35.Ka3 Ra1† 36.Kb4 Ra2 37.Kc3 Re3† 38.Kc4 Re2 39.h4 Raxb2 40.Rxb2 Rxb2 41.Rxa4 Rf2 42.Kd4 Rf3 43.Ke4 Rxg3 44.Kf4 Rg1 45.Ra3 Rb1 46.Rg3† Kh6 47.Rg4 Rb4† 48.Kf3 Rb3† 49.Kf4 Rh3 50.Ke4 Kh5 51.Rg7 Rxh4† 52.Kf3 Kh6 53.Rxf7 Kg5 54.Ra7 Kxf5 55.Ra5† Kg6 56.Kg3 Rb4
564
Black has two split passed pawns but the position is a technical draw, for two reasons: ► The pawns are so close together that White’s king can hinder both of them at the same time. If they were one rank closer, they would be connected, and if they were one rank further apart, they would be split enough that they could not be contained. ► One of Black’s extra pawns is situated on the rook’s file. This means that if White ever gets the chance to trade rooks to win the f-pawn, he will likely reach a drawn pawn ending where the h-pawn will not get through. By contrast, if Black’s pawns were on e6 and g7 for example, the analogous pawn endgames with the g-pawn would usually be winning for Black, as his king would be able to dash to the h-file to support the pawn’s triumphant march. 57.Kf3?! Not a losing move, but a step in the wrong direction. White’s king was already optimally placed, but his rook belongs on the 8th rank. The most convincing drawing plan is: 57.Ra8! h5 58.Kh3 Rg4 Another instructive line is: 58...Kg5 59.Rg8† Kf5 60.Ra8 Rb3†
565
A position like this one highlights why the close proximity of the split pawns exerts a drawish tendency. After 61.Kh4 Kf4 62.Kxh5 White has had to spend a few moves to take the h-pawn, but the king is still not too badly placed since the f-pawn is not so far away. If the pawn stood on the e-file for example, Black would win easily. 59.Rb8 Kg5 60.Rg8† Kf4 61.Ra8 f5 62.Ra4† Kg5 63.Ra8 Rb4 64.Rc8 Rb3† 65.Kg2 Kg4
As long as White does not allow his king to be forced back to the first rank, he will make a draw. 66.Rg8†! Kf4 67.Ra8 Black’s only available plan is to abandon the h-pawn in the hope of promoting the f-pawn in the time it takes White to capture it, but this is futile as the f-pawn is too close to White’s king. 67...Rb2† 68.Kh3 Rd2 The immediate 68...Kf3 is met by 69.Ra3†! when Black’s king has no shelter, so he moves his 566
rook into position to block any lateral checks. 69.Rh8 Ke3 70.Rxh5 f4
Again, we see White’s king is not so far away after all. 71.Ra5 f3 72.Kg3 Black will not be able to block the lateral checks from the a-file without losing his f-pawn, thanks in no small part to White’s king being close enough. The position is drawn. 57...h5 58.Kg3 Rg4†!
59.Kf3?! Again, asking for trouble. 567
59.Kh3 draws more convincingly. The king is once again cut off along the g-file, but Black cannot easily advance the f-pawn as then his king would get harassed. 59...Rg5! White’s king is cut off along the g-file and the h-pawn could prove dangerous. 60.Ra4 If White allows ...h5-h4 now, he is losing: 60.Ra8? h4! 61.Ra2 h3 62.Rh2 Ra5! Black reaches a similar position later in the game. 60...Rb5
61.Kf4? White’s margin of error is shrinking by the move. 61.Ra8 was holding more convincingly. The rook needs to be able to check from behind. 61...Rb3! The king is cut off along the third rank, and Black intends ...h4-h3. The draw has become much harder to accomplish. 62.Ra8 h4 63.Kg4 h3 64.Ra2 f5† At this point, White finally drifted into a lost position.
568
65.Kh4? Now the king will be shut out of play forever. Black can place his rook on f3 and his king will slowly but surely march to g2, while White’s king has no good way to rejoin the game. I find it remarkable that even after White’s earlier imprecise play, he could still have drawn with 65.Kf4!. Black’s split pawns are simply too close together, and thus can be contained. For example, after 65...Rb8 Black would like to bring his rook behind the more advanced passed pawn, but White will still hold with (among other options) 66.Kg3, making use of the king’s proximity to both passers. 65...Kf6 66.Ra6† Ke5 67.Ra5† Ke4 68.Ra4† Kd5 69.Ra5† Ke6 70.Ra6† Kd7 71.Ra7† Kc6 72.Ra6† Kb5 73.Ra2
569
73...Rf3! Well played. The pawn constellation is perfectly secure and Black’s king quickly runs towards the h1-corner. 74.Ra1 Kc4 75.Ra4† Kd3 76.Ra3† Ke2 77.Ra2† Kf1 78.Rh2 Kg1 White resigned. A pretty finish would have been 79.Rxh3 Kg2. 0–1 The endgame with rook and f- and h-pawns against rook is well known to be drawn (unless the initial position is especially unfavorable), and I am sure Khachiyan was annoyed with himself for losing it. But the main reason the two-pawn-down position is holdable is that the pawns are close enough for the king to be able to stop both of them. Let’s consider a similar situation where Black’s f-pawn has been nudged over to the e-file.
570
White’s position is absolutely lost. A single added file between the pawns is more than enough to stretch his ability to stop both pawns with his king. 1.Ra8 h5 2.Rg8† Kf7 3.Rh8 h4† 4.Kf3 Ra4 5.Rh6 I suppose trying to cut off the king is the best practical attempt, but it does not come close to holding, even if Black cooperates. 5...e5 5...Ke7!? followed by ...Kd6 also wins, but it is instructive to see how easily Black wins even with his king cut off. 6.Rb6 Thus far White has been playing in approximately the same manner as he did when the pawns were separated by only one file. But now, the larger distance between them is on full display.
571
6...Rf4†! Nice and simple. Pick a direction please! 7.Kg2 Putting the king in front of the e-pawn doesn’t help either: 7.Ke3 Kg7! Black takes the h6-square under control and the h-pawn is ready to run.
8.Re6 Rf5 9.Ke4 Rh5 Again, White faces the same problem of distance between the pawns. Black has abandoned all his attempts to promote the e-pawn and instead focuses on the h-pawn, but White’s king is now too far away to catch it. 10.Kf3 h3 and Black wins.
572
7...e4 Black’s rook cannot be touched, and he can transfer it to the sixth rank when needed, both to free the king and to get behind a passed pawn. White’s king cannot reach both pawns at once.
8.Rc6 Rf6 9.Rc4 Re6 10.Kh3 e3 11.Rc1 Kf6 12.Kxh4 Here we see why the added distance between the pawns causes White so much difficulty. If Black’s remaining pawn was on the f-file, White’s king would be closer and the position would be drawn.
12...Kf5 13.Kg3 Ke4 Black wins. The difference in the evaluations of the respective positions leads us to the first guideline. 573
The further apart split passed pawns are, the harder they tend to be for the defender to control. Let’s see this principle in action.
Vladimir Kramnik – Peter Svidler Wijk aan Zee 2004 1.e4 c5 2.Nf3 d6 3.d4 cxd4 4.Nxd4 Nf6 5.Nc3 a6 6.Bg5 e6 7.f4 Qb6 8.Qd2 Nc6 9.0-0-0 Qxd4 10.Qxd4 Nxd4 11.Rxd4 Be7 12.Na4 Bd7 13.Nb6 Rd8 14.Nxd7 Rxd7 15.Be2 h6 16.Bh4 Nh5 17.Bxh5 Bxh4 18.Rhd1 Bf2 19.R4d3 Ke7 20.Kb1 Rc8 21.Bg4 Rc4 22.Bf3 g6 23.b3 Rcc7 24.Be2 Rd8 25.g4 Bc5 26.Rh3 Rh8 27.Kb2 Rcc8 28.a3 Rcd8 29.b4 Bf2 30.a4 d5 31.Rf3 Bb6 32.exd5 Rxd5 33.Rxd5 exd5 34.Rd3 Bc7 35.Bf3 Bxf4 36.h3 b6 37.Kb3 Kf6 38.Bxd5 Re8 39.c3 a5 40.bxa5 bxa5 41.Rf3 g5 42.Kc4 Re3 43.Rxe3 Bxe3 44.Kb5 Ke5 45.Bxf7 Kd6 46.c4 Bf2 47.Be8 Ke7 48.Bc6 Kd6 49.Bb7
1–0(??) Faced with the loss of the second pawn on a5, Svidler resigned. Yet the position is drawn, since the combination of the opposite-colored bishops and the close proximity of the a4- and c4-pawns means that White is unable to stretch the defenses and break through. Let’s see how the draw could have been achieved. 49...Be3 Black cannot save the a5-pawn with 49...Be1; after 50.Kb6 Bb4 51.Bg2 he is in zugzwang and will have to lose the pawn anyway, since he cannot allow the c-pawn to march on unobstructed. 574
50.Kxa5 Black now has more than one set-up that will hold. Svidler later indicated that the simplest plan is to leave the bishop on e3 and shuffle the king between c7 and e5 as needed, so as not to allow White’s king to reach b7 or e4. 50...Bf2 Another drawing plan is: 50...Kc5 Black intends to transfer his bishop to e1, then shuffle the king between c5 and d6 to box White’s king out of the game and render it incapable of reaching the kingside. 51.Bd5 Bd2† 52.Ka6 Be1
White has no way to break through, since his king is cut out of the game. Running to the kingside proves impossible as Black can bring his bishop to a5 and king to d6 to prevent any hope of invading via d7 or d8. The reason White is unable to win is that his split passers are too close to one another. If his c-pawn were to magically migrate to e4, then they would be too far apart for Black’s king to control and White would win by playing e5-e6 to distract either Black’s bishop or his king at the right moment. As is, Black’s king can sit on c5 or d6, boxing out White’s king while also keeping an eye on the c-pawn. The defenses cannot be stretched, for instance: 53.Kb7 Ba5 54.Kc8
575
54...Kd6 There is no zugzwang to be had. As long as Black can stop the king from reaching b5 or d8, he will hold easily. In fact, even allowing Kd8 is not enough to lose, though of course Black would be best advised to keep things simple and not let White run to the kingside. If Black were to fall asleep at the wheel, White’s king would be able to switch to the kingside, though even that would not guarantee victory: 54...Bc3 55.Kd7 Bb4 56.Ke6 Be1 57.Kf5
57...Kb4! 58.Kg6 Kxa4 59.Kxh6 Bh4 60.c5 Kb5 61.c6 Kb6 Black will sit with the king on c7, and White cannot break through. 55.Bg8 Neither 55.Bg2 Kc5 nor 55.Kb7 Kc5 can change the assessment. As long as Black takes care not 576
to allow the king to b5, he will not lose. 55...Bb6 56.Kb7 Ba5 Black holds.
51.Bf3 Be3 52.Ka6 Kc7! Of course, Black does not allow the king to reach b7. 53.Kb5 Kd6! And he also doesn’t allow c4-c5. 54.a5 Bf2 55.a6 Svidler’s proposed (and correct) drawing set-up has been enacted. The bishop can sit on the g1-a7 diagonal forever and the pawns are firmly blockaded. As long as Black plays ...Ke5 if and when White’s king plods all the way around to d3, he will hold. Let me reiterate that this is mostly due to White’s pawns being so close together. Just like the other holding set-up with ...Kc5 and ...Be1, if White’s pawn stood on e4, he would routinely win with e4-e5 at a suitable moment to distract Black’s king and follow up with Kc6-b7.
577
55...Be3 56.Ka4 Bf2 57.Kb3 Be3 58.Kc2 Bf2 59.Kd3 Ke5!= Preventing Ke4, with an obvious draw. In this case, the guideline from page 332 clearly held true. The pawns were so close together that Black had no real trouble stopping them, and in fact had more than one drawing set-up. That is, of course, unless he resigns first. Resigning a technically drawn position is perhaps the biggest gaffe an elite grandmaster can make, and Svidler should have been immediately stripped of his title, rating and dignity for such a shameful and embarrassing game. Let’s move on and examine a game of an elite player who would never do something so idiotic in a million years.
Sam Shankland – Aman Hambleton Tromso (ol) 2014 1.e4 e6 2.d4 d5 3.Nd2 c5 4.exd5 Qxd5 5.Ngf3 cxd4 6.Bc4 Qd7 7.0-0 Nf6 8.Nb3 Nc6 9.Qe2 a6 10.a4 Bd6 11.Rd1 0-0 12.Nbxd4 Nxd4 13.Rxd4 Qc7 14.Bg5 e5 15.Rh4 Bf5 16.Bxf6 gxf6 17.Bd3 Bg6 18.Rg4 Rfe8 19.Nh4 e4 20.Bxe4 Bxh2† 21.Kh1 Bf4 22.Qf3 Bg5 23.Nxg6 hxg6 24.Bxb7 Rab8 25.Bc6 Rec8 26.Bd5 Kg7 27.g3 Rxb2 28.Bb3 Qe5 29.Rd1 Rc3 30.Qd5 Qxd5† 31.Rxd5 f5 32.Rgd4 Rb1† 33.Kg2 Bf6 34.Rd2 Re1 35.Rd7 Be7 36.Ra7 Rc6 37.Rdd7 Kf6 38.a5 g5 39.Rdb7 Rd6 40.Rb6 Ra1 41.Rxd6† Bxd6 42.Rxa6 Ke7 43.Ra7† Kd8 44.Bxf7 Bb8 45.Ra8 Kc7 46.Ra6 f4 47.gxf4 gxf4 48.Kf3 Ra3† 49.Kg4 Rc3 50.Rf6 Rxc2 51.Rxf4 Kd8 52.Rf5 Ba7 53.f3 Rc3 54.Bd5 Bf2 55.a6 Ra3 56.Rf6 Ra5 57.Be4 Ke7 58.Rc6 Ra4 59.Kh3 Ra3 60.Kg2 Be3 61.Kf1 Bd4 62.Ke2 Re3† 63.Kd2 Ra3 64.Bd3 Be5 65.Rc2 Kd6 66.Ke2 Bd4 67.f4 Ke7 68.Rc6 Kd7 69.Bb5 Ke7 70.Rc4 Bb6 71.Ra4 Re3†
578
72.Kd2 Ba7 73.Bd3 Kd6 74.Rb4 Re7
I had played a decent game up to this point and White is obviously winning. His passed pawns are quite some distance apart, and Black will not be able to stop both of them. Still, care must be taken. 75.f5 It would be a gross error to try to get the rooks off at all costs: 75.Rb7?? Rxb7! 76.axb7 The position is drawn, specifically because White’s pawns are now one rank closer together and Black’s king can keep an eye on both the d7- and f6-squares. Take the following sample variation: 76...Kc6 77.Be4† Kd6 78.Kd3 Bb8 79.Kc4 Ke7 80.f5 Bc7 81.Kc5 Bb8 82.Kc6
579
White has two plans to win the game: Kd7-c8 and f5-f6-f7. Unfortunately for him, his pawns are close enough together that Black’s king can prevent both plans with no particular difficulties. This is all thanks to White making the foolish choice to force a rook trade while allowing his pawn to be dragged from the a-file to the b-file, bringing his split passed pawns closer together. If the pawn stood on a6 instead, White would win trivially by means of Kc6-b7. 75...Bc5 76.Rg4 Be3† 77.Kc3 Rc7† 78.Rc4! This move does not deserve an exclamation mark for its objective superiority, as in fact every legal move was winning. But the point is that White does not fear the rook trade.
78...Ra7 Let’s see what would have happened had Black traded rooks: 78...Rxc4† 79.Kxc4 White’s passed pawns are too far apart for Black to contain. For instance: 79...Ba7 80.Kb5 Bf2
580
At first it doesn’t look easy for White to break through, but he can do so with instructive play. He needs to threaten the f5-f6 advance, and the best way to do that is to make sure the e6-square is under control. 81.Bf1! Bd4 82.Bh3 Kc7 This is the only way to try to stop f5-f6. 83.Bg4 Zugzwang! Something has to give.
83...Bc3 84.Kc5 White wins by running the king to the kingside. 84...Be1 85.Kd5 Bf2 86.Ke6 Kd8 87.Kf7 The f-pawn advances next, with an easy win. 581
79.Re4 The rest of the game was not so interesting. The real point I want to drive home is that the contrasting evaluations of the opposite-colored-bishop endgames after the rooks were traded depended greatly on how far apart White’s pawns were split. 79...Rc7† 80.Bc4 Bg5 81.Re6† Kc5 Finally, after many preparatory moves, White is ready to advance his f-pawn to the 6th rank. Further advances will soon follow...
82.f6 Bf4 83.Re7 Rc8 84.f7 Bd6 85.Re8 Rc7 86.f8=Q Bxf8 87.Rxf8 Kb6 88.Kb4 Rc6 89.Rb8† Ka7 90.Rb7† Ka8 91.Rh7 Kb8 92.Bb5 Rf6 93.Kc5 Rg6 94.Bc6 1–0 I was able to correctly evaluate the difference in the two opposite-colored-bishop endgames because I had understood the first guideline, even if I had not yet been able to put it into words so clearly. While the rest of the game was straightforward, a key principle was displayed. Once White managed to get f5-f6 through, he was subsequently able to play f6-f7 and/or a6-a7 as soon as he desired. This is in stark contrast to advancing the pawn to f6 in the first place, which took a lot more time. This introduces the second guideline. When split passed pawns are blockaded, if the blockade is broken to allow one pawn to advance, it is extremely likely that further advances will soon follow. This guideline applies to both attackers and defenders. For instance, take the following position: 582
Hikaru Nakamura – Veselin Topalov Thessaloniki 2013 1.e4 c5 2.Nf3 d6 3.d4 cxd4 4.Nxd4 Nf6 5.Nc3 a6 6.Be2 e5 7.Nb3 Be7 8.0-0 0-0 9.Be3 Be6 10.Qd3 Nbd7 11.Nd5 Bxd5 12.exd5 Nc5 13.Nxc5 dxc5 14.Bf3 Qc7 15.c4 g6 16.Rae1 h5 17.Bg5 Ne8 18.Bxe7 Qxe7 19.Qe3 Nd6 20.b3 Rfc8 21.Qxe5 Qxe5 22.Rxe5 Re8 23.Rxe8† Rxe8 24.Rc1 a5 25.Kf1 Kg7 26.h4 b6 27.g3 Kf6 28.Be2 Re7 29.Rc3 Re8 30.Ke1 Ra8 31.Bd1 Re8† 32.Kf1 Ke5 33.Bc2 Kf6 34.f3 Re7 35.Kf2 Re8 36.Re3 Rxe3 37.Kxe3 Kg7 38.Kf4 f6 39.g4 a4 40.Bd3 axb3 41.axb3 Kh6 42.g5† Kg7 43.gxf6† Kxf6 44.Ke3 g5 45.hxg5† Kxg5 46.f4† Kh6 47.Kf3 Kg7 48.Kg3 Kh6 49.Kh4 Ne8 50.f5
White has two split passed pawns, but things are not so simple. The knight on e8 does an admirable blockading job, and the light-squared bishop is not exactly the best piece ever to grace a chess board. Nevertheless, White is winning; and in the game, he cruised straight through. But Black could have forced him to make a tough decision. 50...Nd6? This is capitulation. Once one of White’s pawns manages to safely move, the blockade will fail miserably. Black could have offered much more resistance by trying to maintain the blockade at all costs. His hpawn was doomed anyway, so there was no sense in making concessions to try to keep it alive. 50...Kg7! This move does not save the game, but it would require White to work significantly harder than he ended up having to. 583
51.Kg5! The tempting 51.Kxh5? would be met by 51...Kf6 when I cannot find a winning plan for White. Black’s blockade on the dark squares looks unbreakable. 51...h4
Black’s h-pawn is distracting; but if White keeps his eyes on the prize, he should win. As soon as one of the split pawns advances, White should crash through with no further resistance. 52.Bf1! White avoids rushing to capture the h-pawn and instead makes sure not to lose control of the f6square. 52.Kxh4? Kf6 leads to the same kind of blockade as seen in the previous note; once again, Black should not lose. 52...Kf7 It looks like Black’s blockade still holds firm, but White can break it down. 53.Bh3 Kg7
584
54.Bg4! Black finds himself in a deadly zugzwang and as such, the blockade must be broken. 54...Nf6 After 54...Kf7 55.Bh5† Ke7 56.Bxe8 White obviously wins the pawn ending if Black recaptures, while if 56...h3 57.Bh5 h2 58.Bf3 White catches the pawn and wins. 55.Kf4! Now and only now. At any previous moment, Black would have been able to meet this move with ...Kf6, but here he cannot since the knight is occupying the key square. Thus, White will get his king to e5 and win.
55...Kf7 55...Ne8 56.Ke5 and White wins. 585
55...Nd7 gives White a choice between the flashy 56.f6†!? Nxf6 57.Bh3 when White’s king gets to e5 and forces victory, and the calmer 56.d6 Kf6 57.Bh3 intending Ke4-d5 when the blockade fails. 56.Bh3 The king comes to e5 and the blockade will not hold. For instance: 56...Ne8 57.Ke5 Ke7
58.d6†! Nxd6 59.f6† White wins. 51.f6! Nf7 52.Be2 Just two moves after Black allowed the blockade to be broken, he is not only losing his h5-pawn, but the f-pawn will reach the 7th rank as well. Once one advance is made, the next one becomes much harder to prevent.
586
52...Nd6 53.Bxh5 b5 54.cxb5 Nxb5 White’s next two moves were a little strange, but they were not strange enough to let Black back into the game. 55.Be2 55.Kg4 Nd4 56.d6 wins more easily. 55...Nd4 56.Bh5 Nxb3 57.d6 Nd4 58.d7 Ne6 59.Bg4 Nd8
60.Bf5 c4 61.Kg4 c3 62.Kf4 Nf7 63.Bd3 Nd8 64.Bc2 Kh5 65.Kf5 Kh6 66.Bb3 Kh7 67.Kg5 Nc6 68.Ba4 Nd8 69.Bc2† Kg8 70.Kg6 Kf8 71.Bb3 Nc6 72.Kf5 Nd8 73.Ke5 Nb7 74.Kd4 587
1–0 Topalov would have done well to heed the second guideline and realize that allowing f5-f6 would immediately mean the end of the game. As such, he should have preferred the ...Kg7 plan. Had he found this, White would have also needed to mind the second guideline to bring the full point home with the accurate moves Kh4-g5! and Bd3-f1!. Hikaru is an absurdly strong player and he had some time on his clock, so I suspect he would have been up to the task. Still, the way Black played allowed an easy conversion. It follows logically that if the pawns are very far advanced, say both on the seventh rank, promoting one may immediately lead to promoting the other. This can make all the difference in pawn races. For instance, the following game is very close to my heart.
Sam Shankland – Le Quang Liem Vung Tau 2008 1.e4 c5 2.Nf3 d6 3.d4 cxd4 4.Nxd4 Nf6 5.Nc3 g6 6.Be3 Bg7 7.f3 0-0 8.Qd2 Nc6 9.0-0-0 Nxd4 10.Bxd4 Be6 11.Kb1 Qc7 12.h4 Rfc8 13.h5 Qa5 14.hxg6 fxg6 15.a3 Rab8 16.Bd3 Bf7 17.Ne2 Qxd2 18.Rxd2 a6 19.Re1 Nd7 20.Bxg7 Kxg7 21.Nc3 b5 22.Bf1 Rc5 23.Rd4 Ne5 24.Nd5 Bxd5 25.exd5 g5 26.Re3 h5 27.g3 Rf8 28.Be2 Rf5 29.b4 Rc8 30.a4 Rh8 31.axb5 axb5 32.f4 gxf4 33.Rxf4 Rxf4 34.gxf4 Ng6 35.Bxb5 Nxf4 36.c4 h4 37.Bd7 Kf6 38.Bh3 Rg8 39.Bd7 Rh8 40.Bh3 Rb8 41.b5 Nxh3 42.Rxh3 Kg5 43.Kc2 Kg4 44.Re3 Re8
In the final round of the 2008 World Youth Under-18, I needed a win to ensure a share of first place. I had an unpleasant position for most of the game and no winning chances at any moment. I defended as well as I could, and by now I had a draw well within my grasp by means of Re3-e4†. But I had 588
higher ambitions, thanks largely to the realization that split pawns on the seventh are a force to be reckoned with. 45.c5! This move does not win the game but it puts Black under pressure, and all of a sudden 1–0 becomes a feasible result. 45...dxc5 46.d6 e5 46...h3 is also good enough to draw after 47.Rxe7 or 47.d7. 47.b6 h3 48.d7 Rd8 49.b7 The white pawns are untouchable. We will soon see that if one of them goes through, the other will follow, and two queens are better than one.
49...h2 50.Re1 Kf5? Black is unable to stop the pawns, and he should not try. The only way to draw was to race with 50...Kf3!. The following variation is long, but nevertheless straightforward as neither side has any credible alternatives to running their kings forward, making queens and counting who is ahead. It turns out to be a draw: 51.Kc3 Kg2 52.Kc4 h1=Q 53.Rxh1 Kxh1 54.Kxc5 e4 55.Kc6 e3 56.Kc7 Rxd7† 57.Kxd7 e2 58.b8=Q e1=Q The scoresheets can be signed. Black’s choice in the game presents White with a narrow path to victory. Obviously his plan is to bring the king up from c2 to c7 and promote the pawns. But Black has defensive resources available, and they need to be anticipated. He is down by a critical tempo if he goes straight ahead with Kc3-c4, but he can gain it by minding the second guideline.
589
51.Rb1! White threatens to promote the b-pawn. The key point is that he does not need to worry about Black making a queen of his own, since once the b-pawn advances, the d-pawn is soon to follow. Black must respect the threat. Running directly forward with the king would not reach the desired goal: 51.Kc3 Ke6
52.Rd1!? After 52.Kc4 Kd6! (Black also holds with 52...Kxd7!? 53.Rd1† Kc6 54.Rxd8 h1=Q 55.b8=Q Qc1† with a perpetual check, but the text is easier) Black’s king runs to b8 and the position is drawn; for example, after 53.Kb5 Kc7 54.Rh1 Rxd7 55.Rxh2 Kxb7 56.Kxc5 Black has a token 590
extra pawn but the draw will soon be agreed. The text move is intended to prevent Black’s king from crossing the d-file to reach c7 and b8 if needed, but now Black’s e-pawn is too fast.
52...e4! 53.Kc4 e3 White must be careful – rook to e1 or b1 both draw. But a serious mistake would be: 54.Kxc5? Whoever gets to move here wins. Unfortunately for White, that is not him...
54...e2 55.Re1 Kxd7 Black wins. Scooping up the dangerous h-pawn with 51.Rh1 seems tempting, but is also incorrect. Black holds after: 51...Ke6! 52.Rxh2 Kd6! (of course not 52...Kxd7?? 53.Rd2† and White wins) 591
White would win with either Rb2 or Ra2 if either move were legal, but his king is in the way, giving Black the one critical tempo that he needs to get his king to b8. 53.Kc3 Kc7! 54.Rb2 Kb8!= The pawns will fall and the game is drawn. 51...Rb8 What else? Ignoring the threat is not to be recommended. After 51...Ke6 52.b8=Q Rxb8 53.Rxb8 h1=Q 54.d8=Q White wins – once one of the split blocked pawns advances, the other follows! Black does not have a perpetual, as the queen can come back to d2 or d1 and White’s king will easily escape.
52.Rd1! White makes a similar threat. 592
52...Rd8 We now have the same position as before, except White was able to play Re1-d1 for free, and now it is his move again. The upshot is that he has gained the tempo he needs to win the race. 53.Kc3 Probably realizing he was losing, Black tried his one last trick, but to no avail. 53...Rxd7!? 53...e4 54.Rh1! Now White’s rook will get to b2 or a2 in time. 54...Ke6 55.Rxh2 Black needs to play ...Ke6-c7 to hold, but he is too slow. 55...Kd6 56.Ra2! and White wins. The alternative is: 53...Ke6 54.Kc4 e4 55.Kxc5 e3
We have seen this position before, and we know that whoever moves first will win. And this time, thanks to the second guideline helping me find Re1-b1-d1 winning a critical tempo, that is White. 56.Kc6 e2 57.Re1+– Black has to allow either Rxe2 with check, or Kc7 to promote the pawns. It’s time to resign.
593
54.Rf1†! White should take care to avoid 54.Rxd7? h1=Q 55.b8=Q Qc1†! when he will lose material to a skewer next, and barely scrapes a draw. The text move leads to a new queen, so Black resigned. 1–0 The way White won the game, and the way Black could have held in the beginning, lead to the final guideline of this book. Split passed pawns on the seventh rank can hardly ever be contained by a single piece. One could argue that Le Quang Liem’s play against me was consistent with this guideline, as he was trying to bring his king back to help. However, it was too slow. Instead he needed to accept that the pawns would queen and focus on his own set of split passed pawns to save the game. While the third guideline may seem simple and incredibly straightforward, it is still useful to remember. Even very strong players can go astray in ways that could be avoided by paying proper heed to it. Take the following example.
Victor Mikhalevski – Hannes Stefansson Reykjavik 2008 1.d4 d5 2.c4 c6 3.Nf3 Nf6 4.Nc3 e6 5.Bg5 Nbd7 6.e3 Qa5 7.cxd5 Nxd5 8.Qd2 Bb4 9.Rc1 h6 10.Bh4 c5 11.a3 Bxc3 12.bxc3 b6 13.Ne5 Nxe5 14.dxe5 g5 15.Bg3 Bb7 16.e4 Ne7 17.h4 Bxe4 18.hxg5 h5 19.Qb2 0-0-0 20.Qb4 Qxb4 21.cxb4 Bd3 22.bxc5 b5 23.Rh4 Bxf1 24.Kxf1 Kb7 25.a4 a6 26.Rf4 Nf5 27.c6† Kb6 28.a5† Kxa5 29.Rxf5 exf5 30.e6 fxe6 31.Bc7† Ka4 594
Both sides must be prepared for an all-out race. Black has connected passed pawns; but as we have seen in previous chapters, they will be slowed down by the clumsily-placed king. White would have won the race without a ton of trouble if he prioritized putting his split passers on the seventh rank when Black only has a rook to hold them back. 32.Ra1†?! This is not a bad move and White is still winning, but he is drifting away from the best idea. The simplest win was straightforward when considering the third guideline. 32.Bxd8! Rxd8 33.c7 Rc8 34.g6 b4 35.g7 35.Ra1†!? is the machine’s favorite and it indeed wins more quickly with perfect play, but there are some fancy ideas after both of Black’s possible king moves so we will focus on the more human alternative. 35...b3
595
I am sure Mikhalevski reached this point in his calculations and decided that Black’s b-pawn was enough of a nuisance that he could not get his rook to d8. But this is not correct, because letting the b-pawn through would only give Black one queen, while if White can advance one of his pawns, he will get two queens. 36.Rd1! Of course White’s two pawns are worth more than Black’s rook, and he should avoid the suicidal 36.g8=Q?? Rxg8 37.c8=Q Rxc8 38.Rxc8 b2! 39.Rb8 Ka3! when ...Ka3-a2 is on the way, and Black wins. 36...b2 The problem with playing Rd8 here is not that Black gets a new queen, but rather that it comes with check and the white king has nowhere to hide. By simply stepping out of the danger zone, White prepares Rd8 with decisive effect.
596
37.Kg1! Kb3 38.Kh2! Kc2 Now that White’s king is out of harm’s way, he is ready to slam down to the final rank without regard for Black’s b-pawn. 39.Rd8! Once one pawn goes through, the other will follow! Two queens are better than one...
39...Rxd8 I will take this as the main line in order to emphasize the value of the guideline. After 39...b1=Q? 40.Rxc8+– White may even end up with three heavy pieces against one. 39...Rxc7 would be the best practical try, but White wins after: 40.g8=Q b1=Q 41.Qxe6 Qb4 42.Qa2† (42.Qxf5† Kc1 should win for White eventually but the text move is cleaner) 42...Kc3 43.Rd1!+– Black will have to sacrifice too much material to save his king. 597
40.cxd8=Q b1=Q 41.g8=Q+– Predictably, once one pawn promoted, the other followed. 32...Kb4
33.Rxa6? White needed to take the rook, with similar play to the previous note. Black loses after: 33.Bxd8! Rxd8 34.g6! a5 35.c7 Rc8 36.g7 a4 37.Rb1† Ka5 38.Rd1! a3
Much like the previous line, White should invest a little time to get his king out of the danger zone before smashing through. 598
39.Ke2! Kb4 Black cannot play 39...a2? on account of 40.Ra1, so he must lose a tempo. 40.Rd8 a2 41.g8=Q a1=Q 42.Qf8†! Kc4
43.Qd6!+– White’s centralized queen dashes Black’s hopes of perpetual check, and the c-pawn decides the game. 33...Ra8! 34.Bd6† Kc4 35.Rb6
The position has become messy and unclear, as Black has much better chances of stopping the pawns. The computer screams equal, but anything could still happen. As it turned out, Black went on to win in the time scramble. 599
35...Kd5 36.c7 e5 37.Be7 Rhc8 38.Rd6† Kc4 A final blunder sealed White’s fate.
39.Rd8?? This costs White the c7-pawn. 39.Bd8 should have been preferred, when the position remains objectively drawn but extremely complicated. 39...Ra1†! 40.Ke2 Rxc7! Oops. 41.Bf6 Rg1 42.g3 Rc6 43.Rf8 f4 44.Bxe5 fxg3 45.Bxg3 Rg6 46.Rf4† Kb3 47.Rf5 b4 48.Bf4 Kc4 49.Bd2 Re6† 50.Be3 b3 51.Rc5† Kb4 52.Rc8 Rxg5 53.Kd3 Rd5† 54.Bd4 Red6 55.Rb8† Ka5 56.Rxb3 Rxd4† 57.Ke2 Rb4 58.Re3 Rd5 59.Kf3 Kb5 60.Kg3 Rg4† 61.Kh3 Kc4 62.f3 Rg1 63.Kh2 Rg8 64.Kh3 Kd4 65.Re4† Kd3 66.Ra4 Ke3 0–1 Split passed pawns are not too hard to understand but, as we have seen, even strong GMs can misevaluate them in ways that could be alleviated by considering our guidelines. For the last time in the book, here is your chance to apply yourself and figure out the way forward.
600
Exercises
Alexander Moiseenko – David Navara Khanty-Mansiysk (3.5) 2011
White is in a tough spot but his position is still tenable. How should he continue? Show/Hide Solution > The position should be drawn because White’s king can keep a watchful eye over both the f- and hpawns from the g-file, and Black’s king is poorly placed. With his next move though, White fatally steps away from one of the passers. 74.Kf1? 74.Rg7 Simply waiting would have saved the game. For instance: 74...h4 75.Rg8 f3 How else can Black make progress?
601
76.Rf8! Kg3 76...Rg2† 77.Kh1! Self-stalemating. 77...Rg3 (77...Kg3 78.Rxf3†!=) 78.Rf4! Not the only drawing move, but the simplest; Black loses his f-pawn on the spot. 77.Rg8† Kf4 78.Rf8† Ke3 79.Re8† The king has nowhere to hide, and White makes a draw. 74...Kh2! Navara did not need to be asked twice. Black wins by running the pawn to h3.
75.Rg5 75.Rh8 loses to 75...Kg3 (even 75...h4!? works) 76.Rxh5 Rb1† 77.Ke2 f3† when the pawn gets 602
through. 75...h4 76.Rg4 h3!
77.Rg8 After 77.Rxf4 Kg3 White is unable to give a check, so Black wins with ...Rb1† followed by ...h2. 77...f3 78.Rg7 Black’s pawns are very far advanced, and all he has to do is get his king out of the way. 78...Rg2 79.Rf7 Kg3 80.Rg7† Kf4 81.Rf7† Ke4 82.Re7† Kd5 83.Rd7† Ke6 84.Rh7 h2 0–1
Penteala Harikrishna – Nihal Sarin Malmo 2019
603
How should White continue? Show/Hide Solution > With opposite-colored bishops on the board, it is clear that the a-pawn will not win the game by itself. But if White can make a second passed pawn on the kingside, Black will be unable to defend, as the split passers will be too far apart. 45.h4! Bb5 46.Bxh6! Black actually resigned here. Even with an extra piece, the split passed pawns will be impossible to contain. 1–0 The finish might have been: 46...gxh6 After 46...Bxa6 47.Bxg7 the connected passers are obviously decisive.
604
47.g5 hxg5 48.h5!+– Certainly not 48.hxg5?? Bf1!, when Black’s bishop swings around to e6, and it is he who wins. After the text move Black has nothing to say about the h-pawn promoting. Neither the a-pawn nor the kingside breakthrough would have been enough to win the game by themselves; but when their forces were combined, Black had no chance.
Magnus Carlsen – Viswanathan Anand Chennai (5) 2013
605
For the last problem in the book, you have a chance to put away one of the all-time greats and help Magnus along to his first decisive result in a World Championship match. How should White continue? Show/Hide Solution > 54.Rh7!! White needs to control the 7th rank so that Black’s king will be unable to get back to the 8th rank. At that point, White’s pawn will get to a7 and the h-pawn will soon follow. We already know from the third guideline that one piece is not enough to contain two split passed pawns on the seventh rank. Advancing the pawn right away would enable Black’s king to join the defense: 54.a6? Kc7! Black’s king will be able to get in front of the a-pawn, and then his rook can take care of the hpawn. Since both pawns are rook pawns, Black should be able to reach the Vancura position. 55.Kc4 Kb6 56.Rh6† Ka7 57.Kxc5 Rc2† 58.Kd4 Rd2† 59.Ke3 Rc2 60.h4 Rc4
Black will hold, as White’s king has nowhere to hide. A similar position involving the Vancura defense has already been discussed in the Ivanchuk – Lautier game on page 294. 61.h5 Rc5! 62.Kf4 Rc4† 63.Kg5 Rc5† 64.Kg4 As long as Black does not fall asleep at the wheel and let White’s rook get off the h-file, he makes a draw.
606
64...Rc4†! 65.Kf3 There is nowhere to hide further down the board: 65.Kg5 Rc5† 66.Kg6 Rc6† 67.Kg7 Rc7† 68.Kh8 Rc8† 69.Kh7 Rc7†= and so on. 65...Rc5! Black holds. 54...Kd5 Black could try to defend the whole of the back rank with his rook to keep the pawns from promoting, but we already know that one piece will not be enough to contain the two split passers once they have both reached the seventh rank. 54...Rg8 The following variation is far from forced, but a pretty good prediction of how the game might end. 55.a6 Ra8 56.a7 Kc6 57.h4 Kb6 58.h5
607
Obviously Black cannot take the a-pawn. This is made the case by the great distance between the passed pawns. Things would be different if White’s h-pawn were to move to d5. 58...Rg8 59.h6 Rf8 60.Rg7 Ra8 61.h7 Next comes Rg8, and one of the pawns will promote. Black needed to include his king in the defense.
55.a6 c4† 56.Kc3 Ra2 57.a7 Black’s rook cannot contain both pawns, which will inevitably reach the seventh rank. The book’s final guideline is on full display. 57...Kc5 58.h4 Black resigned. 608
1–0 The finish might have been: 58...Ra3† 59.Kb2 Ra6 60.h5 Kb4 61.h6 c3† 62.Kb1 Kb3 Black almost has serious counterplay...
63.Rb7† But not quite. 63...Kc4 64.h7 It’s all over.
609
Game Index Preface Sam Shankland – Awonder Liang, St Louis 2018 5 Introduction Jonathan Poe – Josh Waitzkin, The Big Screen 1993 10 A. McDonnell – L.C.M. de La Bourdonnais, London (16) 1834 11 Evgeny Bareev – Loek van Wely, Bugojno 1999 12 Viswanathan Anand – Garry Kasparov, Frankfurt (rapid) 1999 12 Chapter 1 Sam Shankland – Almir Correia Cardoso, Praia da Pipa 2014 17 Veselin Topalov – Levon Aronian, Wijk aan Zee 2006 19 Nguyen Anh Dung – Chanda Sandipan, Jodhpur 2003 27 Jon Ludvig Hammer – Hikaru Nakamura, Stavanger 2013 28 Ray Robson – Li Ruifeng, St Louis 2016 34 Vladimir Kramnik – Veselin Topalov, Tromso (ol) 2014 34 Judit Polgar – Peter Svidler, Moscow (blitz) 2009 36 Vladimir Kramnik – Erwin L’Ami, Isle of Man 2018 37 Chapter 2 Jon Ludvig Hammer – Hikaru Nakamura, Stavanger 2013 40 Georgi Ilivitzki – Lev Polugaevsky, Saratov 1953 40 Sam Shankland – Yaroslav Zherebukh, St Louis 2018 43 Shakhriyar Mamedyarov – Alexander Morozevich, Bursa 2010 47 Dmitry Gurevich – Karl Dehmelt, New York 1986 54 Sam Shankland – Elshan Moradiabadi, Chinggis 2017 55 Magnus Carlsen – Penteala Harikrishna, Wijk aan Zee 2013 56 Semen Elistratov – Oleg Nikolenko, Moscow 2016 58 Sam Shankland – Irina Krush, Las Vegas 2014 60 Dimitrios Tsomis – Andreas Tzermiadianos, Kavala 1999 61 Chapter 3 Sam Shankland – Aleksandr Rakhmanov, Havana 2018 65 Peter Leko – Maxime Vachier-Lagrave, Batumi (ol) 2018 70 Ding Liren – Jan-Krzysztof Duda, Batumi (ol) 2018 72 Vassily Ivanchuk – Sam Shankland, Edmonton 2014 76 Sam Shankland – Timur Gareev, USA 2012 82 610
Peter Prohaszka – Zoltan Varga, Budapest 2009 84 Ivan Cheparinov – Bassem Amin, Zagreb 2018 85 Chapter 4 Evgeny Bareev – Peter Svidler, Moscow 2005 87 Aleksandr Rakhmanov – Sam Shankland, Havana 2018 91 Aleksandr Rakhmanov – Robert Hess, Moscow 2011 94 Hikaru Nakamura – Alexander Morozevich, Moscow 2013 96 Andrei Volokitin – Shakhriyar Mamedyarov, Eilat 2012 99 Tomi Nyback – Anish Giri, Wijk aan Zee 2010 101 Aleksandr Rakhmanov – Sam Shankland, Havana 2018 103 Fritz Gygli – Aron Nimzowitsch, Winterthur 1931 107 Hikaru Nakamura – Teimour Radjabov, Moscow (1.3) 2019 108 Alexander Grischuk – Michal Krasenkow, Saint Vincent (3.3) 2005 109 Sam Shankland – Richard Rapport, St Louis (rapid, 10) 2019 110 Alexander Shabalov – Rohan Talukdar, Chicago 2019 111 Chapter 5 Aleksandr Betaneli – Li Ruifeng, St Louis 2017 114 Jon Ludvig Hammer – Alexander Zubarev, Eretria 2011 116 Boris Gelfand – Hicham Hamdouchi, Cap d’Agde (rapid) 1998 119 Loek Van Wely – Gata Kamsky, Dagomys 2008 122 Alexander Onischuk – Bassem Amin, Ningbo 2011 127 Ding Liren – Rauf Mamedov, Shamkir 2018 130 Ivan Cheparinov – Gawain Jones, Bratto 2013 131 Chapter 6 Evgeny Bareev – Jonathan Speelman, Debrecen 1992 133 Fritz Gygli – Aron Nimzowitsch, Winterthur 1931 135 Alexander Huzman – Garry Kasparov, Tel Aviv (clock simul) 1998 137 Ding Liren – Rauf Mamedov, Shamkir 2018 143 Iryna Zenyuk – Anna Zatonskih, St Louis 2012 144 Evgeny Tomashevsky – Peter Svidler, Moscow 2009 150 Mikhail Kobalia – Alexander Areshchenko, Isle of Man 2006 150 Alexander Moiseenko – Baadur Jobava, Gothenburg 2005 152 Evgeny Tomashevsky – Peter Svidler, Moscow 2009 153 Chapter 7 Hikaru Nakamura – Boris Gelfand, London 2012 157 Magnus Carlsen – Alexander Grischuk, Linares 2009 159 Vladimir Kramnik – Erwin L’Ami, Isle of Man 2018 163 David Pruess – Evgenij Miroshnichenko, Cappelle-la-Grande 2007 165 Mohamed-Mehdi Aithmidou – Li Chao, Batumi (ol) 2018 169 611
Rauf Mamedov – Sam Shankland, Batumi (ol) 2018 172 I. R. Ortiz Suarez – Gregory Kaidanov, Mar del Plata 2012 178 Sam Shankland – Felix Rudyak, San Francisco 2007 179 Michael Casella – Sam Shankland, Los Angeles 2010 180 Oscar Humberto Castro Rojas – Laszlo Szabo, Costa Brava 1976 181 Chapter 8 Dean Ippolito – Surya Shekhar Ganguly, Philadelphia 2006 183 David Pruess – Evgenij Miroshnichenko, Cappelle-la-Grande 2007 189 Sam Shankland – Akshat Chandra, St Louis 2016 191 Isan Reynaldo Ortiz Suarez – Gregory Kaidanov, Mar del Plata 2012 195 Sam Shankland – Roman Yankovsky, Santa Clara 2012 199 Jesse Kraai – Florin Felecan, Internet (rapid) 2009 200 Irina Krush – Sam Shankland, Edmonton 2014 206 Sergey Kudrin – Alexander Onischuk, San Diego 2006 208 Gata Kamsky – Alexander Onischuk, St Louis 2010 209 Alexander Shabalov – Joshua Friedel, New England 2007 210 Chapter 9 Alexander Onischuk – Pavel Eljanov, Dresden (ol) 2008 213 Sam Shankland – Gilberto Hernandez Guerrero, Praia da Pipa 2014 215 Magnus Carlsen – Sergey Karjakin, New York (8) 2016 219 Sam Shankland – Jan-Krysztof Duda, Danzhou 2018 221 Alexander Grischuk – Hikaru Nakamura, Thessaloniki 2013 224 Penteala Harikrishna – L. Dominguez Perez, Wijk aan Zee 2014 228 Vladimir Kramnik – Judit Polgar, Madrid 1993 234 Georg Meier – Aryan Tari, Helsingor 2014 235 Erwin L’Ami – Yu Yangyi, Batumi (ol) 2018 236 Varuzhan Akobian – Dmitry Zilberstein, Los Angeles 2003 237 Chapter 10 Sam Shankland – Jacek Tomczak, Batumi (ol) 2018 239 Wang Yue – Magnus Carlsen, Dresden (ol) 2008 243 Alexander Grischuk – Wesley So, Moscow 2019 245 Radoslaw Wojtaszek – Anton Demchenko, Batumi (ol) 2018 249 David Vigorito – Mika Brattain, Somerville 2014 252 Sam Shankland – Jan-Krysztof Duda, Danzhou 2018 258 Sam Shankland – Abhijeet Gupta, Khanty-Mansiysk (2.2) 2011 259 Karthikeyan Murali – Sam Shankland, Biel 2017 260 Varuzhan Akobian – Yaroslav Zherebukh, St Louis 2018 261 Chapter 11 Sam Shankland – Robert Hess, Internet (bullet) 2012 266 612
Vladimir Akopian – Georg Meier, Istanbul (ol) 2012 267 Erwin L’Ami – Sergey Fedorchuk, Hockenheim 2018 269 Vladimir Kramnik – David Howell, London 2010 270 Sam Shankland – Josep Lopez Martinez, Barcelona 2013 279 Vassily Ivanchuk – Anish Giri, Wijk aan Zee 2012 281 Chapter 12 Igor Khenkin – Martin Forchert, Bad Wiessee 2009 283 Luke McShane – Magnus Carlsen, London 2011 286 Varuzhan Akobian – Yuri Shulman, St Louis 2009 290 Vassily Ivanchuk – Joel Lautier, Horgen 1995 291 Vladimir Kramnik – Alexander Morozevich, Dortmund 2001 296 Miguel Illescas Cordoba – Evgeny Bareev, Ubeda 1997 304 Sam Shankland – Ray Robson, St Louis 2019 304 Jahongir Vakhidov – Sam Shankland, Tromso (ol) 2014 306 David Anton Guijarro – M. Vachier Lagrave, Gibraltar 2017 307 Chapter 13 Bobby Fischer – Bent Larsen, Denver (5) 1971 309 Csaba Balogh – Igor Khenkin, Germany 2013 311 Annie Wang – Anna Zatonskih, St Louis 2019 313 Vladimir Fedoseev – Vidit Santosh Gujrathi, Hengshui (rapid) 2019 316 Erwin L’Ami – Sergey Fedorchuk, Hockenheim 2018 317 Sam Shankland – Tsegmed Batchuluun, Philadelphia 2012 323 Maxime Vachier Lagrave – Sam Shankland, Doha 2014 324 Dale Haessel – Sam Shankland, Edmonton 2015 324 Chapter 14 Melikset Khachiyan – Daniel Naroditsky, Internet (rapid) 2012 327 Vladimir Kramnik – Peter Svidler, Wijk aan Zee 2004 332 Sam Shankland – Aman Hambleton, Tromso (ol) 2014 334 Hikaru Nakamura – Veselin Topalov, Thessaloniki 2013 337 Sam Shankland – Le Quang Liem, Vung Tau 2008 339 Victor Mikhalevski – Hannes Stefansson, Reykjavik 2008 343 Alexander Moiseenko – David Navara, Khanty-Mansiysk (3.5) 2011 348 Penteala Harikrishna – Nihal Sarin, Malmo 2019 349 Magnus Carlsen – Viswanathan Anand, Chennai (5) 2013 349
613
Name Index A Aagaard 140 Abrahamyan 172 Aithmidou 169 Akobian 233, 237, 257, 261, 290, 292 Akopian 267, 268, 301 Amin 81, 85, 125, 127 Anand 12, 13, 347, 349 Anton Guijarro 303, 307 Areshchenko 148, 150, 151 Aronian 19, 20, 21, 22, 23, 24 B Balogh 311, 314 Bareev 12, 13, 87, 90, 133, 137, 302, 304 Batchuluun 321, 323 Betaneli 114 Bologan 99 Brattain 252 C Carlsen 52, 56, 159, 160, 161, 219, 224, 243, 252, 286, 290, 347, 349 Casella 177, 180 Castro Rojas 177, 181 Chandra 191 Cheparinov 81, 85, 129, 131, 132 Correia Cardoso 17 D Dehmelt 51, 54 Demchenko 249, 250 Ding Liren 72, 73, 75, 76, 79, 129, 130, 131, 143 Dominguez Perez 228, 231 Duda 72, 79, 221, 256, 258 E Elistratov 52, 58 Eljanov 213, 214 Erenburg 172 Euwe 26 614
F Fedorchuk 269, 302, 317 Fedoseev 316 Felecan 200, 202 Fischer 10, 309, 311 Forchert 283, 285, 286 Friedel 205, 210 G Ganguly 183, 184, 186, 187, 188, 190 Gareev 80, 82 Gelfand 119, 121, 122, 157, 158, 159 Giri 101, 102, 277, 281 Grischuk 105, 109, 110, 159, 161, 224, 225, 226, 227, 228, 245, 246, 248, 249 Gujrathi 316 Gupta 256, 259 Gurevich 51, 54 Gygli 104, 107, 135 H Haessel 322, 324 Hambleton 334 Hamdouchi 119, 122 Hammer 28, 36, 39, 40, 116, 117, 118 Harikrishna 52, 56, 228, 346, 349 Hernandez Guerrero 215 Hess 94, 266 Hillarp Persson 99 Howell 273, 275 Huzman 137, 138, 139 I Ilivitzki 40 Illescas Cordoba 302, 304 Ippolito 183, 190 Ivanchuk 76, 78, 277, 281, 291, 293, 294, 296, 350 J Jobava 149, 152 Jones 129, 131 K Kaidanov 176, 178, 195, 196 Kamsky 122, 123, 124, 125, 205, 209 Karjakin 219, 220, 221, 224 Kasparov 12, 13, 137, 138, 139, 140, 141, 142 615
Khachiyan 327, 330 Khenkin 283, 311, 314 Kobalia 148, 150 Kraai 200 Kramnik 32, 33, 34, 35, 37, 163, 232, 234, 273, 274, 296, 299, 332 Krasenkow 30, 105, 109, 273 Krush 53, 60, 204, 206 Kudrin 204, 208 L La Bourdonnais 11 L’Ami 33, 37, 163, 233, 236, 269, 302, 317, 320 Larsen 309, 311 Laurusas 99 Lautier 291, 293, 295, 296, 350 Leko 70, 79 Le Quang Liem 339, 343 Liang 5 Li Chao 169, 173 Li Ruifeng 32, 34, 114, 116 Lopez Martinez 276, 279 Lucena 188 M Mamedov 129, 130, 143, 172, 185 Mamedyarov 47, 49, 50, 99 McDonnell 11 McShane 286, 288 Meier 232, 235, 236, 267, 268, 301 Mikhalevski 343 Miroshnichenko 165, 168, 189, 190 Moiseenko 149, 152, 346, 348 Moradiabadi 51, 55 Morozevich 47, 96, 98, 296, 297, 299 Murali 257, 260 N Nakamura 28, 36, 39, 40, 96, 104, 108, 157, 159, 224, 228, 337 Naroditsky 327 Navara 346, 348 Nguyen Anh Dung 27 Nikolenko 52, 58 Nimzowitsch 104, 107, 135, 136 616
Nyback 101 O Onischuk 125, 126, 127, 204, 205, 208, 209, 213, 214 Ortiz Suarez 176, 178, 195, 196, 197 P Polgar 33, 36, 232, 234 Polugaevsky 40, 41, 43 Prohaszka 80, 84 Pruess 165, 189 R Radjabov 104, 108 Rakhmanov 65, 70, 72, 91, 93, 94, 103 Rapport 105, 110 Robson 32, 34, 302, 304 Rudyak 176, 179 S Sandipan 27 Sarin 346, 349 Shabalov 106, 111, 205, 210 Short 99 Shulman 290, 291, 292, 293, 296 So 245, 246, 248, 249 Speelman 133, 134, 135, 137 Stefansson 343 Svidler 33, 36, 87, 88, 89, 90, 91, 148, 149, 150, 153, 154, 332, 334 Szabo 177, 181, 184 T Talukdar 106, 111 Tari 232, 235, 236 Timman 99 Tomashevsky 148, 149, 150, 153 Tomczak 239 Topalov 19, 20, 23, 25, 26, 32, 34, 337, 339 Tsomis 53, 61 Tzermiadianos 53, 61 V Vachier-Lagrave 70, 72, 76, 79, 303, 307, 308, 321, 324 Vakhidov 303, 306 Vancura 294, 350 Van Wely 12, 13, 122 617
Varga 80, 84 Vigorito 252 Volokitin 99 W Waitzkin 10 Wang 313 Wang Hao 99 Wang Yue 243, 252 Wojtaszek 249 Y Yankovsky 199 Yu Yangyi 233, 236 Z Zatonskih 144, 145, 146, 313, 314, 315 Zenyuk 144 Zherebukh 43, 67, 257, 261 Zilberstein 233, 237 Zubarev 116
618
Table of Contents Title Page and key to symbols used 4 Preface 5 Introduction 9 1 Identical Twins 17 Exercises 2 Unstoppable and Immovable 39 3 Single and Happy 65 4 Single on Valentine’s Day 87 5 Safety and Inevitability 113 6 Divide and Conquer 133 7 Inevitable Graduation 157 8 Slowing the Invasion 183 9 Support Your Local Vigilante 213 10 Dealing with the Last Man Standing 239 11 The Rack 263 12 Building a Smaller Home 283 13 My Pawn is Bigger than Yours 309 14 Long Distance Relationships 327 Game Index 352 Name Index 356
619
4 6 11 18 46 56 100 139 183 218 259 303 357 405 448 485 534 564 610 614