Mastering Skeet
Table of Contents Title Page Copyright Page Acknowledgements Introduction I - SKEET SHOOTING FUNDAMENTALS CHAPTER 1 - G
Views 241 Downloads 2 File size 7MB
Recommend stories


- Author / Uploaded
- Hercio Moyses
Citation preview
Table of Contents Title Page Copyright Page Acknowledgements Introduction
I - SKEET SHOOTING FUNDAMENTALS CHAPTER 1 - Guns and Equipment OVER-UNDER OR SEMIAUTOMATIC BARREL LENGTH SIGHTS CHOKES FORCING CONES, BACK BORING, AND BARREL PORTING RECOIL REDUCERS GUNS FOR JUNIOR BEGINNERS SHOOTING GLASSES HEARING PROTECTION CHAPTER 2 - Shooting Form STANCE, POSTURE, AND BALANCE GUN MOUNT BASICS FOOT POSITION The Left-Handed Shooter’s Foot Positions Moving Foot Position between Shots on Singles POSITION ON THE STATION OR PAD PIVOT AND SHOULDER TURN WEIGHT REVERSAL OR REVERSE WEIGHT TRANSFER FOLLOW-THROUGH FINISHING THE SHOT THE IMPORTANCE OF FORM CHAPTER 3 - Gun Fit and Mount HEAD POSITION POINT OF AIM AND PATTERNING CAST-OFF COMB SHAPE, HEIGHT, AND ALIGNMENT LENGTH OF PULL PITCH TOE-IN AND TOE-OUT DROP AT THE HEEL CHAPTER 4 - Hold Points and Shooting Methods SWING THROUGH PULL AWAY SUSTAINED LEAD THE CONSTANT TIME PRINCIPLE DEVELOPING IDEAL HOLD POINTS VERTICAL HOLD POINT HOLD POINTS AND AGE CHAPTER 5 - Hitting the Target PATTERNS AND SHOT STRING LEADS KILL ZONE GUN CONTROL FOLLOW-THROUGH MISSING THE TARGET CHAPTER 6 - Eye Dominance and Vision CROSS-DOMINANCE SHIFTING OR INCOMPLETE DOMINANCE VISION CONTROL AND VISUAL FOCUS
HIGH-VISIBILITY FRONT SIGHTS CHAPTER 7 - Flinching and Release Triggers CHAPTER 8 - Mental Focus
II - THE INDIVIDUAL STATIONS CHAPTER 9 - Station 1 STATION 1 HIGH HOUSE STATION 1 LOW HOUSE STATION 1 DOUBLES CHAPTER 10 - Station 2 STATION 2 HIGH HOUSE STATION 2 LOW HOUSE STATION 2 DOUBLES CHAPTER 11 - Station 3 STATION 3 HIGH HOUSE STATION 3 LOW HOUSE STATION 3 DOUBLES CHAPTER 12 - Station 4 STATION 4 HIGH HOUSE STATION 4 LOW HOUSE STATION 4 DOUBLES CHAPTER 13 - Station 5 STATION 5 HIGH HOUSE STATION 5 LOW HOUSE STATION 5 DOUBLES CHAPTER 14 - Station 6 STATION 6 HIGH HOUSE STATION 6 LOW HOUSE STATION 6 DOUBLES CHAPTER 15 - Station 7 STATION 7 HIGH HOUSE STATION 7 LOW HOUSE STATION 7 DOUBLES CHAPTER 16 - Station 8 STATION 8 HIGH HOUSE STATION 8 LOW HOUSE CHAPTER 17 - Doubles at All Stations STATIONS 1 AND 2 AT ALL DOUBLES STATIONS 3, 4, AND 5 DOUBLES Velocity Curves and Best Apparent Lead Curves STATION 3 DOUBLES STATION 4 DOUBLES, HIGH HOUSE FIRST STATION 5 DOUBLES STATION 6 DOUBLES GOING ACROSS STATION 7 DOUBLES STATION 6 DOUBLES COMING BACK STATION 5 DOUBLES COMING BACK STATION 4 DOUBLES, LOW HOUSE FIRST, COMING BACK STATION 3 COMING BACK STATION 2 COMING BACK STATION 1 COMING BACK DRILLS FOR 3, 4, AND 5 DOUBLES DOUBLES IN SHOOT-OFFS
III - OTHER PRINCIPLES CHAPTER 18 - Safety on the Skeet Range CHAPTER 19 - The Rules of Skeet SHOTGUN RULES AMMUNITION REFEREES AND PULLERS SHOOTERS A ROUND OF SKEET COMMON SITUATIONS CHAPTER 20 - Skeet Shooting Etiquette BEFORE YOU EVEN STEP ONTO THE SKEET FIELD ON THE SKEET FIELD AT REGISTERED SKEET MATCHES A LESSON IN ETIQUETTE CHAPTER 21 - Teaching and Coaching PREPARATION LESSON PLANS FOR NEW SHOOTERS PRACTICE ADVICE FOR NEW SHOOTERS Appendix: - The Mechanics of Skeet Shooting
Bibliography About the Author Index
Copyright © 2007 by King Heiple
Published by STACKPOLE BOOKS 5067 Ritter Road Mechanicsburg, PA 17055 www.stac.kpolebooks.com
All rights reserved, including the right to reproduce this book or portions thereof in any form or by any means, electronic or mechanical, including photocopying, recording, or by any information storage and retrieval system, without perenission in writing from the publisher. All inquiries should be addressed to Stackpole Books, 5067 Ritter Road, Mechanicsburg, Pennsylvania 17055. Printed in the United States of America
First edition
10 9 8 7 6 5 4 3 2 1
Cover design by Wendy A. Reynolds Cover photograph by King Heiple
Library of Congress Cataloging-in-Publication Data Heiple, King. Mastering skeet / King Hciple, with contributions by Todd Nelson. p. cm. Includes bibliographical references and index. ISBN-13: 978-0-8117-3361-8 ISBN-10:0-8117-3361-0 1. Skeet shooting. 1. Nelson, Todd, 1967- II. Title. GV1181.3.H45 2007 799.3’132—dc22 2006021225
Acknowledgements Every author of an instruction manual owes gratitude to every previous author writing on the same subject, as well as all those who contributed directly to his or her own knowledge. I am certainly no exception. I wish that I could have personally thanked D. Lee Braun. I taught myself to shoot skeet by reading his Remington-published guide. Many others have had varying degrees of input into my knowledge and skill at this sport, including the late Bob Snyder, a Veteran World 28-gauge champion and shooting buddy for many years; Master Instructors Angelo Troisi, Don Suyder, Todd Bender, John Shima, and Ralph Aaron; Adrian Cousins, the first National Skeet Shooting Association Chief Instructor; Burl Branham, former coach of the U.S. Marksmanship Training Unit Shotgun Team; Lt. Col. Jack Horner, its former commander; and Dwight Davy, who supervised the skeet mechanics study in the appendix. I would also like to thank the many friends who encouraged and shot with me for many years, some of whom also appear in the illustrations: U.S. International Champion Dean Clark, Jim Murphy, Sue Huszai, Jack Albano, Doug DiPalma, Dick Cameron, Rich Cameron, Jim Doebereiner, George McCullough, and many more that I will regret having omitted.
Introduction Skeet is easy, if you’re happy breaking 9 out of 10 birds. But that means you have to be satisfied with shooting 22 to 23 birds out of 25 most of the time. Are you delighted when you manage a 25 straight, with high-fives all around? So am I, but only if I can do it consistently. If an occasional 25 is your goal, you don’t need this manual. With three or four lessons, along with 20 practice sessions, you could shoot an occasional 25, even if this is your first season at skert. This book is addressed to those who want to break out of their comfortable, complacent shooting habits, whether beginners or AAA shooters. If your serious goal is 100 straights, this maaual can help you achieve it. All the material in my previous short manual is included in this book, but with a great deal more background, illustrations, and amplification. There is an overriding emphasis on the basics, because even many excellent shooters overlook these details. If you are already shooting AA to AAA scores at skeet, you may think that a lot of the material in this manual is too basic for you, and you may be right, but you can never be overcommitted to the basics of your technique. A surprising number of top shooters have odd quirks in their shooting technique that probably cost them a bird on occasion. But if you watch top-level AAA shooters carefully, you will see how precise their technique is. This text includes new material about the geometry and flight dynamics of a skeet target and how we perceive it. A portion of it is derived from a senior thesis done some years ago at Case Western Reserve University School of Mechanical and Aerospace Engineering, under the direction of Professor Dwight Davy and myself. Some of these data are included throughout, as well as in the appendix. My conviction is that you can never know too much about the mechanics of whatever you are trying to accomplish. This is not to say that shooters with instinctive, natural styles can’t break 100 straight; a few of them have even won national titles. But I characterize these successes as a triumph of athletic skill and practice over technique. These shooters tend to be “streaky,” shooting an excellent score on a day when they’re in the zone and crashing and burning when they’re not. They occasionally win a tournament despite their basically weak technique, but certainly not because of it. I believe that the more you understand about the mechanics of excellent technique, the closer you will come to championship form, and hopefully, championship achievements. However, no amount of study—of this or any other manual—will automatically make you into a AA or AAA shooter and a top-gun threat at every match. You need excellent eye-hand coordination, reasonable athletic skill, and a commitment and willingness to put in plenty of practice. And because there is simply no way that you can stand behind yourself and see your own errors, you also need coaching, whether by a professional or by an experienced shooting friend. A pro is probably best, because we all tend to take advice we pay for much more seriously than that of idle friends, and the professional wouldn’t have lasted very long if his or her coaching wasn’t effective. There are three fundamentals in skeet: 1. Keep your eye on the target. 2. Keep your head (actually, your cheekbone) on the stock. 3. Have the proper lead at the instant the shot clears the barrel. But these fundamental only tell you what you must do, not why they are so critical or how to achieve these goals. This manual delves into the why and how of technique. I am convinced that it can be very helpful to understand why a certain skill might be able to earn you an extra bird per 100. Only then will you be willing to invest the necessary time and effort to incorporate it into your shooting style. We all learn differently, and we frequently use a combination of learning techniques to acquire any new information or a new skill. Listening to advice, reading books, seeing photos or videos, watching a high-level performance, coaching, and repetitive practice of good technique are all part of learning. The advantage of a written manual is that it lets you stop and ponder what you just read or go back and reread a page. You can pick it up any time for quick reference. And it can cover the same material in much more detail than any video can. This manual is an effort to present excellent technique in skeet shooting in as much detail as possible, because practicing with poor technique doesn’t lead to progress or real improvement, even though your scores may rise to some degree. The biggest deficit of any manual or video, however, is that it can’t see your errors—of both commission and omission. That’s where expert coaching comes in. If your coach has some favorite techniques that vary from this text and they work for you, that’s fine. Unfortunately, your worst enemy in developing good technique is frequently your shooting friends. They offer loads of advice, but it’s rarely useful. Even if they know where you shot, they have no idea why you did so or how to correct it, which is the crux of the matter. Be warned that when you apply basic technical corrections to an established shooting style, you may temporarily feel frustrated and may suffer a decrease in scores. Any change is uncomfortable at first, and unless you persist and work through it, you won’t achieve your goal. If you are an experienced shooter looking for an extra edge or trying to work your way out of a slump, this book can help you. It is also for less polished performers who want to learn good basic technique early in their shooting careers. The text covers the full range of material necessary to the mastery of skeet.
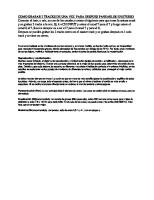
I.1 Layout of a regulation skeet field. Several important elements may not be obvious. The field is not quite half of a circle, since the center stake is 18 feet outside the base cord. This is significant, especially on station 8. In addition, the out-of-bounds markers are at 44 yards from the target emergence points. This is not the same as being in line with the face of the houses; it varies by a foot or more past the face, which is important if you are laying out a new field. As noted in the station discussions, the high house target emerges right over the center of the pad, while the low house emerges 30 inches to the right of center. These peculiarities are a historical accident due to the way the original skeet fields were laid out and subsequently formalized, and they have a slight effect on technique. This is not intended as a “read-and-shoot” manual. It is meant to be studied and its principles and techniques applied to your shooting style. Of course, you don’t need to adopt every minor suggestion, but you should at least give each one some thought and consider whether it could make a difference to you. Throughout the text are boxes containing suggestions for you to try out or to test with your gun, either at home or at the range. Sometimes the only way to convince yourself that something makes sense is to test it yourself. Surprisingly, there is little published material on skeet instruction, apart from the material used in the National Skeet Shooting Association (NSSA) instructor’s courses. This book includes some material (see chapter 21) that addresses methods of teaching beginners and coaching more advanced shooters. It reflects my NSSA instructor background, and it may help if you like to coach, but it is a poor substitute for the NSSA’s instructor certification courses. Figure I.1 shows the official layout of a skeet field. As the diagram indicates, the skeet field is a segment of a circle (not quite half) with a 21-yard radius. Thus, the distance from any shooting station to the center stake is 21 yards, and the distance between the two trap houses is just over 42 yards. No legal shot at skeet can ever be farther than 44 yards, and the vast majority are from 10 to 20 yards, since we shoot almost all targets on the half of the field closest to us.
I SKEET SHOOTING FUNDAMENTALS
CHAPTER 1 Guns and Equipment Skeet originated as off-season practice for upland bird shooting, and many of us start out with either an inherited or a borrowed field gun that isn’t particularly well suited tor skeet. Usually the choke is no tighter than improved cylinder (0.0010 inch) or modified (0.0020 inch), which can break short-range birds fairly well, but for skeet, the pattern is smaller than ideal. The biggest probleut is usually that the comb is too low and slopes toward the rear. When mounting a gun rapidly for bird shooting, hunters rarely get their heads down tight, so this works out fairly well. If you get three out of four birds in the field, you think you’re a great field shot. The same score at skeet won’t satisfy very many.
OVER-UNDER OR SEMIAUTOMATIC
Skeet guns have evolved significantly over the past 40 years. At one time, many or most shooters used semiautomatics, with four different guns for the four gauges of competition, usually with 26 ½-inch barrels. In the 1960s we saw the introduction of four-barrel sets for over-under guns. At least this kept the stock and comb fit from changing, but the barrel weight and swing weight differed significantly with each set of barrels. Barrel weights didn’t quite eliminate these differences. There was a gradual shift toward shooting over-under shotgun instead of semiautomatics. There is little doubt that the over-under generally requires less maintenance and has fewer malfunctions than the semiautomatic. At about the same time, gunsmith Claude Purbaugh introduced full-length insert tubes to convert an over-under to shoot all four gauges. Many shooters initially complained that these made the gun too barrel-heavy, but some remarkable scores began to be achieved. The stock fit didn’t change between gauges, nor did the sight picture, since it always looked like a 12 gauge. Browning adopted another gunsmith’s short tubes (about 16 inches), but these Browning “Super Tubes” and the Purbaugh tubes required changing the extractors for each gauge change and never really caught on. Winning solutions are always adopted by others, and in the next few years, Jessie Briley introduced his tube sets, as did the Kolar firm, both with integral extractors. You can even get them with changeable chokes. Refinement of these sets has now resulted in featherweight and matched-weight tubes, so they all swing essentially the same regardless of what gauge you are shooting. The 12 gauge could actually be the lightest. You can even buy a gun that has two barrels—one a heavy 12-gauge barrel and the other a lighter carrier barrel to be used only with the 20, 28, or 410 tubes, such that all weigh and swing almost exactly the same. This may not be necessary, but anything that you think is making a difference will help your “head game.” If I were advising a serious match competitor, I might suggest this route, but since I shoot my 20-gauge tubes in both 12 gauge and doubles, there would be little point in my having a carrier barrel system. The semiautomatic’s biggest advantages over the over-under are lower cost and that the mechanism spreads out the recoil, so that the peak and perceived recoil are both significantly less. For this reason, some top-level competitors use a semiautomatic in the 12gauge competition to reduce recoil fatigue; others achieve much the same result by using their 20-gauge tubes. The recoil of a ⅞ounce 20-gauge load is just about 60 percent of the recoil of a 1⅛-ounce 12-gauge load shot from similar guns. Shooters find that they score just as well or better with the 20 gauge and retain the advantage of having the same gun feel in their hands. Several world champions were noted for doing this. I encourage most starting skeet shooters to acquire a good used 12-gauge semiautomatic from a well-known manufacturer (Benelli, Beretta, Browning, Remington, Winchester) and shoot it for a year or so. This allows adequate opportunity to explore the variations they want to try and determine their price range. There’s a ready resale market for such guns at little or no loss from the year’s use if the gun is taken care of reasonably well.
BARREL LENGTH
The semiautomatic has a much longer receiver than the over-under. As a result, the 26½-inch barrel length gives a good swing weight and a long sighting plane. With a significant shift to over-under guns, there has also been a marked shift toward longer barrels. Twentyeight-inch barrels on over-under guns are now almost standard, and many have begun using 30 inch; trap guns are frequently even longer. This makes for a smoother-swinging but slower-starting gun. At some point, this trade-off is simply a matter of personal preference. I have noted that big shooters prefer heavier guns (such as the Krieghof) with longer barrels. However, if you have the opportunity to get an excellent skeet gun with the older 26½-inch barrel, don’t pass it up. You can easily obtain aftermarket extended screw-in chokes or have them installed to extend the effective barrel length. At the World Skeet Championships in San Antonio and at most other big shoots, you can see almost every gun manufacturer represented among the competitors, but the most popular guns are certainly tubed over-unders. For these, the “big six” manufacturers are Beretta, Browning, Kolar, Krieghof, Perazzi, and Winchester (I happen to shoot a Perazzi). Why some of us prefer one gun over another is subjective. You should attempt to shoot a borrowed gun of every type, as well as different barrel lengths, before you decide what you like best. There are champions who shoot all of the above. It takes several years of shooting to become comfortable with your own style. Only then will the subtle variations in the different makes of guns and different barrel lengths be apparent to you and make a difference. If you become a serious competitive shooter, you will almost certainly buy a quality over-under shotgun and do whatever is necessary to custom-fit the stock (see chapter 3). Be prepared to work with a knowledgeable coach and stock fitter until your new gun really shoots where you point it on a consistent basis. If you don’t want to do this, you can still have lots of fun and shoot excellent scores, but you might not win too often. There is an extended discussion of the real and perceived advantages of stocks with parallel combs, adjustable combs, and adjustable butt plates in chapter 3. If you are contemplating a change in your skeet gun, read that chapter carefully before making a final decision.
SIGHTS
Traditionally, shotguns have been sold with a white front-sight bead about ⅛ inch in diameter and a smaller metal bead about halfway back the rib. Field guns frequently have no back sights at all. In the past few years, plastic tubular sights with light-collecting properties that make them appear quite bright to the eye have become popular. Hy-Vis and Insta-Dot are two brands. The possible advantages of these are discussed in chapter 6.
CHOKES
Chokes are almost routinely changeable with screw-in sleeves, and many add length to the barrel or barrels so that a shooter can also adjust the effective length by an inch or more. In the past, dedicated skeet guns were routinely delivered with choke constrictions measuring about 0.005 inch. (Chokes in American and English guns are designated by thousandths of an inch. European guns may designate them by millimeters, but most catalogs have a conversion table.) In the past, a skeet gun would sometimes be delivered with slightly different chokes in the two barrels of an over-under-for example, 0.005, referred to as Skeet I, and 0.007 or 0.008, or Skeet II. Many older guns even had Skeet II as 0.012, the thought being that the slightly tighter choke would be used on the bird farthest away. This is a holdover from upland game shooting, in which the second shot at a bird is almost always a longer shot. At skeet, this is rarely the case. In fact, many second shots at doubles are at a closer bird, except possibly at station 4. More important, almost no shot at a skeet target should be at more than 20 to 22 yards; most are at 12 to 16 yards. You routinely shoot the bird on your own half of the skeet field, except possibly the second bird of a double at station 4. In truth, the cylinder bore with no choke at all is well suited for shooting skeet. However, sometimes the very small amount of so-called Skeet I (0.003 to 0.0005 inch) is just enough to slightly reduce the occasional wide pellet at the margin of the pattern, while hardly reducing the size of the typical 30-inch pattern at 20 yards. If I were to order a new skeet gun today, I would order it with 0.005-inch chokes for both barrels. It is also possible to get screw-in chokes with a negative choke—that is, slightly flared. Some shooters like a tighter choke for the second bird of the station 4 double and thus put a 0.007- or 0.008-inch choke in the second barrel. This isn’t really necessary, and they’re giving away an inch or two of pattern size on all the closer birds. I suspect that many of these shooters simply like the harder break they see with a slightly tighter pattern. If that gives them more confidence, it may be worth the loss of pattern size. It is important that you pattern your gun with the choke tubes that you’ll be using. Nominal or screw-in chokes can vary a surprising amount from one manufacturer to another. Read the part of chapter 3 on point of aim and patterning before you finally settle on the chokes you want to shoot with. And remember that you can change them easily if necessary.
FORCING CONES, BACK BORING, AND BARREL PORTING
Many skeet shooters are adding refinements such as lengthened forcing cones, back-bored barrels, and barrel porting to their guns. All these are subtle modifications said by their proponents to reduce shot distortion, reduce felt recoil, and decrease barrel jump when the first shot of a double is fired. Whether these really make a perceptible difference is questionable, at least in terms of scores on the skeet field. They are certainly profitable for the manufacturers and aftermarket gunsmiths. Porting makes a gun harder to clean and much noisier. This feature has become so popular that it is becoming hard to buy a new gun that hasn’t been ported at the factory. Porting is supposed to reduce the amount of upward jump of the barrel, making recovery quicker for the second bird of a double. Although this may be measurable in the laboratory, I can’t perceive a difference on the skeet range. I suspect that much of the perceived advantage of such features is that the owner believes he or she has the best that money can buy.
RECOIL REDUCERS
Every shooter knows that a shotgun has recoil; the 12 gauge has the most, and the 410 the least. Many shooters aren’t bothered by recoil and don’t pay much attention to it. Others are very sensitive to recoil and can’t shoot well without a serious effort to control it. The simple answer for some skeet shooters is to shoot the 20 gauge in place of the 12 gauge in both practice and competition. National shooting data indicate that scores are essentially identical, and the recoil of the 20 is only about 61 percent that of the 12 gauge. You can also shoot a semiautomatic instead of an over-under; the total recoil is the same but is just spread out a bit, which makes it easier to tolerate. Every shotgun magazine includes multiple ads for a wide variety of recoil reducers. But like barrel porting, I question their usefulness. Published data indicate that the effects of recoil reducers are little different from the effects of adding weight to the gun in some way. Try someone else’s gun with a recoil reducer before spending any money.
GUNS FOR JUNIOR BEGINNERS
For youngsters learning to shoot, my choice for a first gun would be a youth model 20-gauge semiautomatic. Both Remington and Beretta make them. In some models, the stock can be changed to a standard size later. There is always a brisk market for these used guns in good condition.
SHOOTING GLASSES
Eye protection is mandatory on the skeet range, and most large-lens or aviator-style driving glasses made of shatter-resistant plastic will do reasonably well. However, your head position when shooting skeet—with your cheek down firmly on the comb of the gun— means that the top edge of a conventional frame is very close to where you are looking for the bird: not an ideal setup. Shooting glasses are usually made so that the lenses sit higher on your face compared with driving glasses. They also have very wide lenses so as not to reduce peripheral vision. And they are made of impact-resistant, shatterproof plastic to be as light as possible. Given the critical nature of vision in our sport, two things have occurred in the past 25 years. First, the color of skeet targets has changed from a black-edged, medium yellow dome target to one with an almost fluorescent orange dome or one that is entirely orange. Second, the makers of shooting glasses have introduced lenses with multiple colors and densities of light transmission. This is intended to make the targets stand out more vividly against various background, whether sky, trees, or water, and whether conditions are overcast and gloomy or bright and sunny. These lenses all come with ultraviolet filtering to protect your eyes from sunlight. If you use prescription glasses, having multiple pairs to accommodate varying conditions would be too expensive. A number of suppliers now make frames that allow multiple sets of lenses to be snapped in and out in a matter of seconds. Many shooters have as many as five sets of lenses to help them see best under varying conditions. Decot is one maker of such interchangeable lenses, but many brands are available. There are 40 or more color options available, but most shooters do fine with only two or three sets of lenses—perhaps a medium target orange for dull or overcast days, a medium bronze tint for sunshine, and clear for shoot-offs under lights. In attendance at every large shoot are vendors with all the colors on display, so you can judge the various lenses for yourself. Color blindness can affect your perception of the contrast between a bright orange target and the background. About 8 percent of the male population has some degree of color blindness, and many men who are mildly affected are unaware that they have a problem. Several suppliers make a lens designed to increase the contrast to the partially red-green color-deficient eye, the most common type of color blindness.
HEARING PROTECTION
Hearing protection is mandatory at registered skeet shoots for everyone on the range. For most shooters, foam plugs or standard earmuffs are sufficient protection, but they must be worn conscientiously to avoid suffering significant hearing loss. Many don’t realize that the abruptness of the sound is more important than the loudness in terms of potential damage. The inner ear has a tiny muscle that tightens to dampen the loudness of a sound. If the sound is very abrupt, like a gunshot, the inner ear doesn’t have time to do this, and the damage is worse. If you have any ringing in yours ears after you finish shooting, your protection is insufficient. Try doubling up with both earplugs and muffs combined. Electronic muffs and plugs are popular. They make it easier to talk during a round, but they are expensive and do not offer better hearing protection. Most shooters can hear well enough through regular plugs or muffs for the conversation needed during a round, which is not the time for small talk. Sitting in a blind or treestand listening for a gobbler or a buck may be a different story.
CHAPTER 2 Shooting Form With Todd Nelson
Good shooting form is a combination of stance, posture, balance, and gun mount. That doesn’t mean you have to use exactly the same form pointed out as excellent in this chapter. Anyone watching the shoot-offs at the World Championships knows that there is wide variation among champions. But unless you have a reasonably good and totally consistent shooting form, your “perfectly fit” stock will be somewhat less than perfect as soon as you change something in your form, whether it is done deliberately or unconsciously. It should be obvious that excellent shooting form won’t automatically let you shoot perfect scores. But less than excellent shooting form certainly makes it more difficult to reach the top level. Champions all have essentially excellent shooting form—but not necessarily the same form.
STANCE, POSTURE, AND BALANCE
Because your stance and posture are almost inseparable from your foot positions, this is where we’ll start. When you watch the performance of almost any fine skill at the top level, it often seems effortless, but we all know better. Great concentration, muscular coordination, and thousands of repetitions are required to make it look so easy. In particular, almost all unnecessary effort and motion have been eliminated. This is especially true for any sport in which endurance and fatigue. come into play. It is certainly true ofskeet. Two 100-bird matches followed by two shoot-offs in one day will usually be won by the most relaxed and least fatigued shooter. Age is also a factor. You may win with a less than optimal style when you’re very young, but the longer the shoot-off goes, and the older you are, the more problematic an extreme style becomes. The 12-gauge shoot-offs in the World Shoot may start with 30 or more competitors, after each has already shot 125 straight that day plus a box at 3-4-5 doubles straight. A few of them may have shooting styles that look as though they require a lot of physical effort, but the rest will probably look astonishingly smooth and relaxed. As is discussed further in chapter 3, they all have remarkably good but not identical shooting form. The U.S. Army International Shotgun Shooting Team shoots out of a significant crouch, but these competitors are usually in their 20s, and international shooters get a 1½ hour break after every 25 birds. Plus, many of the best international shooters from other countries use a more relaxed stand-up style. You should be working at developing a shooting style that incorporates the following: 1. A stand-up style—no deep crouch or excessive knee bend. The latter positions just burn up energy and muscular effort. Most shooters are more comfortable with the knees just slightly bent, particularly the front leg. 2. An erect head position—not bent or forced way down on the stock (see also chapter 3).
2.1 The excellent balance and stance of world champion shooter Rich Cameron. Perfectly set up, he is just beginning his gun mount on station 3 for the high house. The thumb up on top of the rib is a personal quirk of Rich’s and comes down simultaneously with his full mount. I don’t believe this has any positive or negative effect in terms of shooting form.
3. A comfortably balanced, two-foot stance. Put enough weight forward on your front foot (left toot for a right-handed shooter) so that you still have more weight on the front foot (between 60 to 70 percent) after absorbing the recoil of a shot. 4. A stance with your feet no farther apart than your shoulders. Slightly less is all right; just make sure to use the same spread all the time. 5. A level or upward shoulder turn, driven by your legs, not your arms (see section 2). Figure 2.1 shows an excellent stand-up shooting posture. Avoid getting into the habit of setups and stances like those shown in figures 2.2 and 2.3. The goal with balance is to be able to reverse your swing after the first bird of a double at any station (including 3, 4, and 5) and still find yourself perfectly balanced and your weight still mostly on the front foot. Some shooters feel that they have to brace their feet wide apart to be able to accelerate the gun, like the young shooter in figure 2.3. They fail to realize the power and smoothness with which you can pivot on the front foot using your hip and trunk musculature. The name of the game is smooth, not fast. A wide stance may not be a serious problem, but at extremes it inhibits the ability to pivot on the forward leg due to hip motion restriction. To really appreciate how narrow your stance can be without a problem (except in wind), try the following: During your next round of skeet, pick almost any station or target you wish, but stand comfortably upright and actually touch both heels together. Still keep your weight on the front foot, and go ahead and shoot your bird. You will be amazed at how easy and smooth it feels. It’s all in a
smooth, level shoulder turn and body pivot over the leading leg.
2.2 The excessive crouch of this otherwise excellent junior shooter will not help him in the long run. It is fatiguing and even inhibits a full turn at the extremes. Although several champions are noted for their crouches, they don’t win because of them.
2.3 The excessively wide stance of this junior shooter adds little to his ability to move the gun smoothly. And like an excessive crouch, at the extremes it inhibits a full follow-through turn. In addition, he has actually moved his weight from the front to the back foot while shooting high 4 and is about to call for low 4 with his weight still on the back right foot. His overall balance is poor, being back on both heels. The gun mount is also poor. Errors in technique rarely occur singly. This young shooter needs some serious coaching. There are exceptions to almost any rule. I know a senior lady shooter who uses a very deep crouch yet shoots very well. She does so because of severe lower back problems; such a posture is much more comfortable for her, despite its price in fatigue. Todd Bender, Master Instructor and many-time World Champion, points out that a few top-level shooters, including himself, shoot from a somewhat unnecessary crouch. But he would never teach anyone to use his extreme stance, which is a hold-over from his junior shooting days. He says, “What is important is that the legs do the work and the shoulders stay level. The degree of knee bend is not important, it is the turn that is important.”
GUN MOUNT BASICS
If you are a beginning shooter, you may be mounting your gun incorrectly, as shown in figures 2.4 and 2.5 (see also chapter 21). Occasionally, an inexperienced shooter needs basic instruction in how to get into a balanced position. Try the following exercise. Take the empty shotgun in both hands. Place one hand very lightly at the mid fore end and the other on the grip, with one finger outside the trigger guard. Push the gun away from yourself and up into the air at a 45-degree angle to arm’s length. Raise your right arm and elbow to horizontal. Pull the gun straight back to the inner aspect of your shoulder, still angled at 30 to 45 degrees. Now move the butt higher by several inches. Put your cheekbone firmly on the comb. Without moving your arms, bring the barrel down to level by moving your weight onto your left foot and bending forward slightly. You are now very close to an ideal balanced position, with your weight well forward. This technique is illustrated in chapter 21.
Your stance, posture, and gun mount should be as identical as possible every time you step up on a station to shoot. Identical foot positions are essential. If they aren’t consistent, then you won’t mount the gun exactly the same way either.You can’t control the variations of sun, wind, and temperature, but you should try to control all the variables that you can. If your mount varies, then the gun that fit you well last week won’t fit nearly as well today. These things need to become part of a setup routine that you practice until it is automatic.
2.4 This shooter has the gun mounted out on his upper arm, not in the shoulder pocket, which quickly becomes uncomfortable with extended shooting. In addition, the gun is mounted much too low, forcing him to bend his head down considerably to get his right eye in line with the sights. Also, the gun doesn’t fit him properly. He is forced to cock his head more than 20 degrees just to get his eye in line with the rib.
2.5 Todd Nelson’s stock appears to be way too long. His cheek is on the rear of the comb, and there is five inches between his thumb and nose. Actually, the gun fits perfectly, but the gun mount is terrible, with his right shoulder pushed too far forward. It is a cramped posture that is frequently the result of anxiety or simply poor shooting form. It is not helpful to shooting consistency
FOOT POSITION
If you are already an A or AA shooter with a poor foot position setup, you will probably resist changing your foot position with a vengeance. Most self-taught A and AA shooters routinely shoot the second bird of the small station doubles (1, 2, 6, and 7) so early that they pay no attention to good foot position. That is too bad, because sooner or later, mediocre or poor foot position can cost you a bird. In fact, foot position may be one reason that a particular shot is difficult or troublesome. All change feels uncomfortable, and this one really bothers shooters who have been using a natural but less effective set of foot positions for a long time. So, if you are standing in a relaxed, upright posture, are balanced, and have your weight mostly on the front foot, why does your foot position matter, as long as you keep it the same all the time? The simple reason is that no matter how well you set your hold points, get your eye focused on the target, and try to maintain a proper lead, now and then you will have to shoot a target very late. This is especially true for the second bird of a double, when a less than ideal foot position is an invitation for a miss. You may have to shoot a second bird late because of a mental lapse; maybe you weren’t totally ready when you called for the first bird. Or the first bird may have been thrown a bit slow, messing up your timing. Or the bird may have taken a sharp bounce in the wind, and you were forced to make a gun correction to stay with it. Or it may have been thrown flat, requiring a big move to hit it. In any case, whenever you are forced to shoot a bird significantly later than normal, your foot position at setup becomes significant. Most top-level shooters and instructors give similar advice about foot position. Ed Scherer, Todd Bender, John Shima, and others will tell you to face straight at the low house window at every station possible. The only exceptions are station 7 and high 8, where you face outward. (A left-handed shooter should face the high house window.) This seems simple, but there are two common problems: 1. The shooter sets up with his or her feet pointing in a different direction from the belly button. This means that the torso is partly twisted before the shooter even calls for the bird. 2. The shooter sets up as though he or she were going to shoot the bird where it emerges from the trap house, rather than where the shot will actually break the target. We need to look at these problems in detail in order to completely understand them. If shooters are unwilling to adjust problematic habits, it will eventually cost them a bird—maybe only one in several hundred or more, but that is what mastering skeet is all about. Many shooters commanly set up poorly at stations 1 and 7. Figure 2.6 shows proper foot setup positions for all the stations. Be careful as you begin to accustom yourself to new foot positions. Don’t just use the geometry of the pad as your guide; that is, don’t routinely face the corner or one side of the pad. The pad may not have been put in square, or it may be round. You may even forget which station you’re on. Be sure to look down at your toes and then up at the trap-house window every time.
The Left-Handed Shooter’s Foot Positions
Left-handed shooters have to make essentially a 90-degree shift to the left (counterclockwise). At station 1 you face outward, like a right-handed shooter does at station 7. At stations 2, 3, 4, 5, 6, and 7, you face the high house window rather than the low. At station 8, you face the high house to shoot the high house bird and face out for the low house target. The same recommendations apply to keeping the toes and heels equally forward; do not advance the right foot.
2.6 Excellent foot setup positions for stations 1 to 8. A right-handed shooter squares off to the low house window on every station except 7 and high 8, where he or she faces out. A left-hander faces the high house window except at 1 and high 8, where he or she faces out.
2.7 A common but troublesome foot setup on high 1. The shooter is balanced, his weight is forward, and his head is down tight, but the line across his toes is nearly facing the station 3 pad. He has almost managed to get his belt buckle to point at the low house window, but only by twisting his pelvis and torso to the left. This means that for any late low house second bird, he will have no torso twist left and will have to add arm swing to stay ahead of it.
This position works reasonably well for high 1, because very little gun motion is required; it works 99 percent of the time for low 1 as well. But it works well only as long as that second bird is shot in the first three-quarters of its flight. The farther in (i.e., the later) you shoot the low house bird of the double, the farther you have to twist your torso to maintain swing velocity and the proper lead.
2.8 Even though the foot position is not as extreme as that shown in figure 2.7, the shooter is forced to use maximum left hip and torso twist to shoot a late low 1 target almost at the out-of-bounds marker. His right heel has to come up to stay with the target, his left hip has reached maximum inward rotation, and his arms must come into play. The right shoulder dips below the left, resulting in loose face contact on the stock. As this compromised swing progresses, the barrel speed slows down, and the gun is twisted to the right. The target will likely be missed high and behind, all because of poor form. A torso twist like that shown in figure 2.7 is progressively fighting your swing. The farther the low house comes past the center stake, the greater the muscle and ligament resistance. At some point, you run out of hip and spine rotation and have to push the gun with your arms, since you are shooting the bird almost behind your back (see the shooter in figure 2.8). With luck and great skill, you may still break it, but not with the consistency that winning requires.
Moving Foot Position between Shots on Singles
Many experienced shooters change their foot positions between shots on singles, and they do so enough to make a difference. They usually move to face more toward the house the bird will be coming from. I think most people do this so that they start each shot from a “zero point” of some sort, which is fine. It is similar to stepping back and reloading the gun after your first miss rather than just swinging back to shoot the option. If it’s a minimal shift, really more of a weight adjustment, that’s fine. Just don’t get into the bad habit of actually shifting the direction you are facing. It is best to just shift sideways an inch or so to reset yourself for the next shot.
The Neutral Point of the Swing
You want your foot positions to be such that you can shoot the second bird of a double all the way to the out-of-bounds stake if necessary, while still going only modestly past your neutral point. What is your neutral point? Surprisingly, it doesn’t vary much for most shooters. Try this setup: Take your empty gun and set up with your toes touching any straight line, feet comfortably apart. Mount your gun normally, and with your eyes closed, swing the barrel as far to the left and right as comfortable. After several swings, somewhere in the middle you will find your neutral point—that is, the most comfortable direction to point without any sense of strain or twist. Unless you are a very unusual shooter, your gun position will probably be somewhere around 30 to 50 degrees to the left of where your toes line up (or to the right, for left-handed shooters). That is your neutral point. If you put your toes on the front edge of the station 1 pad, the neutral point of the swing is about 45 degrees to the left of this, or about halfway between the center stake and the high house out-of-bounds marker (see figure 2.10). That is just about where you usually want to break the station 1 low house target or the second bird of the station 1 double. Further, you still have room to swing all the way to and past the out-of-bounds stake, with very little sensation of resistance or windup. Your ideal foot position at setup will be very close to that shown in figure 2.9 at station 1. Most new shooters, and all fairly experienced ones, will complain that they feel uncomfortable and twisted standing this way to shoot the low 1. What they usually fail to appreciate is that an equal degree of torso twist in the opposite direction is necessary for any shot taken with their feet positioned poorly. They just don’t feel it in the excitement ofshooting. When coaching experienced shooters, we go through all the reasons why they should consider resetting their foot positions. They may even agree that the new position is comfortable when shooting at their normal target breaking point and makes it easier to swing past the out-of-bounds stake. But then they load two shells, mount the gun, and without even realizing it, move their feet back to their old positions.
2.9 AAA shooter Peter Balunek is balanced and almost squarely facing the low house window. His toes are essentially in line with the front edge of the station 1 shooting pad, but 60 percent of his weight has shifted to the flexed left leg.
2.10 The neutral point of his swing is about halfway between the center stake and this station, and he is able to swing easily past the out-of-bounds marker without any “twist up.” Note the level or slightly upslope shoulder turn.
Coil and Uncoil
Master Instructor Angelo Troisi says, “You coil in from the ideal break point to your hold position and then uncoil to the break point.” Stated differently, your hold point shouldn’t be where you’re most comfortable. You should be most comfortable at your target break point or kill point, at or just approaching your neutral point. The spring-back of uncoiling, your body’s windup, should help your gun acceleration and swing. You shouldn’t have coil-up resistance slowing your swing just as you approach the break point.
Summary
Every time you catch a wind-driven second bird just off the ground, and just before the out-of-bounds stake, thank your foot position. Remember, you want your body’s torque to help you, not fight you. Refer again to figure 2.6, and note that in every case except for station 7 and high 8, a right-angle line is projected from the line across the toes to the low house window. A left-handed shooter uses the same rule, except that he or she points at the high house window and faces out at station 1 and the station 8 low house. Can you deviate from these foot positions and still shoot top scores? Of course you can, with modest variations. Having your toes lined up doesn’t mean that your feet have to be exactly parallel; one or both feet can be turned out a bit if that makes you more comfortable. But don’t allow yourself to adopt extreme in or out foot positions. They will inhibit free hip rotation, forcing you to do all your swinging with torso twist and arm motion. If you are 17 years old with a torso that twists like a snake, you may get away with this. But at 30 to 40 years old, you’ll have trouble.
Face anywhere that is comfortable, and before mounting your gun, turn both feet inward (pigeon-toed) as far as you can manage. Now mount your gun and try a maximum left and right swing. It is difficult because your hips can’t move any farther; all the motion must be done with torso twist and arm swing. The left hip stops your swing toward a high house, and the right hip stops your swing toward a low house. If you’re still not convinced, turn both feet outward as far as you can. Your hips are locked in the opposite direction, and again, you can rotate your body only with torso swing. Once you run out of that, your arms take over. But arms-only shooting leads to mediocre or hunting-type scores.
POSITION ON THE STATION OR PAD
Most of the time, it doesn’t matter where you stand. You can stand at the front, back, or any corner of the pad and still shoot a 100 straight. But on four stations, it occasionally makes a bit of difference: station 1, station 7, and both birds at station 8. Generally, you may be better off in the middle of most skeet pads, but the rules allow you to stand “with any portion of both feet within the shooting station.” Some shooters stand with half their feet off the front of the pad or so far back that only their toes are on the back edge. I have done so in conditions where the pad was three inches deep in water. But what do you achieve? For an imaginary advantage, you give up the most secure footing. This is particularly true if the pad is not flush with the surrounding ground, which is frequently the case, or if it has a broken front edge or is unsteady. Burl Branham, a longtime coach of the U.S. Army’s Marksmanship Training Unit shotgun team, recommends standing in the middle of the pad. But because international skeet rules do not allow any portion of your feet to be over the edge of the pad, this is in some degree a safety play. Why are stations 1, 7, and 8 any different? At staticms 1 and 7, it is occasionally necessary to shoot at a very late second bird on a double. You have the potential of striking your elbow or arm on the side of the house if you are on the rear of the shooting station. Plus, visually, you have the feeling that you are about to run into the house with your barrel. This may cause you to check your swing. If you stand at the forward edge of the pad at both stations 1 and 7, you will have all the room you need—even for a shot as late as the out-ofbounds marker. Figure 2.6 shows this forward edge position. What about station 8? Look at the layout of the skeet field in figure I.1. The center stake is placed 18 feet outside the baseline of the field. So when you are shooting either the high or the low house, the swing is as much to the right or left as it is directly over your head. If you stand close to the outer edge of the pad, the shot is more of a swing backward over your head and less of an oblique swing such as an up-close station 7 high house. So take whatever room the pad gives you, positioning your heels as close to station 4 as possible. This puts you 20 feet inside the center stake, and the angle of your swing is slightly easier. Do the same as you shoot low 8. In addition, use whatever minor time advantage you can get by moving as far away from the house as the pad comfortably allows for both the high and low houses, keeping your heels at the back edge of the pad. If you firmly adopt excellent foot positions and resolutely maintain them, you will be surprised at how soon they become automatic and perfectly comfortable.
PIVOT AND SHOULDER TURN
Every skeet target angles upward as it is thrown. From the high house it starts at 10 feet and rises to 15 feet at the center stake. This is what the rules require. It rises a bit more, flattens off, and then falls in an increasing parabolic curve as it slows. The low house has an even more marked upward angle, starting from only 3 feet at the window to 15 feet at the center stake. It reaches a slightly higher high point at its peak than does the high house, and it curves downward more as it slows. It should be apparent that if you want to shoot every outgoing target before it reaches the center stake (high 2, 3, both station 4s, low 5, 6, and 7), your swing trajectory must be upward as you fire—more so for the low house than the high house. Only when shooting a long incoming bird or the second bird of a double does the swing trajectory become flat or a bit downward. So why does the tip of the gun barrel often follow a downward curve or arc as it moves to and through the instant of firing? There are two different but equally poor techniques that can be at fault: shoulder roll-off and reverse weight transfer. It is also common for shooters to do both at once. Many otherwise excellent shooters depend too much on their arms. They make most of the upward swing with their arms, letting the gun fall away the instant they fire. In contrast, if their pivot and shoulder turn are on the same plane as the target’s flight, the followthrough should always end up higher than the point of firing, unless they happen to shoot the bird very late. Some shooters also bend the upper body toward the direction of the bird’s flight as they swing, while simultaneously letting the forward shoulder drop. This roll-off has the effect of pulling the barrel down toward the later part of the swing. It can easily lead to shooting both under and behind, particularly if the shot is a bit late. What frequently happens is that the gun barrel starts moving down even before the shot gets away, and the swing slows. The result is a below and behind shot. You have to stay up in front of the bird. Most good shooters with this bad habit manage to get the shot off before they have rolled off enough to miss the bird. But anyone with this flawed technique who is forced to shoot a bird late may miss the target. How do you correct this terrible habit of rolling off your shoot? Like many behavior patterns, it can be difficult to break. In my teaching experience, the best solution is to insist that the shooter “finish high” to a dead stop before lowering the gun. If you come to a complete stop before you dismount the gun, it will instantly be apparent if you are rolling off. One AAA shooting friend describes this as “finishing as though you are posed for a picture of perfect follow-through.” When you come to that stop, the gun barrel should be higher than at the firing point for almost every shot, unless your target was taking a nosedive.
2.11 Shooter Jack Albano’s excellent shoulder turn and follow-through on a low 5 target. The shot is being taken in the middle frame.
The follow-through is clearly on an upward plane for this sharply rising target.
2.12 Jack Albano on a high 6 makes a smooth pivot on his leading left foot, with a level or even slightly upsloped shoulder turn, and finishes his follow-through. His shoulders are still in the same plane, the right a bit higher than the left. And his follow-through still has an upward swing. In other words, he finishes his follow-through with the gun higher than at the instant of firing. This is what I call “finishing the shot.” He comes to a complete stop before dismounting the gun.
2.13 Here, Jack has managed to combine several errors in one poor move. His gun barrel has taken a downward arc and is even canted to the right. His trunk is bent to the right. Note the increased folds in his shirt compared with figure 2.12. His weight has shifted so far onto his right foot that his left heel has come off the ground. Only if Jack manages to get the shot away before all these things go wrong will he break this bird. Some off-balance shooters even take a step with the left foot after the shot.
WEIGHT REVERSAL OR REVERSE WEIGHT TRANSFER
Despite all advice to the contrary, many shooters persist in shooting with their weight primarily on the back foot. They may do this on only a few stations and may not even realize it. On many of the easier targets, this habit may not be a major problem, but it is a major flaw in shooting form and will cost them a target now and then. You may start off on the front foot but steadily transfer your weight to the back foot as you swing with the bird, usually the incomers. This causes bad things to happen. Because you are moving the center of rotation of the gun’s swing (your shoulder and body) in the same direction as the bird’s flight, this automatically slows your swing and forces you to make a faster pivot or, even worse, use your arms for extra swing speed. This means that you are making compensating errors to break your target. This seems to occur most frequently for right-handed shooters on the incomers at sta—tions 6 and 7 or sometimes high 8; for left-handed shooters, it occurs on the incomers at stations 1 and 2 or sometimes low 8. The cure is hard to do by yourself. You need a coach or a friend to place a finger or fist half an inch behind your ribs or hip and hold it there while you shoot, not allowing yourself to back into his or her hand. It can also help to pick up the back heel and stand on the toe of the back foot while shooting incomers. Surprisingly, many shooters who make this transition from weight reversal to a proper pivot shoot ahead of the bird for several shots. I think this occurs because their swing is suddenly so much more efficient, with a more positive follow-through.
FOLLOW-THROUGH
Every shooting manual, video, or coach emphasizes the importance of follow-through in shooting skeet. I sometimes give shooters a dummy shell, with shot but no powder and a fired primer. Or I have students load one barrel of an over-under and then look away while I move the barrel selector back and forth. If they don’t know whether the gun is going to fire, they become aware of how they are stopping the gun with little or no follow-through. This often reveals that they jerk with the finger and hand, pulling the barrel down sharply. It is thus not surprising that they shoot below and sometimes even ahead, if they manage to keep their heads down. Training themselves to keep the gun moving smoothly through the instant of firing is difficult for some shooters. Although pistol and rifle shooters make extensive use of dry-fire drills, few shotgun shooters do so. But during the years that I shot a great deal of international skeet, I used a dry-fire swing, mount, fire, follow-through drill extensively to hone the quick and automatic mount required. And more recently, when making the late career transfer from right-handed to left-handed shooting, I used the drill described here for six months to help the transition. Try it. A dry-fire drill can help eliminate shoulder roll-off, reverse weight transfer, and trigger jerk while simultaneously improving follow-through.
Take your gun to a convenient place either indoors or outdoors. Use a set of snap caps or empty shells so that you can snap the trigger without harming your gun. For a right-handed shooter, picture station 6 high house; a left-handed shooter should imagine station 2 low house. Pick four points in the background to represent the following: (1) the trap-house window, (2) your hold point, (3) a normal amount of swing to where you would break the bird, and (4) a point half again farther and a bit higher. Mount your gun to an imagined normal hold point, look over at point 1, and swing smoothly all the way to point 4, snapping the trigger as you pass point 3, your normal firing point. Come to a complete stop at point 4 for a full second, and only then bring your gun down. Concentrate on a smooth swing and pivot, keeping 60 to 70 percent of your weight on your front left foot all the way. Don’t allow yourself to shift your weight to the back right foot. Pull the trigger smoothly in the middle of the swing, and finish the swing with your gun barrel higher than at the firing point. Do not look at your front sight during the swing; look just behind it. Barney Hartman, Canada’s great post-World War II champion, called this “bedroom skeet.” Sometimes it’s the only effective way to change bad habits. One of the most important things that this drill accomplishes is to imprint on your brain that the act of pulling the trigger is just one element of a smooth swing. There should be no feeling that you are doing three separate things: swinging, shooting, and following through. Your follow-through is an integral part of your shooting form and swing, not something tacked on afterward. I frequently suggest that skeet shooters watch professional golfers as they tee off. They set up perfectly and then take an uninterrupted, balanced swing from the beginning to a frozen finish at the end. The ball strike is simply an incident in the middle of their swing. Likewise, your trigger pull should just be an incident in the middle of your swing; the barrel should neither jerk nor hesitate. Or if you are a basketball fan, watch the free throws. Each player uses an identical setup for each try—even having the seam on the ball in the same position—ending again with a frozen follow-through.
FINISHING THE SHOT
As you go through the chapters devoted to each station, you will see that the last item in each list of fundamentals is “finish to a complete stop.” What is the point of this technique? If you let your head come loose and the gun barrel start to sag during the followthrough on singles, you will be establishing a habit that can hinder you in two ways. First, it may start happening earlier and earlier in the follow-through, until it actually starts to happen before you get the shot clear of the barrel. Second, you have to stop the barrel completely to reverse direction for the second target of a double. If you can’t do so while keeping your head tight down on the comb, you’ll be in trouble for the second bird. Your goal is to train yourself to make the “kill zone” for all outgoing singles an area from 25 to 15 feet before the center stake, with a short 10-foot follow-through to a complete stop. If you work at this, you will finish your follow-through at or just before the center stake. If you can’t train yourself to take the bird this early and with a short follow-through, you may become a good doubles shooter during regular rounds, but you’ll rarely be a top-notch one in all doubles, where you shoot them at stations 3, 4, and 5.
THE IMPORTANCE OF FORM
As a final note in this chapter on shooting form, Todd Nelson commonly sees shooters with guns that pattern perfectly but are fitted within the parameters of poor shooting form, such as a loose head or jerking of the trigger. The most common result is inconsistent scores, regardless of the shooter’s class—B or AAA. If you are unwilling to change poor shooting form and persist through the uncomfortable period of adjustment, you will fall short of the consistency you desire. Other experienced instructors have commented that at least two-thirds of the shooters who go through their clinics revert to all their previous bad habits within days. My own coaching experience confirms that. Those who come back for additional coaching and reinforcement are much more likely to make a permanent transition to a higher level of success.
CHAPTER 3 Gun Fit and Mount With Todd Nelson
Gun fit is one of the mysteries of shotgun shooting. Many shooters hardly think about it and shoot mediocre scores with a gun that would be more appropriate for a junior shooter or an NBA guard; conversely, others are so obsessed with gun fit that they are constantly changing some insignificant element that they believe will make them shoot perfectly, usually without any thought that shooting form is their primary problem. Gun fit and excellent, consistent gun mounting are inseparable. If you don’t mount your gun almost identically every time, your gun fit would have to be changed for every shot. You need to make your form as perfect and consistent as possible to make consistent scores. You may know (or think you know) that your gun fit is perfect. If you are absolutely confident, you might choose to skip this section entirely. But if you sometimes wonder a little, it may be a good idea to use this chapter to examine yourself and your gun, perhaps with the help of an observant friend. If nothing else, it will make you a more sophisticated and involved participant in any gun fitting or custom stock work you might choose to have done. You will also be much more likely to achieve a satisfactory result when working with a stock maker or stock fitter because you will understand your goals. Gun fit has nothing to do about whether you shoot a semiautomatic, over-under, pump, or side-by-side. What is important is how easy it is for you to put your head and eyes in exactly the same place every time you shoulder the gun, preferably without ever looking at the rib or front sight, and keep them there during your swing and firing. Critical elements of gun fit include head position and point of aim and patterning of your gun. Gun dimensions also influence gun fit, including: cast-off (the offset of your eye from the gun’s rib); comb shape, height, and alignment; length of pull; pitch; in or out toe; and drop at the heel. All these play a role in making the sight picture perfect as you fire the gun, but some are more important than others. Your overall size also markedly affects how a gun fits you. Specific aspects of your anatomy that relate to gun fit are the size of your face, both height and width; the vertical distance from your mid-shoulder pocket to your eye, which largely depends on the length of your neck plus the size of your head; and the length of your arms and your chest shape.
HEAD POSITION
Head position on the gun refers to where the gun’s comb is in relation to your face. Until you have learned to put your cheekbone down firmly and consistently on the comb of the gun and keep it there, you won’t achieve success on the skeet field. Nothing else will have such a positive effect on your shooting. According to one of skeet’s World Champions, “Almost every time I miss a bird it’s because my head came up.” As stated earlier, the size of your face is an important element of gun fit. In particular, it depends on two aspects of facial anatomy: (1) the distance between the pupil of your eye and the bottom of your cheekbone, and (2) with your eyes level, the distance between the pupil of your shooting eye and the side of your cheekbone. Why should your eyes be level with a properly mounted gun? Because of an inborn brain impulse called the “righting reflex,” our balance mechanism constantly wants to return our eyes and head to a horizontal plane. You may be able to train yourself to keep your head cocked 15 to 20 degrees without any change during gun swing and shooting, but your brain could defeat you at a crucial moment. As a result, your dominant eye will move a quarter inch both sideways and upward as you level your head. When this happens, you may suddenly shoot over and either ahead or behind the target, depending on the house. But what if, to keep your sights lined up with your eye centered on the rib, you must tilt your head 15 degrees? Or, conversely, suppose that you are tipping the gun toward your face 15 degrees to achieve the same purpose. Either one is a significant problem because it means that your gun doesn’t fit. It has either no cast-off or an insufficient amount for the size of your face. But don’t start adjusting your stock or head position until you know the following: does your gun really shoot exactly where you point it after you have learned to keep your cheek down firmly and your eyes in alignment? It does little good to get a custom-fitted stock until you have learned to put your head down on the stock in a consistent manner. If you put your cheek down more firmly, the comb height that was satisfactory last year will be too low (or vice versa). Or you may put your head farther forward on the comb. Or you may have simply gained or lost significant weight. Or perhaps you’re not tipping your head to the same degree constantly. Unfortunately, any of these situations can mean less than ideal gun fitting.
3.1a Todd Nelson with a firm cheek on the stock and a properly fitted gun. His head is erect, and his cheek is firmly down. There is total contact between recoil pad and shoulder.
3.1b Note in the right panel that his eyes are not only level but also looking toward the target—not down the rib at the front sight. Also note how pushed up his cheek looks as he puts his cheekbone firmly on the comb.
3.2 The cheek of Champion Shooter Dick Cameron may appear to be down in the top photo, but it’s not: I asked him to pick his head up half an inch—a recipe for a clean miss over the top. On the right, he has put his head back down using his normal amount of cheekbone pressure on the comb. Like Todd Nelson, he is an eyes-level shooter. If you have done any pistol or rifle shooting, you understand that to raise the point of impact of your shot, you raise the back sight. Some shotgun shooters who have never sighted-in a rifle or a pistol are puzzled by this notion. The essence of the matter is that the true back sight of your shotgun is the pupil of your eye, and if you raise your eye, you will inevitably shoot high. If you let it wander around from side to side, it results in either too much or too little lead. A half-inch lift of your head at the comb will raise your pattern about 10 inches at the distance most skeet birds are shot. Only if you are lucky (or holding too low) will you chip a piece off the top of your target.
Take your empty shotgun and put the front sight on any distant object with your cheek down firmly. Without moving the front sight, lift your head half an inch. Now the front sight looks too low. In live shooting on the skeet field, you will automatically lift the front sight (i.e., the barrel) until the picture looks correct, but then the gun will shoot too high. During the swing and shot on the skeet field, you will never notice that you are also seeing too much of the shotgun’s rib between the two beads. You simply miss by shooting over the bird while everything looks perfect.
Everyone tells you, “Keep your head down,” but no one ever tells you how to accomplish it consistently and comfortably. Many shooters don’t know what it means to have the cheekbone really tight. Also, shooters commonly mount the gun too low on the shoulder because it is more comfortable; thus, they start with the head much too low. The tendency to let the head lift during the swing is almost unconscious and unavoidable. Much of the time, this problem can be solved by a lesson in cheeking the comb properly. Figure 3.4 shows the mechanics of this.
3.3 Many E- to B-level shooters, as well as a few better ones, utilize a head-down position like the one shown here. This shooter’s head is cocked more than 15 to 20 degrees, and he has pulled the skin of his cheek tightly over the comb to position his shooting eye so that the sights line up and he can look straight down the center of the rib. This rapidly results in a sore cheek, which is commonly blamed on the gun rather than poor technique. In addition, this gun is mounted so low that the shooter is forced to bend his head down markedly to get his eye in line with the rib and sights. This low head position compromises his upward peripheral vision, which is a particular problem on station 1 high house. Even with shooting glasses, the top edge of the frame or top edge of the lens might be too close to the flight path of the target. If the shooter could maintain this head posture throughout his swing, shot, and follow-through consistently, all would be well. But after shooting a few rounds, his cheekbone will become tender.
3.4 Start your face mount as shown on the left, with the gun mounted high in your shoulder pocket. Keep your eyes level and head high, and bring your chin (not cheekbone) sideways firmly against the stock. Then bring your head down while keeping your eyes level, causing your cheek to push up and bulge out until the bottom side of your cheekbone is resting firmly on the comb, as shown on the right. If you find that your eye is no longer perfectly centered down the rib, turn your chin toward the stock to bring it in line. Don’t tip your head sideways to center on the rib. You will find that your cheekbone is now free to slide from front to back easily with the recoil of the shot, without jerking your cheek. Cheek discomfort from recoil often disappears. Most shooters who attempt the maneuver shown in figure 3.4 don’t start with their heads or gun mounts high enough, forcing their heads down too far to reach the comb. If a shooter brings the stock all the way to his or her cheekbone without dropping the head below
neutral, one-third to one-half of the butt plate or recoil pad will likely be protruding above the shoulder, as shown in figure 3.4. The shooter now complains that the shoulder fit doesn’t feel comfortable (discussed later).
POINT OF AIM AND PATTERNING
Until you have learned how to put your cheekbone down on the gun’s comb, the results of testing your gun’s point of aim and pattern will be very unreliable. It is frustrating to spend months working on your shooting skills only to find that your gun doesn’t shoot to its point of aim or that you can’t shoot it to the same point of aim consistently. Likewise, you may believe that your gun patterns poorly when your inconsistent head position is the real culprit. Remember, the beads or sights on a shotgun are simply alignment devices that help ensure that your cheek is down firmly and your shooting eye is lined up exactly with the rib. Most skeet and field shotguns should be manufactured to shoot to the exact point of aim at distances from 20 to 30 yards, but it always pays to be sure that your gun actually does so. It is astonishing how many excellent shooters have never patterned their shotguns. If you have never done this for your competition gun, now is the time to do it. Two books that cover the patterning of skeet guns are Hob Brister’s Shotgunning: The Art and Science and Overfull and Thompson’s The Mysteries of Shotgun Patterns. The latter is hard to find, but Brister’s book is excellent and readily available. You can also pattern your gun for skeet shooting by carefully following the accompanying instructions. This should be accomplished in a safe environment, away from any shooting competition.
Set up a pattern board or large piece of cardboard at 16 to 20 Jyards—18 yards is ideal, since that is where most skeet birds are broken. Cover this with a large piece of wrapping paper, as you will need to repeat the test a number of times. Put a big, 2-inch black dot on it, with a big cross through it. Include a 30-inch circle if you can. You will also need several boxes of skeet loads. With the two beads of the shotgun exactly lined up and completely overlapping each other, fire 5 to 6 shells at the target. You’ll have to repeat the test with the other barrel of over-unders (or side-by-sides). It is also instructive to look at each barrel’s pattern from as close as 8 yards, since some birds are shot at this distance (station 8 always). You may be shocked at the small size of your pattern at such a short range. Initially, you should do this pattern testing free-hand, without resting the barrel on any support, just as you would shoot a skeet target. Patterning from a rest may fail to show that you flinch or pull down and sideways toward your trigger hand as you fire. If you have screw-in chokes, you should use your skeet chokes, and be sure that they are in tight. A loose or bad choke tube may throw an errant pattern. If you can’t put your cheek down firmly and still see the front sight of the shotgun, the comb is too low. You need to build it up with a temporary lift until you can cheek firmly and still see the front sight with one eye closed before you continue. Use half-inch strips of a Styrofoam cup, Dr. Scholl’s Molefoam, or a similar material masking taped to the comb. With your cheek down firmly, if you can see the rear bead below the front bead and some rib in between, the gun may pattern a bit high, but this isn’t of immediate concern. Stock adjustments can fix most vertical patterning problems. The pattern should be even and centered, both horizontally and vertically, on your dot. If it is, your gun and your initial sight picture are probably close to correct. If this is not the case, your gun may need attention from a good gunsmith. However, if your gun shoots low and possibly right or left, before consulting a gunsmith, repeat the patterning exercise using a bench rest or other firm support, because you may be the cause of the error. Some otherwise excellent shooters tense as they pull the trigger and pull with the whole hand. This may be a partial flinch in anticipation of the recoil. Most commonly, this causes a pattern shift low and to the right for a right-handed shooter (low and to the left for a left-handed shooter). So if the gun patterns correctly off a bench rest but shoots low off your shoulder, your firing technique may be responsible. If so, work on your gun mount, head position, and trigger control. If it patterns 6 inches left or right with a careful bench rest test, you need a gunsmith. But be sure to tighten the choke and also try a different choke tube, as that particular choke tube could just be the culprit. Commonly, we like to set the comb height of a shotgun so that the pattern is 60/40—that is, about 60 percent of the pattern is above the exact point of aim. Stated another way, we want the gun to shoot 4 to 5 inches high. If your gun shoots to exact point of aim with beads overlapping, you can repeat the exercise with the front bead perched just on top of the rear bead, a so-called upside-down snowman or figure 8. This usually raises the center of your pattern the optimal 4 inches. Every gun is different, however, based on its rib taper and contiguration. It may be necessary to elevate the comb until a split figure 8 is seen—that is, the beads completely separated —to get the desired 60/40 pattern distribution. Most skeet shooters prefer a 60/40 pattern because it allows them to center their shot pattern on the target without ever having to completely. cover it up. Even on a “zero lead” station such as low 7, they can shoot with the target just on top of the front bead and still center the shot. Trap shooters frequently prefer their guns to center higher, 10 to 12+ inches above the point of aim, because they are always coming up from below the bird, but that is not ideal for shooting skeet.
CAST-OFF
Traditionally, many gun stocks were made with the stock bent or ant;led, deviating somewhat to the right (or left) of the barrel line when looking from butt to bead. This deviation—catied cast-oft—was intended to make it easier for the right-handed majority to align their right eyes with the rib. Naturally, this put left-handed shooters at a disadvantage, which may be why so many lefties learned to shoot with their heads canted markedly to the left. More recently, many skeet guns are being designed with perfectly straight stocks without any cast-off. How can you determine the cast-oft of a gun? Eyeballing is not a very accurate method, but measuring your own gun is not that difficult (see figure 3.5). Human anatomy is such that the pupil of the eye is rarely centered over the cheekbone. Generally, the pupil is offset sideways toward the ear by at least inch and frequently by as much as ¼ to inch. As a result, to get your eye in line with the two beads with a perfectly straight stock, there are only a few options: 1. Either tip your head over the comb or tip the comb toward your head. This is only a temporary solution until you can get a properly fitted gun.
3.5 Put your empty gun down on a table with the fore end and barrels lying belly down and the trigger and stock hanging off the edge. Tie a loop in a string and place it over the front sight. Pull the string straight back over the middle of the rib or back sight, clear to the recoil pad. Sight down vertically to the midpoint of the comb at the same area where your cheek would be. Note that this gun with its adjustable comb is set up with about to ¼ inch of cast to the right for its right-handed owner. It is also set with about 10 degrees of toe-out to the right, but with very little drop at the heel.
2. Take a rasp or a carving tool and begin whittling off the side of the stock—but only if you don’t care about appearance. 3. Get a stock maker to “hot oil” bend your stock to introduce some cast-off or make you a brand-new stock to your specifications. Most stock makers own a “try gun” that can be set up with any adjustment, including cast-off in either direction. This is an expensive fix, and if you change your weight or gun mount habits, it may not stay correct. 4. Get an adjustable comb installed on your stock. This is the best and most cost-effective long-term solution. In addition, your gun
can be refitted to a new owner in the future at little or no cost—a plus in the resale market. I would recommend putting on an adjustable butt plate and recoil pad at the same time.
COMB SHAPE, HEIGHT, AND ALIGNMENT
Figure 3.6 indicates how the usual factory comb is measured—the drop at its forward end and then the drop at the heel. If it is a Monte Carlo style, the drops at the rear of the comb and the heel are different. Having gone through the patterning exercise, you should be quite sensitive about having your comb height correct.
Adjustable Comb and Parallel Comb
The adjustable comb has become extremely popular for a number of reasons. For one thing, it lets you vary the adjustments during an extended period of shooting until it seems to remain constant. It also allows accommodation for weight gain or loss. Another significant advantage is that it lets you specify that your adjustable comb be set up so that its top edge is exactly parallel to your rib, a so-called parallel comb. Many skeet shooters have adopted the parallel comb in the last decade. Trap shooters have used this style of comb much longer, but because skeet shooting began as off-season practice for upland bird hunting, skeet guns were essentially hunting guns. Almost without exception, hunting guns’ combs are too low for ideal skeet shooting; in addition, the comb slopes downward from front to back, usually about an inch. Somehow, this design has persisted in skeet guns, despite the fact that manufacturers should know better. In the quick action of hunting, the comb usually just slaps up to the side of the chin. The eye is close to the correct height and may be close to alignment, but not with the consistency required in skeet. Recently, some manufacturers have begun to offer skeet guns with parallel combs. However, the disadvantage of a fixed parallel comb is that it is a perfect height for only one size of face. So now some guns even come with adjustable parallel combs (see figure 3.7).
3.6 Measurement of comb height is shown above. This is a typical sloped comb from the factory on a Ruger 20-gauge over-under. It has a temporary soft elevation for a student. Measure at both the front and rear ends of the comb. Measurement of length of pull is also shown. It is measured from the middle of the trigger to the midpoint of the butt plate or recoil pad.
3.7 Close-up of a stock fitted with an adjustable parallel comb. This one hasa⅛inch soft cover on it, a personal preference of the shooter. Note also the amount of drop at the heel provided by the adjustable butt plate and recoil pad. If you are a big person shooting skeet with a sloped, fixed comb, you may set your head forward, where the comb will be too high, causing you to shoot too high. Conversely, if you are small or just have a small eye-to-cheek distance, and if you put your head down well even at mid-comb, you may see nothing but the receiver. You will be forced to raise your head enough to see the front sight, but now you’ll have a “loose head,” with your pupil wandering around—not the prescription for a 100 straight. An adjustable comb allows you to vary both its height and its offset or cast-off until they are prefect for you. Another significant advantage is that when it is installed, you can request that the comb be exactly parallel to the rib. Then, no matter where your head comes down on the comb, your sight picture will remain constant. Most experienced shooters believe that they almost always have their heads in exactly the same spot on the comb and aren’t concerned with parallel combs. But with different types of shooting apparel—from hot-weather T-shirts to long johns and down jackets— most of us bring our heads down in slightly differently places in each case. Or head position may vary just because we are tired or uncomfortable on a particular day. The adjustable parallel comb is a significant asset in eliminating this problem.
Checking the Comb Height
How can you tell whether your present stock, given its present length, is a reasonable fit for you? Try the following.
Put on your normal shooting jacket or vest. You’ll also need two quarters or nickels and some adhesive tape. Take your empty gun and put your cheek down very firmly on the comb at your normal position—if possible, firmer than usual. With the nonsighting eye closed, you should normally be able to see a figure 8, with no rib visible between the beads (i.e., the front bead just on top of the back bead). Tape one coin to the rib just in back of the rear bead. Now, with your cheek down firmly, you should see only about half of the front bead. Tape a second coin on top of the first; now, with your cheek tight, the front bead should be gone. Without the coins, if you see any rib between the beads, the comb may be too high, and you may shoot too high with the gun. But remember that the size of your face and head is a factor, so go back and consider the section on patterning before coming to any conclusions. Some guns require you to see rib between the sights to give you a 60/40 pattern. If a fixed comb is too high, you can either carve away some comb or pull your head backward until the slope of the comb results in a better sight picture. The latter can’t be done consistently, however, since that isn’t where you comfortably position your head. An extension to the butt plate may work, because that moves your comfortable head position back on the comb a bit. Try taping on butt spacers until you get a decent sight picture with a comfortable head position. Then see about adding the same amount of spacers under your butt plate. If this makes the gun feel uncomfortably long, you need to change the comb height. You can have the comb cut down and the entire stock refinished. I would recommend getting an adjustable comb installed as part of that package, and probably an adjustable butt plate at the same time. Competent stock makers or titters can do so without refinishing the whole stock. If a comb is too low (with your cheek firm and the off eye closed, you see only the back of the receiver or just the rear bead), you won’t be able to hit the bird at all or you’ll have to shoot with your head loose. Putting your head father forward helps with a sloped comb. but again, you can’t do this consistently, and you may get a sore cheekbone. Most skeet guns are made with combs too low for the average shooter, probably because you can always lift your head to get a sight picture, but there is virtually no way to get your head down into a comb that’s too high. Short of installing an adjustable comb, you can do some temporary or even semipermanent fixes to remedy a low comb. First, you can build up the height of the comb where your cheek comes down with ⅛-inch firm foam, such as Dr. Scholl’s Molefoam, from your local drugstore. Use strips about ¾ inch wide and 4 inches long on the crest of the comb. Most fixes require multiple strips that are then strapped down with masking tape or electrician’s vinyl tape. You don’t want to push your cheekbone sideways, only raise it. Keep adding strips until your sight picture looks correct. Then do at least a basic pattern testing with the new comb height. (The gun in figure 3.6 has a temporary comb built up on it.) Other temporary devices are Wrapidcomb (www.gunsolutions.com) and Adjust-a-comb. With both of these products, you have to be careful not to bring the comb elevations over the side of the stock and decrease your cast-off at the same time.
LENGTH OF PULL
Length of pull is usually measured from the middle of the gun’s trigger to the middle of the butt plate or recoil pad. More simply, it is the length of the stock plus any recoil pad. For guns that lack a parallel comb, the length of pull significantly affects where your cheek comes down on the comb. Length of pull also irifluence how heavy the gun feels in your hands and how briskly the gun swings, since it affects the gun’s total length for any one barrel length. Shortening the length of pull immediately makes it feel lighter and swing more easily. But length of pull is probably the least critical of all the stock dimensions. Most shooters adjust to small changes with little trouble. However, with a sloped comb, if a stock is too short, your cheek may be too far forward where the comb is too high, or your cheek may even touch the thumb wrapped around the gun’s grip. If a stock is too long, your head will be too far back, and you’ll be forced to lift your cheek off the comb for a correct sight picture and pattern. Three things about length of pull should be immediately apparent: 1. With a standard rearward-sloped comb, your stock must be exactly the correct length for your head position to give you the correct sight picture. 2. Unless your stock also adjusts for length, proper head-down position may be a problem, depending on the amount of clothing you are wearing. 3. A parallel comb makes length-of-pull problems less significant, as long as you don’t have your nose on your thumb. Currently, both skeet and sporting clays are shot with premounted guns. For practical purposes, this means that any stock length that feels comfortable is satisfactory when you have a parallel comb. But you should have at least an inch between your thumb and nose when correctly mounted. A longer stock can make mounting feel a bit awkward and make the gun move more slowly, but that shouldn’t materially affect your scores in skeet. By making the gun swing a bit slower, it may also make it a little smoother. It’s your choice. Obviously, when shooting guns tor hunting (and international skeet) from a disntounted position, it helps to start with a slightly shorter stock and an easy sheding butt pad to help you come up rapidly and smoothly. In truth, many such guns are shot with the butt not quite tight on the shoulder. Determining the proper length for an individual shooter is largely trial and error, but it is often ⅝ to 1 inch shorter than the same shooter would use tor Anaerican-style skeet. New or inexperienced shooters frequently question where the hand should go on the fore end. Obviously, individual variations are a function of both stock length and arm length, but several generalizations are applicable. A hold out at the tip or even around the tip of the fore end makes mounting the gun awkward and slows your swing. Conversely, a very short hold makes the gun feel barrel-heavy and makes precise gun control more difficult. Midway on the fore end works for most shooters. Most important is that the fore-end hand be relaxed. The gun should lay easily in the loose left hand (right hand for lefties) without any grip tension. Trying to “squeeze the sap” out of the fore end or hanging on with a death grip is a reflection of nervous tension and will lead to jerky swings and aggravate a tendency to flinch. Plus, it is more difficult to maintain excessive whole-body tension when you deliberately relax the one hand.
PITCH
The pitch of a shotgun, is the angle the barrel makes with the butt plate. When it is 90 degrees, the gun is said to have zero pitch or neutral pitch. Years ago, many guns were made with either zero pitch or even a bit of up pitch. These were satisfactory for the bent-over shooting style of those days, but the toe of the stock would be quite uncomfortable for most shooters using the current stand-up shooting style. A gun with no down pitch or some up pitch that is shot in an upright posture contacts only the shooter’s shoulder with its toe. Besides making recoil very uncomfortable, in theory, this would make the gun shoot high because the barrel would be moving upward with recoil, owing to the stock’s toe moving into the shoulder before the heel. With modern upright shouting postures and soft recoil pads, minor degrees of pitch variation are prohably a less important factor in gun fit. The primary importance of good patch is to ensure that the recoil pad makes total contact with your shoulder using your normal gun mount. Comfort is the key. Pitch doesn’t affect your gun’s patterning center, despite older texts’ claims that it does. To confirm this, the influence of pitch on patterning was tested on the range by Todd Nelson and reported in 2005 in Skeet Shooting Review. This was done at 25 yards with a modified choke. Extremes were tested—from 7 inches of down pitch, a normal 1½ inches, and a severe up pitch like that of many 60-year-old side-by-sides. Five shots were fired carefully at each pitch at a patterning sheet. When the three sheets were overlapped, there was no discernible difference in the pattern centers.
3.8 The easiest way to visualize and measure pitch is to put the gun close to vertical so that it rests evenly on its butt plate or recoil pad. Slide it up against a wall or door frame until the receiver just touches. The distance between the tip of the barrel and the wall in inches is a measure of the gun’s down pitch. If the tip of the barrel hits the wall before the receiver does, the gun has up pitch. Almost all guns are now made with 1½ to 2 inches of down pitch, and usually only modest changes from this are indicated. Obviously, this measurement varies with the length of the barrel, but not significantly. So where did the notion that no pitch or up pitch would make a gun shoot high come from? Todd found a reference from 1962 in an old Winchester manual for skeet, but it may go back much further. He suspects that the notion arose because with one of those old, severely up-pitched guns, you had to mount the gun much lower and then bend forward to have comfortable contact between butt plate and shoulder. This would make it almost impossible to get (or keep) your face down far enough to get a proper sight picture, which
could certainly make a gun shoot high. Neutral or slight up pitch makes the barrel jump a bit higher after the shot leaves the barrel, making for a longer recovery time between shots. But if you take the same gun and ignore the discomfort of having only the toe against your shoulder as you pattern it, the pattern should be fine. If your gun has insufficient down pitch for optimal shoulder contact during your normal shooting posture, or even if it has some up pitch, you can temporarily adjust this by removing the upper recoil pad screw, loosening the lower screw, and then inserting several 1inch washers from the hardware store under the upper end of the recoil pad, letting the upper screw hold them in place. Put in enough washers to give your gun 1 ½ to 2 inches of down pitch. You may be struck by how much more comfortable your gun suddenly becomes, and this may help your long-term consistency. Then you can have your stock adjusted or just insert a wedged spacer between the stock and the recoil pad. Too much down pitch won’t make your gun shoot too low. But should you adopt greater down pitch to decrease barrel jump as you fire? This is a dubious proposition. If your gun has so much down pitch that only the heel of the recoil pad hits your shoulder, you will feel increased recoil and eventual discomfort. Todd’s final advice, with which 1 concur fully, is this: “Pitch is set to create comfort, control, and contidrnre that the gun is an extension of your body. Pitch should never be altered in an attempt to change your point of impact.”
TOE-IN AND TOE-OUT
If you look at your gun from the butt end, you may see that the butt plate is vertical and in alignment with the receiver, fore end, and barrels. But some stocks are made with the toe of the butt angling a few degrees to the right or left. This is simply because, like having correct pitch, it is more comfortable for extended shooting sessions; it lessens perceived recoil. The anatomy of your shoulder dictates what will be most comfortable for you. Women in particular may appreciate a significant toe-out stock because it gets the toe of the butt off the upper-outer tail of the breast. There is a way to judge how much toe-out would be ideal for you.
While wearing just a thin shirt, mount your gun in your usual shooting posture, making sure that the butt is well inside your big shoulder muscle (deltoid), but without your head on the gun. Keep your elbow up high, and close your eyes. Now twist the gun back and forth to the left and right. Try to find the most comfortable position on your shoulder. Now open your eyes. Are the gun’s receiver and barrels vertical? If so, toe changes would be of no advantage to you. But if the barrels are canted 10 to 15 degrees to the left, you might seriously consider a toe-out stock with that degree of out toe. A toe-out or toe-in stock doesn’t necessarily mean a custom stock. As noted previously, an adjustable parallel comb and an adjustable butt plate or recoil pad are excellent investments for long-term skeet shooting. They allow you to adjust for changes in your shooting habits and weight over time. And, unlike an expensive custom stock that will fit virtually no one but you, the gun is easily adapted to a new owner or a “new you” at some future time.
3.9 These two guns show different directions and amounts of toe-out and drop at the heel. The one on the left is for a left-handed shooter who needs more than 2 inches of drop. The one on the right is for a right-handed shooter who needs only half an inch of drop, largely because of the much higher set comb.
DROP AT THE HEEL
Another advantage of an adjustable butt plate is that it allows you to drop the pad vertically up to 2½ inches when you adjust the toe-out. This is ideal tor keeping the entire recoil pad in contact with your shoulder and chest wall. Droop at the heel, along with pitch and toe-out, can dramatically reduce your perceived recoil. At the same time, you can get the entire gun up high enough so that you can firmly cheek the comb without having to drop your head appreciably. This all helps your standup shooting style and reduces the tendency to lift your head during the shot. These are major advantages of an easily adjustable butt plate and recoil pad combination, as illustrated by figures 3.10 to 3.12. If your ideal skeet gun has custom engraving, gold inlays, and fancy wood, you may not like the look of an adjustable comb and butt plate. But beauty is in the eye of the beholder. If your skeet gun is also a working tool with which you attempt perfection in shooting, the adjustable stock will be a thing of beauty to you. Even many high-grade or custom guns are now outfitted this way.
3.10 A head-up shooting posture with a normal stock configuration. Only about half the recoil pad is in contact with the shooter’s shoulder. This results in excess felt recoil, particularly because only the toe of the stock is against the shoulder.
3.11 The adjustable pad is now dropped 2 inches, with a toe-out of 15 degrees—ideal for this shooter. Several pads on the market allow such adjustment and can be put back to neutral in just a few seconds.
3.12 The result is comfortable total contact between the recoil pad and the shoulder with an erect, head-up shooting posture. Fatigue and tolerance for long shooting sessions are much improved. There are at least a dozen adjustable combs and butt plates on the market. There are few major differences among the adjustable combs, and they all work reasonably well. The adjustable butt plates are much more variable, having different mechanisms, but almost all can be adjusted for most shooters. However, some are hard to move without taking off the recoil pad. The Nelson Adjustable Pad from Country Gentleman Gun Fitting Shop (www.gunfitter.com) has the major advantage of being movable in 20 seconds to a new position or restorable to neutral in 20 seconds with a hex wrench. It is also available with length-of-pull and pitch adjustments. I believe the Jones pad also allows for adjustments without removing the recoil pad.
CHAPTER 4 Hold Points and Shooting Methods The hold point is the exact spot where the gun is pointing at the moment you call for the bird. It is not where your eyes are looking, which for most stations is where the target is emerging from the trap-house window; this is called your eye fixation point or focal point. The hold point depends entirely on the method you use to break the target. And once you settle on a target-breaking method, hold points are critical to success. There are some differences at the individual stations (discussed in section 2), but in general, there are three ways to break a skeet target: swing through, pull away, or sustained lead. In theory, you could also shoot with a completely stopped gun—just pointing at the right place and pulling the trigger at the right instant, with no gun motion at all. But this is almost impossible except at stations 1 and 7. I have tried this for fun at station 4 and can occasionally break a target with an apparent lead of 10 to 12 feet.
SWING THROUGH
A generation ago, it was common for a shooter to point the gun close to the opening from which the target was thrown, call, and then swing through the bird and shoot as the gun barrel passed it. Essentially, this shooter always got “beaten” by the bird and had to chase it. When using this method, your hold point can be quite close to or even at the trap-house opening, since you are always coming from behind the target. Some excellent shooters still use this technique (also called sweep through) to some degree, but usually for only a few targets, such as high 2 or possibly high 3 and low 6 or possibly low 5. It is a technique that requires perfect timing and is not used by very many toplevel shooters today.
PULL AWAY
With this method, you hold a bit farther out than a swing-through shooter, move at the same time as the bird, touch it, and pull away, firing as you do. Like the swing through, this method also requires excellent timing to be successful. Although many fine scores have been shot with these methods, they lack the consistency we’re looking for. If the bird passes or reaches the gun barrel at any station, you are forced to accelerate sharply and fire as you pass it—or pull away. This is difficult and requires exacting timing. Leads also appear to be much less or may even look like a zero lead if the gun barrel is moving very rapidly. Every shooter is forced to take a shot like this every so often because of a lack of mental focus. The swing-through and pull-away methods are commonly used in the field, but only a small percentage of excellent skeet shooters routinely use these techniques. They come into play only as recovery from an error.
SUSTAINED LEAD
Sustained lead is by far the most successful method and is used principally by almost all (more than 95 percent) top-level skeet shooters today. Because this swing moves the gun barrel at the same speed as the bird, shooters have a much longer time to adjust the critical lead distance and fire. It gives them anywhere from 0.2 second to a full second. That may not seem like much, but consider that with the sweeping or pull-away method, you have much less than 0.1 second to be correct. The concept of a sustained lead is superficially easy, but it causes many shooters to “ride the bird” far too long. On all the long, incoming targets such as low 1, 2, and 3 and high 5, 6, and 7, you have time not only to see the correct amount of lead but also to maintain it for a second or so. But on the close-in birds with a high angular velocity such as high 2 and 3 or low 5 and 6, if you try to maintain the correct lead for a significant amount of time, you will end up shooting the target well past the center stake. “Riding” the target in this fashion may work well for some, but it makes becoming an excellent doubles shooter very difficult, particularly for the shoot-off stations of 3, 4, and 5. In such situations, a modified sustained lead can be helpful. Consider that if you are using a fairly standard one-third out hold point for close birds, at the instant the bird emerges from the trap-house window, you actually have a 21-foot lead. Your gun is accelerating from a dead stop. So for approximately 0.5 second, what your eye actually sees is a closing gap or decreasing lead as the target gains on your front sight. By the time you are about at the two-thirds point from trap to center, the gap should have closed to what you normally see as lead, and your gun should have accelerated to match the target speed. Your gun should fire in the next fraction of a second. If you “check the lead” or try to maintain it for more than a small fraction of a second, you will either miss behind or, for the near house birds, break the bird past the center stake—not ideal by any means. This method still gives you a lot more time for adjustment than either the swing through or pull away, but far less than with the long, incoming targets. That is why the close, outgoing targets are considered the hardest on the field.
THE CONSTANT TIME PRINCIPLE
A constant hold point is the goal, but the reason for it can be called the constant time principle. You will be most consistent when you can initiate the gun swing the instant you see the target emerge and have an equal amount of time to match the speed of the bird at every station. It’s difficult enough that there are 16 different appearances and angles at which to shoot, without adding a completely different gun acceleration time for every target. If you are aware of having to swing the gun much faster for some birds, you are probably holding a bit too close at those stations and may even be sweeping it. Many shooters do this at high 2 and low 6 yet shoot a maintained lead elsewhere on the field. The goal is to set hold points such that you have an equal amount of time to accelerate your gun to match the bird’s speed, no matter what station and which target you are shooting. This will vastly simplify the development of muscle memory and reflex responses that lead to consistency at each station. This doesn’t mean that you have to shoot all the birds in exactly the same amount of time; obviously, you take significantly longer to shoot the long incomers from the opposite side of the field than the outgoing birds from the station that’s closest to you. You have to stay moving with those birds longer before firing. These are the only targets where the lead is maintained for more than a fraction of a second.
DEVELOPING IDEAL HOLD POINTS
To shoot well, constant hold points are vital. Your hold points determine how consistent your shooting style can become. Of course, if you are a sweep-through shooter and have no intention of changing, that’s fine. Just hold on the bottom edge of the window, accept that you will always be “beaten” by the bird, and know that you have to swing rapidly and fire the instant your barrel comes through the bird. This works for some shooters, but they get far fewer 100 straights. Ideally, you need to develop what Don Snyder, one of skeet’s great shooters and instructors, calls a proactive hold point. A proactive hold point is one that’s just far enough from the window so that you can move instantly and smoothly with the appearance of the bird, which will never reach or pass your barrel. That hold point is also far enough out so that as you see the bird and start your swing, the bird is close to the correct lead behind the barrel by the time it has gotten two-thirds of the way to the center stake. And your gun should be moving at almost exactly the same speed as the bird at that point. With almost no further adjustment, you fire and follow through. If you lose your ideal hold point and crowd the house, the bird will almost certainly reach or pass the barrel, and you’ll be forced to make a pull-away or sweep shot. If your hold point is too far from the window or house, you will be forced to either wait for the target and then make a sudden move, or start very slowly and speed up as the target closes in toward the barrel. This means that, depending on the position of the barrel, you will have a different amount of time to accelerate your gun at almost every station. In developing good hold points, it is necessary to examine both the geometry of the skeet field and some fundamentals of human physiology and eyesight. Although all skeet fields are theoretically the same or close to it (see figures 1.1 in the introduction), we differ in terms of reaction times, physical fitness, age, and eyesight, all of which affect our so-called athletic skill. Standard advice for most shooters is to hold one-third of the distance from the window to the center stake. Because the distance from the pad to the center stake is 21 yards from every station, this means that you are always 7 yards, or 21 feet, ahead of the bird the instant it emerges. Normal reaction time to a visual stimulus (for us, the appearance of the target) is fairly standard from the one person to the next, despite talk about “lightning fast” reflexes. However, it can be reduced somewhat by training, which is why the hold points of experienced shooters may be a bit closer than those of newer shooters. Nevertheless, a hold point of more than plus or minus 3 feet from one-third out would be excessive for almost any shooter. But keep in mind that reaction times slow with age, and training can’t eliminate all of this. There is no magic about being exactly one-third out, except that it is surprisingly close to being right for the vast majority of shooters. You should thus learn to recognize what one-third looks like from every station. From station 4, our eyes are remarkably good at estimating the one-third distance from the house to the center stake. This is because the eye judges angles, not true distance, and from station 4, the one-third point is just about one-third of the total angle. But as we go around the field, the one-third point looks closer to the farther trap house as we move in either direction from station 4, and it looks farther away from the closer trap house. Figure 4.1 lays out these angles from the viewpoint of stations 2 through 8. Obviously, they are essentially reversed as you move from station 7 down to station 1 looking at the other house. If you study these diagrams, you will see how the appearance of a true one-third changes dramatically from station 1 out to station 4 and is quite different for each house at each station. For example, at station 2 high house and station 6 low house, one-third of the distance looks almost like half of the angle. It should be apparent why high 2 and low 6 look so fast, particularly to less experienced shooters. This is because in the amount of time it takes high 2 to reach the one-third point, it moves through a 46-degree angle to your eye. In contrast, from station 3 the high 2 angle to one-third is 27 degrees to your eye, and from station 4, it is only 17 degrees. Each bird is perceived as being successively slower. These visual perceptions are important when it comes to shooting every target on the field successfully. It is not legal in registered skeet to put markers on the field to indicate where you want your hold point. Similarly, in golf you are not allowed to use a distance finder to measure the distance to the pin. But there are many ways to train yourself to judge this distance with some accuracy. By doing so, you can get accustomed to the different appearances of one-third from each station. It is most difficult to appreciate that from the station 2 high house and the station 6 low house, one-third looks almost like one-half. That is why many shooters below the AAA level hold a bit too close to the house on both these stations and regard these two as the hardest birds on the field.
The most useful method for training yourself is to put out a marker at the one-third point for practice only. An empty shell box with a few pieces of broken bird in it to keep it from blowing away is unobtrusive to other shooters. Put it at 7 paces out from the pad at station 1 and station 7 in a direct line to the center stake. It’s a good idea to pace the rest of the distance to the center stake. It should be just 14 paces more—a total of 21 yards.
4.1 Note how much the visual angle to the one-third point for the high house changes as we move from station 2 to stations 7 and 8. Each decreasing change makes the bird’s speed look progressively slower than at the previous station. These figures are essentially reversed when looking at the low house from each station.
VERTICAL HOLD POINT
Although developing a dependable and uniform hold-point distance from the house is important, it is only half the problem. It is equally if not more important to keep the barrel sufficiently low so that it never interferes with your vision of the target’s flight. One rule is never put the barrel higher than the bottom of the window of the trap house. Because the initial flight path of the bird is always upward, this prevents the barrel from blocking your clears view of the emerging target. However, this rule is routinely violated by more than half the shooters I see or coach, particularly on low house targets. The bottom of the low house window is only 3 feet above the ground. From almost any station, if you visually project a horizontal line from the bottom of the trap-house window, it will be in the ground, not the sky. A barrel kept this low will always be below horizontal. Figure 4.2 is a typical view of the low house from station 4. A common error is a hold point that is too high—into the background trees. If the bird throws even slightly flat for any reason, it will run into or below the barrel. The shooter’s head has to come up off the stock to keep the bird in sight, causing him to shoot over the bird, even if he maintains the proper forward lead. You should practice visualizing the horizontal from the bottom of the window out to your normal hold point so that it becomes automatic. Do it on each station as you move around the skeet field, because the background is frequently quite different. Determine the height of your hold point in relation to the background. A little attention to this routine can increase your consistency, which equals better scores.
4.2 Low house from station 4. An excellent hold point—one-third out and level with the bottom of the window—is marked HP. A common but too high hold point is marked TH. Two common variations in the flight path of the target are also indicated. If the target follows the lower path, the hold point was clearly too high. Figure 4.3 is a view from station 3 at the high house. The bottom of the window is essentially at the top of the lower treeline. Again, too many shooters try to hold too close to the flight path—an invitation to both head lifting and trouble. When establishing good hold points, it helps to have a professional coach or an experienced shooter as a volunteer coach. If neither is available, two friends can observe each other and work out many of their problems and significantly improve their technique.
HOLD POINTS AND AGE
If you are younger than 40 years of age, you can probably ignore this section and come back and read it in 5 or 10 years. If you are like most under-40 shooters, you have not yet acknowledged that you can’t do everything as well as when you were 20, and it’s probably useless to try to convince you otherwise. However, things do change slowly but steadily, almost from the moment we reach maturity.
4.3 High house from station 3. Note that for this field the bottom of the window is just about at the top of the trees, as marked. A good hold point would be at HP, instead of the too high TH. Both are at the one-third point. If the target throws on the dotted path, your head may come up in an effort to see it. How much does reaction time really matter to shooters? If we assume that your ideal hold point was exactly 21 feet from the window at age 20, how much farther out would you have to hold to compensate for this delay? Surprisingly, the answer is not very much. If you were holding at 21 feet at age 20, then at age 50 you would need to hold 22.8 feet from the house to have equal time for acceleration— just under 2 feet further. By age 60, you would need just over 2 feet of extra hold-point distance to give yourself equal reaction time. And at age 80, you would need to hold between 3 and 4 feet past one-third from the window to move smoothly into a sustained lead and break the bird. For about 120 years, the accepted figure for mean simple reaction time for college-age individuals has been about 190 milliseconds (0.19 seconds) for visual stimuli. The skeet target moves about 14 to 16 feet in that amount of time. Since one-third is only 21 feet, it is apparent that if you hold much closer than one-third, you cannot possibly move ahead of the bird unless you are moving with your call. Why do older individuals tend to shoot lower scores? As a physician, I doubt that reaction time is the only reason. There is some difference in visual acuity and fatigability, as well as a mild but unavoidable loss of muscle mass and strength with age (the medical term is sarcopenia). This means that acceleration of the gun will be a hair slower, as will muscle corrections when the target takes a bad bounce. Much of this can be accommodated for, but not all of it, so older shooters seldom win the open title.
4.4 This graph illustrates the loss of reaction time from age 20 to 80. Regardless of what we would like to believe, reaction time decreases steadily with age. By age 50, your reaction time is about 8 percent slower than it was at 20. However, the loss over the entire 60-year span is only about 18 percent. This is certainly significant, but not sufficient to prevent us from developing satisfactory compensations. These data were based on how quickly an individual could push a button after seeing a light flash. This includes both the time to perceive the visual stimulus and the time to react and push the button. That’s similar to initiating gun motion after seeing the target emerge from the trap window.
The longer you have been shooting skeet, the closer to the house you may have trained yourself to hold. But to compensate for the effects of aging, try adding first 1 foot, then 2 feet, and then 3 feet to your previous hold-point distances, depending on your age. Even a small change can have a dramatic effect. Make only minor and gradual changes. Too much, and you will suddenly be waiting for the bird with a stopped gun. You may be surprised to find that you are suddenly back in control again. The birds seem slower, and you actually feel as though you can move more easily and slowly (which is true) and break the bird almost as well as when you were 20. Will you break it any later? It shouldn’t be more than 1 to 3 feet later, which won’t matter if you are shooting well otherwise. There is absolutely no rule in skeet that prevents you from using some kind of artificial measuring device to check your ideal hold point as you stand on each station. But it needs to be done quickly and unobtrusively, so as not to interfere with other shooters. If you take longer than 15 seconds to call for your target after stepping on the station, it is a time balk, for which you receive only one warning without penalty. I know several champion shooters who have learned to use their own hands to check hold points, especially on strange fields. Hold your clenched fist at arm’s length, and put one edge of it on the edge of the trap window; use the other edge of the fist, perhaps with the thumb extended, to gauge your ideal hold point. You can use this gauge to select some feature of the background as a marker. You could even use a marked index card, a small ruler, or just a shotgun shell held sideways at arm’s length as a quick check once you have determined your ideal hold points for each station. It should be clear that the ideal hold point is different for every shooter. In addition, ideal hold points will change over time—some will decrease because of experience and improved target perception, and some will increase because of age-related factors.
CHAPTER 5 Hitting the Target
PATTERNS AND SHOT STRING
Skeet loads throw out several hundred pellets at 1,100 to 1,250 feet per second, with a pattern approximately 30 inches in diameter at a distance of about 20 yards. Many beginners are surprised that anyone ever misses, considering these facts. But as one of my World Champion acquaintances is fond of saying, “Skeet is a game of precision.” There are several basic truths about skeet shooting that are not immediately obvious. First, although you have a 30-inch-diameter pattern at 20 yards, even if you are centering your pattern well, you have only a 15-inch allowance ahead, behind, and vertically to still break the bird. If you are 12 inches too far ahead, you’ll only chip the front edge; if you are equally behind, you’ll only get a chip off the back. Just 15 inches ahead or behind, and you’ll miss. What is even worse, if you are 8 inches high or low, the front-to-back allowance may be only 8 or 10 inches, not 15, because the pattern is approximately round. In addition, many targets are shot at 10 yards, not 20 yards. In this case, the pattern is only about 15 inches, and the allowable error is down to 7 inches. A second factor is the accuracy of your shotgun. If you shoot a rifle or a pistol, you already know that even in a machine rest, each gun and cartridge combination holds a pattern of a specific size. Most clay target shooters have never even thought about this. The truth is that at skeet distances, with a maximum of about 20 to 24 yards, even from a machine or bench rest, a typical shotgun holds a pattern of only about 5 inches. So if you are 4 inches too high and 6 inches behind dead center, and if the shotgun pattern center is also 2 inches behind, you miss. Remember that the skeet target is moving at somewhere around 40 miles per hour or about 60 feet per second, depending on how close to the skeet house you shoot it. In addition, you have less than 1 second to get off the shot at the closer bird on some stations. In addition to the 30-inch diameter of your pattern, there is the matter of the length of the shot string, which turns out to be around 8 feet. Since the shot is moving about 16 times as fast as the bird, this means that the target moves only about 6 inches in the time it takes the entire shot string to pass. If you combine these truths, it becomes apparent that if you are 10 to 12 inches too far ahead or behind at the moment your shot clears the barrel, you will miss an occasional bird. But this is a small error compared with the lead, particularly at stations 3, 4, and 5, where leads are between 3 and 4 feet. For more detail, every serious student of shotgun shooting should read Bob Brister’s book Shotgunning: The Art and Science . Although published in 1976, it is still the most extensive study of patterns, shot string, and the technical factors of shotgunning available.
LEADS
How much do you have to lead a skeet target in order to break it? World Champion Todd Bender pointed out in one of his Sheet Shooting Review columns that the answer to this question depends on a number of variables. But since many of these have a negligible influence, we can make an estimate of a standard lead. Since Todd’s estimates and calculations are excellent, I take the liberty of quoting them here: Mathematically you would have to make several assumptions before you can derive lead. There is the average speed of the shot from barrel to target (which varies with load used), the distance from barrel to target (which varies with kill point), the length of shot string (which varies with the gun, choke, and shell used), the rate of barrel movement (which varies with shooting method used, e.g. swing through or sustained lead) and target speed at point of impact (which varies with trap settings/weather, etc.). Given just those variables there is no one statement that could be said to be mathematically correct; however, by making a few simple assumptions a rough guide could be derived: • Assume target speed at POI [point of impact] = 60 ft/sec (40.5 mph) • Assume average speed of shot column from barrel to target is 1000 ft/sec • Assume distance from barrel to target is 60 ft • Ignore thinking time and lock time of gun • Assume sustained lead • Ignore effect of shot string At 1000 ft/sec it will take 60/1000 sec for shot to reach target = 0.06 sec. In 0.06 sec target will travel 60 ft X 0.06 sec = 3.6 ft. Therefore the lead would be 3.6 ft. This is all theoretical, but if you were shooting under computer control, and able to nullify all the variables, it would be about right. Any differences that people are either aware of, or speak of, are due to perceived differences due to varying gun speeds. Given any target distance and speed, coupled with a given feet per second of shot speed, there is only one lead for a particular shot. That’s math and physics, period. All other leads are “perceived” based on what the shooter is doing with the gun, i.e. gun speed. Oddly enough, many shooters do not realize that this calculated 3.6-foot or 43-inch lead is actually the same for all the birds on the field if they are shot at the center stake, except for station 8. Why? Although the effect of your angular view of the bird at the instant you fire makes the lead look smaller or larger, you are actually shooting at a point 3.6 feet ahead of the bird. At station 1 high house, for instance, with the very small angle between the barrel and the bird, the barrel may appear to be only about a foot below the bird as you fire. But actually, if you draw a diagram of this shot, that apparent 1 foot is pointing about 3.6 feet ahead of where the bird is at that instant. Of major importance are two items in the above assumptions that do not remain constant: First, most birds are shot at distances other than 60 feet—usually less than 60 feet, because we try to shoot all outgoing targets before they reach the center stake and allow some targets, such as station 7 high house, to come within 20 feet or less to shoot it. Station 8 may be shot within 15 feet. Second, a target shot well before the center stake is moving faster than 40 feet per second—perhaps as much as 55 feet per second. And if a target such as the station 7 high house is shot 20 feet from the station, it may be moving only 35 feet per second. Obviously, all these factors affect the “true” lead of the target, and it varies from station to station and based on initial target velocity, wind effects, shell velocity, and so forth. Finally, no matter how precise our calculations, each shooter’s unique perception of how he or she sees a lead at the instant the trigger is pulled is astonishingly variable. So any calculation provides only a ballpark figure to work with.
KILL ZONE
With proper attention to leads, you can break almost any target almost anywhere on the field. However, consistency demands that you develop the pattern of breaking each target at a specific spot or zone in its flight—called your kill zone. An interesting way to look at this is to consider only half of the field as yours—the half you are standing on. You want to shoot birds only when they are on your side. The other side belongs to the bird, so you can shoot it on that half only with more difficulty, and it has a better chance to “escape.” This means that you shoot all “incoming” birds after they have passed the center stake, but all “outgoing” birds before they reach the center stake. For station 4, both halves are yours, so ideally, the bird is shot before it reaches the center stake. To be even more restrictive, your ideal kill zone is close to the midpoint of your half. But you’ll usually shoot a bit closer to the center stake for outgoers than for incomers, because you have less time to shoot them. For success in doubles, you have to locate your kill zone well before the center stake for outgoers. Each shooter has slightly different reflexes and timing and will develop his or her own ideal kill zone for each target of each staion.
GUN CONTROL
Surprisingly, many experienced shooters have never given any real thought to how they control the movement of the shotgun. They just mount the gun, look, and call for the bird. But smooth and consistent gun motion is a necessary component of excellent shooting form and consistently excellent scores. Most of us are accustomed to some other sport in which our arms play a major role, such as baseball, tennis, golf, or basketball. In all these sports, the interplay is frequently an equal measure of arm-hand and body-leg control. But in skeet, control of the gun’s motion should be achieved mostly by the uncoiling of your trunk’s preliminary coil and the pivoting driven by your legs. Essentially, you pivot on your front or leading foot—the left foot for a right-handed shooter, and the right foot for a left-handed shooter. The arms serve principally to hold the shotgun firmly into your shoulder and to lock your upper body, head, and shotgun into a single integrated unit with as little relative motion between them as possible. If the bird takes a sudden jump or dip, your arms may be called on to make a quick adjustment to the gun’s elevation, although a sudden crouch can also help catch a dropping bird.
FOLLOW-THROUGH
Occasionally, a new shooter may exaggerate his or her follow-through into a jerk or pull-away shot and actually shoot ahead, often by suddenly pulling or pushing with their hand on the gun’s fore end. Generally, however, 90 percent of misses are behind or over or both, and 90 percent of those would have been hit with a more positive follow-through. A firm, consistent follow-through—like firm, consistent cheek pressure on the comb—is an essential component of gun control and shooting success. A review of the dry-fire drill in chapter 2 can help.
MISSING THE TARGET
Teachers and coaches are advised to make only positive recommendations or corrections, never just a litany of don‘ts. A student once asked me, “How many ways are there for me to miss?” After a few minutes of amusing banter, we came up with this short list: 1. Set up just like the shooter in front of you because he looked so cool. 2. Look at your front sight and notice the pretty color. But what color is the bird? 3. Call the instant you mount the gun. Your arms won’t get tired, and you don’t have to focus. 4. Get the barrel up to the level of the flight path before calling. You’ll have much less gun motion. 5. Pick your head up a little bit so you can see the target better. 6. Let the gun drop the instant you pull the trigger. Why waste time on follow-through? 7. Don’t pay any attention to what station you’re on; just shoot the bird. 8. Be sure to check your lead in midswing by looking back at the front sight.
CHAPTER 6 Eye Dominance and Vision Most new shooters give little thought to the visual aspects of shooting. If you require prescription glasses for good distance vision, you know that without them, good shooting is impossible. If your vision is not correctable to 20/20 in at least one eye, you are at a great disadvantage, and achieving top-level performance will be difficult. If you can shoot reasonably good scores with two eyes open, your eye dominance and handedness are almost certainly the same— that is, a right-handed shooter with a dominant right eye, or a left-handed shooter with a dominant left eye. But John Shima, one of skeet’s Master Instructors, believes that as many as one-third of shooters have a problem with eye dominance, perhaps only when shooting a particular bird or at a station where they must look toward their nondominant direction. After more than a dozen years of professional coaching, I am convinced of this as well, so I always check a shooter’s eye dominance, as well as basic gun fit.
There are a number of ways to check your own eye dominance, all of which depend on the fact that the brain picks the image of only one eye to determine alignment. One of the quickest methods is to put the tip of your index finger on a distant object and then close one eye. If the fingertip is still aligned, you are looking through your dominant eye. If it jumps, you closed the dominant eye. A somewhat more reliable method is to take a sheet of 8½ by 11-inch paper and tear a ¾-inch-diameter hole in the center. Hold it at arm’s length with both hands and look over the top of it at some distant object. Smoothly raise the paper so that you are looking at the object through the hole. Again, close one eye and then the other. It should be apparent which eye you used for alignment. Why is dominance so important? Few people realize that with binocular vision, we see two separate images of everything. But the brain has learned to suppress one of those two images—the one from the nondominant eye. The only thing that appears as one fused image is the exact spot on which we are focused.
Hold one index finger up in front of you. Look past your finger at something across the room. Keeping your eye on the distant target, just let your mind think about seeing the finger. You may become aware that there are two images of two fingers: one pointing at your selected target, the dominant eye image, and the other several inches to one side, the nondominant eye image. When your eye is focused on the moving distant target, two images of your shotgun barrel and front sight are being projected into your brain. The image you use to determine lead is the one from your dominant eye. If you momentarily shift your lead judgment to the wrong image, even for an instant, you miss by a huge margin—missing way ahead of the target from one house and equally far behind the target from the opposite house.
CROSS-DOMINANCE
If your handedness and eye dominance are opposite, you have a significant problem. As many as one in eight shooters have this problem and may be unaware of it. If so, you have only a few options: 1. Move the shotgun to the shoulder matching your dominant eye. 2. Close the dominant eye and force your nondominant eye to take over. 3. Patch or otherwise partially or totally obscure the dominant eye’s vision by putting tape on the lens of your shooting glasses. The vast majority of shooters are unwilling to shift the shotgun to the other shoulder. This is too bad, because they could keep binocular vision with better depth perception and better peripheral vision, which is a distinct advantage. As a youngster, I was forced by an instructor to shoot a bolt-action rifle right-handed, even though I was left-handed. So when I took up shotgunning, it was a pleasure to discover that I was strongly right-eye dominant and was already comfortable with a gun on my right shoulder. I shot that way for most of my life, with excellent success. Unfortunately, a few years ago I developed a cataract in my right eye, leading to a gradual loss of visual acuity. As acuity went down, the nondominant but better-seeing left eye would occasionally “grab” the target—a shooting disaster. Simply closing or patching the left eye didn’t work, because cataract surgery still left me with only 20/40 vision in the dominant right eye. Without the 20/20 left eye, I just couldn’t see birds against poor backgrounds well enough. So after all those years, I was forced to become a left-handed shooter. Many years of habit and practice were hard to change, and it took over a year for me to become comfortable as a left-handed shooter and to shoot fairly good scores again. But it did happen. New shooters can shift shoulders with little difficulty. I have started many right-handed but left-eyed shooters off with the gun on the left shoulder. They usually become quite comfortable in a single session of three or four rounds and thereafter give it little thought.
SHIFTING OR INCOMPLETE DOMINANCE
Some people, when doing the paper eye dominance test described previously, find that the object disappears completely, and they are forced to move the paper sideways to bring it back into view. This is a troublesome finding for two-eyed shooting, because it frequently means that neither eye is strongly dominant. For other people, it seems that every time they do the dominance test the result changes, indicating that their dominance is variable. This means that to achieve consistency, they will have to force fixation onto one eye or the other. The simplest solution is to close one eye to shoot. You lose significant depth perception, but fortunately, this isn’t much of a factor in skeet. A fair number of top-level shooters essentially shoot one-eyed. Rather than simply closing one eye, however, most use some method of partially or totally blocking the eye. Many shooters use a small (about ½ to ¾ inch) frosted dot in the middle of the lens of their shooting glasses for the eye they wish to block. This allows them to use the peripheral vision of that eye, but as they focus on the target, only the other eye sees the target sharply. This seems to work well for those whose eye dominance is fairly marked and who only occasionally have a problem when gazing laterally. The dot method has some disadvantages, however. If you are using it on the left lens, when gazing to the far left you may be able to see past it and seize the image with the left eye as the bird emerges from the house. Then, as the bird moves into proper lead distance, it suddenly disappears from the left eye vision and is visible only to the right eye. This sudden jump from one eye to the other can be quite disconcerting and may explain an occasional flinch. In addition, if your left peripheral vision has seized the image of an emerging bird, you may lift your head sufficiently to allow the left eye to remain the tracking eye. Essentially, you are peeking under the dot and defeating its purpose. The result is an automatic miss almost every time it happens. Finally, when directed into bright light, frosted tape tends to create an uncomfortably bright flare, causing squinting and excessive pupil constriction of both eyes, significantly affecting your visual acuity. An effective method of eliminating these problems caused by crossed or variable dominance is to block the upper half of the field of the unwanted eye completely. I use vinyl electrician’s tape to cover the entire upper half of the lens of the eye to be blocked. Doing this has a remarkable effect. You lose the impression of having anything blocking your one eye’s vision. To your mind, it seems that you still have normal two-eyed vision, but the image of the blocked eye is “grayer” than that of the unblocked eye. Dominance is frequently a problem on individual stations. There are data demonstrating that your dominance is affected to some degree by whether you are gazing left or right. So no matter how dominant one eye seems, you can have occasional trouble when you look to one side. I have also been struck by the fact that dominance problems seem much more common now than when I started shooting. Perhaps the lateral gaze phenomenon is partly to blame. Because of changes in technique we are forced to look much farther to one side to pick up the target.
VISION CONTROL AND VISUAL FOCUS
Most skeet shooters are unaware that their eyes take a measurable amount of time to change their focal point. The lens of the eye is round but flattened, a bit like an M&M. The ciliary muscle surrounding it pulls on the lens margins to change the focal distance. The lens is elastic but needs a finite amount of time for its shape to actually change. When you focus on the front sight of the shotgun, your focus is somewhere around 36 inches. When you shift your attention to the edge of the trap house or its window, your focus has to shift to essentially 15 to 35 yards—for practical purposes, to an infinite focus. Ordinarily, we are not conscious of the momentary blur in vision as this change of focus occurs, mostly because the brain suppresses the blurred image and the in-focus image persists for that fraction of a second. Young people have a much more elastic lens, and the change in focal point occurs rapidly. But with advancing age, the time to shift from a close to a distant focus steadily increases. If you are old enough to need reading glasses, you have a slow shift of focus.
Fixing Visual Focus
Shooters of all ages load their guns while looking at the shells and breech—with short focus. They mount the gun, looking for a second at the front sight to check alignment—still with short focus. Then they shift their eye over to look where the bird is coming from (long focus) and call with almost no hesitation. An 18-year-old may acquire the bird in sharp focus in only 0.1 second, perhaps when the bird is only 10 feet out of the window. But a 50-year-old may need almost 1 second for that focal shift to be complete. The bird may be almost to the center stake before it is in sharp focus. The older shooter is basically shooting at a blur and will not react instantly to its emergence. Picking up the emerging target against a mediocre or poor low house background is also difficult—a prescription for a late pickup and often a missed target. The solution is simple: Look away from your front sight and stare hard for at least a full second at the point where you wish to first see the bird. Then call for your target. Against poor backgrounds, this intense focus is frequently the key to good scores. Get the barrel down out of the line of sight and stare intently at the edge of the window or edge of the trap house where your eye will catch the first flash of the bird’s flight.
Eye Fixation Points or Focal Points
The NSSA-recommended standard place to focus is about halfway between your hold point and the trap-house window. If for some reason this location is unclear to you, you can use either the edge of the trap-house window or the edge of the trap house itself. Loss of clear vision occurs as the eye is shifting from one focus to another. For that reason, looking back at the sight to check lead causes the bird to simultaneously disappear. You stop the gun’s swing and lift your head to try to find the bird, usually resulting in a miss both over and behind. Your eye moves almost entirely in jumps from one focal point to the next. Since the eye is swinging and the image is blurred during this swing, the brain suppresses the blurred image until the eye has fixed on its next focal point. With your focus fixed on the skeet target, the gun barrel can move within your peripheral vision without affecting vision. But any attempt to shift the focus to the front sight, even for an instant, results in immediate loss of sight of the bird during the shift. Our eyes and brains are exquisitely sensitive to motion and can pick it up instantly. Be sure that your focus is fixed on the spot where you can first see the bird well, and keep it locked on that moving target with all the concentration you have.
To demonstrate this, you will need a friend. Just watch his or her eyes from a reasonably close distance as he or she scans slowly from left to right. What happens? The eyes move in a series of short jerks as they shift from one point of focus in the background to another. There are only two ways that your friend can force his or her eyes to scan smoothly. The first is to stare at one spot in the distance and slowly move the head from side to side. The second is to keep his or her eye fixed on a moving object, such as your finger.
HIGH-VISIBILITY FRONT SIGHTS
As noted in chapter 1, shotguns have traditionally been sold with a white front-sight bead about ⅛ inch in diameter and a smaller metal bead about halfway back the rib (or, if a field gun, with no back sight at all). Recently, plastic tube sights with light-collecting properties that make them appear quite bright have become popular. Initially, this seemed contradictory, because many shooters felt that anything that might pull their eyes over to the front sight could be a problem. Some even went so far as to blacken the white front beads of their guns. So why the current popularity of these brilliant front sights? Wouldn’t they aggravate, not help, the problem of looking at the front sight? Our eyes have very different capabilities, depending on where the image falls. The central area of the eye, the fovea, has by far the best vision—in a sense, the highest “pixel count”—and it sees primarily in color. The farther from center an image falls, the poorer the resolution and the poorer the color vision become. Thus, off-center images such as the front sight of a shotgun are not seen as well as the central image is, and the color sense is muted. The farther from center the image is, the more black-and-white vision predominates and the poorer fine discrimination is. After using a bright front sight for two years, I believe that it makes it easier for the brain to register the peripheral position of the front sight in relation to the target with more accuracy—and without looking at the sight. It could be viewed as a possible “attractant” to the eye, but in practice, that doesn’t seem to be a problem. It may actually work the other way, making it easier for your peripheral vision to be conscious of the lead. Several varieties of these sights also have a tubular element that blocks the “off eye” from seeing the sight at all. For some shooters with mild or only occasional eye dominance problems, this works out very well, eliminating their occasional cross-fire problems and still allowing them to retain the slight advantage of binocular vision.
CHAPTER 7 Flinching and Release Triggers A flinch in skeet is an involuntary neuronnlscular spasm that makes you jerk and fire when you didn’t mean to do so. Or sometimes it can take the form of making it impossible to pull the trigger at all—the ultimate balk. Every skeet shooter will eventually flinch when trying to shoot. If you have never done so, it is only because you haven’t been shooting long enough. Many shooters will go for years without a problem but then develop one that is so severe they may be forced to quit shooting. People flinch in a more general sense when something seems to threaten their eyes or face, as a protective reflex. So vision can play a large part in flinching. Sometimes, a shooter is simply mentally unready for the bird, doesn’t see it until later than normal, and makes a fast, jerky swing—“I flinched.” Data indicate that in many cases, a flinch is caused by the simultaneous contraction of two opposing muscle groups. One set of muscles accelerates your swing, while another set tries to slow it. This creates a spasm or jerk that totally destroys any smoothness. Similarly, this can occur with the muscles of your forearm and trigger finger. Clearly, there is no single cause of all flinches and thus no easy cure-all to prevent it. Several factors may come into play and may be individual to each shooter. Fatigue or shooting too much at one session is a common cause. Nervous tension plays a significant role for many. In this case, it can be helpful to completely relax the fore-end hand. Don’t even grip the fore end at all; just let it lay in your open hand. It is surprising how difficult it is to remain tense while deliberately relaxing one set of muscles.
As a test of how little your fore-end hand has to do with gun swing and control, try the following: Shoot a Low 3 or high 5 target. But instead of your normal left-hand grip on the fore end, support it with only the tip of your index finger. Concentrate and take your usual shot. You’ll probably smoke the bird, with almost no tension in your swing. Fatigue also comes into play, and relaxation techniques may be even more important if you flinch only when you are tired. Every muscle group you keep tight can contribute to flinching and fatigue. A great deal of what some shooters describe as a flinch can simply be attributed to not being mentally prepared for the shot. Without real eye fixation or mental focus, these shooters just mount, look, and call. They are then surprised by the bird and make a sudden motion and miss. It is easier for them to say, “Damn, I flinched,” and blame the inexplicable rather than take responsibility for their own failure to be fully prepared. Vision has a great deal to do with some flinches. For example, if you call while the focus of your eyes is changing, the bird will suddenly “jump” into view past where you expected to see it. The response may be a jerk or a flinch. An inadvertent jump of your eye dominance from one eye to the other in midswing can be another cause of flinching. As pointed out in chapter 6, this makes the bird appear to “jump” either forward or backward, and you may respond with a flinch. Sometimes if you close or patch one eye for a while you can prove to yourself that this is what’s happening. In this case, you may be better off with a permanent patch on your so-called nondominant eye. The lens dot method of dealing with dominance problems can occasionally be the cause of a flinch. If you are using the dot on the left lens, when gazing far left you may be able to see past it and seize the image with the left eye as the bird emerges from the house. Then, as the bird moves into proper lead distance, it suddenly disappears from the left eye’s vision and is visible only to the right eye. This sudden jump from one eye to the other can be quite disconcerting and may explain an occasional flinch. Another cure for flinching that is frequently advocated by the rifle shooting community is dry-fire practice. The rationale is that if your mind doesn’t know whether the gun is going to fire, you won’t flinch. This is only partially applicable to skeet shooting, given the short time frame we fire in. However, dry fire does enable you to disassociate the trigger pull from the swing and follow-through. I encourage you to try working on dry fire if flinching is a problem.
7.1 Look at the fore-end hands of these three AAA shooters taken at a major skeet shoot. None of them has a tight grip. Whether deliberately or as part of their overall relaxed shooting style, they just rest the gun loosely in the left hand. The majority of experienced shooters are also convinced that flinching can result in anticipation of recoil. Some advocate recoil reducers and lighter loads or shooting 20 gauge in the 12 gauge and doubles. But for a small minority of shooters, nothing seems to cure the problem of flinching once it takes hold. For this small group, the release trigger may be the answer. They are quite common in the trap-shooting world, but not so much in skeet. A release trigger functions exactly backward of most normal triggers. You load, close the gun, and mount. Pick your hold point and firmly and calmly pull the gun’s trigger. Nothing happens. Fix your eyes as you normally do, call for your target, swing along in front, and at the proper instant release the trigger, and the gun fires. You are forced into a relaxation mode to make the gun fire. In most instances, these triggers require a release to fire the first shot of a double but still require a pull to fire the second shot. But some shooters have so much trouble with flinching on a pull that their triggers work only on a pull-release-fire and then a second pullrelease-fire—a so-called release-release trigger. Many good shotgun gunsmiths or the gun manufacturers can do these trigger
conversions. For some, it can rescue a shooting career. I know one AAA skeet shooter who has successfully made the transition from a pull-pull flincher to a release-release champion. Those fighting the problem of flinching should read Dr. Michael Keyes’s book Mental Training for the Shotgun Sports, for his helpful insights and commentary.
CHAPTER 8 Mental Focus We all wonder at the incredible focus and discipline of shooters who remain in shoot-offs for multiple boxes of shells. And we are shocked when the next to last survivor misses. How we wish we had what it takes to duplicate their performance (or preferably, go one better). Every skeet shooter has heard it said that “after a while it’s ninety percent mental.” But this common aphorism doesn’t help to explain what you can do to master the mental aspects of shooting. I actually have significant reservations about the degree to which many of the mental aspects of shooting—relaxed focus, concentration, an ability to block out unwanted thoughts—can be taught. Despite my experience as a shooter and an instructor, I do not think that what I write here is a good substitute for having a knowledgeable coach help you with this on the field. If you would like to read more about the subject, there is a surprisingly large volume of material, both published and on the Internet, to help you deal with the mental problems of competition. Dr. Michael Keyes has been writing a column on the mental aspects of shooting for Shotgun Sports Magazine for a number of years (his column alone is worth the cost of an annual subscription). A compilation of these columns has been published as Mental Training for the Shotugn Sports. Keyes is a psychiatrist and a shooter who has coached and taught in the shooting sports for many years. His book (listed in the bibliography) is well worth a read. One problem is that words, whether written or spoken, don’t carry equal meaning for different people. But this is one area where all we have is words. You can’t easily demonstrate relaxation, concentration, or focus. All you can do is see the results. It can be useful to read the views of a dozen different authorities about how to combine relaxation and focused concentration in shooting, and then try to incorporate some of the concepts into your own attempts to perfect your shooting. The most important element in shooting top-level scores is to master the technical aspects of the sport, as described in the previous chapters. That contidence is the bedrock of your mental game—when you know that you can break 9 out of 10, or 19 out of 20 birds at every station on the field every time you step up. What should you be thinking about when you call “pull”? Surprisingly, your mind should have only a mental image of the bird breaking, or perhaps a mental image of your lead at the station, or even some mental command, such as “kill,” to trigger your patterned move for shooting the bird at that station. All your thinking should have taken place before you stepped on the pad and should shut down coutpletely as you mount the gun. The goal of all your practice and training is to establish a completely consistent shooting form, setup pattern, and gun mount that become automatic—a reflex pattern triggered by your call. When you call for the bird, it should engage your “autopilot” mode. Thinking about what you are doing at this point will only lead to slow shooting and erratic results. Only after the gun has come to a complete stop and is dismounted should you “play back” your visual short-term memory tape to detect any problem that needs correction.
II THE INDIVIDUAL STATIONS
CHAPTER 9 Station 1 In this and the following chapters, we’ll cover every shot that normally occurs in a round of skeet. The format includes a discussion of what is special or unique about the station; how the station’s target looks to the shooter’s eye and why it appears this way, with graphs showing the angular velocity of the bird (which tells you how fast the swing speed has to be at the moment of firing) and the best apparent lead depending on where in the flight the bird is shot; a discussion and analysis of foot positions, hold points, eye fixation points, and the like; and an examination of common errors and suggestions for correcting them.
STATION 1 HIGH HOUSE
This first bird of a round of skeet is deceptively simple. It goes almost straight away from you, and there is not a lot of gun motion. Beginning shooters frequently regard it as one of the easier targets, because they can just point close to it and shoot with some success. But this simplicity is more apparent than real. This target’s visual appearance is very different from that of any other target on the field. Consider the geometry of what is happening: The bird emerges from the window 10 feet above the shooting pad, right over your head. It rises to 15 feet at the center stake, rises a bit farther, and then falls to the ground at the distance stake. The bird is coming from behind and directly above you. Visually, it starts by moving very rapidly across your upper peripheral vision; then it seems to slow rapidly and move steadily downward until it hits the ground. Like any shot at skeet, you must shoot ahead of the bird to hit it. The only possible way to accomplish this at high 1 is to have a gap, with the bird above the barrel as you fire. In other words, you have to shoot slightly under the bird as it appears to be moving downward toward the barrel. This bird enters your vision from above with the highest apparent speed—the highest angular velocity—of any bird on the field. This is simply because if you looked straight upward, your eye would be only 5 feet from the line of flight and almost at a right angle to it. Not everyone visualizes this shot the same way, but figure 9.1 approximates its appearance. Note that the bird enters your peripheral vision as a blur above the point your eye is fixed on and becomes sharply focused only at about your eye fixation point. The necessity of keeping this bird above the barrel puzzles some who shoot it with a quick downward muzzle movement. But this is not the most reliable technique, as figure 9.2 should make clear. Figure 9.3 shows the apparent speed of the bird to your eye (in degrees per second) from the instant it emerges from the window until it clears the out-of-bounds marker about 130 feet away. If you hold a little too high and make the common mistake of trying to shoot right at this bird, you will probably shoot over it because it is moving so quickly across your field of vision. That style also forces you to make a quick downward motion with the barrel to stay with the bird. But this downward motion results in shoot-ing way below the bird if it is thrown a bit high or hangs up in the wind. This is because the downward angular velocity has fallen to only about 3 feet per second by the time the bird is halfway to the center stake (see figure 9.3).
9.1 High 1. Your eye must be looking 6 to 8 feet above the barrel, because the bird comes into sharp focus only at that point. It must still be clearly above the barrel as you fire—1 to 1½ feet usually works—or you will shoot over it. Just make any sideways correction, and let the bird come to you. Some recommend that you hold a bit lower and then come up with the barrel to shoot this bird, the rationale being that this keeps you from blocking your vision of the bird. This is true, but you are then moving the barrel in the opposite direction of the bird’s visual path, making exact timing mandatory and difficult to achieve.
9.2 This side view of the shot at high 1 helps you visualize how the bird only seems to drop from above into the barrel. Depending on your reaction time, it can appear to be anywhere from 2 feet to 6 inches above the barrel as you fire. But clearly your hold point must be about 20 to 22 feet above the ground at center if you want to break this bird 15 feet on your side of the field.
9.3 High 1 angular velocity curve. This figure illustrates that if you looked straight up at station 1, the bird’s angular velocity would be 70 degrees per second. When it’s only halfway (30 feet) to the center stake, this velocity has already decreased to about 5 degrees per second. Past the center stake, the downward angular velocity is 2 degrees per second, and it decreases to almost zero at the out-ofbounds marker.
9.4 High 1 best apparent lead curve. This figure shows how much you need to shoot below the bird to center your break, depending on how far from the high house window you shoot it. Obviously, there is not much variation until you get past the center stake, when it begins to increase significantly. Indeed, a high 1 target shot at the far house or boundary marker requires you to shoot below the bird about double the amount that you see just before the center stake. If you have ever tried shooting high 1 as a long trap shot, you know that you need to hold 2+ feet under it at that distance to hit it successfully. All this is discussed further in the appendix. The middle ground here is to just let the bird come to you, with very little gun motion. The bird is never covered by the barrel, and you still have a reasonable amount of time to get the shot away. The concepts of visual angular velocity and the best apparent lead curve are new to most skeet shooters and might seem strange at first. But they can give you a better mental picture of what is happening beyond the simple answer of “that’s what works best.” For a more complete explanation of these concepts, see the appendix, which contains data about the flight of a target that has never been published before. This data was gathered from an engineering study I participated in more than twenty years ago, and I believe it can help you understand why certain techniques work better at different stations.
Fundamentals
The fundamentals of high 1 are as follows: 1. Get your stance correct, and don’t change it because of nervousness. Feet and body face the low house window (lefties face 90 degrees out). This stance is not really an advantage for singles, but it becomes important when you shoot the double. Adopt it now and stay fixed. 2. Your hold point should be 20 to 22 feet above the center stake. This is hard to learn because you have no fixed reference points. 3. Your eye focus is off the barrel and front sight. Fix your eyes on a point 6 to 10 feet above the barrel, about halfway between yourself and the center stake. Stare at the sky or a cloud in line with the barrel for a full second before you call. 4. There is very little gun motion, except to correct any sideways error. Keep a quiet gun, letting the bird drop down to the barrel. The barrel may ease down or relax a little as the bird approaches, but there should be no active downswing. If you make an active downswing, you will either shoot under the bird or shoot it well past the center stake. 5. Fire when the bird is still 1 to 2 feet above the barrel and approaching it quite rapidly. Early in your vision, the angular velocity is high, so the bird may appear to be several feet above the barrel as you mentally think “fire.” An ideal hold point and visualization of the bird should result in your hitting the target about 15 feet before the center stake. Your lead here is mostly a matter of timing the shot. How much you see the bird above the barrel is entirely a matter of your reaction time. If your coach confirms that you are shooting over it, you need to shoot with more gap above the barrel; don’t just automatically hold lower. 6. Follow-through is principally a matter of staying locked tight on the gun and watching the bird fragments. If you don’t learn to stay locked on the gun for a full second after the single, you won’t be on the gun for the second bird of a double.
Common Errors
Holding too high. If you hold too high, the bird will jump past the barrel before you can move or fire. You will usually shoot over the bird and probably lift your head to keep it in sight, so when shooting doubles, you may also miss the second bird. Look at the angular velocity curve in figure 9.3 again. Correction: If you are missing too often with a fairly high hold point, try lowering it just a bit, but don’t overdo it. Try just an inch lower at the barrel tip, and make sure the bird is still clearly in sight as you fire.Then try 2 inches lower, or 3 inches if necessary. If you break the bird past the center stake, you have gone too low for the best doubles technique. Missing sideways. Another problem with a high hold point is that the bird may suddenly drop into the barrel, where it can be seen only by the nondominant eye. This may cause you to shoot several feet to one side of the bird because you’re using the wrong eye image. Correction: If a slightly lower hold point hasn’t helped, try shooting this bird a few times with the nondominant eye closed. If this suddenly makes everything look much clearer, you may have found the cause of your occasional high 1 miss. Continue to shoot this bird one-eyed until your brain is trained to the correct image. High hold point with exaggerated downswing. Because of holding too high, you may have learned to make an exaggerated downward swing to stay with the bird. As a result, you may catch too quickly, pass it, and shoot under the bird, or you might be forced to wait for it and shoot very late. Again, the second bird of doubles will be a problem. Correction: Practice keeping the gun barrel still. Let the bird come to you, but shoot while it is still clearly above the barrel. Head movement. When looking up at high 1, a shooter’s head often moves up, not just the eyes. As a result, the cheek is not down tight on the comb. Most shooters are totally unaware that they are doing this. So even though the sight picture looks good, the shooter shoots over the bird. This doubles the error of holding too high. Correction: Consciously tighten down with your cheek at the same time you gaze upward before you call. Holding too low. If you hold too low, it seems that the bird never gets to the barrel. You may pull the trigger before you mean to and shoot under it. Or you may shoot the high-house much too late (20 to 30 feet past the center stake). Or you may lift the barrel to meet the dropping bird. This last can make things worse, because now the barrel and the bird are moving in opposite directions, making a very difficult snap shot as target and barrel approach each other. All low holds tend to make you shoot the first bird late and then be very late for the second bird of the double. Correction: Keep raising your hold point, but only 1 inch at a time, until you find that you have to shoot quite aggressively, or “briskly,” to avoid shooting over the bird. Remember, the bird is thrown to pass through a 3-foot hoop whose center is 15 feet above the center stake. Your hold point needs to be 6 to 8 feet higher than that (20+ feet above center) for the path of the bird to intersect your point of aim and shot string 15 to 20 feet before it reaches the center. The side view in figure 9.2 makes it clear why this hold point needs to be correct to break the bird early. To avoid shooting too soon (this applies to almost every station), keep a loose finger on the trigger as you call. You have plenty to time to get the shot away, but a tight, nervous finger may cause you to fire too soon. Good hold point, but downward barrel motion. If you persist in moving the gun barrel down as the bird “falls” toward it, either you’ll shoot under the bird or it won’t get to the barrel until it’s way past the center stake. You need to let the bird approach the barrel, with merely the slightest downward ease as you fire. Correetion: This can be a difficult habit to break. You may even actively “pull” the gun down with your fore-end hand. Try shooting this bird with the fore end just resting on your open hand or the tip of your left index finger and think to yourself, “Wait for it.” Dominance problem. Some shooters miss either left or right of the bird without making any correction. Interestingly, high 1 and low 7 are perhaps the most common shots that involve using the wrong eye in firing (i.e., cross-firing). Perhaps this occurs because the bird and front bead are so close together when you first see the bird, and the barrel is very still. Correction: It is sometimes helpful for a shooter with occasional inconsistency on high 1 (or low 7) to shoot this bird one-eyed. This can make what once appeared as a blurred or confused image crystal clear.
STATION 1 LOW HOUSE
Almost all experienced shooters regard low 1 as one of the easiest birds on the field. But as with other so-called easy birds, shooters can get lazy and ignore some fundamentals, particularly the follow-through. Beginners can successfully spot shoot low 1 if they give it a 2- or 3-foot lead. The most deceptive aspect of low 1 is the drastic change in its angular velocity as it crosses the field. It shares this aspect with low 2 and, in reverse, with high 6 and high 7. Like all low house birds, it has a higher upward angle of initial flight, since the trap-house window is only 3 feet above the ground and the bird still must pass through the hoop centered 15 feet above the center stake. Since this bird is coming from the full distance across the field, your hold point and eye fixation point may not be critical as they are for many other birds. But it is still good training to use one-third as a hold point and the edge of the house or window as an eye fixation point. This forces you to use the same reaction time to initiate your swing as for the rest of the stations on the field.
Fundamentals
The fundamentals of low 1 are as follows: 1. Don’t abandon the stance you had for the high house. Keep your belly to the low house window. In fact, this stance was recommended to make you shoot the low house better as a second bird and thus shoot more consistently in doubles. 2. Your hold point is still one-third the distance from the low house to the center stake, but it looks very small and remains at or below the window (see figure 9.5). 3. Your eye is focused on a spot about halfway between your hold point and the window or the edge of the window or trap house for instant recognition of the target.
9.5 Low 1. Note how close the one-third marker appears to be to the house from station 1. It all depends on your angle to it. Here, it looks like it’s only 3 to 4 feet left of the window. Your hold point is there or just beyond. Although you have lots of time, train your eye to a set point in the air or at the edge of the window or edge of the house. The barrel is clearly at or below the bottom of the window—never higher.
4. Swing smoothly upward and in front of the bird. The bird is rising all the way to the center before it flattens, so be sure to keep your barrel rising with it. 5. Adjust the lead to 1 to 1½ feet. Fire when the target is well on your side of the center stake—about halfway between the center stake and your station. 6. Keep your head down tight, and follow through until stopped.
Common Errors
Losing your lead. You actually have too much time for this bird, making it easy to swing along too deliberately. With this single, you have to consciously accelerate as you pass the center stake, or you will surely shoot behind. To an observer, it frequently appears that you “stopped” as you fired, because the difference between bird speed and gun speed is so apparent.You, however, may not recognize what you did. Beginners love to spot shoot this bird, taking it by or before the center stake, but with a 2- to 3-foot lead. It’s not very hard to do but makes for an occasional miss.
9.6 Low 1 angular velocity curve. Note that you look at this curve from right to left—that is, from low house to high house—the same way you would follow the target with your eyes. Here, the target emerges with a modest angular velocity of about 15 degrees per second, which gradually increases to about 30 at the center stake. After that, the angular velocity almost doubles in the next 40 feet, to almost 60 degrees per second just before it passes the trap house. Remember, this curve does not represent the flight path of the bird coming across the field but rather its apparent speed to your eye as it comes toward you. What this curve tells us is that the smooth, slow swing that led the target satisfactorily for the first half the field will fall behind in the second half unless you accelerate to match the bird’s angular speed. So although the perceived lead changes only a little (see figure 9.7), unless you increase your swing speed sharply as the bird comes past the center stake, you will shoot behind.
9.7 Low 1 best apparent lead curve. Actually, the lead here is greatest if the target is shot clear across the field right after its emergence from the low house, owing to the distance to the target. The lead decreases modestly but then changes little from the center stake to the boundary marker. This is because the changing distance from gun to target is offset by the increased angle to the target in this half of the field. But unless the speed of the gun swing increases to match the angular velocity curve of figure 9.6, you will lose your lead and shoot behind. Correction: Look at the angular velocity curve for low 1 again (figure 9.6). You have to match it with gun speed. This semistop is one of the most frequent causes of misses at low 1. One effective cure is to deliberately take a very low hold point into the ground. Then swing along ahead of but well below the bird until it has passed the center stake. Then swing up in front and take it immediately, without delay or tracking. Loose head. This bird is so easy that you may tend to relax and let your head relax as well. A loose head is all it takes to shoot over this bird. Your pattern may be only 18 inches or less where you break this bird, which allows only a 9-inch error. Correction: You can never be too dedicated to keeping your head tight. Clamping it down as you fire is a great skeet habit. Flat swing. The approaching bird’s path can seem quite flat, so you swing flat. But the bird is actually rising to well past the center stake. It is very easy to end up seeing too much space above the barrel and shooting a foot below.
Correction: Project the flight path mentally, and stay up in front of the target.
STATION 1 DOUBLES
You need to be comfortable and confident in your ability to hit the first bird of each station at least four out of five times before you should try adding the double. It may be mechanically true that the first bird of the double is identical to the high 1 single, but it is certainly mentally different, and the second bird is clearly physically different from the single low house. These differences are frequently seen in the pattern of a shooter who “smokes” high 1 and low 1 but then misses both birds of the double. You also see the phenomenon of a shooter missing low 1, the low 1 option, and then smoking the double because he or she now has the gun moving for the low house bird. Every shooter has some extra anxiety when shooting doubles compared with singles on a station, even the very best. This is usually minimal for stations 1 and 7 and maximal for station 4. Your goal is to control and use that tension to your advantage. A low level of adrenaline can be a plus. Several very highly ranked shooters have contested my statement that every shooter has some degree of anxiety about doubles. When asked if they enjoy shooting the doubles more than singles, all have said yes. I believe the reason they prefer shooting doubles is the same reason they enjoy shooting at all—because it is fun and challenging to be perfect. It is challenging because of the possibility of missing, which increases slightly with the double. This heightened challenge accounts for both the anxiety and the fun and satisfaction that are associated with shooting doubles. While it may be fun, shooting doubles is also very informative, as it will instantly point out any flaws in your basic technique for the singles on that station.
Fundamentals
The tundamentals of doubles at station 1 are as follows: 1. Your foot and body positions remain unchanged; your belly button should still be pointing at the low house window. Here is where your foot position pays off. 2. Your hold point is the same as for high 1. You are going to shoot these birds as linked singles. The high house bird needs to be shot aggressively. Mentally, you cannot afford to suddenly get careful or lower your hold point. 3. Shoot the high house about 15 to 18 feet before the center stake—essentially identical to how and where you shoot it in singles. This allows you to reverse your swing and usually be ahead of the incoming second bird. If you can’t reverse ahead of the second bird, you are probably shooting the first bird a bit late. 4. Clamp your head down after shooting the high house, reverse, and the second bird should be to the right of your barrel—that is, you are already ahead of it. Accelerate, establish at least a 1½-foot lead, fire, and follow through. 5. Stay on the gun until you are stopped.
Common Errors
Incorrect hold for the first bird. Beginners and too many others have doubles anxiety and change their hold point for the first bird of a double. Either they hold higher, to try to shoot it quicker, or they hold lower or farther out, trying to be extra careful. It does your score little good to miss the high house and then smoke the low. If there were a better way of shooting the high house, you should have been doing it for singles. Correction: Force yourself to shoot this bird as if you were confident of it for the single. If you always shoot it past the center stake, do so now. Trying to shoot it earlier than your norm will probably result in a miss. It’s better to have to sweep the second bird than to miss the first bird. Just work on an earlier high 1 single and then incorporate it into your double. Incorrect hold for the second bird. A too-high hold point to shoot the first bird quickly often means missing over and perhaps also having the barrel block your view of the second bird, so your head comes up. Holding too low to be careful means a late shot, reversing behind the second bird and forcing you to rush the second shot. Correetion: Correcting this problem isn’t easy because your anxiety tends to make you shoot differently from the single. Also, there is no fixed reference of one-third or of background to help you for high 1. Here is where a good coach helps a lot. Mentally remind yourself to hold and shoot just like it was the single. Be aggressive on this bird, not careful. Poor foot position. You may shift back to a poor but natural foot position while loading for the doubles. Frequently this is done unconsciously just as you close and mount the gun. If this is combined with a late first shot, the second bird is almost behind your back before you reach it, and you miss. You just ran out of hip and torso swing and fell behind at the last instant. Correction: If you drill for several months on looking down at your feet just before you mount your gun, you’ll never have to think about foot position again. Your goal is to eliminate almost all prethought for each shot, except for a metal image of the bird being smoked. Head movement. You pick up your head after shooting the first bird to look for the second bird, or you fail to put it back down after the recoil of the first shot. Unless you keep your head clamped down, you’ll miss the second bird. Correction: Try letting the barrel drop downward after you see the first bird burst, allowing your eye to lock on the second bird without the barrel obstructing your vision. Then sweep up in front of the second bird. Everyone’s head comes a bit loose with the recoil of the first shot, but all good shooters have trained themselves to reclamp their heads and are not really aware that they’re doing so. You may have to consciously train yourself to shoot, clamp your head, and shoot until this is automatic, just like your foot positions.
CHAPTER 10 Station 2
STATION 2 HIGH HOUSE
I believe that for a right-handed shooter, high 2 is one of the most difficult birds on the skeet field. A quick look at figure 1.1 (in the introduction) should help you understand the difference between station 2 (likewise, station 6) and the rest of them. You are dramatically closer to the flight path of the bird than on stations 3, 4, and 5—close to half the distance. (Figure 10.5, later in this chapter, also visualizes this well.) As a result of that closeness, the bird’s initial visual angular velocity is almost as high as it was at high 1. But here you have to generate much more gun motion to shoot the target successfully. It is astonishingly easy for this bird to jump past the barrel before you can initiate your swing. By the time you shoot it, however, that initial velocity has dropped so sharply that it is easy to swing past and shoot ahead or be so far ahead that you stop. An additional problem on station 2 for the high house is visual. The angle between the normal one-third hold point and the trap-house window is too great for our eyes to easily bridge. Looking this far left is a strain, and it is common for the left eye to pick up the bird first. Even if you are able to see the window or edge of the trap house fairly easily, I believe that it is an error to try to do so because is affects your eye dominance. If you gaze that far to the left, your eye dominance moves to the left eye as well. Having it then jump to the right eye as you are swinging—or worse, not move back at all—can be a big problem. The solution is not to look all the way back to the house on high 2. If you try to look at the edge of the window on high 2, you will almost inevitably pull the barrel in too close to the window and be forced to sweep this bird with a rapid swing. Look only about halfway back from your barrel but distinctly higher, where the bird crosses your eye fixation point. Your peripheral vision will pick it up even before it gets to that point.
10.1 High 2. This figure illustrates how big one-third actually looks to your eye when on station 2—almost like one-half. Plus it shows the largeness of the angle (46 degrees) if you were to try to look at the edge of the window.
10.2 High 2 angular velocity curve. The initial value of 68 degrees per second falls so rapidly to 20 degrees per second at the center stake that it seems as if the bird has brakes. If you hold too close, the initial swing must be quicker than for any other bird except low 6. This makes it easy to swing too far ahead, particularly if you shoot a bit late, because from the center stake on, the angular velocity decreases much less rapidly.
10.3 High 2 best apparent lead curve. The perceived lead changes surprisingly little for high 2. The rapidly decreasing visual angular velocity is almost completely offset by the increasing distance from the shooter to the bird. The increased time for the shot to reach the bird offsets the lower angular velocity. Most shooters see this as a single lead picture of 1 to 1½ feet. It is actually lowest just about where you would prefer to shoot it, 10 to15 feet before the center stake.
Fundamentals
The fundamentals of high 2 are as follows: 1. You should be set rock solid facing the low house window (or facing the high house window if a left-handed shooter), with your weight forward on the front foot. 2. Your hold point is one-third the distance from the window. This is 3 to 4 feet past where the gun barrel is square to the baseline. It almost looks like one-half to your eye. And the hold point should be no higher than the bottom of the window—a bit lower than that is fine. 3. Your eye fixation point is not at the window or edge of the house, even if you look back that far on other stations. This would make you look too far left for good vision and pull the barrel in too far. Focus (i.e., stare) 6 to 8 feet to the left of your hold point and 4 to 5 feet above it. Essentially, this is the flight path of the target halfway back to the window. 4. Keep your head tight on the gun as you call. Angle smoothly upward, with and ahead of the target as it catches your peripheral vision. Although it closes rapidly to the barrel, you will have reached “bird speed” just as it approaches. Your swing is actually slower than your mind wants to believe. As the bird gets to 1 to 1½ feet, fire and follow through. The window of opportunity for this bird is small, similar to that for high 1. You have to commit and fire; otherwise, you’ll be too far ahead in another quarter second. But you still have much longer to be right than if you were “sweeping” this bird.
10.4 High 2. This photograph is deceptive in two respects. First, the wide-angle lens can see farther sideways toward the window than your eye can with the barrel at the one-third point. Second, the barrel is actually about 4 feet past the “square across” point, at or just beyond the one-third point. Note that it is level with the bottom of the window.
5. Follow through. This is easy to say, but the amount of swing on this bird, along with its visual slowdown, makes it easy to stop. Be sure to develop a positive follow-through, even if it’s short. 6. Continue with your head tight until stopped. If you can’t stay on the gun after the single, you won’t be on it for the double.
Common Errors
Hold point too close to the house. At least 75 percent of shooters let their hold points creep back too close to the house. They are determined to try to look at the window. If you get to where the gun barrel is at right angles to the baseline (i.e., square), you are pushing the limits of closeness. Even coming as close as square across requires a very quick move and makes it a harder shot. If you get closer to the house than square, you will usually be beaten by the bird and have to sweep the shot. Or worse, you will actually be moving the gun with your call, rather than when you first see the bird. This works some of the time, but when you get a fractionally slow pull, you’re in trouble.
10.5 This drawing of the skeet field shows the dramatic change in the visual angle from the one-third hold point to the high house window, as viewed from stations 2 through 8. This is simply a visual representation of the same basic facts demonstrated by the angular velocity curve. The angle is 47 degrees at station 2—more than almost anyone can see comfortably without strain or double vision. It plummets to almost half that, or 27 degrees, at station 3, where you can comfortably look at the window with good binocular vision (assuming you shoot with both eyes open). The steady decrease in angle as you move across the field makes each successive target seem slower and easier. High 2 is the biggest problem, but the angles also indicate why high 3 and low 5 look quicker than the other middle stations. Obviously, these angles essentially reverse themselves as you look at the low house birds from station 2 and then around the field to station 6, where it is again poor practice to try to look as far back as the window. Correction: Learn a formal setup for high 2 that works on any field, any time. Get your feet set right, and then point your gun straight across the baseline, at a right angle. Then move it 3 to 4 feet farther right and visually mark this point in the background. That is your hold point and should be no higher than the bottom of the window; a bit lower can be even better. Looking back too far. Some find that they can just barely see the edge of the window or the house when looking back, even with a good hold point. But the bird’s apparent speed (angular velocity) is much too fast and pulls your eye too fast; plus, there may be a problem with eye dominance (see chapter 6). Look back only about half the distance from your muzzle to the window, or you will probably make an abrupt swing and fire well ahead of the bird. Correction: Don’t allow yourself to be misted by the ability to look so far left. Doing so can move your eye dominance to the left eye. Train yourself to looking only partway back until this becomes a much easier and more consistent shot. Hold point too high. If you get your hold point up too close to the bird’s flight path and the bird is a bit flat or dips in the wind, it will disappear into the barrel just as it is approaching your 1-foot lead. Your head will come up to find it, and you will shoot over the top. Correction: Never hold higher than the bottom of the window—better yet, hold even lower. Starting even lower and swinging with an upward-angle shoulder turn can help you achieve brisk gun acceleration and more positive follow-through.
STATION 2 LOW HOUSE
Almost everything said about low 1 applies to some degree to low 2. For example, you have forever to shoot it. It starts slowly and only gradually seems to accelerate, achieving its highest angular velocity close to where most want to shoot it. It shares with low 1 a significant increase in angular velocity past the center stake. Once you are set up, it should look something like figure 10.6.
Fundamentals
The fundamentals of low 2 are as follows: 1. You are still set solidly facing the low house window. 2. A hold point of one-third is still best, but this is not a critical factor at this station. 3. Lock your eye focus halfway back to the house, or possibly at the edge of the window or edge of the house. 4. Move smoothly, pivoting on your front foot. The lead will close in until past the center stake. Lock your head down. 5. Be sure to match the increasing angular velocity as you come past the center stake. See 2½ feet of lead, fire, and follow through. 6. Finish to a full stop.
10.6 Low 2. Like low 1, your one-third hold point appears to be very close to the window but is not critical. However, it pays to stay below the bird almost to the center stake, just in case it takes a bad bounce or flattens suddenly in the wind. As always, start at the bottom of the window, as shown.
Common Errors
Stopping your gun and shooting behind. This bird seems easy, so you loaf. This doesn’t mean that you come to an abrupt stop, but you slow down just when you need to be accelerating. Look at the angular velocity curve in figure 10.7. Correction: As this bird comes past the center stake, you have to match its increasing velocity. Consciously accelerate to the moment of firing, using almost a pull-away, if need be. Don’t just increase the lead; instead, use a more positive swing and followthrough. Backing away. For left-handers, there can be another cause for stopping. Frequently, they allow themselves to “back away” from this bird, transferring their weight away from their right foot as they lead the bird across the field to their back left foot. This both slows their swing and frequently causes a shoulder roll-off at the same time. Correction: Re-emphasize that your weight should be on the front foot. Pick up the heel of your back foot as you shoot this bird for a few sessions to remind yourself. If you are still missing this bird, try the same cure as for low 1. Track ahead but well below until just past the center stake, and then come up and take it quickly.
10.7 Low 2 angular velocity curve. The curve is similar to that for low 1, except that the bird seems a bit faster from the start, and its apparent speed increases moderately to halfway past the center stake. It looks fastest just before your position on station 2. It emerges at a low of 28 degrees per second and peaks at 45 degrees per second just where most of us would shoot it, particularly for a double. Despite the increased angular velocity at this point, the best apparent lead distance is actually less because of how much closer you are to the bird.
10.8 Low 2 best apparent lead curve. The maximum lead at low 2, like at low 1, is just as it comes out of the window because of the greater distance. This is true despite the low angular velocity at that point. The lead then drops steadily and reaches its minimum about halfway between the center stake and the high house, just as the angular velocity peaks. Most shooters see this as a 2- to 2½-foot lead. Head movement. You need to keep your head tight. What else is there? Correction: Be conscious of cheek pressure as you call. If it means having a slightly tender cheek for a few sessions, it’s worth it.
STATION 2 DOUBLES
This double is easy; it is the high house single that’s hard. Your goal is to make the high 2 single easy enough that the double is just like tacking on a nice, easy second target—the low house. Don’t get hung up with this double. Concentrate on learning to smoke the high house bird 15 feet before the center stake, and this double will suddenly be in your comfort zone.
Fundamentals
The fundamentals of station 2 doubles are as follows: 1. Stance and foot positions are standard. 2. Hold point and eye fixation point are the same as for high 2—one-third out, but with your eye fixation point only halfway back toward the window. 3. Like station 1, these are linked singles.Take the high house 15 feet before the center, and reverse with a tight head. 4. Positively accelerate to take the low house with a 2- to 2½-foot lead. 5. Finish to your usual dead stop.
Common Errors
Hold position. If you move your hold closer to the high house in an effort to be quicker for the second bird, you may get beaten by the high bird and miss behind. So then you increase your swing speed, swing too fast, and miss ahead. Correction: The answer isn’t usually swing speed but rather a correct hold point with a smooth, deliberate swing. Rethink your hold point. Doubles anxiety. You have a good hold point but move faster for the high house than you would for singles. As a result, you may fire ahead of the high house, which is not a good way to break two at this station. Correction: Allow the high 2 bird to come to your barrel, with just a 1-foot lead. Use a smooth front foot pivot and a smooth followthrough but a quick reversal. Hend movement. You pick your head up after shooting the first bird to look for the second bird. Correction: Just clamp your head down tight and reverse after shooting the first bird. The second bird will be right there, so keep the gun moving. Even if the bird is way off course, your eyes will find it. Even if you are behind, you still have plenty of time to catch and pass this second target.
CHAPTER 11 Station 3 As you move from the small stations (stations 1 and 2) to the big stations (stations 3, 4, and 5), things change. In the first place, you are now far enough back from the baseline and around the field to be able to look at the window of the closer house. Second, these three stations are extremely similar, with the biggest differences being for the high 3 and low 5 targets. The reason for the similarity of these three stations is a historical accident in the development of skeet. The original layout for the first field was a full circle, with eight stations evenly spaced around it. Obviously, this put the shotfall in every direction as the round was shot. One neighbor objected to shots being fired in his direction, so the circle was cut in half, with a trap placed at each end of the field. Now they shot two birds at each station, one from a trap at each end. The field was still a full half circle, with seven evenly spaced stations and one in the middle. But it quickly became apparent that the trap boy was at risk from shooters at stations 1 and 7 and that when clubs wanted more than one field in a row, both shot and broken birds would fall on fields down the line. The first solution was simply to move the target crossing point 6 yards out beyond the base of the half circle, but still with evenly spaced stations. However, shooters now felt that the birds from stations 3, 4, and 5 were frequently well beyond normal upland bird ranges. So the half circle was shifted so that its center was based at the new target crossing point, but the baseline from station 1 to station 7 was still 6 yards away. This reduced the arc of the field to significantly less than a half circle. Because the stations were evenly redistributed in this smaller arc, stations 3, 4, and 5 now fall in a much flatter arc than when the field was a full circle. As a result, the distance from gun to target is very similar for all shots from these three stations, but there are differences.
STATION 3 HIGH HOUSE
A look at figure 10.5 from chapter 10 shows that the angle from a normal hold point to the window is about 27 degrees. This is less than the angle tor high 2, but still much higher than it is for the high house from stations 4 and 5. So this target will look quicker. The visual angular velocity curve for high 3 shows you just how quick (see figure 11.1). The best apparent lead curve has become almost flat (see figure 11.2). Given these basic facts, your shot should resemble figure 11.3.
Fundamentals
The timdamentals of high 3 are as follows: 1. Your posture and foot positions should be second nature by now. Point your belly button toward the low house window. 2. get your hold point precisely set and your eyes fixed halfway toward the house or edge of the window. Focus, and keep your head tight. 3. Keep your weight forward, and visualize a 3½- to 4-foot lead. 4. Swing upward and ahead of this bird, and shoot as soon as it closes to your visualized lead—usually about 15 feet before the center stake. 5. Follow through to a high stopped finish.
11.1 High 3 angular velocity curve. Although peaking at 65 degrees per second, the angular velocity curve is flatter and much higher at the center stake than it was at high 2. This, plus the greater distance to the bird, causes a considerable increase in the lead on this target compared with the small stations. The best apparent lead curve has become almost flat (see figure 11.2).
11.2 High 3 best apparent lead curve. Sometimes things equal out. Here, the variables of angular velocity, distance to the bird, and slowing speed of the bird almost cancel one another out. Although the visual lead is more than double what is was for high 2, it remains almost constant no matter where the bird is shot on the field. Most see this lead as from 3½ to 4 feet. Given these basic facts, your shot should resemble figure 11.3.
11.3 High 3. Here is your familiar one-third hold point, with the approximate bird path and your gun’s path. You sweep up from the level of the bottom of the window to intercept the bird’s path 15 feet or more before the center stake.
Common Errors
Head movement. Lifting your head to see better is common at all stations. Correction: One of your established routines should be to lock your head down before you call. Calling too fast. Calling too fast after the gun is set up is another common error. Correction: Stare at your eye fixation point for a full second before calling to ensure that your eye focus is fixed and you are mentally ready. Moving with your call. You need to wait until you first see the bird. A slightly slow pull will clearly indicate whether you are having this problem. Correction: Focus hard, and look for the orange flash. Don’t leave without the target. With practice, you will move reflexively with the flash and not as you call. Missing behind. Missing behind is common here because the lead has increased so much from the lead seen at station 2. Correction: Be sure that you both see the big lead you need and shoot the instant the bird closes to that—no measuring or tracking just to be sure.
STATION 3 LOW HOUSE
Low 3 can almost be thought of as low 2 with a bigger lead. But the angular velocity curve and best apparent lead curve have both shifted upward.
Fundamentals
The fundamentals of low 3 are as follows: 1. Glance down at your feet and then up at the window to check alignment, which by now should be your standard setup routine. Don’t shift from your stance for the high house. 2. Balance is forward, with a perfect gun mount and cheek solidly on the comb. 3. Keep the barrel below the window, into the ground. 4. Focus hard halfway back to the window or trap-house edge before you call. 5. Take this bird with a 3½- to 4-foot lead and a positive follow-through after it enters your half of the field. 6. Finish your follow-through to a complete stop.
11.4 Low 3 angular velocity curve. The angular velocity for low 3 peaks at about 52 degrees per second, some 15 percent higher than for low 2. It also peaks earlier, just at the center stake. This means that the gun’s angular velocity will be about 15 percent higher at the kill point than it was at low 2 if you are shooting a maintained lead.
11.5 Low 3 best apparent lead curve. This curve has the same general pattern as for low 2, but it’s displaced about 50 percent higher at the point where we generally like to shoot this target—opposite the station 3 shooting pad. This apparent lead is slightly less than at high 3, but with a slightly higher gun speed. The combination of these two factors means that the same lead works well for both.
11.6 Low 3. Visually, the familiar one-third hold moves out just a bit more than at low 2. The hold point is not critical at this station, but it pays to be consistent. The approximate target path and gun path are indicated. The gun is at the usual low hold point in the grass, not up in the trees.
Common Errors
Relaxation. Like all incoming birds, this one gives you more time, but relaxing too much is a cardinal sin. It makes your head loose and slows your swing. Stay alert and smooth. Correction: Clamp your head down and note that the angular speed is increasing all the way to where you should be pulling the trigger. Keep a very positive follow-through. Riding the incomer. Low 3 is easy compared with hugh 3, so you ride it to within 10 feet of the hugh house. Your swing slows as your body torques up, and your arms are forced into play. This is a setup for a stop and miss behind. Correction: Shoot the bird anytime it arrives on your side of the field past the center stake. Riding incomers too long is a significant error in technique. Don’t allow yourself to fall into this bad habit. Shoulder roll-off. You’re not keeping a level or upslope shoulder turn—that is, you’re rolling off. Correction: Concentrate on finishing to a stop that is higher than the firing point, still on your front foot. Weight transfer. If you are a left-handed shooter, it’s very easy to make a bad weight transfer onto the rear left foot while tracking this bird. It slows your swing and may be accompanied by shoulder roll-off. Coriection: Concentrate on pivoting on your front foot. Pick up your left heel to keep you on your front right foot as you pivot.
STATION 3 DOUBLES
Doubles at stations 3, 4, and 5 are normally shot only as part of a round of all doubles in a doubles match or as part of a shoot-off. All doubles matches and shoot-offs are sufficiently different from a regular round of skeet that they are considered separately in chapter 17.
CHAPTER 12 Station 4
STATION 4 HIGH HOUSE
As a big station, high 4’s lead, appearance, and timing are quite similar to those for the other big middle stations. The changes from high 3 are modest and predictable. The angular velocity curve flattens out a bit. The initial value is slightly lower, and the drop-off is less than for high 3 (see figure 12.1). The best apparent lead curve is quite similar to that for station 3 (see figure 12.2).
Fundamentals
The fundamentals of high 4 are as follows: 1. Determine your correct hold point—both distance out and height. 2. Set up perfectly balanced, with your weight forward, head down tight, and eyes focused hard before you call. 3. Visualize your lead and follow-through. 4. Keep your shoulder turn level, and pivot on your front foot. Keep yourself locked solidly into the gun. 5. Take the bird with a mid-station lead of 3 ½ to 4 feet, and finish to a high stop.
Common Errors
Getting your arms into the swing. When shooting high houses, right-handed shooters tend to get their arms into the swing, pulling the gun away from the face and moving the eye’s pupil to the left. On a high house, this makes you shoot behind, even though everything still looks fine. Correction: Lift both elbows a bit and lock into the gun so that your turn is one piece on your front foot with your head locked down.
12.1 High 4 angular velocity curve. The peak angular velocity occurs just before the center stake and is about 57 degrees per second; it never falls much below 30 degrees per second. The drop in angular velocity past the center is less than at high 3 because you remain at a greater angle to the bird past the center.
12.2 High 4 best apparent lead curve. The curve is still very flat and indicates that this would be the highest lead of any on the field—just at the window as the bird emerges. But by the time it is normally shot, two-thirds of the way to the center stake, that lead has fallen to essentially the identical lead as for high 3. The slightly shorter lead past the center stake has meaning only for shooting the second bird of a double at this station (see chapter 17).
12.3 High 4. If you go back and look at figure 10.5, you’ll see that the angle from the window to one-third is now only 17 degrees. Station 4 is the only station on the field for which a measured one-third actually looks like one-third to your eyes. Note that the one-third hold point is barely at the horizon in order to stay below the window. You have to project the hold point height for each different field, because background always varies. The normal flight path of the target and the intercept barrel path are indicated. Riding the bird. If you take advantage of the perceived extra time, you may ride this bird to or past the center stake. This can make you fall behind and, even it you break it, lead to trouble on doubles. Correction: This bird is still an outgoer, so treat it as such. Take it briskly, well before the stake. If you shoot it with the same gun acceleration and timing that you used for high 3, you will break it a few feet earlier. This is an asset for doubles at this station. Insufficient lead. One of the most common errors at all three middle stations is not visualizing enough lead. It may be caused by a very mild slowdown of the swing or follow-through that makes the previous lead insufficient. Correction: Don’t arbitrarily increase the lead when you are shooting behind a particular bird. This may result in your shooting an abnormally long lead with an abnormally slow gun speed. Get back to basics: strong pivot and shoulder turn on the front foot, normal lead, very firm follow-through to a high finish. If this doesn’t solve the problem, you can add 6 to 12 inches of lead. Head movement. Picking up your head to see the bird better is a problem at any station, any field, any club, and any match. Correction: No matter what else you do after you make your first miss in a round, clamp your head down extra firmly and be extra conscious of cheek pressure as you smoke the option shot.
STATION 4 LOW HOUSE
Something suddenly changes at low 4, and during a normal round of skeet, you must mentally shift gears. Up to now, every bird from the low house has been treated as an incomer, which means that you have allowed them to come at least a little past the center stake before shooting them. But at station 4, you need to treat both high and low house targets as outgoers, shooting them 15 to 18 feet before the center stake. So the timing and rhythm of this shot are distinctly different from those for low 3.
12.4 Low 4 angular velocity curve. Low 4’s angular velocity peak is about 55 degrees per second, similar to high 4, but the peak is on the low house side of the center stake—just about where you want to break it. This curve is almost a mirror image of the one for high 4. Obviously, you can’t afford to be slowing down your swing as you shoot this bird, unless your plan is to deliberately shoot it very late.
12.5 Low 4 best apparent lead curve. The lead remains essentially identical to that for the high house until past the center stake. It can hardly be distinguished from that for low 3. This lower lead past the center has meaning only for the second bird of doubles at station 4, when shooting the high house first (see chapter 17).
12.6 Low 4. As with most low house birds, the hold point is down into the grass. The gun moves to intercept the bird’s path at about 20 feet before the center stake.
Fundamentals
The fundamentals of low 4 are as follows: 1. Remain poised and balanced, with your weight forward. 2. Keep yourself locked firmly into the gun, with your head tight. 3. Set up on the proper hold point. 4. Keep your eyes focused and fixed for target emergence. 5. Stay alert, moving with and ahead of the bird. Be ready. You are making a stronger move on this bird than you did on low 3 because you are taking it earlier. 6. See the correct lead. 7. Fire, and finish the shot to a stop.
Common Errors
Riding the bird. Like high 4, it is easy to get into the habit of letting this target reach the center stake or go past it before shooting. This isn’t a big problem in singles but can be a disadvantage in doubles. Correction: Concentrate on taking this bird as soon as it closes to your normal lead. Visually, it is shot as a closing lead, for the most part. Holding too high. As you move from the low house at station 3 to station 4 (and then station 5), it becomes easier to hold too high. And if you make the error of holding too high and this bird throws flat, your head will come up to see it. Correction: Use a lower original hold point. Firmly establish where the bottom of the window is in relation to the ground. It may be no higher than the center walkway, if there is one, or down in the grass.
STATION 4 DOUBLES
Doubles at stations 3, 4, and 5 are normally shot only as part of a round of all doubles in a doubles match or as part of a shoot-off. All doubles and shoot-offs are sufficiently different from a regular round of skeet that they are considered separately in chapter 17.
CHAPTER 13 Station 5
STATION 5 HIGH HOUSE
This last of the big stations is not much different from stations 3 and 4. The principal change is that you have more time for high 5 because you let it come past the center stake before shooting it. You treat it as an incomer. When looking at the angular velocity and best apparent lead curves for this station (figures 13.1 and 13.2, respectively), it is apparent that they are almost mirror images of the curves for station 3 low house.
Fundamentals
The fundamentals of high 5 are as follows: 1. Set up solidly facing the low house window. 2. Establish your one-third hold point, lock into the gun, and keep your cheek down tight. 3. Keep your weight forward, and make a smooth pivot on the front foot. Focus halfway back or on the edge of the trap house. 4. Match the target speed by the center stake, and take it 15 to 20 feet past the center stake with a 3½ to 4 foot lead. 5. Follow through firmly to a stopped finish.
Common Errors
Riding the bird. With all incomers, it’s easy to ride them too far and make a semistop. Correction: Force yourself to take this bird a bit earlier than normal. Try shooting it as soon as it comes to the center stake, and force the follow-through a bit. Even when you think you broke it right over the center stake, your smoke will frequently be hanging 10 to 15 feet past center.
13.1 High 5 angular velocity curve. Like high 3, the high 5 angular velocity peaks at about 52 degrees per second, and it does so very close to or just past the center stake. However, your gun is accelerating all the way to the kill point.
13.2 High 5 best apparent lead curve. The lead is big, but within the range of leads for the other big stations. Most shooters see it as about 3½ to 4 feet. Also, like low 3, the best apparent lead is highest just as the bird emerges from the house, mostly because of higher bird velocity and greater distance at that point. It is lowest just about where we normally shoot it, at 10 to 20 feet past the center stake.
13.3 High 5. Visually, the one-third hold point moves in toward the house. The visual angle is down to 11 degrees (see figure 10.5). The hold point still remains below the window. As always, you want to sweep up, staying with and ahead of the bird on an intercept path. Weight transfer. If you’re a right-handed shooter, it’s easy to make an incorrect weight transfer as the bird crosses the field. Correction: Force yourself to concentrate on a pivot and shoulder turn based on your leading left foot. Pick up the right heel if it helps, but it’s better to stay balanced on both feet with your weight forward. Head movement. As always, keep your head tight on the comb as you fire. The three fundamentals for every station remain the same: head on gun, eye on target, and proper lead. My notes for correcting common errors can only alert you to some mistakes that are more common than others at certain stations.
STATION 5 LOW HOUSE
Champion Ed Scherer has called low 5 the “insidious target” and has even suggested that it be eliminate. I happen to think that high 2 and low 6 are more difficult, or at least are the source of more misses.
13.4 Low 5 angular velocity curve. The curve is just over 60 degrees per second immediately after emergence and then falls smoothly. But it is still about 50 degrees per second at the center stake, past where you normally want to shoot it. This is almost a reverse of the curve for high 3, differing slightly because of the different throw speed and more upward angle of flight.
13.5 Low 5 best apparent lead curve. The best apparent lead is almost identical to that for all the other middle station birds, with only a modest decrease from emergence to center stake. Low 5 has three things that make it more difficult than the five targets preceding it. First, like high 3, you are closer in, so the high initial angular velocity makes it look faster. Second, its flight path has a significantly higher upward angle, making it easy to fail to go up sufficiently. Third and perhaps most important, it always emerges into a ground or tree background. You may be forced to shoot it before it reaches a sky background, which affects your judgment of lead.
Fundamentals
The fundamentals of low 5 are as follows: 1. Your foot placement, balance, and perfect gun mount remain unchanged. 2. Like all outgoing targets, use a precise hold at the one-third point (or a bit plus or minus). 3. Although you can get eye fixation on the edge of the window or edge of the trap house, halfway to three-quarters back from your hold point may be better. Left-handed shooters, especially those shooting with a patched or closed right eye, may not pick up this bird quite as quickly.
13.6 Low 5. Many fields have a poor background for shooting low 5 (and low 6). Clearly, this low 5 target will be in the ground and trees until almost the kill point. It won’t be in the sky until it’s almost past the taller group of trees. Although this is also true for low 3 and low 4, you have more time to see and adjust your lead on those targets. For low 5, you need a steeper upward gun sweep than for low 3 or low 4.
4. You have to move instantly with this bird, or you’ll be forced to do a semisweep or pull-away shot. Be ready and fully focused. 5. You need a very positive upward sweep ahead of this bird. You may be conscious of seeing the lead as a closing lead. The instant it is right, the gun should go off. 6. The marked upward sweep emphasizes the high follow-through to a stop.
Common Errors
Hold point too high. This is an extremely common error on this station. Even in figure 13.3, the barrel should be down another inch or so. I think the shooter lifted a bit as he moved his head out of the way for the picture. You need a clear view of this bird for the three reasons mentioned before: high angular velocity, larger swing angle, and dark background. Correction: Keep the barrel down to the bottom of the window with a vengeance. Double-check that height against the background before you mount your gun. Calling too soon. The increased difficulty of this target causes a tendency to call too rapidly, owing to anxiety. Correction: Double your focus time before calling for this bird. Hold point too close. Getting your hold point even a hair too close can result in getting beaten by this target, especially against a poor background. Correction: Double-check your normal hold point carefully. Against bad backgrounds, you may need to move your normal hold point out 1 or 2 feet to allow for the extra reaction time and to keep your swing the same.
STATION 5 DOUBLES
As with the other middle station doubles, these are considered separately in chapter 17.
CHAPTER 14 Station 6
STATION 6 HIGH HOUSE
The big shift from station 5 high house is the much shorter lead and longer flight time before the bird is shot. High 6 shares specific problems with low 2 because of these factors.
Fundamentals
The fundamentals of high 6 are as follows: 1. Check your foot position in relation to the low house window. 2. Maintain a solid gun mount, tight head, and one-third hold point. 3. Be focused before you call. 4. Take a balanced swing on your leading foot. 5. Accelerate slightly all the way to and past the firing point, with a 2-to 2½-foot lead. 6. Finish to a high stop.
Common Errors
Weight transfer. Right-handed shooters tend to move their weight in the same direction as the bird’s flight—from the front left foot to the right foot—as they swing along with the bird. This moves their center of rotation to the right, slowing the swing just as it should be accelerating. Some shooters have learned to compensate by adding arm swing or shooting with a longer lead. With these two compensating errors they can still break the target, but with a less reliable technique. Even though high 6 is a nominally easy target, it is one of the worst for weight reversal, resulting in missed targets, especially on the second bird of the double. Correction: Try temporarily exaggerating the weight-forward position, and complete the pivot on the left foot. Pick up the right heel as you shoot this bird, as illustrated in figure 14.5, until you maintain correct balance through the follow-through.
14.1 High 6 angular velocity curve. The curve starts low and peaks at about 50 degrees per second, just about where we like to shoot it. As with other incomers, you must match this with an increasing swing speed up to the instant of firing to maintain your lead. Note that this curve is almost a mirror image of that for low 2.
14.2 High 6 best apparent lead curve. The curve mirrors that for high 2. The biggest lead occurs at the window when the target emerges and falls to a minimum just before it reaches the low house. Like its low 2 counterpart, this combination of increased time and lower apparent lead makes high 6 a nominally easy bird. But note that the swing speed at the kill point is almost the same as for high 5. There is less lead but close to maximum swing velocity.
14.3 High 6. Like the other small station incomers, the hold point is not critical because you have so much time for correction. But consistency is a virtue, so use the one-third hold point. Just remember that you must be accelerating all the way to the kill point to maintain the lead.
14.4 Poor posture and unbalanced finish on high 6. The shooter’s weight has transferred so far onto the right foot that his left heel has actually come off the ground. His swing center and balance have moved right, to over his right foot. His shoulders have rolled off to the right, pulling the barrel down. Some shooters even have to take a step with the left foot to maintain their balance after firing.
14.5 Balanced high 6 finish. The shooter’s weight is still 60 to 70 percent on the front left foot, and the pivot is entirely on the left leg, with a level shoulder turn. Even keeping the back heel up as you shoot can help if you have a problem developing a good turn on this station. Once you have that down, keep the right heel down for better balance. Shooting behind or over. On this easy target, you may loaf along and shoot a foot behind. From the sidelines, it looks like a stopped gun. Or you may pick your head up to admire the easy bird and shoot over it. Correction: Top-level shooters rarely have loose heads or fail to give this bird a normal follow-through. Look at the angular velocity curve for this station again and compare it with that for high 4. They have almost identical peak angular velocities. Although the lead is less, mostly due to the short distance to the target, the gun speed at the kill point is almost identical to that for high 4 and high 5. This target may be easy, but that doesn’t mean you can have a slower gun at the moment of firing. You have to match its increasing velocity all the way.
STATION 6 LOW HOUSE
Low 6 is one of the two most difficult shots of a normal round of skeet. It has all the same problems that occur with high 2. This station is so close to the house that the angular velocity is very high. The angle between a good hold point and the window is so great that looking at the edge of the window will force any shooter into sweeping. In addition, the bird usually emerges into a grass or tree background, not the sky. The data curves confirm this.
Fundamentals
The fundamentals of low 6 are as follows: 1. Keep your stance, posture, and balance correct. 2. This is a critical hold point station—usually 2 to 4 feet farther out from square to the baseline. 3. The eye fixation point is only halfway back from the gun barrel toward the window. 4. Maintain a smooth, even swing as the bird closes in to your barrel. 5. Have a 1- to 1½-foot lead, with a small but positive follow-through. 6. Complete the shot to a high stop.
14.6 Low 6 angular velocity curve. This curve mimics the one for high 2 in reverse. Its velocity is a bit lower than that of high 2 simply because the bird is thrown slightly slower from the low house trap. Like high 2, the initial high velocity—63 degrees per second—falls to less than half that value at the center stake. Visually, it slows down abruptly in the first half of its flight.
14.7 Low 6 best apparent lead curve. Like high 2, the apparent lead doesn’t change very much, no matter where you shoot it across the field. The angular velocity decrease is largely canceled out by the increasing distance to the bird. Like high 2, most shooters see the lead at low 6 as between 1 and 1½ feet.
Common Errors
Hold point too close to the window. As discussed under high 2, shooters who originally shot by sweeping this bird almost unconsciously move the barrel in toward the window as they look back before calling, even though they initially set up with a good hold point. They are uncomfortable not being able to look right at the window. Correction: As with high 2, learn a routine for setting yourself up at this station. Get the stance right, and point the gun square to the baseline. Add 2 to 4 feet, or however much turns out to be right for you. Visually mark that point in the background. When you look back halfway toward the low house, be conscious of maintaining your hold point. Focus hard and visualize the break before you call. Holding too high. If you anticipate the upward path of this bird, you may hold too high. If the bird throws even a bit flat, it goes under the barrel and your head comes up. Correction: If the barrel is not below horizontal when you set up for low 6, your hold point is too high—untess you are only 3 feet tall. This bird emerges only 3 feet above the ground. Carefully scan with your eye the level of the window bottom projected out to your hold point. This shot requires that your swing have a marked upward initial sweep, quite similar to low 8, except for direction.
14.8 Low 6. Like the photo for high 2, this one is deceptive in that the camera lens sees much farther sideways than your eyes can. If anything, the gun is a bit high here, but it is out past square by 3 feet, and the eye fixation point should be no farther back than indicated by E. As the reverse of high 2, the angle between the window and your eyes is too great (46 degrees) to allow looking into the window for a maintained lead (see figure 10.5). The bird’s flight path and gun intercept path are also indicated. Swinging too fast. As with high 2, you allow the initial high visual velocity of the bird push you into swinging too fast. You either shoot ahead or get so far ahead that you are forced to check your swing and shoot behind. Correction: Check the velocity curve again. Note how it slows markedly by two-thirds of the way to center. Concentrate on a smooth, even swing, and let the bird close to the proper lead. Like high 1, it is a mentally quick shot with a small lead or forward allowance.
STATION 6 DOUBLES
As mentioned for station 2 doubles, the double itself is not that hard. The problem is a metal one: how to shoot the low 6 bird first without behaving dittferently from when you shot it as a single. It takes a great deal of concentration and an emphasis on the basics of the first bird. This double also makes it clear if you are shooting the low 6 a bit late—that is, shooting it at or beyond the center stake— because you now find yourself chasing the second bird almost to the low house.
Fundamentals
The fundamentals of station 6 doubles are as follows: 1. The setup is standard: stance, feet, head, and hold point. 2. Take a smooth, even, upward swing with the climbing first bird. Take the bird as it closes to 1 or 1 ½ feet, 15 to 18 feet before the center stake. 3. Reverse with a tight head. As with all doubles, you have to train yourself to clamp down your head, because the first recoil always loosens you up a bit. 4. You should be ahead of the incoming high house, but remember that you are picking up this bird at its highest angular velocity. Accelerate firmly to a positive follow-through. 5. Finish the shot to a stop.
Common Errors
Shooting the first bird differently from the single. Like at station 2, you may try to shoot the first bird better than you did the single —holding in closer, holding out farther, or shooting it more quickly. Correction: Your setup routine is half the battle. Focus on a smooth easy swing and do not allow yourself to prematurely move on to the second bird until you have finished shooting the first bird! That results in a stop and miss behind on the low house. Be sure your focus is fixed before you call. Reverse weight transfer. This error occurs when you make the reverse after the first shot by shifting your weight from your left front foot to your right foot. This eliminates your front foot pivot and slows your swing. Some shooters who have no trouble with this on the high 6 single have a problem on the double. Correction: Three things can help: shoot with your rear heel off the ground; have a friend hold a finger almost in your ribs while you shoot, and don’t back into it; and intensely focus on the front foot pivot. As noted in chapter 2, it is surprising how many shooters who make this transition from weight reversal to a proper pivot suddenly start shooting ahead of the bird. Because their swing is suddenly so much more efficient, with a more positive follow-through, they need to see less lead. Other mechanical errors. You can also lift your head, poke at the second bird instead of swinging, and even stop. Correction: Get back to basics: feet, head, hold point, eye fixation, focus, and smooth pivot on the front foot.
CHAPTER 15 Station 7
STATION 7 HIGH HOUSE
This shot, frequently the beginner’s favorite, can beguile some otherwise top-level shooters. Similar to low 1, there is too much swing time before a normal kill-zone shot. The angular velocity curve adds to the problem.
Fundamentals
The fundamentals of high 7 are as follows: 1. None of the fundamentals have changed. But let any one of them slip, and you may have the round’s second most embarrassing miss (missing the second bird at low 8 is a bit worse). 2. Keep your head down tight and your eyes locked on target, accelerate to maintain your proper 1- to 1½-foot lead, and finish the shot with an excellent follow-through to a stop.
Common Errors
Slow swing. You nearly get lulled to sleep, because it seems to take so long for this bird to get to your kill zone, and your gun speed doesn’t increase when it should. Your lead looks right, but you miss behind. Because your swing is slightly too slow, you learn to break it only by giving it a longer lead, thus introducing compensating errors. Correction: This bird, like low 1, can occasionally trouble an otherwise good shooter. If reemphasizing the fundamentals doesn’t work, try the same solution mentioned for low 1: lower your hold point into the ground; swing way below the bird until it is just past the center stake; come up smoothly and take it immediately as you see your proper lead, without any further tracking or hesitation; and finish your follow-through.
15.1 High 7 angular velocity curve. Given the very narrow angle of view, the initial angular velocity is very small, only about 18 degrees per second. Then it steadily rises all the way across the field, peaking just past the normal kill zone at about 46 degrees per second. Unless you take this bird much earlier than you would as a double, you must still be accelerating significantly as it enters your kill zone.
15.2 High 7 best apparent lead curve. The best apparent lead, though decreasing slightly from the window to center, hardly changes at all from there on. The lead doesn’t change, but the gun must be accelerating to match the bird speed if you want to maintain that lead.
15.3 High 7. The viewpoint angle as you set up is tiny. The normal one-third hold point is only 7 degrees from the window (see figure 10.5). The hold point is not critical at this station. Just remember that as you come past the center stake, you are still in an accelerating mode. The final gun speed is only slightly less than that for high 5 at the point you normally shoot this target, even though the lead hardly changes. Compare their peak angular velocities. Shooting ahead. Although not as common as a slow swing, this error has essentially the same cause. It can happen when you are working on the fundamentals to achieve consistency. If you previously developed the bad habit of shooting high 7 with at least a 2-foot lead but a slow gun, and you now concentrate on mastering the other fundamentals, the lead suddenly becomes too much. Correction: I once missed four or five high 7s in a single flight at a competition many years ago because of this problem. A coaching friend was able to cure it after watching me for a couple of shots. He simply had me pull my lead back to match the other fundamentals for that shot. Reverse weight transfer. Like high 6, this is an easy bird for right-handers to back away from with a reverse weight transfer, which now and then causes a miss behind. Correction: As on high 6, focus on the front foot pivot. See the discussion of weight transfer in chapter 2.
STATION 7 LOW HOUSE
Whether it is easy or hard for you, low 7 is the only shot on the field where you can talk about no lead. In truth, if you were shooting it with a 22 rifle, it would actually have several inches of lead—maybe 2 inches below and 1 inch to the left. But with a shotgun shot pattern, you don’t have to think much about it. The position of the window several feet to your right and 2 feet below the gun makes the angular velocity curve look strange, but this is what your peripheral vision sees.
Fundamentals
The fundamentals of low 7 are as follows: 1. Like high 7, your only real excuse for missing this bird is to have significantly neglected one of the three skeet fundamentals: eye on target, head on gun, and proper lead. 2. Your hold point is very important here, and you have a couple options: • I prefer the barrel right over the center stake, but only about 5 to 6 feet above ground level. The bird won’t be this high until almost halfway to the center, and it becomes clear to your eye at about the same point. Look several feet above the barrel at the sky (or background), move to the bird, and take it as you reach its toes (the bottom edge). Shoot it before the center stake. There’s no need to see it sharply; just move to and shoot the blur. Unless the bird throws far inside, your move will always be up or up and right.
15.4 Low 7 angular velocity curve. Seen only in the margin of peripheral vision, the bird flashes out so fast that you see it clearly only about one-third to one-half to the center stake. At that point, similar to high 1, it loses nearly all meaningful angular velocity. By the time it is two-thirds to the stake, that velocity is only 5 degrees per second, and it falls to 3 degrees per second or less past the center stake.
15.5 Low 7 best apparent lead curve. Many are surprised that this target has any lead other than zero. But because it is several feet to your right as it is thrown, it has a very small initial lead just to the left of the bird, which by the time it reaches the center, is several inches below the target. This hardly seems enough to be concerned about, but it can be a source of one common error—shooting over the bird.
15.6 Low 7. The appearance of a level hold point, with the usual bird path and gun swing path indicated. The target first appears to the right and closes to the left as it approaches the center stake. Only high 1 has as little gun motion.
• Several excellent competitors I know hold low, but always in a slightly different spot—left, center, or right—for every low 7. This forces them to always make a positive move to wherever the bird is thrown. The advantage of such a hold is that, like high 1, low 7 can throw not only high or low but also left or right. The other targets don’t have the same four-way variability. If they throw a bit in or out, you normally can’t see it, and it has little or no effect on hitting the bird properly. Taking a variable hold point forces you to focus on where the bird is actually thrown, rather than where you think it should go.
Common Errors
Hold point and eye fixation point too close together. This is even worse on low 7 than on high 1. Your nominal hold point can be so close to a good eye fixation point that it is astonishingly hard not to be looking at the front sight when you call “pull.” Fortunately, this shot requires so little from you that you’ll break it 90 percent of the time anyway—but not always. Correction: Deliberately look away from the front sight and stare at the sky several feet above the barrel for a full second before you allow yourself to call “pull.” This gets your eye into its distance focus, and the bird will jump into focus about halfway to the center stake. Then it’s kill time. Holding too high. Part of the same problem is holding too high, or anywhere up close to the point where the bird will be at the center stake. If you hold there, the bird will never be up to the barrel until it’s at the center stake. You are already shooting it late. Correction: Put the barrel only 6 feet above the base of the center marker—essentially level. Stare at the background several feet above the barrel. As the bird jumps into vision, make a small but positive move to its toes and instantly shoot it. Don’t cover it up. Practice staying with your head tight on the gun for a full second after you have shot low 7 and stopped. This is good training for shooting the double. Spot shooting. This error involves putting the barrel about where the bird should be at two-thirds to the stake, calling, and pulling the trigger without any real gun motion. Again, this bird requires so little from you that you can often get away with this, unless it throws a bit off. But shooting with a dead gun in your hands is never going to get you top scores. Correction: Make sure that your preferred hold point is one that will always force you to make a modest gun motion to reach the bird. Shooting over. As the blurred bird enters your peripheral vision, it is a bit below and to the right of the barrel. If you lift your head at all, you will shoot over it. Less experienced shooters frequently lift the barrel much too quickly to reach the bird and, as a result, cover the bird completely before getting the shot off. This also causes a miss over the top. Correction: Move the gun barrel with your legs and trunk, not your arms. This results in a short, controlled move to the bird. Take it just as you approach its bottom edge.
STATION 7 DOUBLES
This is the double that beginners like best. It should be simple, but only if you pay attention to the fundamentals and concentrate.
Fundamentals
The fundamentals of station 7 doubles are as follows: 1. Look at your feet before you mount your gun. Because station 7 seems so easy, many shooters revert to the foot positions they used as beginners. 2. Keep your head down. 3. Move to wherever the low house bird throws, and shoot as you approach its bottom edge (toes). 4. Look at the second bird, the incoming high house, before moving to shoot it. If you move without seeing it, you will frequently be much too far ahead and have a dead gun in your hands.
Common Errors
Poor foot position. For lett-handers in particular, if you have drifted back to sloppy foot positions because this bird is so easy, you will eventually miss the second bird. If the first bird throws wide or bounces in the wind, you may get to it, but then you may be late for the second bird and have to shoot it almost at the low house behind your back. You will be very fortunate if your head doesn’t come up at the same time. Correction: Look at your feet as you set up. Lock your head tight, and take the bird briskly; don’t let it reach the center stake. Keep that second shot easy. Shooting over the top. An erratic low house can cause you to reach it a bit late, particularly with a bird thrown high. Because you have to make an unusually strong upsweep to the bird, your normal follow-through is high as well. The second bird may now be below the barrel, and your head comes up to search for it. Correction: You will always have an upward gun motion with this bird if you use the recommended hold point. Practice clamping your head down and bringing the gun down as you reverse. Actually get below the incoming high house and then sweep back up in front of it. Make this your never-miss double, if only because you always work so hard on it.
CHAPTER 16 Station 8
STATION 8 HIGH HOUSE
Rank beginners think that station 8 is almost impossible. Six months later, they find it quite easy, even if still arouses a bit of anxiety. With progress into the upper shooting classes, high 8 can be the source of an occasional miss again if it gets to be too easy and is shot mechanically by rote. Since you have moved in to only half the distance for the high 7 target, you shouldn’t be surprised by the different angular velocity curve (see figure 16.1).
Fundamentals
The fundamentals of high 8 are as follows: 1. Take one smooth diagonal swing up in front of this target with a 6-to 12-inch lead. 2. Be very focused before you call, because you don’t have any correction time available. Looking only halfway back is almost at the edge of the house. 3. Let the gun push your head up. Don’t lead with your head, because that lifts it off the stock. 4. Take the bird the instant it closes to within 6 to 12 inches, with no hesitation. 5. You still need a follow-through, but not past the center stake. Even here, you should finish to a stop.
Common Errors
Poor all-around form. I repeatedly see new shooters approach high 8 as if the bird were throwing right over their heads. They swing almost straight up, bend backward, move onto the back foot, and shoot somewhere—frequently 2 feet ahead.
16.1 High 8 angular velocity curve. The striking difference in this curve is not how high the final angular velocity becomes (because it’s not that high) but the steepness of the curve—that is, how fast it changes from emergence to center stake. Compare it with the curve for high 7. It is apparent that this target will always require a short but quite high gun acceleration if you are to match the target speed by one-half or two-thirds to the center stake. Correction: At this station, it is difficult to get shooters to keep their weight 60 percent on their front foot. Even some very good shooters move backward as they shoot. Review figure I.1, the layout of a standard skeet field. The target crossing or center stake is 18 feet outside the baseline. This shot is diagonal—as much left to right as it is upward. Exaggerate your weight forward for a few shots at this station. You will be conscious of how much knee flex is required to keep you pivoting with your weight mostly on the front foot. But your turn will be much more efficient. Don’t be disturbed if you shoot ahead once or twice before you begin to get the feel of shooting this bird with good technique and a normal but very small lead. Crowding the window with the barrel. The face of this house is commonly 8 feet wide. Your one-third hold point is at least 4 feet to the right of the edge of the house. Holding at the bottom of the window is fine, but the top of the window is also acceptable here, because of the higher upward angle of this bird to your eye from station 8. Correction: If you are sometimes getting beaten by this bird, your mental preparation is faulty. But for your first try at correction, don’t hold farther up along the flight path trying to stay farther ahead. Move your hold point 1 or 2 feet farther right from the house. This gives you both a fraction of a second more time and a better early sight of this target.
16.2 High 8 best apparent lead curve. Many shooters and many older skeet manuals insist that this bird requires no lead—just cover it up and shoot it. But this only proves that they are essentially sweeping the bird. The best apparent lead curve indicates this. The lead is small, only 6 to 9 inches, but it is there. And considering that your pattern may only be 12 to 18 inches, it is best to see this small lead. Obviously, everything now looks much closer and, to the neophyte, very threatening. The angle to a one-third hold point is double that for high 7, but still quite low.
16.3 High 8. It is only a short, bnsk swing up and ahead of this bird. Because of the shorter angle that the gun swings through, it always appears as a closing lead shot. It is impossible to “maintain” for more than a tiny fraction of a second. As in several other photos in this book, your peripheral vision may be able to see where the center stake is, but the camera cannot. Don’t forget your follow-through. It may be small, but it is there. Trying to “cover” this bird with a closing lead technique. If you allow the bird to reach the barrel, you will almost certainly shoot behind. Covering means that you must be moving the gun significantly faster than the target, and the visual lead drops so much that most shooters describe it as no lead at all. Correction: Move your hold point a foot or two to the right and concentrate on moving with the bird. See that 6- to 12-inch lead. Holding too high, up at the level of the bird’s path. If you shoot with two eyes open, you may be totally unaware that your barrel is blocking your right eye’s view of the target, so you shoot it left-eyed and behind. I have encountered several shooters who shot this bird very well but insisted that it looked like a 2-foot lead to them. Unaware they had been shooting it left-eyed, they had found by trial and error the abnormally large lead that would break the bird for them. Correction: Take your normal hold point and then close your left eye. If your view of the window disappears it proves you are holding too high. Lower the hold point until your right eye has a clear view of the window. Spot shooting. A few excellent shooters essentially spot shoot this bird (and low 8 as well) with an 18- to 24-inch lead. And they do so with 99 percent reliability. But top-level shooters can go some years without ever missing this bird—they are your real competition. It still requires a tight head and intense focus. Correction: Force yourself to take a follow-through all the way to the center stake a number of times. Don’t be surprised if this makes you miss ahead several times. Then just add a short but positive follow-through to this bird for the future.
STATION 8 LOW HOUSE
Physically, low 8 differs little, but mentally, it differs a great deal. Many new shooters get several scores of 24, missing one of the two birds at low 8, before they succeed in posting their first 25 straight. Like high 8, the velocity curve is steep due to your closeness.
16.4 Low 8 angular velocity curve. Low 8 has a slightly lower angular velocity than the high house, but with a similar high upward slope. Because the bird and barrel start much lower than with high 8, the barrel must move through a large angle (the greatest of the entire skeet round) to be correct halfway to the stake. It is your quickest shot.
16.5 Low 8 best apparent lead curve. Like high 8, low 8 has a real but small lead, unless you are sweeping this bird. Don’t forget a short but positive follow-through. Like high 8, your closeness makes this a “one move and shoot” shot.
16.6 Low 8. Note that in the absence of other reference points, a one-third hold point is 4 to 5 feet to the left of the window. Holding at the bottom of the window is still fine, but like high 8, because of the higher upward angle of throw, holding at the top of the window or even a bit above it is also acceptable, as shown here. Just be consistent and use whatever is most comfortable for you and your reaction time.
Fundamentals
The fundamentals of low 8 are as follows: 1. Keep your head and cheek clamped down tight and your eyes fixed on the edge of the window. 2. Make the gun push your head. Your head cannot pull the gun upward. 3. Keeping your weight forward and making a good pivot are easier here than at high 8 for right-handed shooters. 4. Relax your fore-end hand and shoot this bird halfway to you with a 6- to 12-inch lead. 5. Finish this shot completely. Dismount and hope that you have to reload and smoke it a second time.
Common Errors
Score counting. If your mind is fixed more on the 25 straight you are hoping to shoot than on the two singles still facing you, this is frequently evidenced by a dead stop of the swing and a miss behind. This is a mental game. Anyone can break every bird, but not every time. And this target carries just an ounce more “mental weight.” At least one World Championship shoot-off was lost at station 8 in the days when shoot-offs were conducted in full rounds instead of just 3-4-5 doubles. And mental fatigue certainly played a role. Correction: Force yourself to relax and see a mental image of the correct technique. Take a deep breath, relax, loosen your right hand on the fore end. Visualize the bird path and your swing, shot, and follow-through. Clamp your head down, and replicate what you just visualized. Stopping or spot shooting. It is possible to get quite proficient at spot shooting this bird halfway to the center with a 1½- to 2-foot lead. But you want 100 percent success if at all possible. Correction: Concentrate on a short but positive follow-through to a complete stop, even on this station. Don’t carry the follow-through past the center stake, however.
CHAPTER 17 Doubles at All Stations Once most shooters have broken their first round of 25 straight, they want to begin shooting all doubles. It is fun and challenging, even though there are more misses, even at the top level of shooting. This book has already covered shooting doubles at stations 1, 2, 6, and 7 in the chapters devoted to those stations. This chapter is concerned with shooting doubles at all stations as a separate event, as well as the differences in shoot-off doubles when it is done only on stations 3, 4, and 5. At this point, you should be reasonably comfortable with the doubles on the small stations (stations 1, 2, 6, and 7) and are now ready to shoot doubles on stations 3, 4, and 5 as well. It should be apparent by now that your follow-through on any first bird of a double is much shorter than usual. In fact, when watching some champion doubles shooters, it may look like there’s no follow-through at all. This is not so. The follow-through is there, but it’s very abbreviated. Success at doubles depends on training yourself at the singles to an early kill zone and a short follow-through to a dead stop.
STATIONS 1 AND 2 AT ALL DOUBLES
If you want to shoot all doubles well, the first thing you must do is break all the birds at the four small stations. You can’t afford to miss birds at stations 1, 2, 6, or 7 if you want a good doubles score. Yet some shooters miss more of these small-station birds in an alldoubles event than they would shooting the same gauge gun in a regular event. The only explanation is anticipation anxiety. They have started to worry about stations 3, 4, and 5 before they’ve shot on stations 1 and 2, and that tension persists when they get to stations 6 and 7. Your first goal in shooting all doubles is to shoot the first two doubles just as you would in a regular round. Several items may help in this regard: 1. Go through your complete, normal setup routine for each of the first two doubles. Don’t be hurried, especially since a double squad tends to move much more quickly than a usual sequence round. But don’t get extra careful either. 2. Concentrate on visualizing and being smooth and relaxed for these doubles that you shoot regularly with confidence. 3. Remember to relax your fore-end hand and your whole body. Being alert and ready does not mean being tense. This is not the time to start squeezing the sap out of your fore end and getting your arms into the swing.
STATIONS 3, 4, AND 5 DOUBLES
If you are like most shooters, your first efforts at doubles on the three middle stations will be frustrating. Your timing will be off, often because you rush the first shot. You may crowd the house with the barrel and then either miss the first bird behind or catch it very late and never get back to the second bird. Or sometimes you’ll swing so fast on the second bird and get so far ahead of it that you stop. But all the time and effort you put into breaking the midstation birds 15 to 20 feet in front of the center stake should begin to pay off now. As pointed out earlier, even though the geometry of the skeet field escapes many shooters, you are going to use it to your advantage. Both birds are thrown simultaneously at doubles, which means that they cross almost in the middle. So if you break the first bird at or past the center stake, you have already been beaten or passed by the second bird. Conversely, for every foot before the center stake that you break the first bird, you gain 2 feet on the second bird. For example, if you break the first bird 15 feet before the stake, the second bird is still 30 feet away from your barrel. You have time for an abbreviated follow-through (about 10 feet) and a smooth reversal. If you have been comfortably taking the high 3 single well before the stake, doubles shouldn’t give you much trouble. Some shooters say that station 3 is nothing but a big station 2. Similarly, if you hit the low 5 bird 15 or more feet before the stake normally, it won’t be hard to acquire the timing for this double. Doubles depends on rhythm and timing, and these are not acquired easily without dedication and application. Be prepared to shoot dozens or even hundreds of rounds of doubles.
Velocity Curves and Best Apparent Lead Curves
It may be helpful to review the angular velocity curves and best apparent lead curves for these three stations in chapters 11, 12, and 13. This should convince you that, in most respects, these three doubles are similar. Certainly stations 3 and 5 differ little and are in fact almost mirror images. The double at station 4 is somewhat different and is considered by most to be a bit more difficult. At singles, you almost never shoot a station 4 bird as late as the second bird of this double forces you to take it. And if you always tend to shoot your station 4 singles late (past the center stake), you will now be struggling to catch the second.
Foot Position and Setup
The main setup difference between these three doubles and the small-station doubles is necessitated by the fact that the second bird is usually taken later in its flight than in singles. This means that it now pays to shift your foot position for singles to at least moderately favor your swing for the second target. But in doing so, you must remember that you have lost a bit of torque for your swing on the first target of the double. Not all good shooters make a position shift for doubles at stations 3 and 5, but most do so for station 4. Most coaches and skeet writers recommend at least some position shift. Stated simply, you are shifting your feet about 30 degrees toward where you will shoot the second bird. See figures 17.1 and 17.2 for diagrams of
17.1 Right-handed shooter. Note that the shooter changes his address from facing the low house window to facing the center stake for station 3 and for station 4 going out. However, he shifts to face the right side of the shooting pad for station 5 and almost the side of the pad for the station 4 double coming back around. The amount of your shift may vary a bit, but almost all good doubles shooters make some setup shift on these three stations. these three middle stations with such a shift. Initially, it may be hard to remember that this is almost 90 degrees different for the station 4 double going out than for the station 4 double coming back.
17.2 Left-handed shooter. The left-hander shifts his position from facing the high house window to the left side of the pad for station 3 and the station 4 double going out. Then he shifts to face the center stake for the double at station 5 and for the station 4 double coming back.
STATION 3 DOUBLES
This double shouldn’t be much of a problem. But as the first of the middle station doubles, you have to start by hitting high 3.
Fundamentals
1. Right-handed shooters shift 30 degrees to the left, facing square at the center stake. Left-handrd shooters also shift 30 degrees to the left, facing the left side of the shooting pad. See figures 17.1 and 17.2. 2. Your setup routine and hold point don’t change, but because you’ve given away some of your torque, your move with the first bird of the double needs to be very positive—a strong swing to a kill point 15 feet before the center stake. This doesn’t mean swing faster. You have the same amount of time and distance to get the gun up to speed, but you need to put slightly more muscular leg drive into your first move to achieve the same gun acceleration. (Dropping the muzzle an inch below normal will make you very conscious of the need for this strong first move. Try it.) You can’t afford to be hurried on this shot. Don’t try to shoot it earlier than your single. 3. Your eyes must make a shift from the first bird to the second almost at the instant you shoot the first bird. There is no time to admire the smoked target or follow the fragments. This is true of all the doubles but is especially important at the middle stations. To train yourself to do this, just watch the shooters. As they shoot their doubles, stare at the first bird, and the instant it breaks, shift your eyes to lock on the second target. 4. This eye shift makes it easy to lose lead or partially stop in anticipation of the swing reversal. The follow-through is a bit shorter than for singles, but that is part of what makes doubles at 3, 4, and 5 more difficult. Practice and focus are key. 5. Many good shooters reverse ahead of the second bird of the station 3 double and thus see the same amount of lead as for the single at low 3. They are usually conscious of a maintained lead, however brief. But if you don’t consistently break the first bird before the center stake, you will always be coming back from behind the second bird and shoot it as a pass-through or sweeping shot. This means that your gun will be moving faster than the target as you catch and pass it. If so, and if your mind is locked on the same visual lead you see for the single, you may shoot too far ahead. Or even worse, the swing will put you so far ahead that you see too much lead and stop dead, in which case the miss is almost always behind. If you are habitually late in shooting the first bird and struggling with the second bird, one answer is to simply cut your visual lead on the second bird and shoot as you come through it. In the long run, however, it’s better to retrain yourself to take the first bird well before the center stake.
Common Errors
Timing. Don’t allow yourself to be mentally hurried into shooting the first bird too fast. If you do, you will probably fire before you have adequate gun speed, shooting behind the first bird but perhaps hitting the second just fine. Or you may “short stroke” the follow-through on the first bird, missing behind because you actually started to slow down before the shot cleared the barrel. Correction: Concentrate on a full visual lead on the first bird with a positive follow-through. It is better to have to sweep the second target or shoot it later than to miss the first one. Head movement. More heads come up to look for the second bird of big-station doubles than at most of the other targets put together. Because the second bird is often shot a bit later than the single, it will of necessity be a bit lower as well. Correction: Clamp your head down, and shift yours eyes to the second bird the instant you see the first one break. Come back flat for the second bird. It is easier to correct upward than downward, and the temptation to lift your head is less.
STATION 4 DOUBLES, HIGH HOUSE FIRST
Station 4 doubles are really two entirely different shots: high house first, going across initially, and low house first, coming back across the field (discussed in sequence). They are so different that you need to think about them individually. In station 4 singles, you normally shoot the bird before the center stake—ideally, as much as 15 to 18 feet before it—as an outgoer. But even quick doubles shooters take the second bird of the double past the center stake, with a significantly different sight picture and swing than for the same bird as a single. Remember that you can’t successfully shoot a double without breaking the first target. When I watch AAA shooters go through multiple boxes in shoot-offs, the final loss is most often the second bird of a double, seldom the first bird.
Fundamentals
1. Set up with the shifted foot positions—right-handers facing the center stake squarely, and left-handers facing the left side of the pad. 2. Keep your preshot mental drill basically unchanged. Perhaps move your weight slightly more to the front foot, knowing that you need greater leg thrust on the first bird to compensate for less body torque. 3. Don’t rush the first shot, and be sure that you see the bird break. 4. Your eye should shift for the second bird as you are finishing an abbreviated follow-through. 5. Lock on the second bird with a tight head, move to and with it, and fire with little thought about lead—just keep that gun moving. You can analyze the picture in your mind after the shot is over. If you are coming from behind on the second bird, try to shoot it without as much lead, because your gun is moving much faster than the bird. Champion shooter and coach Ed Scherer wrote that the lead on the second shot of a double at station 4 is less because the visual angle to the second bird is less. Although it appears that way to most shooters, the best apparent lead curves for these two shots indicate that it is only slightly less, at least when a true maintained lead is achieved. I believe that the apparent discrepancy is because almost every shooter has a faster-moving gun on this second target.
Common Errors
Coming back too fast. This error results in shooting ahead or getting so far ahead that you stop the gun. Correction: Reverse and move smoothly to the second bird, keeping the gun moving. You have more time than you think. Late eye shift. You need to shift your eyes as soon as you fire at the first bird. Correction: Practice the eye shift drill while watching other shooters’ doubles. Shooting too fast at the first bird. It helps to shoot this bird early, but only if you have trained yourself to do so with assurance as a single. Correction: Take the first bird with your high 4 single sight picture and your normal timing. Then reverse smoothly and swing on the second bird, keeping your head tight.
STATION 5 DOUBLES
Fundamentals
1. Shift your foot positions: right-handers facing the side of the pad, and left-handers facing the center stake. Check your feet and the side of the pad for alignment. 2. Reconfirm your normal hold point and eye fixation point. Remind yourself what station you are shooting and what those points are. 3. Be conscious of your strong move on the first bird, and be sure to see it break. You have plenty of time for this double. Make your eye shift as you see the first bird break. 4. Reverse with a tight head and take the second bird, preferably with a normal-length lead. If you are habitually late or make an error, shoot it as a passing shot with a much shorter lead, but keep the gun moving.
Common Errors
Losing concentration. You can’t relax too much after shooting 4 successfully. Remember that this is still a middle station. Correction: Your setup and focus need to be very deliberate. This double is not that much easier than the station 4 double. Holding in too close and too high. Remember that the first bird comes out only 3 feet above the ground. Correction: Keep the low hold point you developed for this single. Preview it mentally before you even step on the pad, and don’t change it.
STATION 6 DOUBLES GOING ACROSS
Although this pair doesn’t seem to present any particular problems, I have seen too many shooters miss here after breaking all six birds of the three middle stations. There are two common reasons. The first is that the shooter moves so quickly on the first bird that he or she shoots ahead or stops. This is caused by being in too strong a mode after the three middle stations. You need to be smooth, with a relaxed hand on the fore end and normal timing. The second is that the shooter almost stops dead on the second bird and misses. At the three previous doubles, the second bird required a firm and rapid reversal, as well as a faster gun swing on the second bird than on the first. If this carries over to station 6, there is the potential for trouble. If you reverse as fast as you did for the station 5 double, you may find yourself with a 15-foot lead and a dead gun in your hands. You may or may not recover. It is better to have to chase the second target than to reverse 20 feet ahead of it. Or you might make a nice normal reversal but shoot the second bird with a normal high 6 lead and a slow, lazy swing. Although the lead on this bird is decreased, the angular velocity at the kill point for the second bird is almost the same as that for the high 5 single. You can’t afford to have a slow gun or neglect your follow-through because it looks easy. Maintain a smaller lead but very positive gun motion, and finish the shot. There are no easy birds.
STATION 7 DOUBLES
Relaxation is the deadly sin on this double. One of my world-class shooting acquaintances says, “You can’t give away any baseline birds and win at doubles.” Mentally review how you always shoot these birds before you step on the station: head tight, eyes locked on target, loose fore-end grip, and positive follow-through to finish the second shot.
STATION 6 DOUBLES COMING BACK
This station can be shot normally, with your usual setup, hold point, and eye fixation point. Maintain a relaxed, smooth swing and a tight head, and finish the second shot with a positive follow-through. The only reason to miss this double is carelessness on the first bird or spot shooting the second. If you do this very often, your regular skeet round needs work.
STATION 5 DOUBLES COMING BACK
This should require no variation from your setup and shooting style on this pair going out.
STATION 4 DOUBLES, LOW HOUSE FIRST, COMING BACK
Recheck figures 12.1 and 12.2 and note that the best apparent lead is actually slightly less at the kill point for the second target than when you shoot it as a single; the angular velocity is a little less as well. This plus the faster gun speed usually makes the lead look significantly less for the second bird than for the single. In addition, the second bird is flat or dropping at the point you shoot it, so it’s extremely easy to shoot over and sometimes ahead of it. Again, this is a shot where you appear to “poke” at the target. The high house at station 4 is thrown with a flatter arc than the low house is. And because it is shot later than the single, it is also shot significantly lower.
Fundamentals
1. Shift your foot positions to those for shooting the low house first. 2. Use your normal setup routine, with an emphasis on a strong, positive move to the normal kill point. You need some extra leg drive to accommodate the position shift. 3. See the low house break and make an instant eye shift to the second bird. Remember that the second bird is frequently lower than when shooting this pair in the opposite order. 4. Reverse as you make the eye shift and make a smooth swing, either with and ahead of the target or to and through it with a reduced visual lead. Keep the gun moving as you fire. The gun path to the second bird is usually flatter than for the high house first double.
Common Errors
Head movement. It is common to let your head come up to find the second bird. Correction: Keep your head clamped down hard and come back flat, as this is now a dropping bird. Make sure that your eyes shift as soon as you see the first bird break. Shooting the first bird too fast and reversing too fast. Basically, this is the same error as for this double going the other way. Correction: Keep your normal first-bird kill point, and see the first bird break before your reversal. It is better to get to the second bird late than to miss the first bird or to reverse way ahead of the second one.
STATION 3 COMING BACK
Nothing has changed from what you did going out. Use the same setup, hold point, eyes, and timing. Focus and keep your head down. Finish the second shot with a positive follow-through.
STATION 2 COMING BACK
Like at station 7, letting down in any respect is the most common fault here. There is nothing particularly easy about the station 2 double. High 2 has always been one of the harder birds for me, and doubles doesn’t make it any easier. Focus on the fundamentals, not on what you just did or didn’t do on the previous two stations.
STATION 1 COMING BACK
Station 1 is the mental equivalent of station 7, and mental preparedness is everything. You can’t afford to relax your concentration or focus in the slightest. There are two deadly sins. One is to smoke the high house and spot shoot the second bird with a dead gun. Surprisingly, many good shooters spot shoot this bird with a 2-foot lead quite often, and just when they think they’ll never miss again, they do. The second sin is to suddenly get a bit careful and shoot this target a fraction late, usually with a miss over the top. Stay aggressive on the last double on station 1.
DRILLS FOR 3, 4, AND 5 DOUBLES
There are several good drills that can help you develop good timing and a smooth doubles technique. They are worth your while if you are only a mediocre doubles shooter.
First Bird Drill
This drill addresses a problem common to many shooters: doing something different on the first bird of a double than when shooting it as a single. At stations 3, 4, and 5, shoot the first bird as a single, and then immediately follow it with the same double. In other words, shoot a high 3 single, concentrating on a smooth and normal shot. Immediately follow this with the same double, focusing on taking the first bird with exactly the same timing and follow-through you used on the single and staying clamped down as you come back for the second bird. Do this twice on station 3, using six shells. It is helpful to have a coach or an observant friend watch to make sure that you are taking the first bird of the double in the same place as the single, not trying to shoot it 10 feet earlier. Move to station 4 and do the same thing—a high 4 single followed by a double, high bird first. Repeat using six shells. Move your foot position for low 4 first, shoot a low 4 single, and follow with the double. Repeat using six shells. Move to station 5 and follow the same sequence—a low 5 single, then a double, twice. Then take another low 5 single with a quick reverse as though shooting a double.
Second Bird Drills
For doubles, you need a slightly shortened follow-through and a quick reversal, so it helps to practice this when you don’t have the anxiety of having to shoot a second bird. Try shooting a series of midstation singles with only one shell in the gun. But take the follow-through firmly for only about 10 feet (just to the center stake) and then make a firm reversal, simultaneously shifting your eyes to the side where a second bird would be coming from. Once you can do so without missing the first bird, try having doubles thrown. Start with only one shell so that you can clearly see where you are reversing in relation to the second bird, without the worry of trying to hit it. You may be astonished to find that your doubles anxiety has you reversing in time to have a 20-foot lead on the second bird, which causes you to slow down and end up with a dead gun in your hand. If this is the case, make sure that you’re not rushing the first bird, and carry the follow-through just a bit farther. After half a dozen tries, you may find that you can reverse smoothly enough to actually be conscious of an abbreviated maintained lead on the second shot. Another useful exercise can help you develop better reversal skills and a better mental image of the lead picture. The late Ed Scherer taught me this drill many years ago. This can be done for all the midstation doubles, but it needs to be done for only one direction at stations 3 and 5 and both directions at station 4. The drill is as follows: 1. Load a single shell. 2. Put the front sight and muzzle directly over the center stake, about 15 feet above the center. 3. Look only 10 feet toward the house that the bird will come from. Don’t cheat and look back closer to the house. 4. Call for the bird. As it enters your peripheral vision, start the barrel acceleration and try to take the bird with your normal lead. You should be able to stay ahead of it and use an abbreviated maintained lead. At first, you may be behind (unless you cheated with your eyes) and be forced to sweep. Keep trying until you can accelerate and still stay ahead of the bird. At the actual doubles, there is always a microsecond that the gun is stopped as you reverse and start the swing back for the second bird. This is what you are practicing.
DOUBLES IN SHOOT-OFFS
When you are shooting well and consistently at any level in registered skeet, you will be involved in 3-4-5 shoot-offs. This is a somewhat different game from the all-doubles event. It requires the same skills, but the mental approach is different. You can’t help but have some extra adrenaline pumping in your system for a shoot-off, no matter how experienced you are. Crowding the house with the muzzle for the first bird at station 3 and then popping off ahead of this bird with an overfast swing is not uncommon. The shoot-off order is generally the order in which the participants finished the event. If you were an early flight shooter, you are likely to go first. Taking an imaginary high 3 with your normal hold and swing, before actually calling for the bird, can help smooth you out. This is not allowed in international skeet but is certainly acceptable in American skeet. It’s somewhat harder to start cold on high 3 for doubles than to work up to it by starting on station 1. So-called Kentucky doubles shoot-offs start on station 1 and then go to 2, 3, 4, 5, 4, 3, 4, and so forth. Most regard this as an easier way to start. But most doubles shoot-offs start on station 3 and go to 4, 5, 4, 3, 4, 5, and so forth. The rules are: miss and you’re out, by station. This means that if another shooter breaks the first bird but misses the second, and you miss the first but break the second, you are both still tied and continue to shoot off. Once you become competitive enough to be concerned about shoot-offs, start shooting a box of shells at 3, 4, and 5 doubles at the end of each practice session, and start cold on station 3. If you can start on station 3 and break your first six or eight birds, you will win class titles in most shoots.
III OTHER PRINCIPLES
CHAPTER 18 Safety on the Skeet Range There has never been a fatal accident on the field in the history of registered skeet shooting. Very few sports can match that record. That it has endured is a tribute to the care taken by everyone involved.To some degree, this is partly due to the awareness that shotguns are inherently dangerous. The following is a general summary of the skeet rules as they appear in the National Skeet Shooting Association rule book. Those with an asterisk are applicable mostly to registered skeet shooting but may be enforced even for practice rounds at many or most clubs. It is the duty of both field personnel and shooters to assist in the enforcement of safety rules. You must wear eye and ear protection at all times. * This includes field personnel and trap loaders, as well as shooters. Most clubs make it mandatory, even in practice. Every shooter is occasionally struck by small bird fragments, especially on stations 1, 7, and 8. On rare occasions a ricochet shot from another field may hit you hard enough to break the skin. You may not load the gun until you are on the station ready to shoot. This includes putting any part of a shell into any part of the gun. Don’t slip shells partly into the chamber and then drop them in completely as you step on the station. An alert referee will call you on this. Wait until you are completely on the station. Test shots are not permitted without the permission of the referee. Besides being against the rules, you may damage others’ hearing if they don’t have their ear protection in place. The gun must always be pointed in a safe direction. Essentially, this means out between the two skeet houses. Excessive tollowthough that passes the opposite skeet house must be avoided. All guns must be open and empty at all times, except when on the shooting station. Pumps and semiautomatics must have the bolt open. Over-unders must be broken open. The only time an over-under can be closed is to put it in a rack or gun case. Open it again as soon as you pick it up. You will be justifiably challenged if you walk around with a closed gun. With any interruption in shooting, the gun must be opened and emptied. This includes waiting for the trap to be reloaded or repaired, even though you remain on the shooting pad. You may ordinarily load two shells for singles on every station except station 8.* The club may prohibit the loading of two shells for singles but, conversely, may not require you to load two shells when you are shooting only singles. New shooters should be discouraged from loading two shells when shooting only the two singles. If something interrupts their concentration while shooting the first bird, they may forget that they still have a loaded gun. You may not load more than two shells into your gun at any time. * Even if your gun allows it, you may not load four shells and then shoot both singles and doubles on a station, or put in three shells because you have to shoot an option bird and then a double. You may not use a gun that will accept more than one gauge of shell at a time.* If you wanted to, you could hunt with a 20gauge tube in the first barrel of a 12-gauge over-under, but this is a dangerous practice. Ammunition manufacturers make all 20-gauge shells in a standard yellow color to prevent you from accidentally dropping a 20-gauge shell into a 12-gauge gun. It would easily drop past the chamber and stop only in the barrel, leaving no shell visible. If a 12-gauge shell was loaded behind it and the gun was fired, the butt end of the barrel would probably explode, possibly resulting in serious injury. In addition, a 28-gauge shell can slide out of sight but stick in a 20-gauge gun, which is equally dangerous. You may not use a gun with a release trigger without notifying both the referee and the rest of the squad. In registered skeet, the gun must also have a visible “release trigger” sticker applied. Release triggers are used mostly by shooters with flinching problems. With one of these, you pull the trigger, hold it down, and call for the bird. To fire, you release the trigger. If something interrupts the shooter before the bird is released, there is usually no way to open the gun without firing it first, although some release triggers do have a mechanism for doing this. If your gun accidentally fires twice in the same round, you must change it or get it repaired.* This is mostly for the equanimity and peace of mind of the rest of the squad. Suppose it happened when the barrel was pointing in an unsafe direction? Shooting twice at the same target is a safety violation.* If you do it a second time, you will be disqualified in registered skeet shooting. However, if you’re by yourself or with hunting friends, it can be excellent training for getting a bird with your second shot in the field. Make sure that it’s all right with everyone on the squad before doing it in practice. No spectators are allowed on the skeet field.* Of course, spectators are routinely allowed at many clubs during practice rounds, but with caution. Spectators should be careful not to distract the shooters. Never mix shooting with alcohol or other drugs.* Use even medicinal drugs with caution. Wait to take your medication until after you have finished shooting, if this can be done safely.
Most clubs and common sense add a number of other safety precautions that are not spelled out in the skeet rule book. These include the following.
Always be sure that your gun barrel is clear before you load the gun. After any abnormal-sounding shell, check to make sure that the wad cleared the barrel. Similarly, any time your barrel touches anything (the ground, snow, vegetation, and so forth), doublecheck that the barrel is clear. If you’re on station, unload the gun first to do this. Stop with the barrel pointed out and up if you have any gun malfunction during shooting. If you are unacquainted with corrective measures, wait for assistance from the puller or other squad members. Don’t turn around with the loaded gun in your hands. Stay away from the front of the low house window. Skeet birds can cause nasty injuries. Even with shooting stopped, the trap loader frequently throws a bird when turning off the trap to load it. Similarly, a broken bird from the high house on station 7 sometimes results in a fragment coming straight at you. You can duck, close your eyes, or turn your back, but always turn toward the field, not back toward the squad. If you loaded two shells, your gun still has one in it. Stay out of the trap house unless it is your club and you are authorized to be there. There are many different kinds of machines, and all have powerful springs and throwing arms capable of breaking your arm or causing serious hand injuries. Finally, while you may think that your closed gun is not loaded, no one around you will share that confidence. So-called “unloaded” guns continue to cause accidents. Don’t let it happen in skeet. Always open, always empty!
CHAPTER 19 The Rules of Skeet It always Surprises me how many shooters, even top-level competitors, have never read the rule book. If you intend to be a serious competitor, you should read the rules at least once and ask a licensed referee about anything that seems unclear. It may save you a bird or, perhaps more important, keep you from getting upset over a referee’s call. Skeet started informally in 1920 as off-season practice for bird hunting, so it needed few rules. It become more formally organized in 1926 when the National Skeet Shooting Association (NSSA) was formed. The NSSA keeps records, sanctions matches, and is responsible for updating the rules as nccessary. As with any sport that has competitions, a simple set of rules designed to describe its formal is required. But as time goes by, various odd circumstances lead to more detailed rules, and they can become excessively complicated. This apparent and real complexity can generally be reduced to four basic principles that allow you to see the purpose or logic of any particular rule. These four principles are: 1. What is going on must be sate, both to the shooter and to everyone else. 2. Every shooter must have a fair and equal opportunity to break a target. In other words, we want a level playing field tor all shooters. 3. If an event on the shooting field results in your missing a target, and the event can be ascribed to your responsibility or to conditions that affects all shooters equally, the target is a “lost bird.” This includes such tings as the sun in your eyes, rain, cold, leaving the safety on, flinching, loading the wrong barrel, gun malfunctions after the second tinre (since you could have changed guns), and just plain missing. 4. If a miss can be fairly blamed on something that affects only you as the shooter and is not your error, you can repeat the shot. This includes such things as the first two gun malfunctions in each round, ammunition malfunctions (only two allowed), the referee releasing the target before you call or more than one second after you call, a target thrown seriously off course, or outside interference (e.g., a thunderclap just after your call, a trap boy opening the skeet house door just as you call). The rest of this chapter is a concise summary of the shooter’s portion of the rules of skeet. The material from the rule book dealing with club responsibilities, classification, referees’ responsibilities, and so forth is only touched on lightly. Members of the NSSA receive a copy of the updated rule book every year and should read it carefully to note any changes, which are also published in the Skeet Shooting Review and posted on the NSSA Web site at www.myNSSA.com.You can also download the current and updated rules from the NSSA Web site.
SHOTGUN RULES
Skeet matches are conducted in four gauges: 12 gauge (sometimes called all gauge), 20 gauge, 28 gauge, and 410 bore. Both the 410-bore and doubles events are defined as a gauge for skeet purposes. It is perfectly legal to use a smaller-gauge gun in a match for a larger gauge, as long as the amount of shot in the shell does not exceed that specified for the larger gauge. However, it is not legal to use a larger-bore gun in a smaller-bore match, even though the shot load may have been reduced. Any style shotgun in safe operating condition may be used in a skeet match, although the gun obviously must be able to shoot doubles. The only restriction here is that shotguns with release triggers can’t be used without notifying the referee and the rest of the squad and labeling the stock.
AMMUNITION
It is permissible to use reloaded shot shells, even in registered matches. However, you could be subjected to inspection for legal weight unless you are shooting factory-new ammunition. The maximum amount of lead shot (or equivalent target load in steel, bismuth, or other approved material) that may be used in each gauge is as follows: • 12 gauge: 1 ⅛ ounce • 20 gauge: ⅞ ounce • 28 gauge: ¾ ounce • 410 bore: ½ ounce
REFEREES AND PULLERS
In a registered skeet match, the referee is in charge. He or she is the sole judge of whether a bird has been hit and makes all decisions regarding rules. The referees job is to make sure that all the principles listed above are met under the rules and to help shooters achieve the best score possible. In practice situations, the puller, who is frequently a club employee, is in charge and should enforce all safety rules. However, every shooter is responsible for assisting in this endeavor, because the puller may be inexperienced or may not observe a blatant violation, or the squad may be pulling for itself.
SHOOTERS
You must wear eye and ear protection in all registered matches, and most clubs make this mandatory in practice rounds as well. You must have some portion of each toot on the 3-foot-square shooting pad when you call for the bird. Most shooters stand cotnpletely on the pad. Your gun may be in any safe position as you call for the bird. An off-shoulder gun or field position is permissible, and so is a fitlly mounted gun. (For other safety precautions, see chapter 18.)
A ROUND OF SKEET
A skeet squad usually consists of five shooters, but there can be six if the club wishes. Each squad member shoots at 25 birds, and each shooter must complete each station before the squad moves on to the next station. The squad is entitled to observe two birds from each trap house before starting the round. This is usually done by looking at one high house, one low house, and then one pair of doubles. In addition, you are entitled to see one bird front the house you are shooting next after any abnormal interruption in shooting or after a bird is thrown broken. On station 1, each shooter shoots in order a high house bird, a low house bird, and a pair of birds (doubles). In doubles, the bird coming from the house closest to the shooter must be shot first—on station 1, the high house. Note that if you miss any one of these four birds, you repeat it, and the result is marked as your 25th shot. No matter where you happen to make your first miss during the round, you repeat that bird as your 25th shot (this 25th shot is also called your option). On station 2, each shooter repeats the same sequence as on station 1: a high house bird, a low house bird, and doubles, still shooting the high house first. On stations 3, 4, and 5, you shoot a high house bird and then a low house bird. Except in all-doubles competition or in a shoot-off at the end of a match, you do not shoot doubles at the three middle stations. On station 6, each shooter shoots in order a high house bird, a low house bird, and doubles. For this doubles, you still shoot the bird from the house nearest you first, but this is now the low house bird. On station 7, each shooter repeats this sequence: a high house bird, a low house bird, and doubles, still shooting the low house first. At station 8, you must shoot birds from both directions. For safety reasons, every shooter on the squad shoots the high house bird only and must fire at the bird before it passes the center stake. Shooting at the bird past the center stake is a safety violation. Only after the entire squad has shot the high house does the squad reverse direction and shoot the low house bird. If you haven’t missed any birds during the round up to this point, the low house bird is shot twice in a row to establish your 25th bird.
COMMON SITUATIONS
The rules come into play and must be understood in the following situations. No bird. If a bird is thrown broken, the referee will call “no bird.” This target can’t be entered on your score, even if you fire at it and break it before the no-bird call. A no-bird call is also given if the bird’s line of flight deviates significantly from normal or it is thrown before you call or with excessive delay (more than one second after your call). Note, however, that in any of these cases, if you actually fire at the bird before the referee calls “no bird,” the result of your shot stands. It’s a dead bird if you hit it, a lost bird if you don’t. Experienced shooters rarely fire at such birds. The referee might also call “no bird” if he or she sees some safety violation or anything else that requires shooting to stop instantly, even though the bird has already been thrown. Regular target, or “good bird” or “legal bird.” To be considered a regular target or a good bird on the skeet field, the target must satisfy several criteria. If these requirements are not met, it is an irregular target. The judgment of the referee comes into play in these situations. The requirements are as follows: 1. The bird must be thrown within one second of your call, but not before your call. The referee or puller generally tries to release the bird instantaneously with your call, but it’s not a requirement. Most referees call “no bird” if they think they have given you a slow pull, even if it’s less than 1 second. But remember, if you fire before the call, you buy the result. 2. It must be a whole, intact bird. No broken bird can ever be a regular target or scored even if it’s fired upon. 3. The bird’s height, direction, and speed cannot be grossly abnormal. Here, the referee’s judgment comes into play. The traps are supposed to be set such that the bird passes through a 3-foot-diameter circle whose center is 15 feet above the center point. A hoop is normally used to set the traps correctly. In addition, its speed must be such that if the target passed through the center of the hoop in still air, it would carry 60 yards, plus or minus 2 yards. If the bird flies so erratically that it would not have passed through the hoop, you can withhold firing and get another bird, but the referee must agree with you. However, in a brisk breeze— when a bird going with the wind flies farther and faster than a bird going against the wind—the birds are legal if the referee believes they would have met the speed requirement in still air and gone through the hoop. Dead targets and lost targets. A target is scored as dead only if the referee sees at least one visible piece of it after you fire. Just seeing some dust it not enough. In addition, it must not have passed the out-of-bounds stake at the far house when you shoot it. If there is no visible piece (or only dust) from the bird before it strikes the ground past the out-of-bounds stake, it is scored lost. Both these judgments are solely the referee’s, regardless of the opinion of anyone else on the field. Remember that at station 8, the shot must be fired before the bird passes the center stake. Misses due to interference. Just about the only time you’ll be allowed to reshoot a bird you missed is in the case of interference. Interference is anything that happens from the instant of your call to the time you fire that constitutes a serious distraction. This might include sudden loud sounds (not loudspeaker announcements), a sheet of newspaper blowing across your field of vision (not just a leaf or a gum wrapper), a safety risk in your sight (trap boy visible beyond the house you are shooting toward), and the like. This decision is always the referee’s, but you will almost always be granted a repeat shot. In a match, you can protest a referee’s decision, and you will be allowed to shoot another bird. Which bird counts then depends on the decision of the chief referee or the shoot’s protest committee. Don’t bother to protest whether a bird was hit or whether it was a legal bird. These decisions of fact can’t be appealed. These rules should be sufficient for all except serious registered skeet shooters. Those with an interest should study the rule book regarding shoot-offs, withdrawals, broken guns, and all the rest that can occasionally affect a score.
CHAPTER 20 Skeet Shooting Etiquette Every sport—and, for that matter, most human activity—has some sort of accepted behavior attached. If you want to be a welcome addition to the skeet squads, it pays to understand what might offend others.
BEFORE YOU EVEN STEP ONTO THE SKEET FIELD Be safe. As important as courtesy and friendliness are, they cannot be allowed to override safety. If you see a safety infraction, it’s best to speak quietly to the shooter after he or she has left the station. For example, “John, both the club rules and rules of skeet require that the gun be loaded only after you are on the station, and it has to be open and unloaded before you step off. Please help us observe this rule.” Rarely, you may have to interrupt a shooter on station. If so, apologize afterward. Be friendly. Introduce yourself to a strange squad and to any new member or stranger joining your squad. Invite visitors to shoot with you. Skeet is a very sociable sport, despite our competitions. Invite friends and juniors to shoot, but always make sure that the squad knows a new shooter is present. And make sure the newcomer knows the basic safety rules. Never pick up anyone else’s gun without permission. And the more beautiful and unusual the gun is, the more this applies. Almost anyone will be happy to show you his or her gun. But if it has exhibition-grade wood and custom engraving, the owner may not be eager to let you handle it. If you are allowrd to examine it, never snap the action of an over-under closed. Close the action gently, holding the locking lever over with your thumb. If you don’t know how to do this, don’t close it. And never snap the trigger if you have closed the action.
ON THE SKEET FIELD Don’t fire your gun without the referee’s permission and the squad’s awareness. Surprise test shots are unnerving and could damage someone’s hearing. This is a rule requirement in registered skeet, and you should follow it in practice rounds as well. Make a pull call the referee can hear. The referee can’t be expected to give you briskly pulled birds if you give faint chirps. But don’t call so loudly that you cause a bird to be thrown on the next field. Be ready when it’s your turn to shoot. This applies to individuals stepping up to the station when the shooter ahead comes off the pad and to the whole squad waiting to shoot the next round. Don’t annoy or distract other shooters. Move out of the peripheral vision of the shooter on the pad—the rules mandate not more than one-third of the way to the next station and at least 6 feet outside the shooting circle. The best place is right behind the rest of the squad. Save conversation and jokes for when the pad is empty. When another shooter steps on the pad, be quiet until he or she has finished shooting all the birds. There may also be shooters on adjacent fields who will be disturbed by loud banter or shouts of congratulations. Save this for post-shooting socialization. Don’t shoot a “first 100 straights” hat until there is no shooting on adjacent fields. Be careful what you do with your gun and shells. If opening an over-under, don’t eject your shells into anyone’s face or scratch someone else’s gun with ejected shells. If you reload shells, don’t pick up shells from an automatic during the round; wait until after you have finished. Some clubs post notices stating that empty shells on the ground belong to the club. If you like to carry your gun over your shoulder, do it with the barrel forward and pointed down, not swinging the barrel in other shooters’ faces. Don’t shoot twice at the same target. This is against the rules in registered competitions and can lead to a safety violation by swinging the follow-through too far. It is also distracting to other shooters. If you’re doing this as hunting practice, make sure that the rest of the squad is agreeable. Don’t display your temper or have a tantrum on the field. One of the sagest observations in skeet is, “Never judge a shooter by how he (or she) breaks a target, but by how he misses one.” Ninety-eight percent (or more) of missed birds are due to shooter error. These misses give you a wonderful opportunity to demonstrate your equanimity, poise, and strength of character. Don’t coach your squad mates unless specifically requested. For real coaching, you and the shooter should be alone on the field, with you looking right over the shooter’s shoulder. Much unsolicited advice is wrong. If you are asked about misses during a practice round, express no opinion unless you were really in a position to tell. Finally, try to limit advice to what will not disturb the rest of the squad.
AT REGISTERED SKEET MATCHES Don’t be late for your starting time. It’s not fair to your squad mates. And if you are shooting as a team, rushing will almost certainly affect your performance, to their detriment. Remember to allow time to register. Respect the referee. The referee is there to both help and protect you and deserves your courtesy and support. You may shoot only 100 birds, but the referee is expected to be totally alert for several thousand per day. Don’t rush him or her, and be sure to make your calls in a firm and consistent manner. The referee knows the rules, but under pressure, he or she may hesitate and need a moment to think. He or she will be glad to explain the ruling. Thank the referee for a job well done when the squad finishes. Don’t play games during registered shooting. If you miss a bird early, it takes real character to still post a 99. If you miss a second bird, it takes even more character to still post a 98. If you start playing around after a miss—snap shooting or low gun or hip shooting— you are being discourteous to other squad members who are working for a good score. It you‘rea B shooter who posts occasional 99s and you do this in registered shooting, you will be known as a sandbagger.
A LESSON IN ETIQUETTE
You may be familiar with a newspaper column called “Miss Manners” by Judith Martin. It is a frequently amusing and sometimes acerbic column about modern behavior and simple etiquette. Several years ago, I had a particularly unpleasant encounter involving poor manners at a skeet match. Sometime later, I decided to write up a piece for the Skeet Shooting Review, the National Skeet Shooting Association’s monthly journal. It caused a bit of comment and hopefully amused many readers and perhaps educated a few. It is reproduced here.
MISS MANNERS SHOOTS SKEET (or How to Be a Pariah at Your Club)
I have been a fan of Judith Martin (Miss Manners) and her national column for a long time. And more than once I have wondered how she would react to some of the behavior we see occasionally on the skeet field. All of us at one time or another have encountered an individual who seems to embody within their obnoxious behavior everything we love to hate! Skeet shooter Eddie Shupuck is a superb example of what has been called the Equine Paradox, i.e., in this world there are more horses’ behinds than horses! (And my apologies to all the other Eddies of our shooting fraternity.) How do the Shupucks of this world manage to make themselves so universally unpopular at the clubs they shoot at? Well, it is almost unbelievably easy for them. As a matter of fact they mostly seem to be totally unconscious of what they are doing. This indeed is probably one of the primary talents required to be as unpopular as they are! Accompanied by Judith Martin (Miss Manners), whose straightforward approach to human personal interactions I have always admired, let’s follow Eddie through his wonderful approach to our sport at his local club. If all of us recognize an occasional behavioral lapse of which we may have been guilty (hopefully only very rarely), we may all squirm a little at some point.
Part I: Shupuck arrives Despite having pre-registered for his club’s Spring Open, Shupuck arrived at least 10 minutes after his assigned squad in the 12 gauge had started. He squealed his tires on the turn into the parking lot and gunned the engine down to the assigned field, stopping at least two other squads shooting as they turned to see who or what had just driven in. Pulling up to his field, he even gunned the engine just before turning off the ignition, “to make sure the carburetor is full.” (He doesn’t even realize his car doesn’t have one anymore!) When informed by the referee that he couldn’t “shoot up” since the squad was already on station 4, he returned to the clubhouse and immediately complained about the squad starting without him. After exchanging these pleasantries with the registration desk and bitching about how much the cost of shooting had gone up, he grudgingly accepted the lead-off position on a later squad. He couldn’t help complaining, however, that he really hated to shoot with a squad of “low-class shooters.” Judy (Miss Manners) looked to be in a mild state of amazement as we followed him into the lounge of the clubhouse. Eddie’s eyes lit up as he scanned the room and spied a table with four shooters that he recognized, playing cards. Busting up to them he interrupted with, “Gee, where’s you guys’ usual fifth? If he ain’t here I’ll just jump on your squad instead of those bummers they’ve stuck me with, sure rather shoot with you hotshots.” After a long moment’s silence, John Squadleader said, “Mr. Shupuck, I’m afraid that we are still expecting our tail gunner to arrive shortly, sorry, ... and Joe, I’ll see you and raise you two bits.” Judy claims (with remarkable hearing or maybe just very clear insight) that what she heard Joe mutter was, “Even though we don’t have any idea who that may be yet!” At that point we went to registration and, after explaining that Judy would be shooting as a non-classified shooter, asked if there was a squad with two openings that wouldn’t mind us. The shoot director pointed out three guys having lunch in the corner that he thought would be amenable, so we went over and I introduced myself and Judy. Two of them even stood up when I did so! As Judy commented later, “Not really necessary, as this is a pretty laid-back game, and we were interrupting their lunch, but I am never offended by politeness.” Anyway, they all indicated that we were welcome to join them on the 1:30 flight. The squad leader did say, “Ms. Judy, you both are most welcome on our squad, but please remember that this is a registered skeet match, so we are all going to be concentrating very hard and will not want to try to give you any pointers during the match.” We both allowed as how that was just fine and I reminded myself that any comments I wished to make to Judy should be quite limited and really only done during the move from station to station. And to do so quietly enough for the rest of the squad to not really even hear. Meanwhile, back at the card game, Eddie wasn’t fazed a bit. Slapping John on the shoulder, he said, “Say, one of your fan club says you bought a Megabuck-Invincible in Grade VIII, with a carrier barrel and Never-Miss Negative Weight tubes, Back Bored with Obnoxious Porting and On-Beyond-Zebra wood. That must have scalded your old lady’s eyeballs.” He turned to the nearest rack and exclaimed, “This must be it, ain’t that a honey,” and without hesitation he grabbed it out of the rack and broke the action open. Then before anyone could react or say a word, he slapped the action closed, popped it up, and swinging it back and forth, snapped off an imaginary double! “Boy, this is some smooth beauty.” Heads turned with the double trigger snap and that portion of the lounge was very quiet. Miss Manners’ face was ashen, but John Squadleader’s face turned slowly red. With astonishing control (maybe that’s why he’s a AAA shooter) he laid down his cards, stood, and gently removed his gun from Eddie’s hands. “Mr. Shupuck,” he said tightly, “seeing as what I have invested in this gun, I have been charging ten bucks a look and twenty bucks a feel, but seeing as how you didn’t know that, I’ll skip it this time. In the meantime I think I’ll just put it back in the case until we shoot.” Eddie seem to vaguely realize that John was not overly pleased with all this and said, “OK, OK, no need to get hufl-y,” and sailed off in search of some lunch. After picking up his burger and fries, he found that two different tables of three were somehow waiting for a fourth to join them momentarily. Imagine that! A table of three strangers to Shupuck accepted him with ease, with introductions all around and then the usual chit-chat about
weather, lunch, squad time, guns, and what powder they were using in their various reloads. Of course he was able to graciously inform them of the perfect world-beating load combinations that he had personally developed and they accepted his offer to fax or e-mail them to them (without charge!) without comment. Judy was suitably impressed with this last. She even laughed. (Would you believe we have not even gotten ourselves out to the skeet field!) Oh well! Anyway, Miss Judy and I sat at the next table and agreed that this was such a unique opportunity that we would continue to follow Eddie as much of the rest of the day as we could manage, since at this point he had a “straight” in the first round of the “Miss Manners Open” and was well on his way to establishing a World’s Record “behavioral long run”!
Part II: On the skeet field When we left Eddie Shupuck and Miss Manners last month, Eddie and his squad were making their way to field 4 for the 1:30 flight of the 12-gauge competition. As we left lunch, Miss Judy asked me if I was really up to such a blood pressure stimulating afternoon. “After all, Dr. H.,” she said, “I’m a professional at observing the world’s aberrant behavior and, as such, have a certain immunity from the effects of such observation. I wouldn’t want to lose you just for the purpose of acquiring material for another column. I could just go watch him quietly myself.” I pointed out, however, that as a neophyte shooter, she might overlook some of the finer nuances of Shupuck’s performance and that I would steel myself to the ordeal. So, as we weren’t shooting until later, we followed Eddie’s 1:30 squad down to field 4 and found a comtortable spot in the shade for our fording chairs. Eddie S. approached with his squad within a few minutes and everyone proceeded to rack their guns near the fence. Eddie, however, proceeded to move one of the other shooter’s guns. “Because,” he said, “I’m shooting first so my gun goes in the first slot.” Two Shuter, whose gun he had moved, looked blankly at Eddie for a moment, shook his head in disbelief, but didn’t say anything. After several minutes their referee, our old friend Dick Gibralter, came up to their squad and announced the squad order. Eddie stepped onto the field and without any comment dropped two shells into his over-under. shouldered it, and attempted to fire a test shot! Click. No shot. Dick Gibralter colored slightly and asked, “What are you doing. Mr. Shupuck? You know you can’t fire test shots without permission. And why didn’t your gun fire?” As they looked at Eddie’s gun, they suddenly realized that there were two untired red 28-gauge shells lying on the ground in front of his gun. Ed looked in his pouch and slapped his forehead. “Geeze, I picked up my 28s by mistake. I’ll be back in a minute.” And without further apology. he took off for his vehicle at least 100 yards away. I swear, while watching him, that after dumping his 28s and refilling his pouch, he stood there and cleaned his glasses before returning to his squad. Only five minutes late in starting, they finally got back on station 1. Eddie promptly asked to see a high house, but Dick just blinked and asked, “Would the squad like to look at some birds?” And he waited for the other shooters to cluster on station 1 before he threw a single from each house and then a double. Eddie complained that the high house bird was at least 6 inches outside the stake, but none of the other shooters felt that was a problem. And since Dick Gibralter indicated he wouldn’t change anything without hooping the birds, Eddie reluctantly decided to finally start shooting.
Part III: Would you believe they finally get a shot off! Round 1. Somehow the Shupuck clan lives in a small, closed world in which the existence of others seems hardly to touch their awareness. Eddie lives squarely in the middle of that world. He hit all four of his station 1 birds OK, but each time he emptied the gun he ejected his over-under shells into the following members of the squad, one shell bouncing off Two Shuter’s Grade IV Browning! The next several stations appeared to go almost uneventfully, except that Eddie kept trying to engage various members of the squad in conversation after he came off the pad and didn’t stop even when the following shooters were on the station. Once he called over to Miss Manners, waving his hand and shouting, “I read your column all the time, it’s great.” Judy could only shake her head in amazement that anyone could possibly both read her column and simultaneously behave in such an impossible fashion. At that point Dick Gibralter had to stop the squad for a moment and pointedly inform Eddie that he would have to maintain strict silence as the squad was shooting for the rest of the flight or he might have to disqualify him for unsportsmanlike conduct. After a loud “Geez, why pick on me” he proceeded to sulk for the next several stations. Not really being a bad shot (nobody is all bad!) he was still straight until he got to station 6 low house, where he suddenly missed the low house. “Damn,” he exclaimed. “That was a lousy shell. Didn’t you hear that? Couldn’t have had more than half a powder charge in it.” “And besides,” he just couldn’t help adding, “I think you slow pulled me on that one!” Dick Gibralter just stood there for a long moment staring at Shupuck without saying a word. Finally with a shake of his head he managed a spit, cleared his throat, and said, “Lost.” Eddie started to complain and wanted to protest the call and demanded that the chief referee be sent for immediately. Dick shook his head again and frowned. “Shupuck,” he said, “you know darn well that’s not the way it’s done. You shoot your option here and if you’re still only down one at low 8 I’ll let you shoot a protest option and you can take your protest to the chief referee at the end of the flight. But your shell sounded OK to me and that was a good pull. Take your choice.” After muttering to himself about the lousy referees this club kept coming up with, Eddie abandoned his protest and the round was finished without any further apparent incident on Eddie’s part. The rest of the squad was grim faced, however, and two of the other members of the squad promptly headed for the clubhouse after the first round was finished. Three minutes later one of them returned and informed Dick Gibralter that the other shooter had demanded to be moved to another squad. Informed that all the squads on this flight and the following flight were full, he had dropped out of the shoot and informed the shoot management that under no circumstances would he shoot on the same squad with Shupuck in the future. The returning shooter asked Dick to please keep this @^ & # quiet the rest of the flight or he was going to do the same thing. Miss Manners and I wondered what could possibly occur in the subsequent three rounds that could match Eddie’s performance in the first round. In the “Miss Manners Open” he still hadn’t missed a single opportunity to be obnoxious! Round Two. Eddie was remarkably quiet as they started the second round. Silent and puting as they started around, he promptly began singing his over-under over his shoulder with the barrels pointing back at the rest of the squad and swinging them in their faces. He even clicked barrels with Steve Forthplace, who glared at Shupuck and promptly retreated 10 feet behind him for the rest of the flight. Eddie, of course, managed to mutter, “What the hell you doing there anyway,” before he proceeded to the next station.
The rest of the round was finished in dead silence except for the calls and gunfire. Dick Gibralter just raised his eyebrows and gave a big sigh as they headed from station 8 back to the gun racks to start station 3. Judy asked me if it was possible to get any worse than this. I was forced to admit that in the past 40 years this was close to the most perfect low behavior score that I had ever observed. It is perhaps not surprising that the remaining three shooters on the squad besides Eddie shot between three and four birds below their average in this 12 gauge. Maybe they shouldn’t have, but not being AAA shooters they are only human, and sometimes life is tough. Shuptrck, oblivious to most of the turmoil that he had created with his behavior, managed to post a 99. Nothing that had occurred had apparently gotten deeper than his rhinoceros-thick skin. When the flight finished, Miss Manners and I watched as Eddie grabbed his shell carrier and sailed off toward the clubhouse without a word of thanks to the referee or a word to the other remaining three shooters on the squad. Two Shuter stared after him and finally said to Forthplace, “Let’s make sure we have a full squad when we go to the Zone Shoot next month, otherwise I’m not going. Not if there’s any chance of getting that thing again!” Miss Manners and I folded our chairs and walked back up to the clubhouse for a snack and pop as we were shooting on the 4:30 squad. We got there just in time to see Shupuck stalk out the door and slam it behind him. Judy and I went up to the desk and asked Billy Delaowner what had happened. Billy just shook his head. “You got to believe he came in here and complained about the scheduling, the birds, the referees, his squad mates and skeet in general. I wished him luck at whatever his new sport was going to be, but then he wanted to sign up for the Zone Shoot here next month, and ‘Only on rotation 1 with a good squad.’ I informed him that rotation 1 was entirely filled and he stormed out of here saying he was never going to shoot at this club again! We should be so lucky.” As Miss Manners and I walked back to my car to begin to get our gear together, she said, “Maybe you had best write this up for your skeet magazine. I’m not sure that most of my readers would understand it and I’m absolutely certain they wouldn’t believe it!”
CHAPTER 21 Teaching and Coaching This is not intended to be a teaching manual, but if you are an excellent skeet shooter, you will probably be asked to advise other shooters about what they are doing or how they could shoot better scores. But don’t give off-the-cuff advice on a casual practice round. Offer advice only if you’re asked and if you are willing to coach another shooter for a round, without shooting yourself. Not everyone, including many AAA shooters, has the ability to be a good coach. If you are going to coach or teach more than occasionally, I strongly recommend that you take the National Skeet Shooting Association’s level I instructor’s course. One should be given in your zone each year, and the schedule is listed on the NSSA Web site at www.myNSSA.com. It will improve your ability to teach effectively and open your eyes to common errors that you haven’t seriously considered since you were a neophyte shooter. Most of us have forgotten how awkward and difficult skeet was in the beginning. This chapter outlines a good basic approach to teaching beginners how to approach skeet shooting and how to do basic problem solving for intermediate shooters. Although I am an NSSA certified instructor, this chapter can’t substitute for the NSSA’s instructor courses, but it can give you a start if you’re interested in teaching skeet. If you are already a certified instructor, you may find some useful suggestions that I have picked up in several thousand hours of instructing. Much of what follows is freely adapted from the NSSA instructor’s manual as filtered through my own 30 years of experience.
PREPARATION
Off the Field Before even stepping onto the skeet field, do the following:
1. Go over all the safety rules first, and reinforce them as necessary when shooting. 2. Determine what the shooter’s goals are. 3. Check handedness and eye dominance. 4. Check reasonable gun fit (see chapter 3). 5. If the person has never shot, instruct him or her in gun mount and eye alignment. 6. Review the mechanics of the gun the shooter will be using.
On the Field
Occasionally, beginners need basic instruction in how to get into a “balanced” position. Try the routine illustrated in figures 21.1 to 21.4. Remember that every new shooter is tense and anxious and doesn’t understand even a quarter of what you are saying. But no matter what the shooter does, you need to respond positively. Say something good about every effort before you make any corrections. For instance: “Nice smooth swing, your head looked down tight, and good balance. You just need to be farther ahead.” Or “Good mount, nice swing and lead. I think you looked back at the front sight just before firing to check the lead, because I saw the barrel jerk. Focus hard on staring at the bird, and ignore the front sight.” Let your pupil shoot a bird or two on the ground at 15 yards just to get used to the noise and recoil. Don’t proceed until the shooter can hit these successfully. One of the goals in the NSSA instructor’s course is to have every new shooter break the first bird he or she shoots at. How is this accomplished? Start on station 7 with the high house bird, and proceed as follows: 1. Watch two or three birds coming across the field. Count out loud to emphasize the time it takes. Make the shooter call for the bird to get used to doing this. 2. Have the shooter track several birds with the non-dominant index finger, trying to track smoothly and staying 1 to 1½ feet, or about one finger width, ahead of the bird. 3. Once this is fairly smooth, have the shooter do the same thing with an unloaded gun. Then do the same thing but snap the trigger as if shooting the bird. They will usually stop dead!
21.1 Take the gun in both hands with the butt touching your hip (or have your student do so). Don’t put your finger in the trigger. Point the gun upward to at least 45 degrees, grasping the fore end loosely with the left hand.
21.2 Push the entire gun up into the air away from your body to almost arm’s length, as shown, still angled up at 45 degrees.
21.3 Raise your right elbow, which creates a pocket at the inner aspect of your shoulder, and then pull the recoil pad back into your shoulder pocket, with the gun still pointing upward 45 degrees. Generally, it will be a bit low, so slide the pad up an inch or more.
21.4 Put your cheek firmly down on the comb so your eye is in line with the rib. You should still be able to see the front sight even with the off eye closed. If not, the comb must be adjusted. Bring the gun barrel down to the correct hold point for the station by moving only your trunk and legs. Just flex the front knee a bit and bend forward, with your weight moving to that foot, until the gun is down at the hold point where the shot will be taken. This will get even a novice shooter into a reasonable facsimile of a balanced shooting stance and posture, with the weight mostly on the front foot. 4. Only when you are convinced that the shooter would have broken the bird with at least a semblance of a follow-through should you let him or her try to actually shoot a bird.
LESSON PLANS FOR NEW SHOOTERS
Following are my general lesson plans for instructing both beginning and intermediate skeet shooters. I suggest putting out one-third hold point markers. Coaching advanced skeet shooters requires more individualized instruction and is not covered here.
Beginner
Lesson 1: two hours minimum, two to four boxes of shells, best done in 20 gauge. 1. Spend 30 minutes on gun safety, eye dominance, gun mount, and gun fit. Pad the comb with ⅛-inch strips of Molefoam and masking tape, if necessary. 2. If the student has never fired a shotgun, have him or her shoot a bird 20 feet away on the ground first. Then start with only incomers. 3. Station 7 high house: Have the student do the finger-point swing and empty-gun swing (described earlier). Demonstrate a 1-foot lead. Don’t have the student shoot until you are convinced that he or she will break the first bird. 4. Repeat high 7 four to six times, until the student can break two or three in a row with a good follow-through.Take a 5- to 10minute break. 5. Try low 7 if the student seems to be doing well. 6. Station 6 high house: Same drill. If the student misses twice, demonstrate the lead at the barrel tip or with two sets of birds at target distance. If three misses, go back to high 7 for a shot, then out to “station 6½,” then to full station 6. 7. Station 5 high house: Same drill. 8. Move to station 1 low house: Same drill, but omit finger point. If you have used up two hours, stop.
Lesson 2: two hours, two to four boxes of shells. 1. Do a safety reminder. Do high 7, low 7, high 6, and high 5 with two to three shells each. 2. Go back to low 1, then to low 2 and low 3. 3. Add station 4, both ways. Take a break after each box of shells, or sooner. 4. Start on outgoers: low 7 and then low 6 and low 5. But don’t let the student get frustrated on these last two; shoot four to five of each and move on after the student has hit them once or twice. Reassure the student that these are harder birds and he or she will improve. 5. High 1, high 2, and high 3. Remember to take breaks. Quit if the student gets too tired. 6. Station 8: Start with the walk-up game from station 7, then from station 1. 7. If all went well, go back to station 7 and let the student try two or three doubles. 8. Take a break for a few weeks, unless you didn’t finish all the stations. Suggest that the student shoot four or five times before another lesson, but singles only. Leave doubles until the student can hit birds from every station most of the time.
Intermediate
Lesson 1: two hours, three to four boxes of shells, 20 or 12 gauge. 1. Spend 30 minutes on gun safety, eye dominance, gun mount, and gun fit. Don’t assume that the student has any of this right— especially gun fit. 2. Have the student shoot a full round of skeet while you observe carefully and take mental notes. Go over the lesson plan verbally. Comment on the things the student needs to change, starting from the ground up (e.g., foot position), and explain why. 3. Essentially the same as for beginners: incomers first from stations 7, 6, and 5, then from stations 1, 2, and 3. 4. Start on outgoers after a break: high 1, high 2, high 3, low 7, low 6, low 5, and high and low 4. 5. Station 8 with an abbreviated walk-up game. 6. Maybe doubles. But these shooters need to concentrate on becoming confident on their singles before working hard on doubles. 7. With one shooter, this takes two hours; with two shooters, three to four hours; with three to five shooters, this becomes a clinic rather than a lesson. I do these over five to seven hours, including a lunch break. 8. Practice round for those wanting or needing more consistency on the more difficult low-angle outgoers (stations 1, 2, 6, and 7): high 1 times two and the double; high 2 times two and the double; high and low 3, 4, and 5; low 6 twice and the double; station 7 two doubles; station 8.
Lesson 2. 1. You may find that the “perfect round” scheme is effective: Start on station 1, but the student must hit every bird, with excellent technique, no matter how many shells it takes. Break after every box of shells or five minutes and discuss any problems.
21.5 Bob Englund’s four-round practice regimen.
2. This is frequently the only time I occasionally take a shot or two to demonstrate something the student can’t seem to grasp well.
PRACTICE ADVICE FOR NEW SHOOTERS
New or relatively inexperienced shooters often ask for advice about how to practice effectively. Bob Englund, PhD, a longtime NSSA level III instructor, published an excellent format for a four-round practice regimen in Skeet Shooting Review. It is principally directed at new and intermediate-level shooters. It was so popular that he also printed it on an index card that can be carried in your pocket. It is reproduced here as figure 21.5. Copy it and paste it on your own index card to use as a guide for practice sessions.
Appendix: The Mechanics of Skeet Shooting The main text covered every shot that normally occurs in a round of skeet. In chapter 4 on hold points, there was considerable discussion of the need to hold out sufficiently from each house to prevent the bird from getting past the gun. In considering this problem. we addressed how to accomplish this, given the different appearance of each target. But to really understand the “why” of these recommendations, it helps to consider the angular velocity of the target and, to a lesser degree, how lead can change depending on where the target is shot. Every skeet shooter knows that some birds look very fast and others look quite slow. Since we know that the actual speed of the bird as thrown doesn’t change from station to station, what is the technical explanation for this visual difference?
VISUAL ANGULAR VELOCITY It is apparent that the skeet target has a very different apparent velocity to our eyes, depending on which station we are on and from which house the bird is thrown. This is because our distance from the flight path of the bird and our angle to it affect its apparent velocity. This difference is due to the visual angular speed or velocity of the target relative to our eye. Visual angular velocity is a measure of how many degrees of arc the target moves through in a given time (a second or any fraction of a second), as seen by our eyes. If you have never considered this concept before, you can compare it to watching an automobile approach from a distance. At a great distance, the car appears to move across your vision very slowly. As it approaches, its speed across your vision gradually increases, and just as it passes, your head must turn rapidly to keep it in sight. Its angular velocity went from very little to maximum just as it passed you, although the speed of the car never changed.
DATA AND METHODOLOGY This appendix introduces previously unpublished information about skeet and the flight of the target. The data were developed because of my own curiosity. At the time, I was coaching Dwight Davy, a friend and colleague who is a professor of mechanical and aerospace engineering at Case Western Reserve University in Cleveland. Ohio. Because of our mutual curiosity about skeet, and because we were working together on several different research projects in biomechanics, we developed a project to examine the flight of the skeet target in some detail. As is common in engineering schools, the best way to approach such a project is to enlist the enthusiasm of a student who needs a good senior research project—and, in this case, someone with a hunting and shooting background. The resulting thesis, entitled “Mechanics of Skeet Shooting,” was written by Gregory Beran, a senior biomedical engineering student at Case. It is 44 pages long, plus an equal number of figure pages. It is not duplicated here, but those portions that are of particular interest to skeet shooters have been extracted and presented graphically. The goal of the project was to determine the visual angular speed of the target at each skeet station, using velocity profile data to develop plots for range, azimuth, and elevation angles measured for targets coming from both high and low houses. These were plotted from the first derivative curve for each station. From this data, we developed lead data for each station as a function of where the target is shot in relation to each house. To obtain these data, we used a Cine Kodak Special II 16mm high-speed movie camera, transit declinometer, surveying equipment, and tripods. Keeping the camera position close to a right angle to the bird’s flight required four camera positions for both high and low house targets, thus eight camera positions in all. Markers were placed along the flight path that were visible in the camera’s field of view. Four or more successive targets (legally set by the skeet rules) were photographed from each camera position for both high and low houses. To plot the data, the film was projected onto graph paper frame by frame, and dots were placed on the target position for every frame. All these data were plotted and averaged, and the curves were mathematically smoothed to obtain the curves shown here and in the chapters on the individual stations. Although the actual and angular velocity of the target was plotted and calculated for all three vectors of the bird’s flight, only the figures for the horizontal direction are presented here, because this is what determines the visual lead of the target to a skeet shooter.
BEST APPARENT LEAD DATA It should be apparent that the data on apparent leads depend on multiple assumptions about shot string velocity, pattern diameter, and shot string length. These assumptions were derived from Bob Brister’s book Shotgunning: The Art and Science . Because of these variables, you cannot use these curves to determine an exact lead in inches. Rather, they show you how your apparent lead should vary depending on where in the bird’s flight from the trap-house window to the out-of-bounds marker you choose to shoot it. Each of the plots that follow is presented as you would stand on that station and look at a target from first the high house and then the low house. In other words, you look at the graph or plot line from left to right for a high house bird and from right to left for a low house bird. To help make this clear, a labeled trap-house figure has been placed at the end of each graph where it should be. You follow the plot from that side, just as you would the target in flight. An arrow indicating the direction of target flight helps in visualizing this. Each pair of graphs shows a different aspect of how the target looks to the eyes of a shooter from each station. The first one shows the visual angular velocity of the target from the instant it appears from the window until it passes the out-of-bounds marker, measured in degrees per second. The second graph for each station shows the variation in apparent or visual lead for each station as if it were shot anywhere from the time the target emerges until it passes the out-of-bounds marker. These graphs for lead have been done only for a “perfect” maintained lead and follow-through. Thus, the absolute lead in feet or inches is not indicated because this will vary for each shooter, depending on the multiple assumptions made to calculate the data, as well as the shooter’s individual shooting style. For example, using even a bit of pull-away will result in seeing shorter leads for your best breaks. What is important is the shape of the curve—that is, how the lead varies depending on where in the bird’s flight it is shot. This variation will be the same for each shooter using the same shells and technique for each bird. Some of these curves are not much different from our ordinary perceptions of what happens. But others, particularly high 1, high 2, and low 6, are very instructive. And some of the others help explain why certain techniques lead to occasional misses. For all stations of the skeet field, the angular velocity curve and best apparent lead curve were included in the chapters in station 2. Thus, they are not presented full size here, but a little more detail about what these figures show may be warranted. Each pair of graphs tells you something different, It is obvious what the best apparent lead curve depicts, but it may not be apparent that the angular velocity curve tells you how fast the gun must be moving at wherever in the lead curve you shoot the bird. For example. although the lead for a high 6 bird is far less than for a high 4, the gun speed, if the bird is shot opposite station 6, is only slightly less. Figures A.1 and A.2 illustrate how to interpret these two different curves.
Figure A.1 The visual angular velocity curve for station 1 high house is a dramatic one. You can see that if you stand on the station 1 pad and look straight upward without a hat brim, as the bird appears, the angular velocity exceeds 70 degrees per second. Then it rapidly drops in almost linear fashion during the first 15 feet of flight. In this case, not seeing the first 10 feet of the target’s flight can actually be an advantage. It can prevent you from being startled into making a jerky downward barrel motion because the target looks so fast. By the time the target has gone 30 feet, or halfway to the center stake, this apparent angular speed has dropped so rapidly that the target almost seems to have stopped. The change is then very gradual as it drops to the out-of-bounds marker. You can easily see why a sharp downward motion of the gun barrel can lead to shooting under the bird.
Figure A.2 The best apparent lead curve for station 1 tells you that 10 feet out of the window, the best lead would still be less than 1 foot. This is true despite a shooting angle that would be much closer to a right angle, similar to a station 3 or 4 high house. How can this be so? The distance to the target is also very small at this point in the bird’s flight. Remember that lead for this bird consists of how far below the bird you must shoot, because you’re looking at it going almost directly away from you. It is apparent that in all the best apparent lead curves, three things are changing at the same time: 1. The angle of your eye’s line of sight to the target’s flight path changes constantly as the bird travels across the field. 2. The distance from the shooter to the target changes steadily. 3. The true or linear velocity of the target slows steadily. This sometimes results in the almost complete cancellation of one of these factors by another. Thus, the best apparent lead may hardly change over a surprising portion of the skeet field for some stations, as we will see. It is instructive to look at the various curves grouped sequentially. This way, you can appreciate how the angular velocity changes or how the best apparent lead changes from station to station as you progress around the skeet field.
ANGULAR VELOCITY CURVES FOR HIGH 1—4
Figure A.3 At high 1, you are first under and then almost straight behind the flight of the bird, so you get a very distorted view of its speed. It goes from an extremely fast to a rapidly receding and slowly falling target.
Figure A.4 At high 2, the bird’s closeness plus the high angle in the first 40 feet of flight result in a high apparent speed but a rapid falloff. There is a dramatic shift to a lower apparent speed just past the center stake. If the bird is shot just before the center stake, its angular velocity will be about 35 degrees per second.
Figure A.5 The high 3 target still looks fairly rapid on emergence, but your increased distance and wider angle to the bird make the angular velocity fall off more slowly. Still, you usually shoot this bird where the velocity is quite high, about 55 degrees per second.
Figure A.6 High 4 shows a continuation of the flattening of the velocity curve. It actually rises a bit for the first 40 feet and then maintains a higher velocity well past the center stake. Its angular velocity just before the center stake is about 55 degrees per second, very similar to high 3.
ANGULAR VELOCITY CURVES FOR HIGH 5—8
Figure A.7 High 5, like high 4, has an increasing angular velocity to about the center, peaking at about 52 degrees per second. It then falls off modestly as it passes your right angle to its path; its linear speed also slows.
Figure A.8 With your small initial visual angle, high 6 seems to start slowly and then climb steadily to 50 degrees per second just about where you usually want to break it. As noted in chapter 14, its angular velocity at that point may be even higher than that for the station 5 high house, even though the lead is less.
Figure A.9 High 7’s apparent velocity also increases steadily all the way across the field, almost to the out-of-bounds marker. Unless it is shot early, it requires a surprisingly fast gun speed, even though the lead may appear quite small.
Figure A.10 High 8 is actually a foreshortened version of high 7. Everything changes in the same way but in only half the time. Gun acceleration is almost doubled, but final gun speed is equal to that on any other station if you are really following through.
BEST APPARENT LEAD CURVES FOR HIGH 1—8
Figure A.11 High 1, if shot almost anywhere in the first half of the field, has a lead of less than a foot. But it is essentially impossible to match the initial angular velocity much before one-half or two-thirds of the way to the center. If high 1 is shot very late, the lead actually increases, which, since the bird is falling, means shooting farther below.
Figure A.12 High 2 has a modest fall in lead to just past the center stake. Then it rises if you are a very late shooter, because the increased distance to the bird more than offsets the decreasing angle.
Figure A.13 High 3 has the flattest lead curve of any bird on the field. Angle to bird, bird speed, and distance to bird combine to nearly cancel one another out. Perceived lead should not change, no matter where you shoot it.
Figure A.14 High 4’s best apparent lead is quite similar to high 3’s, but it starts a bit higher and falls modestly for late shots. But it is almost identical to high 3 at the usual kill point. The lead will be slightly less when high 4 is shot as the second bird of a double past the center stake.
Figure A.15 High 5’s best lead falls moderately from emergence to the usual break point and then turns up a bit. Is lead is actually about 6 inches less just past the center, where it is usually shot, than high 4’s, which is usually shot before the center stake.
Figure A.16 With high 6, the effect ot major visual angle change begins to reappear. A surprisingly big lead is required if the bird is shot before it passes the center stake. However, only about three-fifths the lead of high 4 or 5 is required if it is shot at the normal kill point as the second bird of a double.
Figure A.17 High 7 has a low, flat lead curve that is quite similar to low 1 in reverse. On the near half of the field, it is essentially flat and quite small. But compare the lead with what is happening to the angular velocity curve at the same time.
Figure A.18 High 8 does have a lead, unless you are sweeping this target. The lead is as small as 4 to 6 inches if the bird is shot almost overhead, but more like a foot if it’s shot halfway to the center stake.
ANGULAR VELOCITY CURVES FOR LOW 1—8 The following graphs and comments apply to the targets from the low house. Remember that the target flight—and your reading of the curve—is now from right to left, or from low house to high house, matching the flight of the target.
Figure A.19 Low 1 is the reciprocal of high 7. It is very slow in appearance as it emerges but steadily increases its angular velocity to 55 degrees per second just before it reaches the boundary marker. This angular velocity is as high as that of any middle station target.
Figure A.20 Low 2 exhibits an upward shift of velocity for the first half of the target flight, with a comparable flattening of the rise for the second half. But it still reaches almost 50 degrees per second just where you usually want to break it. Thus, there’s a smaller lead but close to maximum gun speed.
Figure A.21 Low 3 is not quite a reversal of high 5. Its velocity curve is quite similar for the first half of its flight but then falls more rapidly. This bird is thrown slightly slower and at a more upward angle than high 5, and its angular velocity slows rapidly past the center stake as it slows down.
Distance from window (ft.)
Figure A.22 The comments for low 3 are equally valid for low 4. It is a rapid bird to the center stake and then slows markedly from the center stake to the boundary marker.
Figure A.23 Low 5 continues this pattern of a high initial velocity out of the house. It peaks only 10 feet out of the window and then falls steadily to a low of just above 20 degrees per second at the boundary marker. But it is still high—at about 50 degrees per second— where it’s usually broken.
Figure A.24 Low 6 becomes almost a reversal of high 2. It looks very rapid to our eye—above 60 degrees per second at the window. But it falls off very quickly to half that value just before the center stake.
Figure A.25 Low 7, like high 1, emerges where even your peripheral vision can hardly see it. It comes out below, 30 inches right, and actually behind you. It has an extremely high velocity if you were to turn your head and actually try to look at it. Fortunately, that figure plummets to a minimal 10 degrees per second halfway to the center, where you first see it well.
Figure A.26 Low 8 becomes a short version of low 1. But like high 8, it has a very steep velocity curve all the way to the center stake. So like high 8, it requires a very high acceleration curve to match its speed halfway to the center.
BEST APPARENT LEAD CURVES FOR LOW 1—8
Figure A.27 Low 1 has a best lead of almost 3 feet at the window, but it falls to just over a foot by the center. It changes little thereafter, with the rapid decrease in distance to the target offsetting the bird’s slowing speed. But compare its angular velocity.
Figure A.28 Low 2 is mostly just low 1 displaced upward, adding about a foot of lead to this bird compared to low 1 almost anywhere across the field.
Figure A.29 Low 3 is not quite a reversal of high 5. This bird, thrown slower and with more arc, clearly has a slightly lower lead than high 5 past the center stake. This is particularly true if it’s shot late as the second bird of a double.
Figure A.30 Low 4 is obviously slightly different depending on whether it’s shot before or after the center stake. Past the center stake it’s much like high 4, but the leads are a bit less owing to the slightly slower bird at all points in the flight path.
Figure A.31 Low 5 has a full midstation lead at emergence, falling only modestly by the center stake and changing little thereafter.
Figure A.32 Low 6 is one of those targets where all the variables almost cancel one another out. The best apparent lead should look almost the same wherever you shoot it, unless you are sweeping this target or moving too far ahead and spot shooting.
Figure A.33 It is surprising that low 7 has a lead at all, since you routinely shoot right at it or at its toes. But since this bird emerges 2½ feet to your right, you should really be shooting at a spot that appears to be several inches to the left of the bird.
Figure A.34 Like high 8, low 8 actually has a lead, although it is small and decreases as it approaches the stake. It is approximately a foot at the window and half that at the center. If you are shooting right at it, you have to be sweeping or doing a pull-away.
Bibliography A number of excellent books have been published on the game of skeet, but most are morse than 30 years old. Unfortunately, those dedicated to skeet alone are mostly out of print, and those that include other shotgun sports usually include just a chapter about skeet. In addition, many of our current techniques are somewhat different from those used 30 years ago, Although most of the basics have changed very little. The following publications are still worth perusing if you can locate a copy. They often have fascinating background material on the history of skeet and the careers of some of the world champions. Some can be found through the used book market on the Web (try www.abebooks.com.or www.alibris.com). Most can be had for $10 to $.30.
Bassham, Lanny. With Winning in Mind (Wilsonville, OR : Book Partners, Inc., 1995). The author is a multiple World and olympic rifle champion who has made a career of teaching mental management in both sports and business. Web site: www.lannybassham.com. Some of it seems simplistic, but there is good advice about the importance of focus and how to achieve it. Beran, Gregory. “Mechanics of Skeet Shooting” (thesis. Case Western Reserve University, 1981). Unfortunately, this is not available through University Microfilms, but its essentials are included in the appendix. It includes unique data about the mechanics of skeet, Braun. D. Lee. Skeet Shooting with D. Lee Braun, edited by Robert Campbell (New York: Benjamin, 1979). A Remington Sportsman’s Library Book. Braun was a true professional and one of skeet’s (and trap’s) all-time greats, as well as one of the best teachers in this sport. It’s hard to shoot skeet and not know about Braun’s reputation. Brister, Bob. Shotgunning: The Art and Science, foreword by Grant Illseng (New York: Winchester Press, 1976). This is a must-read for anyone who shoots clay pigeon sports seriously. No one has spent more time studying shot strings and what happens when you swing and shoot a shotgun. Although many other books are fun, and most are educational, nobody has explored or written about the technology behind shotgun shooting better. Christian, Chris. The Gun Digest Book of Trap and Skeet Shooting , 3rd ed. (Northbrook, IL: DBI Books, 1994), There is a limited amount of information on skeet but good general information on the other shotgun sports and on guns and equipment. Churchill, Robert, How to Shoot: Some Lessons in the Science of Shotgun Shooting, 2nd ed, (London: Geoffrey Bles, 1927). An interesting book by one of the flounders of the “English” school of shotgunning. A lot has changed; for instance, “under-overs are just a fad and will never replace the side by side”! Etchen. Fred. Commonsense Shotgun Shooting, with an introduction by Nash Buckingham (Huntington, WV: Standard Publications, 1946). Interesting coverage of both trap and skeet by an old-time champion. Ghose, T., M. S. Banks, and J. M. Hillis. Eye dominance changes with eye position and image magnitication (abstract). Journal of Vision 2, no. 7 (2002): 326a. http://journalofvision.org/2/7/326/, doi:10.1167/2.7.326. Hartman, Barney. Hartman on Skeet. (Harrisburg, PA: Stackpole Books, 1973). A personal reminiscence by C:anada’s great champion. This is a well-illustrated manual with generally excellent advice. Heiple, King. Skoet and Field (Cleveland, OH: Author, 2004). A basic manual that was the genesis for this book. One of only two books (along with Scherer’s) on skeet that are current and still in print. Available through Shotgun Sports Magazine or from the author. Keyes, Michael J., MD. Mental Training for the Shotgun Sports (published by Shotgun Sports Magazine). A compilation of columns from Shotgun Sports Magazine. Includes a good discussion of flinching and many other aspects of shooting. Missildine, Fred. Store Better at Skeet (New York: Winchester Press, 1972). A classic by the many-time champion and longtime pro at Sea Island resort in Georgia. He and Braun were famous skeet teachers in the generation after World War 11. Worth a serious read, but many of the details have changed. Montague, Andrew, with S. V. Beckwith. Successful Shotgun Shooting (New York: Winchester Press, 1971). The author was an oldtime master live pigeon and trap shot. The book’s not about skeet but includes excellent discussions of balance, swing, and other mechanics. Nelson,Todd. Pitch and its effects. Skeet Shooting Review 59, (April 2005): 20—22, 77. An on-the-range study of the effects of pitch on patterning. Oberfell, Gorge G., and Charles E. Thompson. The Mysteries of Shotgun Patterning (Still-water: Oklahoma State University Press, 1960). This book is hard to find, but these data have never been completely duplicated. Contains many charts and diagrams. Robinson, Jimmy. Wing Shooting Trap and Skeet, vo/. 2 (Minneapolis: Author, 1955). Not very much on how to shoot, but a great exploration of the early years of wing shooting, live pigeon, and registered trap and skeet by the longtime shotgun editor of Field and Stream. He wasn’t a very good shot but was a great writer. For many years, Robinson was the solo picker of the “All American” teams. It’s a fun read, full of the names and pictures of the old-time greats. (It is not clear whether there was ever a vol. 1.) Scherer, Ed. Schaer on Skeet (Waukesha, WI: Author, 1986). This booklet includes only 50 pages on skeet but has some interesting suggestions and pointers. The rest is mostly personal history and reminiscence by the many-time champion and excellent teacher. It has been kept in print by Scherer’s family since his disappearance in a blizzard while hunting some years ago. Stanbury, Percy, and G. L. Carlisle. Shotgun Marksmanship, 2nd ed. (New York: Barnes, 1969). An interesting English book on wing
shooting.
About the Author King Heiple has been shooting skeet for more than 40 years. His professional career as an orthopedic surgeon spanned 32 years and culminated with the position of chairman of the Department of Orthopedic Surgery at Case Western Reserve University School of Medicine. During that time, he taught, lectured, and wrote more than 80 scientific articles, a number of book chapters, and multiple surgical instruction manuals. Many of those publications dealt with biomechanics research, an interest strongly reflected in this manual. He was also adjunct professor of mechanical and aerospace engineering at Case Western Reserve’s School of Engineering during much of that time. Some years ago, Heiple began a second career as a skeet instructor. He is one of the National Skeet Shooting Association’s ten master instructors and coached Dean Clark, USA International Skeet Champion and Olympic team member. During much of his shooting career, Heiple held AA and occasionally AAA classification in American skeet. For about 16 years he also shot and competed in international or Olympic-style skeet, winning two state championships and one national title. He took part in the U.S. International Championships a dozen times and the Olympic tryouts four times. Heiple is a life member of the Ohio State Skeet Shooting Association and in 2001 was inducted into its Hall of Fame. He continues to compete in both state and national competitions as a veteran. He is also a life member of the National Rifle Association and the National Skeet Shooting Association (NSSA). He has been a national director of the NSSA for many years and has served on and chaired its Rules Committee. For the past dozen years he has also been writing a column. “What’s Your Call?” for Skeet Shooting Review, the magazine of the NSSA. He also published a short basic skeet manual, Skeet and Field, which was the basis for this volume. It is available at www.shotgunsportsmagazine.com. Todd Nelson collaborated on chapters 2 and 3 of this book. He also writes a column, “Fit for Success,” for Skeet Shooting Review and Trap & Field magazines. He has a BS in education, with majors in physical education and biology, including kinesiology, exercise physiology, and anatomy. He is currently the gun-fitting and shooting-form expert for the NSSA’s advanced level 2 and 3 instructor courses at NSSA headquarters in San Antonio, Texas. He is also a regular presence at the NSSA World Skeet Championships and many other major shotgun shoots. Todd and his father, Jerry, operate Country Gentlemen Gun Fitting Shop in Cherokee, Alabama.
Index
Aiming and patterning
Back boring Balance Barrel length Barrel porting
Cast-off chokes. Comb
Doubles all first bird drill. second bird drills in shoot-offs station station station station station station station
Etiquette, skeet Eye dominance Eye protection
Finishing Flinching Focus mental visual Follow-through Foot position Forcing cones Gun fit cast-off comb heel, drop at pitch pull, length of toe-in and toe-out Gun mount aiming and patterning basic exercise head position Gun selection
Head position Hearing protection Heel, drop at High house station station station station station station station station Hitting the target follow-through gun control kill zone leads patterns Hold points, shooting methods and age and constant time principle and developing ideal pull away sustained lead swing through vertical
Low house station station station station station station station station
Mental focus
Over-under, semiautomatic versus
Pad, position on the Patterning, aiming and Pitch Pivoting and turning Posture Pull, length of Pullers
Recoil reducers Referees Release triggers Rules, skeet
Safety equipment on the range Semiautomatic, over-under versus Shooting form finishing follow-through foot position gun mount pad, position on the pivoting and turning stance, posture, and balance weight transfer/reversal Shooting mechanics Shooting methods. See Hold points, shooting methods and Shoot-offs, doubles in Sights Stance Station doubles high house low house Station doubles high house low house Station doubles high house low house Station doubles high house low house Station doubles high house low house Station doubles high house low house Station doubles high house low house
Station high house low house
Teaching skeet Toe-in and toe-out Turning, pivoting and
Vision eye dominance eye protection focus sights
Weight transfer/reversal
Youth model guns